What kind of gasket to buy to replace a burnt one?
The new part should be:
- sufficiently elastic so as not to deform during installation and use;
- impermeable to gases;
- resistant to prolonged exposure to chemicals and aggressive substances.
The manufacturer recommends installing only the original cylinder head gasket, its article number is 21083-1003020. The dimensions of this part are calculated for the VAZ-2114 cylinder head. The original spare part is produced at AvtoVAZ, but you can buy a part with the same parameters from Trialli, Patron, and Reinz. But please note that some analogues often cost 2-3 times more than stock components.
When is cylinder head repair required?
The seal for the VAZ cylinder block cover has a complex structure: sheets of steel, cardboard, and fiber pressed together. They are coated with a layer of sealant, which improves the connection of the parts to each other. Replacement must be carried out if this gasket burns out during engine repairs. The following symptoms indicate a problem with this component:
- Air bubbles in the antifreeze appeared in the expansion tank of the cooling system. This is the first sign that the seal has been broken.
- Exhaust gases begin to escape through the seal. In this case, the gasket may be damaged after repair if you overtightened the mounting bolts.
- White smoke appeared from the muffler, a bit like steam. This happens when coolant enters the cylinders through a breakdown in the gasket.
- White foam has appeared on the oil level dipstick. This is another sign that coolant is present in the engine - it is mixed with the engine oil.
- Increased fuel consumption with insufficient engine power, the car takes more time to gain speed. If the gasket wears out significantly, the vehicle may stall when driving uphill, and when pressing the gas pedal, the driver will feel a dip in the power of the power unit. In the most difficult cases, the car will stall when moving the gear lever to neutral or when stopping at a traffic light.
- Oil stains on the surface of the antifreeze in the expansion tank. This is another sign that the cylinder head is leaking.
- The spark plugs are filled with antifreeze. This malfunction can be detected if you remove the high-voltage wires from the spark plugs and then unscrew them.
In all these cases, you will need to purchase a new spare part to replace it with the failed one.
Replacement of intake manifold gaskets VAZ 2114 8 cl (Kalina, 2110)
21.03.2019
21999
Repair
It is recommended to replace the gaskets on the VAZ intake manifold after each removal. But I had to do this prematurely, as I discovered a significant air leak, which mainly manifested itself on a cold engine. Every cold start was accompanied by a terrible tripping.
In addition to the tripping when cold, there was a slight drop in speed when sharply pressing the gas pedal. This applies to both a cold and a hot engine.
A homemade smoke generator made from a cigarette helped me detect the air leak. A very simple and primitive contraption that has helped me out more than once.
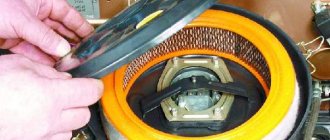
My car (Kalina 1.6 8 valves) has a plastic intake manifold (receiver). The same will be installed on all VAZ family cars with an 8-valve 1.6-liter engine (2114, 2110, etc.). 4 rubber rings act as gaskets. According to reviews, black rings last much longer than white ones. And I was convinced of this personally - these gaskets lasted for about six months and began to let air through. They felt like plastic to the touch. Unfortunately, I didn’t find black ones, so I’ll install white ones again. I hope these last longer.
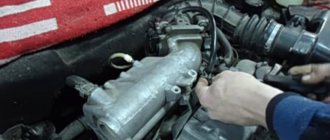
To remove the intake manifold (receiver), you must first unscrew the corrugation from the air filter, the throttle cable, and the small crankcase ventilation hoses. I will not remove the throttle and its heating.
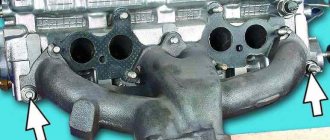
The intake manifold is attached to 5 studs - one in the center, two on the sides. To unscrew them you will need a 13mm socket. After unscrewing the nuts, you need to remove the receiver itself from the studs and move it to the side. Remove the old gaskets and wipe the seats from oil and dirt. You also need to wipe the seat on the engine.
The manifold has special grooves for guides on the gaskets. The gaskets must be installed with the higher side in the plastic manifold. It is the guide that will prevent you from making mistakes.
I additionally coated the areas near the guides with sealant on the outside of the gasket. Because it felt like that was where the ring entered the groove the deepest. In addition, there was a place for air leaks on the old gaskets.
After all procedures, the intake manifold can be installed back. I couldn't find any information on how tightly to tighten the mounting nuts. I delayed it at my own peril and risk. The main thing is not to overtighten, as the manifold is plastic and can crack.
This is how I replaced the old intake manifold gaskets on my Kalina with new ones. There is no more air leakage, the engine stopped stalling when cold and began to behave much better when warm.
How to change the gasket correctly
To work, you need to place the car in a garage with a pit or drive it onto an overpass. Then make the replacement according to the instructions:
- Remove the negative terminal from the battery so that the voltage in the network disappears.
- Place the transmission lever in neutral until the first cylinder is locked at top dead center. Secure the wheels with bricks or shoes to prevent the machine from rolling during the repair process. Remove the right front wheel after placing a jack under the car.
- Remove the fasteners from the engine compartment splash guard to remove it. Find the cover covering the front camshaft drive; it also needs to be removed.
- Using the generator set fixing screw, turn the crankshaft so that the marks on its pulley coincide with those on the rear cover. The matching marks must also be checked in the clutch housing. To do this, remove the cover from the technological hole.
- Drain the refrigerant from the system, first placing a container under the plug to collect it.
- Relieve pressure in the fuel system.
- Disconnect the intake line of the gas exhaust system from the exhaust manifold.
- Disconnect the intake and exhaust manifolds, throttle body and receiver to remove the cylinder head cover. Loosen the clamp of the pipes supplying air to the throttle. After this, you can remove the throttle assembly with the air intake pipe and the cleaner housing.
- There are several wires to the right of the cylinder head. Disconnect them and remove the fuel rail assembly with other system components.
- Remove the fasteners from the front of the unit cover. Secure the crankshaft from turning, then remove the timing belt.
- Loosen the tension roller and remove it, then remove the spacer washer and remove the camshaft gear.
- Remove the screws from the back of the cover. Disconnect all conductors from the cylinder head exhaust hose by loosening the clamps with a screwdriver.
- Using a hex key, you need to unscrew 10 cylinder head fixing bolts. Do this one by one, unscrewing the outer fasteners halfway first and then the middle fasteners. After this, you can unscrew them all the way.
- Remove the cylinder head along with the gasket, and then carefully clean it and the seat from dirt and engine oil residues. After this, this component is replaced.
How to replace the cylinder head gasket of a VAZ-2114 8 valve
The cylinder head (cylinder head) gasket is a disposable part and therefore cannot be repaired. If for some reason it is damaged, it is necessary to replace the cylinder head gasket in a VAZ-2114 8-valve car. You can understand that this part needs to be replaced by the following signs:
- Coolant is constantly bubbling in the radiator.
- Exhaust gases escape through the gasket.
- The exhaust pipe smokes.
- The oil on the dipstick is covered with a white emulsion that looks like foam.
- The coolant is oily.
Often a sign of such a problem is thick white smoke from the exhaust pipe. This occurrence indicates that the gasket has developed a blowout between one cylinder and the coolant leak hole. If the liquid is oily, this indicates the presence of a breakdown, as a result of which oil began to enter the channel with the coolant. If a sharp whistle is heard when the engine is running, and traces of oil are visible on the cylinder block, this indicates a gasket breakdown.
Also, a sign of gasket failure may be an increase in fuel consumption and a decrease in engine power. However, it is worth considering that some of these signs also occur with other damage to the car’s mechanism. For example, a white emulsion on the surface of the oil also indicates that the block has a crack. In any case, you must first make sure that the cause is a faulty cylinder head gasket.
If in doubt, it is better to entrust the diagnosis to a specialist.
Replacing the gasket of the VAZ 2114 receiver
I came to a guy I knew in the garage to change the gasket under the receiver; oil was oozing from under it. I bought a regular gasket, when everything was unscrewed it became even more interesting) because my 1.6 8kl has rubber seals. I didn’t know, but now I will know) I went to buy resealers and decided at the same time to buy a mass air flow sensor, which the system complains about. While the master was changing and tightening everything, I installed a new mass air flow sensor. Everyone put the hood on, closed it, everything started up perfectly (although the floating revs of XX were very slightly noticeable, but after driving for a little while, all the floating seemed to stop), the car started working differently. For the first time in a long time I experienced the thrill of driving) it started working like clockwork, I gave it a little gas and my swallow took off.
Issue price: MAF BOSH 116 = 3500 rub. Kit for cutting seals = 175 RUR.
1. Remove the throttle assembly from the studs of the receiver flange without disconnecting the cooling system hoses from it (see “Throttle assembly - removal, gasket replacement and installation”).
2. Loosen the clamp (1), and remove the vacuum brake booster hose from the receiver pipe.
10 mm socket wrench
unscrew the three nuts (2) securing the throttle drive cable bracket.
3. Disconnect the cable end from the throttle valve sector (see “Throttle valve - replacing the drive cable”) and move the throttle drive cable along with the bracket to the side.
13 mm socket wrench
unscrew the five nuts securing the receiver to the intake manifold.
5. Remove the receiver from the engine.
6. Remove the rubber O-rings from the grooves of the receiver flange. We replace damaged rings.
Install the receiver in reverse order.
I decided to post this information in a separate topic.
Forum registration is required to view some images.
The reason, as always, is banal, this is the quality of our rubber products. We are talking about seals for the intake receiver flange and the throttle mounting flange for 8 and 16 valve engines with a mechanical throttle.
These seals are sold as a set, 4 for the receiver flange where it connects to the intake manifold and one for the throttle. For the time being, there were no special problems with them, they were quite high-quality rubber bands, both white and black. They felt something like silicone. But our enterprises always want to save money and have reached them as well. At the moment, “White” produces the well-known BRT enterprise or some kind of company, and even this is now quite possible, under the arches of this enterprise. The photo shows these same seals in their branded packaging. Also in the photo there are “Black” ones, these are no-name products, or a cooperative, or the filthy Ketai. Neither these nor these, I DO NOT recommend buying
, and install it on your cars! White ones become tanned after a month and lose their elasticity. In the cold, already at -5 degrees, they simply become breadcrumbs, even new ones just out of the package! It doesn't feel like rubber to the touch, more like vinyl or some kind of plastic! But they have good geometry, this indicates that the manufacturer has changed something in the manufacturing process of these seals, they clearly use low quality raw materials! The black ones are made of low-quality rubber, with flashes and broken geometry (we couldn’t install them on the receiver! They don’t fit into the landing grooves!) Actually, here they are in the photo: BRT
Instructions
Replacing the cylinder head gasket is a procedure consisting of several stages.
By following the step-by-step guide, you will be able to complete this job quickly and without any problems. To perform this work, prepare sets of open-end and socket wrenches, a set of heads of different sizes, screwdrivers, rags, and a container for draining coolant and fuel.
First, turn off the power to the car. Remove the negative terminal from the battery. Then set the 1st cylinder (its piston) to the TDC position. Drain the coolant.
After this, you need to make sure that the pressure level in the power system is low enough. To do this, unscrew the cap, which is located at the rear end of the fuel rail, press the spool and drain the fuel, then screw the cap back on. It is very important to consider that these actions can only be carried out a couple of hours after using the car. If you do this immediately after stopping the car, it is possible that you will get burned both from contact with the spool and from the fuel that will be sprayed under pressure. In this case, it will not be possible to safely drain it.
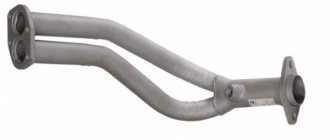
Replacing the exhaust manifold and gasket on a VAZ 2114
The exhaust manifold is a unit that is responsible for ride quality, without which comfort is impossible. This is silence and the absence of exhaust smell under the hood, which can be drawn into the cabin through the hole in the cabin filter. Fixing a leak in the exhaust manifold of a VAZ 2114 is a necessary repair. Fortunately, it is not urgent; you can prepare in advance and choose a convenient moment.
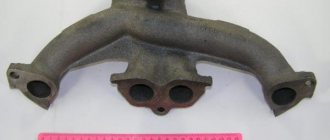
Exhaust manifold for VAZ 2114
Replacing the VAZ 2114 manifold
The collector (resonator, “pants”) is an engine attachment; it is a closed reservoir of complex shape with a common chamber (receiver) and outlet pipes. Depending on the nature of the functions performed in a car, there are two types of manifolds - exhaust and intake.
The main task of the intake manifold is to supply air from the distribution system, mix it with fuel and transform it into an air-fuel mixture of the desired consistency, followed by a uniform supply to the combustion chamber of the cylinders. Therefore, the main task of the exhaust manifold is to collect exhaust gases from the engine cylinders into a single pipe.
Causes of malfunctions
The key factor that causes 90% of exhaust manifold malfunctions on VAZ 2114 cars is high temperature and poor quality materials from which the parts are made. During operation, the steel repeatedly heats up and cools down, which leads to the appearance of cracks in the body. This is a common occurrence for VAZ cars older than 7-8 years.
Auto repair shops offer crack welding services using argon welding. However, for a number of reasons, this activity is useless for cars older than 7 years.
1) Just removing and installing the exhaust manifold will cost about 2.5 thousand rubles. Taking into account the work of the welder and other actions, the cost of repairs can be 4-5 thousand rubles. If you do the work yourself, buying a new part will cost less.
2) Welding, even argon welding, disrupts the structure of “tired” metal. A boiled part rarely lasts longer than a year, after which new holes appear. The older the car, the faster the problem returns, and the collector has to be removed again.
If the car is older than 8 years and there are problems with cracks in the manifold, it is better to remove the part and replace it with a new one.
Signs of trouble
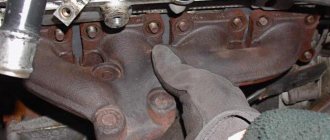
Exhaust manifold gasket
One of the main signs of a leak in the system is a “sporty” growling sound when the engine speed increases. This may be a symptom of various exhaust system problems. To check, it is better to take an assistant and go to a garage with a pit or to an overpass. Most often, you can determine by eye whether the problem lies in the muffler, resonator or exhaust.
Gasket wear may become apparent during planting. Open the hood and start the car - white or grayish smoke rising from the manifold during warm-up indicates a leak for this reason. VAZ car owners usually encounter this problem once every 3-4 years. When using low-quality spare parts and before. The solution may be to manufacture a custom-made steel gasket. It can last as long as the entire collector.
Service specialists, when attracting clients, like to tell scary stories about the explosion of the exhaust manifold on VAZ 2114 cars due to cracks. In reality this is nothing more than a myth. But the real problems are no less serious, so there is no point in putting off repairs.
A cracked exhaust manifold or worn gasket can cause your engine to run rough.
1) A lambda probe is installed in the exhaust manifold, which affects the operation of the injection system. Strong air suction disrupts the oxygen mass content in the exhaust; the lambda incorrectly adjusts the quality of the mixture, causing tripping, uneven idling, loss of power, and “black” spark plugs.
2) Another function is crankcase ventilation. Impaired air circulation causes disturbances in the operation of the gas distribution mechanism, increased wear of valves, the formation of carbon deposits on the pistons and other “joys”.
If increased noise and unpleasant odors during engine operation are combined with dirty work, the car needs urgent repairs.
When is it necessary to replace and remove the intake manifold on a VAZ-2114
Huge temperature changes are the main problem faced by the exhaust manifold and the gasket, for which it is removed. The collector itself is made of a special grade of cast iron; it can withstand high temperatures (up to 800-900 degrees) , however, these are critical values, after which the collector may warp or crack.
Exhaust manifold VAZ-2114
Its main task is to collect exhaust gases and distribute them into the exhaust pipe of the muffler.
Replacing or dismantling the VAZ-2114 exhaust manifold is necessary in the following cases:
- Mechanical damage to the collector.
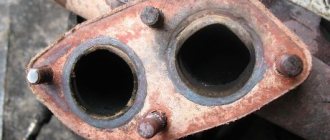
- Warping and loss of tightness at the junction with the cylinder head.
- Burnout of the gasket between the head and the manifold.
- The appearance of cracks as a result of engine overheating.
- Replacing the collector with a device of a different configuration, adapted to a more severe operating mode.
In the event that we are not going to participate in high-speed races for the prize of the head of the regional traffic police, replacing or dismantling the collector may be necessary in a number of cases.
Causes of malfunctions
The key factor that causes 90% of exhaust manifold malfunctions on VAZ 2114 cars is high temperature and poor quality materials from which the parts are made. During operation, the steel repeatedly heats up and cools down, which leads to the appearance of cracks in the body. This is a common occurrence for VAZ cars older than 7-8 years.
Auto repair shops offer crack welding services using argon welding. However, for a number of reasons, this activity is useless for cars older than 7 years.
1) Just removing and installing the exhaust manifold will cost about 2.5 thousand rubles. Taking into account the work of the welder and other actions, the cost of repairs can be 4-5 thousand rubles. If you do the work yourself, buying a new part will cost less.
2) Welding, even argon welding, disrupts the structure of “tired” metal. A boiled part rarely lasts longer than a year, after which new holes appear. The older the car, the faster the problem returns, and the collector has to be removed again. If the car is older than 8 years and there are problems with cracks in the manifold, it is better to remove the part and replace it with a new one.
- Wear . During operation, the car emits hot gases that destroy the surface of the gasket, as a result of which it can tear or delaminate.
- Since there is only one gasket for the intake and exhaust manifolds, gasoline entering through the first channel can get on the gasket, which also affects the integrity and structure of the material from which it is made.
- Part quality, not always high, even original, so when choosing, you should pay special attention to this.
Bent valves due to irregular valve timing do not threaten the 8-valve valve
Signs of trouble
Exhaust manifold gasket One of the main signs of a leak in the system is a “sporty” growling sound when the engine speed increases. This may be a symptom of various exhaust system problems. To check, it is better to take an assistant and go to a garage with a pit or to an overpass. Most often, you can determine by eye whether the problem lies in the muffler, resonator or exhaust.
Gasket wear may become apparent during planting. Open the hood and start the car - white or grayish smoke rising from the manifold during warm-up indicates a leak for this reason. VAZ car owners usually encounter this problem once every 3-4 years. When using low-quality spare parts and before. The solution may be to manufacture a custom-made steel gasket. It can last as long as the entire collector.
Service specialists, when attracting clients, like to tell scary stories about the explosion of the exhaust manifold on VAZ 2114 cars due to cracks. In reality this is nothing more than a myth. But the real problems are no less serious, so there is no point in putting off repairs.
A cracked exhaust manifold or worn gasket can cause your engine to run rough.
1) A lambda probe is installed in the exhaust manifold, which affects the operation of the injection system. Strong air suction disrupts the oxygen mass content in the exhaust; the lambda incorrectly adjusts the quality of the mixture, causing tripping, uneven idling, loss of power, and “black” spark plugs.
This is interesting: Where is the cabin filter on a Fiat Ducato and how to replace it?
2) Another function is crankcase ventilation. Impaired air circulation causes disturbances in the operation of the gas distribution mechanism, increased wear of valves, the formation of carbon deposits on the pistons and other “joys”. If increased noise and unpleasant odors during engine operation are combined with dirty work, the car needs urgent repairs.
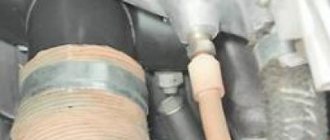
Places of possible suction
There are quite a few places through which air can get inside the fuel system, and during the test you will have to examine them all (we’ll talk about how to detect them a little lower).
For now, let's say that you have to check:
- The intake manifold gasket (its destruction or burnout in the vast majority of cases is the cause of suction).
- Hoses and pipes suitable for the manifold.
- Injector seals.
- Throttle gaskets.
- Plugs placed on the manifold.
- Bushings.
- Vacuum brake boosters.
If symptoms of air leaks appear in the VAZ 2114 injector, all these elements will have to be checked.
You should also check and, if necessary, replace the idle speed sensor. Very often they are of poor workmanship and are not sealed, leading to air entering the manifold.
How to find the leak location
There are 3 main methods by which you can find a leaky area:
- by monitoring the rarefaction of air in the line;
- using a smoke generator;
- using a volatile flammable liquid.
We will omit the first method, since it requires special equipment, which is not available at all service stations. But the second method deserves a lot of attention, since it is quite simple to implement and at the same time very accurate. It will require a compressor, a blow gun and cigarettes (the latter will serve as a source of smoke).
Before checking the air intake of the VAZ 2114, you will need to assemble the entire installation, namely, connect the gun to the compressor receiver, and insert a cigarette into the nozzle of the gun. After this, a pressure of about 0.8 atmospheres is built up and the smoke is directed into the collector using a gun.
The smoke itself created by such an installation is quite thick and quickly fills the entire system. All that remains for the motorist is to carefully monitor the place where the smoke is coming out, and after detecting it, carry out repair work.
In some cases, the leak can be found without additional means - the damaged area can be easily detected by the characteristic whistle or hiss that is produced by the intake air when the engine is running. True, this only happens if there are serious cracks and breaks.
If the proposed method using a smoke generator is not suitable (for example, there is no compressor available), then the test can also be performed using volatile flammable liquids packaged in pressurized cans. As such, you can use ethyl ether (although it is almost impossible to get it in its pure form now), a means for winter starting diesel engines (the main component of which is the same ether), as well as special cleaning products based on hydrocarbons.
In order to find the location of the leak, you need to start the car engine and, while idling, begin to spray all possible components, joints, plugs and hoses that relate to the manifold and may cause air penetration.
This should be done with pauses - after spraying one place, you should wait a few seconds. If you notice that the engine speed has increased sharply after the procedure, then the detected area should be thickly sprayed again. If after this the revolutions quickly go up again, then the leak point has been successfully found.
What does a faulty collector affect?
There are many stories about the rupture (and even explosion) of a cracked manifold while the car is moving.
Of course, none of them are true, but nevertheless, a leaky manifold is a very serious problem that requires an immediate solution, and here’s why: through burnouts and cracks, air can enter the exhaust system, diluting the exhaust gases.
As a result of this, the lambda sensor will incorrectly determine their composition and incorrectly adjust the composition of the fuel-air mixture injected into the engine, which will lead to tripping, a drop in speed and carbon deposits on the spark plugs.
Bent valves due to incorrect valve timing
These same cracks will affect the crankcase ventilation, disrupting it. This will lead to timing problems and increased valve wear. And finally, exhaust gases escaping through the burnouts will enter the engine compartment and, partially, into the interior, causing unpleasant odors and discomfort during trips.
A severely burnt manifold gasket can lead to exactly the same consequences as cracks on the part itself.
Tools and necessary parts
To remove the exhaust manifold on a VAZ 2114 in order to replace the gasket or entire part, you will need the following tool:
- open-end and ring wrenches for 8, 10, 13, 17;
- wrench with heads 17, 19;
- screwdrivers, pliers.
It is also a good idea to have tools such as a Dremel, nut saw or nut pick on hand. As a rule, the fasteners on the exhaust system parts stick tightly.
A few days before your planned repair, begin treating accessible nuts with WD-40 or another penetrating lubricant. Repeat the operation 2-3 times. This will make the task of removing the manifold a little easier .
The question often arises: is it worth using a sealant after removing and replacing the gasket? Experts believe that if you apply sealant to the gasket, it should only be high-quality silicone. A bad sealant can bring a lot of trouble to a VAZ 2114 engine: when it burns out, it turns into “pellets” that are pulled into the crankcase. And this is unnecessary contamination of the piston system.
Exhaust manifold removal procedure
Before removing the exhaust manifold yourself, think 7 times. Having this work done by a service center is not cheap, but the inaccessibility and difficulty of unscrewing some nuts can be a serious problem.
Unscrew the bolt securing the intake pipe
It is important to drain the coolant before removal, as antifreeze may enter the cylinders during the process. The sequence of actions for cars with an injector is as follows:
- Disconnect the battery, release the throttle cable from the throttle valve.
- Disconnect the fuel line pipes.
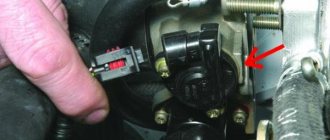
- Disconnect the wires from the TPS and idle speed control.
- Release the crankcase ventilation, vacuum, and brake booster hoses.
- Remove the receiver, remove the injector block wires and remove the injector fuel rail.
- Remove the bracket and thermal shield.
- After this, you can disconnect the exhaust pipe, exhaust and intake manifolds from the manifold.
After disassembly, all gaskets are replaced with new ones. Please note when purchasing that the exhaust manifold gaskets for 8-valve and 16-valve VAZ 2114 are different. Select the parts carefully and you can avoid wasting time and money.
Removal
2. On engine 11183 (1.6i), loosen the clamp (1) and remove the brake booster hose from the fitting. 10 mm
socket wrench , unscrew the three nuts (2) securing the throttle drive cable bracket.
On engine 2111 (1.5i), loosen the clamp (1), and disconnect the brake booster hose from the receiver. Disconnect the fuel pressure regulator hose (2) from the receiver. 10 mm socket wrench
unscrew the two bolts (3) securing the throttle drive cable bracket.
3. Disconnect the cable end from the throttle valve sector (see “Throttle valve - replacing the drive cable”) and move the throttle drive cable along with the bracket towards the radiator.
4. Remove the throttle assembly from the studs of the receiver flange without disconnecting the cooling system hoses and the adsorber hose from it (see “Throttle assembly - removal and installation”).
5. On engine 2111 (1.5i):
a) Using a Phillips screwdriver, unscrew the screw (1) and remove the plate securing the fuel pipes. 13 mm socket wrench
unscrew the two nuts (2) securing the bracket.
b) Remove the bracket for securing the fuel pipes from the receiver studs.
13 mm socket wrench
Unscrew the nut securing the receiver to the bracket.
13 mm high head socket wrench
unscrew the five nuts securing the receiver to the intake manifold.
7. Remove the receiver.
8. On engine 11183 (1.6i), remove the rubber O-rings from the grooves of the receiver flange. We replace damaged rings.
On the 2111 (1.5i) engine, remove the sealing gasket from the intake manifold studs. We replace the gasket.