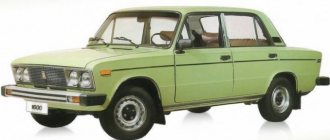
01/26/2022 5 312 VAZ 2106
Author: Ivan Baranov
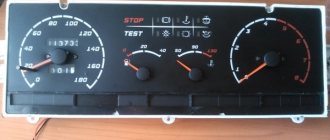
On a VAZ 2106 car, the instrument panel is designed to inform the driver about the technical condition of the car. Some drivers are not satisfied with the appearance of the standard tidy. The article discusses tuning possibilities and provides instructions for removing the dashboard.
[Hide]
Elements of the VAZ 2106 panel and their purpose
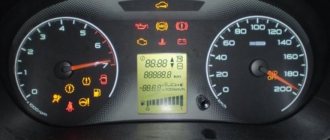
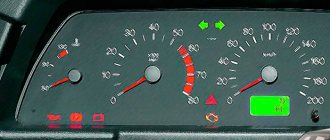
During the trip, the driver must not only monitor the situation on the road, but look at the instruments to control how fast the car is moving, monitor the engine temperature, oil level and the presence of fuel in the gas tank.
The instrument panel is located on the dashboard and contains a large number of elements, each of which is responsible for the operation of a specific component of the car.
The main elements are:
- speedometer;
- tachometer;
- battery charging indicator;
- engine temperature sensor;
- odometer;
- resettable mileage counter;
- oil level sensor;
- oil pressure gauge;
- fuel presence sensor.
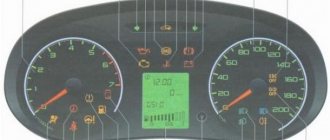
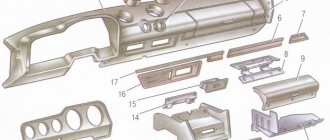
In addition to instruments and sensors, the dashboard contains controls for emergency lighting, lights, direction indicators, and windshield wipers. In addition, the tidy also includes other switch levers, which can be seen in the diagram.
So, everything seems to have been pulled together, now let’s get to work:
We remove the standard tidy along with the steering wheel. Removing the instrument panel 2101 is described in detail in the manual for 2101. The steering wheel can not be removed, but then the inconvenience during operation greatly increases.
We try on the dashboard to the seats on the body. The differences in the 2101 and –06 devices immediately become visible:
We begin to eliminate the listed interference:
Installation of both stove levers and places for mismatched fastening (Fig. 6)
The heater valve cable is short. Looking carefully at the end of the cable that fits onto the heater valve lever, we see that it is twisted into a ring 3 times - this is the necessary reserve. Unwind the ring - leaving 1 turn (Figure 
The cables are sorted out. Now let's figure out where to place the offset fasteners!
We make a U-shaped bracket (Fig. 9)
Figure 9 – bracket for fastening
And we weld it to the intended place for fastening the dashboard -06. The result is a picture - Fig. 10
Figure 10 – Displacement of the fastening point
Now let's take care of the suction - we need to make brackets for it and place it approximately in the place of the old suction. The bracket is made according to TheForester's drawing (special thanks!)
Figure 11 – Homemade suction bracket
Figure 12 – Hand-made bracket for suction
We weld this example of crazy hands to the crossbar:
Figure 13 – Welded to the cross member
After welding, do not forget to prime to avoid rusting.
We insert a cable with suction into the manufactured bracket and screw in the end switch.
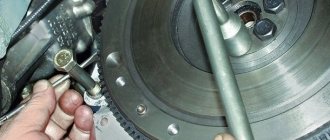
There is another important point - because. the speedometer in 2106 is shifted to the right than in 2101, then it is necessary to rewind the sidometer cable differently (see Fig. 14), however, due to the fact that the cable 2101 is longer, in the new place its length turns out to be excessive even after installing the panel due to excess radii If the cable bends, the speedometer needle may shake, so I recommend using a cable from 2103, 2106 that has a shorter length.
Figure 14 – location of the speedometer cable
This is where the mechanical part of the installation actually ends and the electrical part begins:
We screw the oil pressure indicator sensor with a tee (Fig. 4) and tighten the wire from the sensor into the passenger compartment, do not forget to put on the boot (2101-3724114 Fig. 4). We tighten the wire from terminal K - the ignition coil into the passenger compartment. We make a connection with the instrument panel harness 2106. The connection diagram when connecting new devices can differ greatly from model to model due to differences in the colors of the on-board network wires, and even the instrument panel harness 2106, so the correct one will be look at your diagram in place and make the appropriate connections.
In short, the decision comes down to a banal reconnection of wires. In 2101 there are 2 connectors of 6 contacts on the left and right, in 2106 - the left connector has 8 contacts, and the right one also has 6, like 2101.
Typical malfunctions of the instrument panel
Deviation of the scale arrow indicates a malfunction of the device and damage to the wire that connects the sensor to the pointer.
The following malfunctions of the instrument panel elements are possible:
- the arrow on the scale of the coolant temperature sensor is constantly either in the initial position or in the red zone;
- the fuel gauge needle: does not leave the initial position even with a full tank, always lies at the end of the scale, moves jerkily and often returns to the beginning of the scale;
- The fuel reserve indicator light is constantly on or does not light up;
- The oil pressure indicator does not light up when the ignition is turned on, it lights up constantly, and goes out at high engine speeds;
- speedometer, tachometer faulty;
- The flexible speedometer drive is noisy.
Device malfunctions are eliminated by replacing sensors, contacts, devices, and restoring wiring.
Dashboard faults
The instrument panel of the VAZ Six consists of a small number of devices that may stop functioning over time. The causes of breakdowns may be different, but any of them will require dismantling and partial disassembly of the shield. If one of the devices malfunctions or fails altogether, driving the vehicle becomes uncomfortable because it is impossible to control one or another vehicle system. Therefore, it is necessary to monitor the serviceability of the indicators and promptly correct any problems that arise.
Removing the dashboard
To dismantle the dashboard you will need a pair of flathead screwdrivers and pliers. The procedure is performed in the following sequence:
- Unscrew the fastener and remove the steering shaft housing.
- We pry up the shield first on one side and then on the other.
When reassembling, first install the top part of the panel, and then press on the bottom to snap the brackets into place.
Replacing backlight bulbs
If it was noticed that one of the indicators on the tidy stopped lighting up when the lights were turned on, then the most likely reason is the failure of the light bulb. To replace it, you will need a pair of slotted screwdrivers, and the procedure itself consists of the following steps:
- Repeat steps 1–2 to remove the dashboard.
- We find the device on which the light bulb has burned out and, with a simple movement of the hand, remove the socket from the pointer.
Checking and replacing the instrument panel light switch
Sometimes a situation arises when the instrument panel lighting switch stops functioning. In this case, the panel is simply not illuminated and driving a car in the dark becomes problematic. Breakdowns of the switch in most cases are caused by damage to the internal mechanism. To remove and check the part you will need a flathead screwdriver and a multimeter. The process works as follows:
- By pulling the button, we remove the switch from the instrument panel.
Checking and replacing individual devices
The breakdown of any of the VAZ 2106 indicators causes inconvenience. Problems are caused both by the age of the car and the attitude of the owner towards it. Therefore, it is worth considering possible device malfunctions and ways to eliminate them.
Fuel level indicator
Two elements are responsible for the fuel level readings on the sixth Zhiguli model: an indicator installed in the dashboard and the sensor itself, located in the gas tank. Through the latter, the light in the indicator is also activated, which indicates a low fuel level. The main problems with the device in question boil down to sensor problems, in which the arrow constantly shows a full or empty tank. We check the mechanism as follows:
- With the tank constantly full, disconnect the pink wire from the sensor by turning on the ignition. If the arrow moves to the beginning of the scale, the sensor is considered to be working. If this is not the case, then the problem lies either in the pointer indicator or in the wiring shorted to ground.
- To check the indicator, dismantle the tidy and disconnect the gray wire with a red stripe, then turn on the ignition. When the arrow returns to the extreme left position, the pointer is considered working and the wire is damaged.
If the fuel sensor fails, to replace it you will need a 7-mm open-end wrench and a Phillips screwdriver. The essence of the procedure is to remove a pair of terminals and unscrew the fasteners. A new one is installed in place of the faulty part.
Table: checking the fuel sensor
| Amount of fuel in the tank | Sensor resistance, Ohm |
| Empty tank | 315–345 |
| Half tank | 100–135 |
| Full tank | 7 or less |
Video: installing a digital fuel gauge
Tachometer
The instrument panel tachometer displays engine speed readings. The TX-193 device is installed on the VAZ 2106. The following problems are possible with the mechanism:
- lack of evidence;
- twitching of the arrow in any mode of operation of the power unit;
- overestimated or underestimated readings.
The first malfunction is caused by wiring problems and poor contact. Therefore, you should check the condition of all connecting elements and connectors, starting with the brown wire with the terminal on the ignition coil: there should be no oxides or other damage on it. Otherwise, clean the contact with fine sandpaper and tighten the nut. You should also check the reliability of the connection between the tachometer and ground and, if necessary, restore it. In addition, with the ignition on, use a multimeter to check whether power is supplied to the device. If there is no voltage, inspect the integrity of fuse F9. Also, a digital device is used to check the reliability of the contacts in the tachometer wiring harness.
If the arrow twitches, then the problem lies in poor wiring contact or in the distributor (wear of the shaft bearing, slider or contacts on the cover). Such a malfunction can be eliminated by restoring contact or replacing failed parts. If the tachometer readings are incorrect, you will need to disassemble the distributor, clean the contacts and set the correct gap between them. If this does not help, one of the elements of the tachometer board may have failed. In this case, the device is dismantled, the board is disassembled and repaired. However, disassembly is only appropriate if you understand electrical engineering.
To replace the device you will need pliers and a screwdriver. The sequence of actions is as follows:
- We pry up the tidy and move it to the side.
- We disconnect the corresponding pads from the tachometer.
temperature sensor
The engine coolant temperature is measured using a sensor located in the cylinder head and an indicator on the dashboard.
Despite the high reliability of the sensor, malfunctions can sometimes occur with it, which are indicated by non-standard readings, for example, the absence of needle deviations. To check the sensor, you will need to remove it from the engine, lower it into water and gradually heat it up, and measure the resistance using a multimeter.
Table: resistance values of the VAZ 2106 sensor depending on temperature
| Temperature, °C | Resistance, Ohm |
| +5 | 7280 |
| +10 | 5670 |
| +15 | 4450 |
| +20 | 3520 |
| +25 | 2796 |
| +30 | 2238 |
| +40 | 1459 |
| +45 | 1188 |
| +50 | 973 |
| +60 | 667 |
| +70 | 467 |
| +80 | 332 |
| +90 | 241 |
| +100 | 177 |
The sensor is changed in this order:
- Disconnect the negative terminal from the battery.
- Drain the antifreeze from the cooling system.
- Remove the protective element from the sensor, and then the wire.
Oil pressure sensor
The oil pressure in the “six” lubrication system is determined by two devices: a dial indicator and a light bulb. Signals to both devices are supplied from sensors installed in the engine block.
If there is insufficient pressure while the engine is running, the light comes on.
The arrow pointer or indicator lamp may sometimes function intermittently. Therefore, you need to know how to check them for malfunctions. The procedure is performed as follows:
- We disconnect the wires of the standard sensors, unscrew them from the engine block and install a mechanical pressure gauge with a scale of up to 10 bar.
Both oil sensors are non-repairable and must only be replaced.
Speedometer
The speedometer is responsible for displaying speed on the VAZ 2106. Like any other mechanism, it has its own characteristic malfunctions:
- mechanical wear, which only requires replacement of the device;
- damage to the flexible shaft;
- loosening the speedometer cable nuts.
Since the main problems are caused by the failure of the cable, we will consider replacing this element. Repair work is carried out using the following set of tools:
- flat screwdriver;
- pliers;
- spanners;
- wire or cord up to 2 meters long;
- new drive cable.
The sequence of actions is as follows:
- Remove the negative terminal of the battery.
- We dismantle the tidy.
- Unscrew the nut securing the cable to the speedometer.
- We tie a cord or wire to the nut.
Sometimes the speedometer may not work due to a drive failure. In this case, you will need to remove the worn part and install a new one, paying attention to the number of gear teeth.
Video: why the speedometer needle twitches
Malfunctions also sometimes occur with the “six” watches, the main of which are:
- damage to the internal mechanism;
- backlight malfunction;
- electrical wiring problems.
To replace or repair your watch, follow these steps:
- Remove the negative terminal from the power source.
- We pry the device with a screwdriver and remove it from the panel.
If you want to repair the watch yourself, you will need to disassemble the mechanism, blow off dust and bend the legs on the pendulum (depending on the nature of the malfunction).
Cigarette lighter
Today, a cigarette lighter is a multifunctional device, through which you can not only light a cigarette, but also connect a compressor for inflating tires, a charger to a phone, laptop, etc.
Therefore, failure of this element can cause inconvenience. The main malfunctions of the cigarette lighter are:
- poor fixation of the spiral in the socket. In this case, to heat the coil you have to hold it until it warms up, which is inconvenient and unsafe while moving. The cause of the problem is due to wear of the special antennae. The problem is eliminated by bending the latter;
- burnout of the spiral. The malfunction is solved by replacing the cigarette lighter head or replacing the device;
- fuse failure. If the fuse ( F 1 at 16 A) blows, power will simply not flow to the cigarette lighter. The protective element is installed only of the required value;
- wiring problems. To diagnose electrical wiring, the circuit is tested with a multimeter to check for a break. Having identified the damaged area, it is restored and carefully isolated.
If you need to replace the cigarette lighter, perform the following sequence of actions:
- Use a flat-head screwdriver to pry up the insert on one side and the other, and then remove it.
Dismantling instructions
Removing the VAZ 2106 instrument scale may be necessary when repairing and replacing its elements, tuning and modification. Dismantling is not difficult and will require a small set of tools: wrenches and screwdrivers.
Stages of dismantling the tidy
The removal procedure consists of the following steps:
- First of all, you need to remove the front box from below the tidy.
- Then you need to unscrew all the fasteners and pull out the lower latches.
- Remove the radio plate.
- Next, remove the casing from the steering column.
- The next step is to disconnect the wires. Each one needs to be marked to make assembly easier.
- Now you can dismantle the shield by disconnecting all connectors.
- After removing the sensors, they need to be sorted in order to assemble correctly.
After upgrading the instrument panel, assembly is carried out in the reverse order (the author of the video is Nikolay).
LED illumination of the “six” instruments
As a tuning option, diode lighting of devices is also installed, during the installation of which LED strip and lamps with diodes are also used. Some car enthusiasts are interested in how to make illumination for VAZ 2106 devices of this type and what is required for this.
So, to install LED backlighting for devices, you need 10 -15 cm of tape with diodes of the selected color, several diode lamps of the selected color and a soldering iron.
The order of work is as follows:
- We disconnect the negative contact of the battery and dismantle the instrument panel, disconnect from the connections the board with the instruments where the speed indicators, engine speed indicators, etc. are located.
- We take out the factory backlight bulbs for the instruments of the VAZ 2106 contour arrangement (4 pieces) and for convenience we dismantle the speed and speed indicators;
- We carry out preventive preparation of wiring and diode-type tapes, tested and suitable for use, measure the wires in sections of 3-5 cm, cut and clean the edges for connection, prepare for soldering and solder pieces of wiring with tapes and lamps;
- We prepare places for fastening LED strips and diode lamps, then we stretch the wiring on which the lamps are attached, and glue the tape and prepare the board for soldering;
- After checking the functionality, we assemble the backlight. We recommend the direction of the lamps in the following order: I – vehicle mileage indicator, II – limit (red) line of the power plant speed indicator.
The year 1975 plays an important role in the history of the VAZ automobile company. It was then, 40 years ago, that the first “six” rolled off the assembly line of the plant. Since then, the car has been extremely popular, VAZ 2106 owners have created numerous clubs, and many drivers claim that they would not trade their “swallow” for anything. Let's look at methods for tuning the dashboard of a legendary car with your own hands.
General tuning aspects
The simplest tuning of the VAZ 2106 dashboard is to purchase a ready-made set of accessories and replace standard instruments. You can install it yourself using the instructions included with the kit. More labor-intensive is the tuning of individual devices, which involves replacing stickers and arrows.
1. Dismantled devices for replacement
2. LED instrument lighting
3. Tuned six panel
When changing arrows and stickers, you need to be careful, as these parts are very fragile.
Tuning the VAZ instrument panel can be done by replacing the meter dials with white ones and installing overlays on the panel. You can cover the panel with artificial leather or leather if you have sufficient funds. Before stretching the material, the surface of the shield must be cleaned and then adhesive must be applied in an even layer. Next, press the leather or substitute over the entire surface and wait until the glue dries. At the last stage, you need to process the edges, giving it an aesthetic appearance.
Replacing seats
The first part that is replaced in the cabin is the seats. Even a person with minimal knowledge of structural assembly can handle the installation. It is not difficult to select seats for the VAZ 2106, since Ford Scorpio seats, which have won the love of car enthusiasts with their convenient design for long trips, are suitable for replacement.
To replace it yourself you will need:
- Drill;
- Brackets (the thickness of which is from 5 mm);
- Bolts 8*25 and 10*75 mm.
First we dismantle the old chairs. Using bolts, we attach the brackets to the legs of the new seats, taking into account that each chair requires 2 brackets. We drill holes on the bottom under the chairs, and repeat the same on the brackets themselves. Now we install the seats and secure them with bolts.
Advice. When working, use large washers to securely fasten the chairs. After installation, treat all metal parts.
LED panel lighting
The most popular lighting for VAZ 2106 devices is LEDs. The panel looks especially beautiful at night. LED lamps of various colors are used for illumination. At least 2 bulbs are installed on the speedometer and tachometer dials. For small sensors, one LED is sufficient.
LED lighting around the entire perimeter will look more impressive. LEDs must meet the 12-volt voltage of the on-board network. When installing LEDs, be sure to observe polarity. Thanks to tuning, the VAZ 2106 tidy takes on an individual look and becomes more convenient and functional.
Loading …
Modifications
Electrical diagrams of individual branches The electrical equipment of the VAZ has undergone minor changes. Generator; 9. Upper left part of the VAZ wiring diagram This diagram allows you to examine the elements of the front part of the car. When replacing a single wire, a new one should be of the same color and size.
Lower left part of the VAZ wiring diagram This part of the diagram shows the elements and spare parts responsible for the operation of the engine and the electrical wiring system, starters, relays, etc.
Socket for portable lamp,
To troubleshoot the problem, it is worth checking all these elements and eliminating the shortcomings.
Headlight switch. While the engine is running, the sensor creates pulses that enter the transistor switch. Hazard switch;
At the time of its release it was the most prestigious and comfortable car. Auto electrics, emergency light and turn signal relay diagram for VAZ 2106
See also: Connecting a two-key era switch
Sound signal circuit
- Sound signals;
- Relay for turning on sound signals;
- Sound switch;
- Fuse box;
- Generator;
- Accumulator battery.
Since 1993, one sound signal of type 20.2721-01 has been installed on cars, and it is turned on without an auxiliary relay “2”. There are two wires leading to the signal: red from plug “A” of the fuse box and gray with a black stripe from the horn switch.
| See all advertisements in the archive |