All modern cars, and indeed all vehicles in general, are equipped with various devices that convey to a person information about the condition of the unit being used as a whole. They warn about the instability of the operation of individual components of the mechanism, about violations of specified standards and about the timely implementation of certain measures. And many car owners do not quite clearly understand the symbols of devices and a flashing indicator scares them. Some people, on the contrary, ignore the signals, which leads to dire consequences. The VAZ-2112 is also equipped with various alarms and sensors, which will be discussed below.
The instrument panel of the VAZ-2112 is no different from other VAZ models, the symbols are similar everywhere, they are only located slightly differently. Conventionally, the instrument panel can be divided into top and bottom.
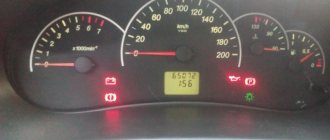
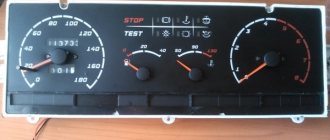
Designation of icons on the dashboard of Lada 2112
| Number in photo | Interpretation of lamps and indicators |
| 1 | Coolant temperature indicator; if the light comes on at the top of the scale, the engine has overheated. |
| 3/4 | The turn signal indicators light up simultaneously when the hazard lights are turned on. |
| 7 | Empty tank indicator; if the lamp lights up, stop at a gas station. |
| 8 | External lighting is turned on and operating normally. |
| 9 | The pressure in the brake system has dropped. It is necessary to immediately add fluid to the expansion tank of the system. |
| 10 | The high beam headlights are activated. |
| 12 | The odometer display shows non-resettable mileage. |
| 13 | The hazard warning lights are on. |
| 14 | The engine control system is damaged or not working correctly. |
| 15 | The battery is not receiving a charge. In this case, you should check the battery itself for wear and the generator set. |
| 16 | The handbrake is activated. |
| 17 | The oil pressure in the engine crankcase has dropped below normal. You should add fluid to the specified level and check the operation of the pump. |
| 18 | In a configuration with an airbag, it indicates that the squib drive is turned off. In other versions the light bulb is a backup one. |
Help me figure out some things :)
Hello, in short, I understand that blogs mostly talk about the work done, but on the contrary, I want to ask you for help in some things that I don’t understand :) Let’s get started:
1. On my dvenakh there is a thing (pictured below, black), for some reason it hisses from time to time (as if the speaker is repeating). What is this thing and why does it make noise/crackle, and why not all the time but sometimes? How to fix?
2. There is a green light in a circle around the place for inserting the ignition key; it should glow so that at night you can see where to insert the key. I don't understand how it works. Either it burns, or it doesn’t burn. And I don’t understand in what cases it lights up and in what cases it doesn’t? Should it always be on? Or does she understand when it's dark? Or how? I tried turning on the dimensions and interior lighting, but nothing helps. What could be the problem? How to fix it? Maybe something wrong with the wiring?
3. Explain what kind of twister this is and what the thing with the light bulb is? I take it this is a standard alarm? It blinks constantly. Is this how it should be? And yet, there was a StarLine alarm system with feedback. The remote control is broken, there is also a remote control without feedback. It works, you press it once and it beeps once, you press it again and it beeps 2 times. But the machine does not lock. And in theory it should. Is it possible to find a remote control somewhere and configure it to unlock my car? Or do I need to completely change the signaling?
4. The turn signal lever (when turning to the left) does not tilt back when you turn the steering wheel. it just crunches, as if trying to throw it back, but it doesn’t work, you have to turn it off manually. Will replacing the lever fix the problem? So as not to buy in vain.
5. When the car is stationary - if you turn the steering wheel - it accelerates on its own, the speed rises. Is something wrong or is this how it should be? They write differently on different sites! That's all for now, thank you!
Source
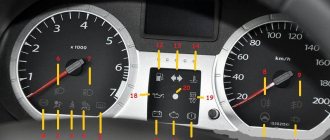
Description of the buttons on the panel
| Number in photo | Purpose |
| 10 | Additional equipment control module. |
| 18 | Steering rack position regulator. |
| 19 | Hood lock drive. |
| 20 | Horn button. |
| 22 | Trunk lock actuator button. |
| 24 | Hydrocorrector of headlights. |
| 25 | Switch for turning mode and headlights. |
| 26 | External lighting switch button. |
| 27/31 | Front/rear fog light switch. |
| 33 | Button for turning on the rear window heater. |
| 34 | Instrument lighting regulator. |
| 38 | Exhaust gas recirculation switch. |
| 39 | Air conditioner control buttons. |
| 40 | Heater damper position regulator. |
| 42 | Emergency button. |
| 43 | Switch for wipers and headlight washers. |
Installation and repair instructions
View after dismantling the panel
Replacing the panel, especially if you are installing it on an old VAZ 2112, is a certain difficulty. Older machines do not have some of the functions for which the panel has buttons. The wiring may need to be worked on.
Tools and materials
Standard tools will be required.
But a certain amount of additional materials is needed:
- you will need plugs for extra buttons that are not needed on an old car;
- air duct;
- various inserts, buttons (5 pieces) and pads;
- a new wiring harness suitable for the wiring diagram;
- brackets for mounting the instrument panel;
Algorithm of actions
Shield fully installed
First you need to remove the old panel. This is done in the same way as on other models of VAZ cars.
When installing, you need to replace the ignition switch with a decimal or Kalinovsky one, depending on how many terminals there are on the block to the lock. You can leave the old one and rearrange the wires, but the new one will work and look better.
The instrument panel wiring needs to be replaced. Also, connect the dimensions with additional two wires in Ш4/13 and Ш3/13 on the mounting block. This applies to older units with 11 relay spaces.
Depending on whether it is an injector or a carburetor, the connection has its own nuances. If you bought a solid factory panel, then instructions should be included with it. Briefly, it can be noted that the injector is not equipped with a speed sensor, please take this into account when installing.
The car's electrical circuit can be of great help. If it is not there, you can find it on the Internet. There are some differences between the VAZ 21124, 2111 and other car variants, so find yours.
If the instrument panel does not work after turning it on, check that the wiring is connected correctly - this is usually the error.
Errors on the dashboard 2112
VAZ cars have always stood out for their ease of operation and maintenance. Regardless of the type of engine, injector or carburetor, here the user can independently perform diagnostics and read errors without additional equipment. Symbols may appear on the instrument panel.
| Number | Meaning |
| 2 | Critical voltage drops have been detected in the on-board network. |
| 3 | The gasoline level sensor is damaged or does not work correctly. |
| 4 | Likewise for the antifreeze temperature sensor. |
| 5 | The outdoor thermometer is faulty. |
| 6 | There is critical engine overheating. You need to stop and let the engine cool. |
| 7 | The oil pressure in the engine is insufficient for normal operation. |
| 8 | The brake expansion tank is empty and needs to be topped up. |
| 9 | The battery is not charging properly. You will need to check the generator and its wiring. |
| E | BC firmware is damaged. |
Most two-digit codes are a combination of two errors.
Where can I get Europanel?
The fact is that europlates, as well as assembled europanels, have become in short supply, since their production was discontinued more than five years ago. Therefore, they mostly sell used ones in good condition; it is quite difficult to find a new one. If suddenly the offered product does not suit you, you can install the Priorovskaya by completely disassembling the old one.
Didn't find the information you are looking for? on our forum.
We recommend reading:
The instrument panel on the VAZ 2115 does not work - injector, causes of failure, repair
How to drain gasoline from a VAZ 2110, a few simple recommendations
VAZ 2114 injector boils, reasons
VAZ 2107 pulls to the right when braking, the main reasons for cars
How to install a tow bar on a VAZ 2114
How to remove the gearbox on a VAZ 2107
VAZ 2121 how to change silent blocks on a car
VAZ 2114 how to adjust the clutch
Removing the torpedo on the old model 2112
To completely remove the device from the car you will need:
- Turn off the on-board power supply.
- Remove the screws around the panel.
- Move the plastic cover of the shield aside and disconnect the wires from the buttons.
- Unscrew the panel fasteners.
- Then the device moves away from its seat and is disconnected from the on-board network.
The standard dashboard of the Lada 2112 is thoughtful and informative. The symbols on the instrument panel are easy to read and understandable even for beginners.
Specialization : Graduated from the State Automobile University, worked for 20 years at GAZ-56, now I drive a Zhiguli.
Source
How to easily and quickly remove the dashboard on a VAZ 2110 with your own hands?
Without a doubt, the dashboard is the most noticeable interior detail in a car, because it is located right in front of the eyes of passengers and drivers. The need to remove the dashboard on a VAZ 2110 may arise for car owners for a variety of reasons.
So, by removing this part, you can get full access to all the electrical components of your vehicle, replace the burnt-out wiring with a new one, connect additional devices or lighting, install a Euro trim or sound insulation.
Options for replacing the standard VAZ 2110 panel:
If desired, you can cover the dashboard with various materials of your choice, thereby making the desired changes to the interior of the cabin.
Subtleties
I would like to say right away that removing and replacing a torpedo on a VAZ 2110 will require a lot of time and patience from you
In addition, all repair work must be carried out extremely carefully and carefully so as not to accidentally break the fastening, since the dashboard will not fit back as it should and will creak when driving
To work you will need the following tools:
- marker;
- self-adhesive labels;
- set of screwdrivers and wrenches.
Removal instructions
It is recommended to remove the VAZ 2110 torpedo in the following sequence:
- Interior details. Before starting work directly, it is necessary to prepare the interior, since disassembling the front panel of the VAZ 2110 is best done with room for maneuvers. Therefore, the first thing we do is remove the front seats and steering wheel of the car. It is advisable to carry out dismantling in exactly the same sequence as indicated above, since otherwise it will be extremely difficult to remove the driver’s seat. In order not to break anything, consider your strength when pulling the wheel out of the column splines; to do this, loosen the steering wheel nut a little, and then pull it towards you while loosening it from side to side;
- Transmission tunnel. After the salon is prepared and there is a place to work, we are faced with the next task - dismantling the floor tunnel in the salon. Simply unscrew the screws and push the top of the part being disassembled back. Then do the same with the bottom of the tunnel;
- Steering wheel and steering column. Unscrew the screws on the steering column casing of the VAZ 2110, and then remove the steering column switches. Mark all the wires and connectors released during disassembly with a marker or labels; this will later work to your advantage when, when assembling the torpedo, you end up with a large number of wires of different colors. It is recommended to use the marking especially for owners of cars that are already equipped with an audio system and alarm system;
- Glovebox. The next stage of work will be to dismantle the glove compartment, after which it is necessary to remove the relay and mounting block. Don’t forget to mark the wires as you work and take special care with the fragile speedometer and other dashboard elements that also require special treatment;
- Torpedo. And now we can move on to the immediate purpose of the repair - we have to remove the dashboard. To do this, it is necessary to unscrew the screws in the resulting void behind the glove compartment and unscrew the fastenings. After that, use a screwdriver to hook the air duct on the left side and remove it. Then all that remains is to unscrew the nut, holding the torpedo with your hand, the torpedo and pull it out from the studs, at the same time do not forget to mark the wires with a marker so as not to get confused.
The dashboard has been removed, we have disassembled everything that needed to be disassembled, all that remains is to carry out the repair work, for which the whole procedure was actually started.
Finally, I would like to advise - take the opportunity, do not be lazy and clean the ventilation ducts, sooner or later they will still become clogged and you will have to remove the dashboard again.
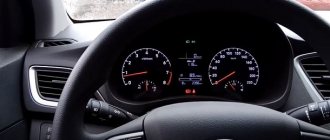
Instrument panel VAZ 2112 - designations
The more modern the car, the more complex its design and the more difficult it is to control the condition of components and systems independently. For foreign-made cars, this issue has been resolved since the 80s by integrating on-board computers and other auxiliary devices into the car control system. Modern cars from Tolyatti are at the level of the 70s of the last century in terms of electronics equipment, and on-board computers can only display the time and temperature in front of the front bumper.
Designations
Despite such electronic asceticism, it is in principle possible to splurge on several dozen light bulbs and scales. Sitting at home, with a book in hand and drinking tea. But when, at a speed of 140, some indicator begins to frantically demand attention, you involuntarily get lost, and control over the car becomes, to put it mildly, not the most ideal.
Especially when you change from a penny to the wheel of a 2112, you feel like young Gagarin in an alien spaceship, when every light means something, and what exactly - go and figure it out. For these purposes alone, it was worth studying the new panel one hundred and twelfth in more detail, which we are happy to share.
Description
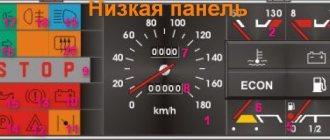
In order not to violate the informational nature of the panel description, and most importantly, so as not to redraw the arrows, we will use the factory layout of warning lamps and indicators on the instrument panel. Here she is.
- A pointer indicator that schematically shows the approximate temperature of the coolant in the cooling system. The pointer receives a signal from a sensor that is installed between the cylinder head and the thermostat, so it shows a more objective temperature. The device is divided into divisions with a value of 20 degrees. The sensor is able to recognize temperatures starting from 50 degrees, and unsafe temperature conditions begin in the red zone with a temperature of 105 degrees. The gradation ends at 130 degrees, at which the motor is almost guaranteed to overheat and jam.
- Tachometer. Shows engine revolutions per minute in real time. The tachometer scale has divisions of five units, and digitization is carried out every 10. By adding two zeros we get the real value. The red zone starts at 55 units.
- A llama with an arrow indicating which turn signal is on, in this case, the left one.
- Controlling the activation of the right turn signal.
- An induction speedometer receives data on the speed of the vehicle from a sensor located in the gearbox. The accuracy of the speedometer readings is not very high, and depending on the speed of movement, it may have an error of 5 km/h or more.
- Fuel level indicator. It receives a signal from a sensor located directly in the fuel tank.
- When the fuel level drops to critical, this warning lamp lights up.
- Low beam switch lamp.
- Brake fluid level warning lamp.
- High beam indicator.
- Clock adjustment knob.
- Odometer and daily mileage.
- Alarm.
- Critical engine failure caused by failure of electronic systems.
- Clock and thermometer.
- Low battery charging voltage.
- Handbrake warning indicator.
- Critical oil pressure.
- Fuel mixture enricher indicator.
2. Controls, instrument panel and interior equipment
Controls
Center console:
Instrument cluster:
Control unit between the front seats:
Note
Some versions of cars of later releases (in particular, models produced) are equipped with a modified instrument panel - the so-called “European panel”.
Instrument cluster:
Speedometer
Shows the approximate vehicle speed (in km/h).
Odometer
Serves to display the total mileage of the vehicle (in km).
Trip counter
The daily mileage counter allows you to determine the vehicle mileage for a specific period of time (for example, during the last trip). To reset the daily mileage counter, use a special reset button.
Note
: The trip odometer can only be reset when the vehicle is stationary.
Tachometer
Shows the approximate engine speed (in revolutions per minute). To obtain the rotation speed value, you must multiply by 100 the number on the scale that the arrow points to.
The red zone (the area of the scale shaded in red) means the engine is operating at a high frequency, which is dangerous for the engine.
Attention
: Do not allow the engine to operate in such a way that the tachometer needle is in the red zone (more than 5500 rpm).
Coolant temperature gauge
The transition of the arrow of this indicator to the red zone of the scale indicates overheating of the engine. In this case, you should check the operation of the thermostat and electric fan of the cooling system.
Attention
: Do not allow the engine to operate in overheating mode (over 110 ºС).
Fuel level indicator
Turn signal indicators
and When one of the direction indicators (left or right) is turned on, the corresponding indicator begins to flash in the instrument cluster.
Alarm indicator
This indicator lights up simultaneously with the hazard warning lights turning on.
CHECK ENGINE warning indicator
A short-term lighting of the indicator when the ignition is turned on indicates self-diagnosis of the system; if there is no malfunction, the indicator goes out. If a malfunction is detected in the system, the indicator flashes or stays on.
Attention
: Driving with the CHECK ENGINE indicator on is prohibited.
Side light indicator
This indicator lights up when the vehicle's exterior lighting is turned on.
Warning indicator for insufficient brake fluid level
Lights up red when the brake fluid level in the expansion tank of the brake master cylinder drops below the “MIN” mark.
Attention
: If the indicator lights up while the vehicle is moving, further movement is prohibited until the causes of the malfunction are eliminated.
High beam indicator
This indicator lights up blue when the high beam headlights are turned on.
Charging system indicator
This indicator lights up red when the ignition is turned on and goes out after the engine starts. If the lamp lights up brightly or glows at half strength when the engine is running, it indicates a weak tension (break) in the generator drive belt or a malfunction in the charging system circuit.
Parking brake indicator
The indicator lights up red when the parking brake is activated.
Emergency oil pressure drop indicator
This indicator lights up red if the engine oil pressure drops.
Attention
: Driving the vehicle while the oil pressure warning light is on can cause serious engine damage.
Warning indicator of insufficient engine oil level in the crankcase
This indicator lights up if the engine oil level in the engine crankcase has reached the maximum permissible minimum.
Note
: Before adding oil to the engine, you must make sure there are no leaks.
Warning indicator of insufficient fluid level in the windshield washer reservoir
This indicator lights up if there is less than one liter of washer fluid remaining in the windshield washer reservoir.
Low coolant level warning indicator
This indicator lights up when the coolant level on a cold engine drops below the permissible limit.
Note
: Before adding coolant to the system, make sure there are no leaks.
Warning indicator for signal lamp failure
This indicator lights up if the brake lights, side lights or direction indicators burn out.
Brake pad wear warning indicator
This indicator lights up when you press the brake pedal with the ignition on and stays on until the ignition is turned off if the thickness of the front wheel brake pads has reached 1.5 mm. In this case, it is necessary to replace the brake pads with new ones.
Seat belt warning
This light signal lights up on the instrument panel if the driver's seat belt is not fastened while the engine is running.
Source
Instrument panel device
On the instrument panel of the VAZ-2112 there is:
- Speedometer.
- Tachometer.
- Fuel level indicator.
- Direction indicator.
- Liquid temperature indicator in the cooling system.
- Control lights.
- Blocks for connecting wires.
Before you start doing any work on the dashboard, it is recommended that you familiarize yourself with its pinout. In other words, you first need to understand where each wire goes and what it is intended for.
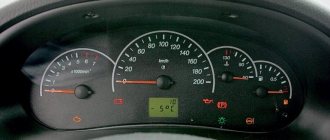
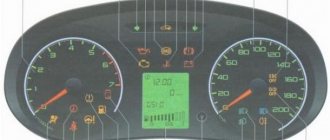
Pinout and instrument panel diagram
Instrument panel pinout
1 — fuel reserve warning lamp; 2 — instrument cluster lighting lamps; 3 — right turn indicator lamp; 4 — left turn indicator lamp; 5 - backup warning lamp; 6 — coolant temperature indicator; 7 — indicator lamp for external lighting; 8 — control lamp for the carburetor air damper; 9 — oil pressure warning lamp; 10 — parking brake warning lamp; 11 — battery charge indicator lamp; 12 — tachometer; 13 — control lamp “CHECK ENGINE”; 14 — speedometer; 15 — brake fluid level warning lamp; 16 —hazard warning lamp; 17 — control lamp for high beam headlights; 18 — fuel level indicator.
Problems when paying with bank cards
Sometimes difficulties may arise when paying with Visa/MasterCard bank cards. The most common of them:
- There is a restriction on the card for paying for online purchases
- A plastic card is not intended for making payments online.
- The plastic card is not activated for making payments online.
- There are not enough funds on the plastic card.
In order to solve these problems, you need to call or write to the technical support of the bank where you are served. Bank specialists will help you resolve them and make payments.
That's basically it. The entire process of paying for a book in PDF format on car repair on our website takes 1-2 minutes.
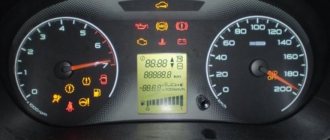
7 - the fuel reserve warning lamp lights up if there is less than 9.5 liters of fuel left in the gas tank. To avoid fuel pump failure, do not allow all the gasoline in the fuel tank to run out. 8 - control lamp for turning on external lighting. Lights up when the external lighting is turned on with the corresponding switch (see item 6). 9 — warning lamp for low brake fluid level. Lights up if the brake fluid level in the master cylinder reservoir is below the minimum permissible level. Driving with the low brake fluid level light on is prohibited. 10 — control lamp for turning on the high beam headlights.
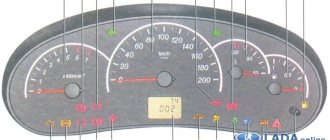
Lights up when the headlights are switched from low to high. 11 — reset button for the daily mileage counter. To reset the meter readings, you must press the button. 12 — odometer display. The top numbers show the total mileage of the vehicle, and the bottom numbers show the daily mileage. 13 - warning lamp for turning on the hazard warning lights. Lights up when the hazard warning lights are turned on. Designations of indicator lamps on the instrument panel of the VAZ 2110 - 15. Many car enthusiasts are faced with this seemingly simple question. What do the indicator lights on the instrument panel mean? And what do we know, they all light up together only when the ignition is turned on, and when one of them lights up while driving, it becomes a little uneasy.
I didn’t know this myself when I switched to the “two” after the “seven”; on the 2107, half of them didn’t light up at all, so I didn’t know what it was and what it was for. And my friend, after the purchase, even bought a whole book on VAZ, due to ignorance of these light bulbs. The symbols on the instrument panels on all VAZs are almost the same, just the location is different. Let's start in order. 1 — Coolant temperature, in degrees Celsius. 2 — Tachometer, engine speed. 3.4 - Turn signals. 5 — Speedometer, vehicle speed in km/h. 6 - Fuel level in the tank.
When there are 5-7 liters left, a yellow light comes on - a warning or an icon with a picture of a gas station. 7 - Actually, this is an image of a gas station, signaling the need to refuel. 8 - Indicator lamp for turning on the dimensions. 9 — The brake fluid level is low, it may be leaking somewhere. 10 - Turn on the high beam. 11 - Clock adjustment knob (hours/minutes - switches when pressed), sometimes this knob serves as the function of switching the total mileage/day mileage (on panels with a narrow display). 12 — The display showing the total mileage/daily mileage is narrow on some models. 13 - Hazard warning lamp - “hazard light”. 14 - Check Engine, often indicated by this icon P - this means a malfunction in the engine, it is recommended to stop the engine. 15 — Display with a clock (can show the outside air temperature if there is a temperature sensor). 16 - Malfunction in the battery charging system: loose or broken generator belt, generator malfunction, open circuit and other problems. 17 - Parking brake indicator. 18 - Insufficient oil pressure in the engine, it is recommended to turn off the engine and find the cause.
I’ll also add about the lamps on the additional panel in the dashboard of the VAZ 2110 - 12. - The lamp marked with an arrow is a check for faulty dimensions or brake lights. — Below is a brake pad wear indicator, if it lights up, check the brake pads, maybe it’s time to change them. — Seat belt warning light — this is clear from the picture.