The VAZ 2107 is equipped with an electric radiator cooling fan. It automatically turns on when the coolant heats up to 90 degrees and under normal conditions ensures a stable engine temperature regardless of air temperature and driving mode.
But there is one problem. Sometimes the fan switching relay (sensor) breaks and the VAZ 2107 radiator fan does not start. As a result, the engine overheats and the matter, at best, is limited to boiling and leakage of coolant, and at worst, a major engine overhaul. To avoid problems, you can improve the design by organizing forced cooling of the radiator. There are two ways to do this: mechanical and electrical.
Mechanical forced cooling of the VAZ 2107 radiator
On older VAZ models, the radiator was cooled using an impeller mounted on the water pump rotor. This solution ensured constant airflow to the radiator when the engine was running. Considering that the design of the VAZ 2107 differs little from its “predecessors”, installing such an impeller will not be difficult.
The advantage of this solution is reliability. Forced mechanical airflow of the radiator ensures that the car does not boil while sitting in a traffic jam on a hot day. But at the same time, the efficiency of blowing at low speeds is reduced in comparison with electric blowing. In winter, another disadvantage of forced cooling appears - a cold engine is additionally blown by a fan, which slightly slows down its warming up. The fact that the fan blows on the radiator on a cold engine does not in any way affect the warm-up speed provided the thermostat is working. The fact is that before the engine warms up, the coolant circulates through a small circuit, bypassing the radiator.
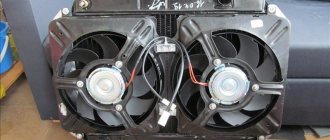
Electric radiator cooling fan (forced)
To prevent a breakdown of the VAZ 2107 fan sensor from causing problems, you can organize forced cooling without replacing the standard electric fan with an impeller mounted on the pump pulley. To do this, it is enough to ensure that the fan is turned on with a button. You will need the following parts and materials:
- electromagnetic relay;
- relay block;
- button for installation on the dashboard (can be backlit);
- wire with a cross section of at least 0.75 mm;
- male-female connectors;
- insulation.
You will also need a new fan sensor if the old one is faulty. Serviceability can be checked with an ohmmeter or continuity tester. If the fan does not turn on when the lower part of the radiator heats up, it must be replaced.
First you need to reduce the current passing through the contacts of the thermal relay that controls the fan. To do this, the VAZ 2107 fan switching circuit must be changed so that it is powered not directly from the sensor, but through an additional relay. In this case, the contacts of the fan sensor (thermal relay) will not burn out, and if the additional relay fails, it will be much easier to replace the latter.
It is also necessary to connect the fan switch button so that when turned on, it duplicates the sensor, supplying voltage to the relay coil when turned on. In this case, if the sensor breaks down, you can manually turn on the VAZ cooling fan and protect the engine from overheating.
Carburetor sevens
In these cars, the control system for turning on the electric fan is very simple. It can even be called analog. The entire circuit consists of the simplest form of the following elements:
- Electric fan motor.
- Power sensor.
- Wiring.
That's it, there is nothing else, you need to look for breakdowns only in these parts of the structure. In 70% of cases the sensor fails, in 5% the electric fan fails, in 20% the electrical wiring is to blame.
But some cars use a slightly more advanced circuit, which includes an electromagnetic relay. With its help, it is possible to remove high currents from the sensor. This increases the resource of the device.
Some drivers who are not used to trusting automation install a regular button parallel to the sensor (and sometimes instead of it). Such a scheme has a right to exist, but the driver himself must be extremely careful in order to notice the temperature rise in time and turn on the electric fan.
Improving the cooling system with an electric fan
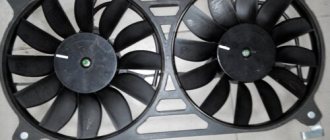
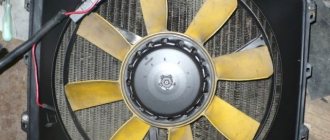
To improve cooling, you can replace the standard VAZ 2107 cooling fan with a more powerful and advanced one. Fans from Viburnum or Priora are suitable for this purpose. The eight-blade fan is especially effective, providing particularly strong air flow.
Radiator fan - it is only needed for the radiator, because it cools it, coolant runs inside the radiator when the engine is running and it heats up very much, thanks to the fan, this liquid heats up longer and therefore the engine temperature does not rise so quickly, that’s why when the fan fails, the car begins to get very hot and overheat, this is especially noticeable when you are stuck in a traffic jam for many hours in the summer heat.
Does not work
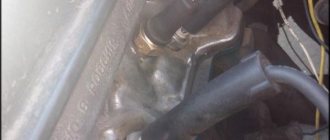
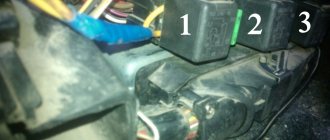
On VAZ-2107 injection engines, a two-contact fan sensor, which is located in the upper pipe, when the coolant temperature rises above that for which it is designed, it must send a signal to the ECU. The electronic control unit, having analyzed the signal, turns on the fan through a relay.
Therefore, the search for reasons for the fan not turning on begins by removing the connector from the sensor with the ignition on. If the fan itself is working properly, then it should work. By inserting a load in the form of a light bulb into the connector terminals, the fan should stop. Thus, you check the electrical circuit of the fan motor. In this case, it will be fine, but the fan sensor will have to be replaced. However, it should be noted that there are also substandard sensors on sale, which, when installed on the engine, will also not work.
If, after removing the connector from the sensor, the fan does not work, then its functionality must be checked by connecting it directly to the battery. There are only two options for the experiment. If the fan is working, then you will have to check the functionality of the fuse that protects this circuit, the fan relay and the ECU. And if the fan does not work, then you will have to check the condition of its brushes for wear.
On carburetor engines of the VAZ-2107 car, there will be no ECU in the electrical circuit for turning on the fan, and some “sevens” do not even have a fan turn-on relay. Therefore, it is much easier to find the reason why the fan does not turn on, and many drivers of VAZ-2107 cars can cope with this.
Instructions: replacing the radiator grille.
How to remove a stove radiator, the material is available at the link.
Which thermostat is better to install https://vz07-up.ru/ssh/termostat.html#t2.
Scheme
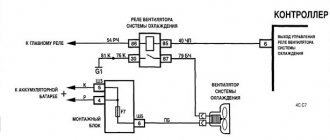
We present to you a diagram for switching on the electric radiator cooling fan for the VAZ-2107, VAZ-2105 and VAZ-2104. In this circuit, there is a relay in the fuse block; therefore, a low-current sensor can be installed.
Doesn't turn off
The fan switch sensor, which monitors the temperature, has failed.
It is located on the right side of the radiator (screwed into the radiator itself). This is what needs to be replaced.
The fan switch on sensor (DV) on any car, including the VAZ 2107, plays an important role. It is thanks to this that the engine is cooled using air flow, which prevents the power unit from overheating. Read more about the principle of operation, diagnostics and replacement method below.
What's new
The main innovation was the replacement of the mechanical functions of the ignition system and preparation of the air-fuel mixture with electronic devices, which are more accurate and efficient. The wiring diagrams of the VAZ 2112 and the Samara family also underwent a similar modernization. Accordingly, the wiring of the VAZ 2107 to the injector received differences from the carburetor version.
Under the hood of the VAZ 2107-20, the absence of a carburetor and distributor is immediately striking
ECM functions
The electronic engine control system (abbr. ECM) took on the following operating parameters of the power unit:
- Controlling the amount of air and gasoline entering the car engine cylinders,
- crankshaft speed
- Spark plug control;
- Adjustment of ignition timing in all operating modes;
- Turning the electric fuel pump on and off,
- Control of the electric fan of the engine cooling system.
The photo below shows a VAZ 2107 wiring diagram for an injector with an M1.5.4N ECM and a January-5.1.3 controller
Injection system VAZ 2107
Electrical diagram
The classic 2107 wiring on cars with an injection system has also undergone changes. In particular, under-hood elements equipped with connectors for sensors and electronic devices have appeared.
Electrical diagram of VAZ 2107 with carburetor
For reference: The developers of Moskvich 2141 followed a similar path. True, they had a more global problem - the lack of their own engine.
Explanation for the electrical diagram of the carburetor VAZ 2107
For reference: The photo below shows the electrical wiring of a VAZ 2107 to an injector with catalog numbers. The differences from carburetor kits are in the engine compartment harnesses.
When converting the engine to an injection system, you should also purchase new wiring
Forced fan activation
The cooling system on the VAZ 2107 does not provide for regular operation of the ventilation device. But despite this, sometimes the principle of its forced activation is implemented. This happens when the regulator fails, and, as you understand, it is impossible to replace it while driving. You can check this like this - the DTOZH, which is located under the hood, demonstrated on the dashboard the critical temperature of the engine when the needle moves into the red zone. In this case, the fan does not activate and if this is the case, then there may be several explanations for this.
First, there was a breakdown of the DV itself, which turned on the fan on the “seven”. This outcome of events, as practice shows, is more favorable for the driver. This is because the system itself remains complete, while the radiator functions properly, and accordingly, some of the heat is still removed from the engine.
In this case, the driver has several options to solve the problem:
- If you are driving on a flat road and the vehicle will be driving non-stop, then simply monitor the temperature on the dashboard. If there are traffic lights or traffic jams along the way, just turn on the stove at full power.
- If you drive for a long time, you can force the fan to activate. To do this, two contacts should be removed from the controller and connected to each other. But before you perform these steps, you need to remove the negative cable from the battery. When the wires are closed to each other, the negative wire can be installed in place on the battery, after which the fan will work constantly and without interruption. The engine temperature in this case does not play a role, just like the driving mode of the car. When the vehicle stops, the fan will function until the battery is completely discharged; to prevent it, you need to open the engine compartment and disconnect the negative from the battery.
Regulator location
This option is less acceptable for car owners with an anti-theft system installed, so if you had to disconnect the wiring of the device, then it will need to be connected and insulated. In addition, in the engine compartment it will be necessary to ensure that nothing gets under the blades, since the layout of the wires suggests they are in bundles. Of course, this will bring certain inconveniences, since constantly opening the hood and closing contacts is not entirely convenient. So the forced activation option should be implemented in an emergency. The antifreeze itself is an element whose cost is quite low, but replacing it on the road is almost impossible, since the driver will have to drain the antifreeze in any case.
Wiring harness in the cabin
In the interior of the VAZ 21074 there are wiring harnesses:
- under the instrument panel. This bundle contains the wires responsible for the headlights, direction indicators, instrument panel, and interior lighting;
- stretched from the fuse box to the rear of the car. The wires of this bundle power the rear lights, glass heater, and gasoline level sensor.
The wires that are used in the “seven” for electrical connections are of the PVA type and have a cross-section from 0.75 to 16 mm2. The number of copper wires from which the wires are twisted can range from 19 to 84. The wiring insulation is made on the basis of polyvinyl chloride, which is resistant to temperature overloads and chemical influences.
The wiring harness under the instrument panel of the VAZ 21074 contains wires that are responsible for the headlights, direction indicators, instrument panel, and interior lighting.
To simplify the repair, maintenance and replacement of electrical equipment, the factory electrical wiring of VAZ 21074 vehicles has a set color.
Table: cross-section and color of wiring of the most important electrical appliances VAZ 21074
| Electrical circuit section | Wire cross-section, mm2 | Insulation color |
| minus battery - body mass | 16 | black |
| starter plus - battery | 16 | red |
| plus generator - battery | 6 | black |
| generator—black connector | 6 | black |
| terminal “30” of the generator—white block MB | 4 | pink |
| terminal “50” starter—starter start relay | 4 | red |
| Starter start relay—black connector | 4 | brown |
| ignition relay—black connector | 4 | blue |
| terminal “50” of the ignition switch—blue connector | 4 | red |
| terminal “30” of the ignition switch—green connector | 4 | pink |
| right headlight connector - ground | 2,5 | black |
| left headlight connector—blue connector | 2,5 | green (gray) |
| terminal “15” of the generator—yellow connector | 2,5 | orange |
| Radiator fan ED - “ground” | 2,5 | black |
| Radiator fan ED—red connector | 2,5 | blue |
| contact “30/1” of the ignition switch—ignition relay | 2,5 | brown |
| pin “15” of the ignition switch—single-pin connector | 2,5 | blue |
| cigarette lighter—blue connector | 1,5 | blue (red) |
Controller diagnostics
To diagnose the controller, you will need a calibrated thermometer that can operate at the boiling point of water. The diagnostic procedure is carried out as follows:
- Often the sensor facing the inside of the radiator should be placed in water.
- Next, the tester probes are connected to the controller contacts, and they are adjusted to ensure there is no resistance.
- When the liquid begins to heat up, the resistance disappears at approximately 87-92 degrees. If so, then the controller is healthy and will work as expected.
Instructions for removing and replacing the sensor
The regulator, which should be in the engine compartment, tends to periodically fail. Accordingly, it will be useful for the owner of the “Seven” to know how to dismantle and install a new controller.
To remove and install the DV, perform the following steps:
- First of all, it is necessary to de-energize the on-board network of the machine. To do this, remove the negative terminal from the battery.
- Next, remove the distribution tank cap, as well as the radiator cap, so as not to create high pressure in the system.
- It is necessary to place a container under the radiator into which the coolant will be drained. Unscrew the radiator tap and drain the antifreeze into a basin or other container.
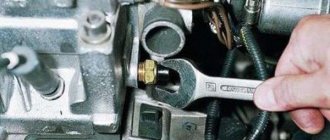
- After these steps, you need to disconnect the wires from the controller. Then take a 30mm wrench and unscrew the regulator itself using the large nut. Now you can dismantle the device. When removing, be especially careful; the iron o-ring on the regulator must not be lost under any circumstances. Having done this, you can begin installing the new device. During installation, do not forget that immediately before installation, the contact points between the controller and the radiator must be lubricated with sealant. In this case, the sealant must be high-temperature; this process is carried out dry. Using a sealant can prevent coolant leakage.
- After installing the controller, you can tighten the cap on the radiator. Then the assembly is carried out in the reverse order - the previously drained antifreeze is poured in, and the negative terminal of the battery is installed in place. To be sure that the system is working, warm up the engine and wait until the fan turns on. It would also be a good idea to rid the cooling system lines of air pockets. Our resource provides instructions for replacing antifreeze in the “Seven”. If you have any questions, it will help you figure it out, the article is at this link.
What is the device in question?
The fuel pump on the VAZ 2107 injector is presented in the form of an electric motor with a pump, which pumps gasoline from the tank.
The pump design has an electric motor that is powered from a 12V vehicle network. The design of the electric motor consists of a rotor, brushes and a commutator, which are constantly in gasoline. Many will think that such an injector power system for the VAZ-2107 car is quite dangerous, but not everything is so simple.
Spark and gasoline are a dangerous compound that can lead not only to fire, but also to explosion. This would happen, because sparking occurs in the electric motor of the gasoline pump, if not for the fact that gasoline belongs to the category of liquids that do not conduct electric current. In addition, gasoline does not burn if there is no air, and the fuel circuit is exclusively closed. Thus, the design of an electric fuel pump on a VAZ 2107 car is presented.
Car owners find out where the VAZ 2107 injector fuel pump is located only when there is a suspicion that it is faulty. On carburetor sevens, this device is located in the engine compartment near the engine. Many may think that this device is located there on injection sevens, but no. The device is located directly in the car’s gas tank, which simplifies the fuel pumping system. If you open the trunk and lift the carpet, you can see its outlet pipes. This arrangement of the device in question simplified the process of pumping fuel, but thereby complicated access and replacement of the product when it fails.
The principle of operation of the device is quite simple. After turning the ignition key, power is supplied to the electric motor terminals, causing the pump to pump gasoline into the system until a certain pressure is created. When the pressure has been created, the engine can be started. When the engine starts, the fuel pump continues to function throughout the entire period of engine operation, while maintaining pressure in the fuel system. After the engine is turned off, the pressure in the system remains for some time for several minutes, after which, if the engine does not restart, it decreases.
Causes of malfunctions and their diagnosis
To find out the cause of the fuel pump malfunction, you will need to pay attention to the characteristic symptoms. In this case, diagnostics of the device in question is performed. The easiest way to check the VAZ 2107 fuel pump injector is to turn on the ignition and listen for a characteristic noise. If the fuel pump does not pump fuel, then a characteristic buzzing noise will not be heard in the area of the gas tank. The reasons may be varied:
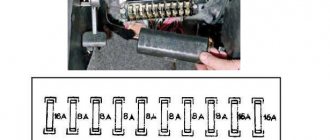
- Fuse failure. To do this, replace the fuse and check whether the device starts to function.
- Faulty relay. If the relay is faulty, there will be no voltage supplied to the electric motor terminals, which means the device will not function.
- Damage in the power supply circuit of the electric motor. It is necessary to check the integrity of the wiring. The wiring to the fuel pump may be damaged or there is no ground contact.
- Electric motor malfunction. It is necessary to check the product by removing it from the gas tank.
- Pump malfunction. The engine will run, but no fuel will be supplied to the system.
- Filter clogged.
- ECU malfunction. A malfunction of the control unit cannot be ruled out either.
Source