The density of the electrolyte in the battery is the most important parameter for acid batteries. The density of the electrolyte directly affects the service life and overall performance of the battery, the battery capacity, the ability to accumulate and hold a charge, and also operate under load.
At the same time, during operation, the density in the battery may change, which indicates the need for checking. Next, we will look at what the density of the electrolyte in the battery should be, how to check the density of the battery, and also how to increase the density in the battery if necessary as part of battery maintenance.
What density should a car battery have?
So, before considering what the density of the electrolyte should be and how to properly increase the density of the battery, it is important to understand that this density itself should be understood as the specific gravity of the acid in the solution that is poured into the battery jars.
First of all, checking the density is an important step in battery maintenance. So, in lead batteries the density is measured in grams per cm3. The density indicator is proportional to the concentration of the solution and also depends on temperature. The more the solution is heated, the lower the density will be.
At the same time, the density of the electrolyte indicates the state of the battery. As a rule, if the battery loses its ability to hold a charge, it is necessary to check the level and condition of the electrolyte in the banks. This check is carried out with a hydrometer, and the temperature should be about 25 degrees Celsius. If the temperature is different, separate corrections must be made (a table can be used).
Let's move on. During battery operation, it is important that the electrolyte density indicator corresponds to the norm, taking into account climatic conditions. This means that the density of the electrolyte is different in winter and summer. If the climate is moderate (there is no great heat or cold), the density of the electrolyte should be 1.25-1.27 g/cm3. If frosts in the region are greater than -30, then the value is increased by 0.01 g/cm3 more, but if there is extreme heat above +30, then the value is reduced by 0.01 g/cm3.
If the frosts are severe (temperature drops to -50 °C), so that the electrolyte in the battery does not freeze, in this case it is necessary to increase the density of the electrolyte in the battery in winter to 1.29 g/cm3.
For clarity, the table of the density of the electrolyte in the battery allows you to understand what the density of the battery should be in winter or summer, in conditions of extreme heat or cold, in a temperate climate, etc. It is important to take into account that the lower the density, the longer the overall service life of the car battery. This means that increasing the density unless necessary is not recommended.
You also need to take into account that the battery installed on the car is charged not 100%, but 85-90% of the nominal capacity. This means that the density of the electrolyte during measurements is often lower compared to a fully charged battery. For the reasons stated above, you need to choose a value that is slightly higher (by 0.01) than given in the density table. This approach will mean that the battery will not freeze in winter.
However, if we are talking about summer, too high a density can lead to boiling of the electrolyte in the battery. It is important to maintain a balance, since an increase in density shortens the battery life, while a decrease leads to a decrease in voltage, the battery turns the starter worse, discharges faster, etc.
Let us also add that if in winter the temperature does not fall below -30 and in summer does not rise above + 30, then the standard value of the battery density should not be changed. The main thing is to ensure that this value is constantly maintained.
Electrolyte density in the battery in winter and summer
So, the nominal density of the electrolyte in the battery in winter is 1.27. If temperatures are below -35, then the density increases to 1.28 g/cm3. However, further increase in density is also not recommended.
If the density is reduced, for example, to 1.09, then the electrolyte will freeze already at -7 degrees Celsius. However, if in winter it is discovered that the density has decreased, instead of immediately raising it, you must first charge the battery well from the charger.
In fact, in winter, during short trips, the battery often does not have time to charge, does not accumulate charge well, etc. As a result, the battery charge decreases, and the density also decreases. However, it is not recommended to change the density by adding acid yourself.
Changes are allowed only by using distilled water to correct the level (the norm is 1.5 cm above the plates in the battery of passenger cars or 3 cm in trucks). Moreover, if the battery is new or fully functional, the change in electrolyte density during a complete discharge and a full charge should be at around 0.15-0.16 g/cm3.
It is also important to take into account that you cannot use a discharged battery at sub-zero temperatures, as the electrolyte freezes and the lead plates are destroyed. In practice, if the battery is half discharged in winter and more than a quarter discharged in summer, the battery needs to be recharged.
As for the density of the battery in the summer, usually the banks dry out and the density increases. Taking into account the fact that high density has a bad effect on the plates, it is better to keep the indicator 0.02 g/cm3 below the optimal value in regions with hot climates.
In fact, in the summer, water from the battery jars actively evaporates, since the outside air temperature and heating under the hood (where the battery is often located) also lead to a strong increase in the temperature of the battery. As a result, the battery “boils”.
At the same time, the decrease in density does not affect the quality of current output when the battery is heated. For example, even at 1.22 g/cm3 the battery will turn the starter well. It turns out that if it’s hot outside, the electrolyte level decreases and the density increases. In turn, high density “kills” the battery.
To prevent this from happening, you need to check the electrolyte level and add water to the battery, lowering the density and maintaining the required level of solution in the jars to prevent overcharging and shedding of the plates. It should be remembered that constantly adding water to the battery leads to a decrease in density. If the density is low, the battery cannot be used further, since it is necessary to increase the density of the electrolyte in the battery.
Important information for car enthusiasts
Also, unless absolutely necessary, you should not replace the electrolyte completely. If the acid must be diluted with water, then it should be remembered that the density of liquids differs. For this reason, the acid is poured into the water in a thin stream with constant stirring.
Handling the power source must be as careful as possible; the battery must not be turned upside down due to the possible occurrence of a short circuit during operation. Before screwing the lids on the jars, you must follow the recommendation of experts on how to check the density of the battery with a hydrometer before operating the unit.
How to check the density in a battery
Having figured out what the density in the battery affects and what it should be, let’s move on to how the density in the battery is checked. This check should be performed every 20-25 thousand km. mileage, as well as before the onset of summer and winter.
To measure, you need a device called a hydrometer (densimeter). In fact, it is a glass tube with a hydrometer inside. There is a rubber tip on one end and a bulb on the other.
To check, you should unscrew the caps of the cans of the battery being serviced one by one, then immerse the rubber tip in the solution and draw in the electrolyte with a bulb. Next, a hydrometer with a scale will show what the density of the solution is. The lower the density, the lower the battery charge.
By the way, let’s also add that it is not possible to check maintenance-free batteries using this method, since there is no direct access to the banks. Moreover, such batteries have a special color charge indicator (density indicator) of a maintenance-free battery.
In fact, if the indicator is green, then it indicates that the battery is 65 or 100% charged. If the density is low and the battery needs to be charged, then the indicator will be black. Moreover, if the color is, for example, red, then this indicates that the water has boiled away and needs to be topped up. By the way, there should be a sticker on the battery itself indicating what the color of the indicator indicates in a given case.
Now let's get back to checking. Checking the electrolyte density should be done on a fully charged battery. At the same time, you can charge the battery only when the level in the banks is normal. In other words, the order is as follows:
- first the electrolyte level is adjusted, then the battery is fully charged;
- After charging is complete and the charger is turned off, you should also allow the battery to “settle” for about 2-3 hours.
- Then the density of the electrolyte in the battery is checked.
If you add water or charge the battery and immediately measure the density, the data will not be accurate. It is also important to measure density at optimal air temperature. If deviations occur, then you need to check the table above and make corrections.
When the electrolyte is collected, the hydrometer should be at rest and floating, without touching the walls. Measurements from each battery bank should be recorded. It is important that the electrolyte density is approximately the same in all banks.
If it is noticed that the density has decreased significantly in one jar or several, but not in all, then this indicates defects. As a rule, we are talking about a short circuit of the battery plates. If the density has dropped in all banks, this indicates that the battery is in a deep discharge, the plates have crumbled, or the old battery has exhausted its service life.
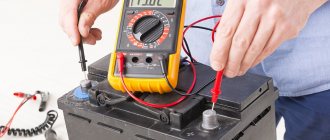
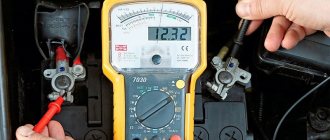
To accurately determine the cause, you need to check the battery voltage with a multimeter and a load plug. If the density is high, this also indicates problems. Typically, the density increases as the electrolyte boils.
One way or another, adjustment is needed using a correction solution or distilled water, after which the battery is charged with a rated current (about 30 minutes), and then the battery is kept at rest for several hours. This is necessary to equalize the density in the jars. Let's look at how to increase the electrolyte density in a battery in more detail.
How to measure with a hydrometer
First, squeeze the hydrometer bulb and place the device in the liquid. Smoothly releasing the bulb, fill the flask with the substance being measured. Swirl the hydrometer slightly to remove any air bubbles. Hold the device vertically and wait until the hydrometer inside stops in one place. It is important that it does not touch the walls of the flask! The mark at which the liquid level coincides with the hydrometer scale is the density value of this liquid.
It is important to measure density with a hydrometer at a temperature of about 20 degrees. If the temperature of the substance being measured is different, then the readings must be adjusted in accordance with the table below.
| Temperature of the measured liquid, °C | -20°С | -10°С | 0°C | 10°C | 20°C | 30°С | 40°C | |
| Correction amount | For electrolyte, g/cm³ | -0,035 | -0,025 | -0,014 | -0,007 | 0 | +0,007 | +0,014 |
| For antifreeze, °C | +27 | +21 | +12 | +5 | 0 | -7 | -12 | |
If you still have questions about how to use a hydrometer, watch these videos:
What is a hydrometer for and how to use it
It is important to consider that several factors influence the accuracy of hydrometer measurements.
- Cleanliness - all components of the device must be clean, especially the bulb and scale. Therefore, the device must be thoroughly washed after each use.
- Temperature - it is better that the hydrometer and the liquid being measured are at the same temperature as the environment (ideally 20°C). This will prevent the density from changing during testing and the readings will be more accurate.
- Device design - the outer vessel must have a diameter 2-2.5 centimeters larger than the measuring element itself, so that the hydrometer can float freely in the liquid without touching the walls. The hydrometer touching the flask gives incorrect measurements.
How to increase battery density
First of all, it is important to know how to properly increase the density in a battery. First of all, when working with electrolyte you need to be extremely careful, since the solution contains sulfuric acid.
Acid can cause burns to the skin, mucous membranes and respiratory tract. You need to work with electrolyte in a well-ventilated area, wear gloves, a mask, etc. You also need to take into account all the nuances and know how to increase the density in the battery.
Please note that the need to do this arises when the electrolyte level in the jars has been adjusted several times with water or density measurements indicate that the density is too low for winter.
It is also necessary to increase the density after long battery recharges. As a rule, it is necessary to increase the density if the charge and discharge interval has noticeably shortened. To determine the density of the battery, you can use a concentrated electrolyte (adjusting electrolyte solution) or simply add acid.
In any case, you need to have a hydrometer, a measuring cup, a container for diluting the electrolyte, an electrolyte correction solution or acid, and distilled water.
- In general terms, a little electrolyte is pumped out of the battery can with a bulb, then a correction electrolyte is added in the same amount to raise the density or distilled water to lower it;
- Then the battery is charged for 30 minutes from the charger; it must be charged with the rated current so that the liquid is mixed;
- Next, the battery is disconnected from the charger, a pause is maintained for about 2-3 hours, so that during this time the density in all banks is equalized, gas bubbles come out, and the temperature drops;
- Now you can check the density of the electrolyte again, if necessary, repeat the procedure, decreasing or increasing the amount;
- During measurements, the difference in density in all jars should not be more than 0.01 g/cm3. If such density cannot be achieved, then you need to do the so-called equalizing charging again, and with a current that is 2-3 times less than the rated charge current.
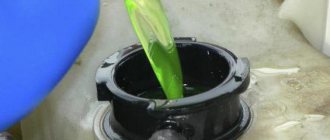
To make it more convenient, it is recommended to study in advance what the volume in cm3 is in each bank of a particular battery. The electrolyte itself has a composition in the following proportions: 40% sulfuric acid to 60% distilled water. By the way, proportions and density can be calculated using the formula, but in practice it is easier to use this method:
- The liquid is pumped out of the jar and poured into a measuring cup, which allows you to determine the volume;
- then half of the resulting amount is drained, and the other is filled with electrolyte (the glass needs to be rocked to mix).
If the density values are still low, then you can add another ¼ of the electrolyte from the volume pumped out of the jar. This topping can be done repeatedly, reducing the amount by half.
Moreover, if the density in the battery is too low (below 1.18), in this case the usual addition of electrolyte is not enough. In such a situation, you need to add acid (1.8 g/cm3).
The procedure itself is similar to adding an electrolyte. The only thing is that you need to add acid to the solution step by step, since you can immediately pour a large amount and exceed the required indicators. Please note that when preparing the solution, it is imperative to pour the acid into the water. It is prohibited to pour water into acid!
Preparatory work before checking the level and density
Before determining density at home using a special device, you need to keep in mind that:
- The car battery is checked using eye protection glasses and rubber gloves. The electrolyte solution is an aggressive acid that causes burns if it comes into contact with the body.
- The machine's battery density level should be measured after a visual inspection of the device.
- The battery terminals are cleaned from oxidation and contamination. It is necessary to use a special iron brush or fine-grained sandpaper.
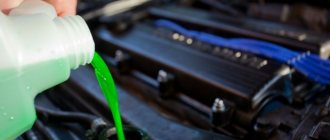
- Before measuring the density of the liquid in a car battery, you need to make sure that there is electrolyte in the banks. If the volume of the substance is reduced, you will need to add distilled water to the device.
- If necessary, the battery is removed. The terminals are disconnected from the device and the fixing plate is dismantled.
- Before disconnecting the battery in the car, the ignition system is deactivated, and the operation of electrical equipment and devices is first turned off.
- The battery is wiped with a damp and clean cloth to prevent dust from getting into the electrolyte jars.
Video: how to remove the battery from a car
The “Battery Man” channel in its video spoke in detail about the nuances of removing the battery from a car and turning off this device.
Tips and tricks
As practice shows, the service life of batteries (average in price) is 3-4 years, expensive analogues can last 1-2 years longer. Moreover, such indicators are possible only if the operating and maintenance rules are followed, and the equipment is in good working order.
First of all, it is important to prevent overcharging the battery or, conversely, deep discharge of the battery. As a rule, the owner himself can drain the battery too much. Electrical equipment faults or connection errors also lead to discharge. One way or another, consumers “pull” the charge even when the car is not in use, the battery runs out. As for overcharging, this can occur as a result of breakdowns of the relay regulator, etc.
We also recommend reading the article on how to choose a charger for a car battery. From this article you will learn about the types of battery chargers, their features, advantages and disadvantages, as well as what is the best choice when purchasing.
In any case, if the battery is maintenance-free and/or old (worked for more than 3 or 4 years), then you should not try to restore its functionality by replacing the electrolyte. Often, in this case, the plates in the jars have already crumbled (partially or completely). The result is that the battery will not work normally even with fresh electrolyte.
Often, if the electrolyte in a battery has turned brown or brown, in cold weather such a battery will not work well. If the electrolyte turns black, this indicates that the plates have shed and particles have entered the solution. In fact, the surface area of the plates has become smaller. It turns out that even after servicing and charging, it is not possible to obtain the necessary characteristics of the battery. In this case, it is better to change the battery immediately.
Hydrometer design for measuring electrolyte density
Since we are interested in the electrolyte, let’s look at how a hydrometer for a car battery is designed and works.
Its design is extremely simple:
- tube or flask made of glass or transparent plastic;
- pipette;
- rubber bulb;
- the hydrometer itself.
A pipette for collecting electrolyte, made of rubber, is placed on one end of the flask (so as not to damage the separators and plates in the jar), a hydrometer is placed inside, and a bulb is placed on top, with the help of which liquid from the battery is pumped into the flask. The hydrometer itself is a glass flask sealed on both sides with a lower wide and upper narrow part. A ballast weight made of metal or other material is installed at the bottom, and a scale is applied at the top, adjusted in such a way as to indicate the density of the electrolyte.
We will tell you how to use a hydrometer bulb a little later, mentioning that there are also many varieties of automobile hydrometers, but they all use the same principle, based on Archimedes’ law - a glass flask is immersed in an electrolyte, and on a scale you can track what density this immersion corresponds to.
How can a car service help?
In any service station of our company there are all the necessary devices and experienced specialists who will be able to check the density of the electrolyte and adjust it on the day of your call. The peculiarity of our services is that we solve technical problems on the same day of contact. In addition, services are offered at a fixed price, which allows you to pre-calculate the budget for servicing and repairing your car.
We looked at how to check the electrolyte in the battery, and what to do if its density deviates from the norm. You can find out in detail about the condition of the battery by visiting the Oiler car service center in Kyiv, having previously made an appointment on our website.