How to replace crankshaft bearings without removing the engine
The uninterrupted operation of the power unit depends on the serviceability of each individual element. If a characteristic metallic knock is noticed during its operation, this is usually caused by wear or rotation of the upper/lower sliding element. In this case, replacing the engine liner is carried out quickly in order to protect the engine from major repairs.
How to replace bearings without removing the engine?
To replace the liners successfully, it is not at all necessary to dismantle the motor. If you are assured that it is impossible to get to them without removing and pulling the engine out of the hood, urgently change the car service center. But be sure to take into account one condition - the crankshaft (CV) should not be worn out. Otherwise, you won’t be able to do without removing the engine and completely disassembling it!
Without dismantling the power unit, it is easier to change the connecting rod bearings; it is more difficult to change the main bearings. For the latter case, you need to loosen the fastenings and release the crankshaft by 10-15 cm. Although there is another method, adopted by our grandfathers from ship motorists. The main bearings are pushed out using a soft rivet or bolt, which is inserted into the desired lubrication passage and rotated clockwise. The main thing is that the size of the aluminum insert should be slightly smaller than the hole and not scratch the crankshaft.
After removing the half rings, it is imperative to evaluate their condition. If there are no visible scuffs or damage, you can get by with a simple replacement. However, if it is very worn, polishing the HF is mandatory. Therefore, you will have to remove it from the mounts, and to do this, pull out the motor.
More information about condition assessment:
- pits or pockets - fatigue wear;
- scratches and ingrained dirt - low-quality motor oil;
- worn surface - insufficient amount of lubricant;
- chamfers on the edge - taper of the necks.
Detection of crankshaft defects
Sometimes after assembly, dents, scuffs, and chips of metal remain on the sliding plane of the connecting rod and main journals. It happens that insufficient lubricant pressure is created in the system, or the oil is of poor quality.
Engine crankshaft failures occur due to overheating, oil dilution, and excessive clogging of the oil filter. A common failure is oil seal leakage, which occurs due to scratches or cracks on the part. These defects can appear in the metal due to the long life of the vehicle. Another possible reason is the lack of a mesh on the oil filler neck.
During the next oil change, unscrupulous mechanics can fill it with a dirty product containing stones, metal shavings, and pieces of metal. Due to the lack of a mesh, foreign bodies enter the oil system, causing irreparable harm. It is necessary to monitor engine oil seals for oil leaks. Don't panic if the seals leak.
Replacement of the crankshaft is carried out in extreme cases. It can be restored, fused, re-bored, and polished more than once. Even with heavy wear, the engine crankshaft will still serve for many years. Repair shafts are no different from new units. They are equipped with new piston groups, oil seals, liners, rings, and the engine will continue to operate.
Replacement procedure and marking of liners
Below are instructions for independent work. Replacing the engine liner will be faster and easier if you do it consistently.
- Place the car in a repair pit. Remove the power unit protective cover, if present. Place a jack under one of the drive wheels. Be sure to drain the engine oil.
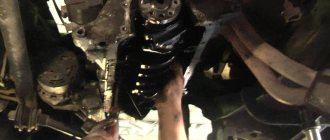
- Remove exhaust pants and other components that interfere with work from below. Also unscrew the suspensions connecting the engine to the gearbox. Loosen the camshaft chain, remove the starter, and on some cars, the beam.
- Remove the oil pan bolts, nuts and studs.
- Rotate the wheel to move the connecting rods to the most convenient position for unscrewing the bolts. They are tightened with a force of approximately 3 kg, so you need to select the appropriate tool (usually a socket of the appropriate size with an extension). After tearing off the pins, you can continue to unscrew them by hand.
- Remove the half rings along with the connecting rod caps by pulling down. Be sure to check the condition of the internal surfaces of the half rings.
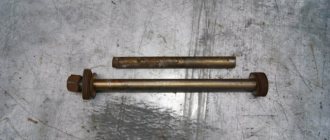
- Pull out the main bearings using a pusher - a bolt of a suitable size or rivet.
- Install a new set of half rings, tighten and reassemble everything in reverse order.
For quick installation of half rings, the connecting rod is completely raised up, moved to the side and lowered. Now nothing will interfere with the work, the sliding element can be inserted faster. Then the connecting rod is put in place.
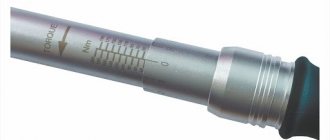
It is important to tighten the fastener bolts tightly so that they do not loosen after the car has been driven for a long time and cause a malfunction, such as spinning. To do this, tightening is carried out at a specific moment:
The connecting rod bearings are marked with numbers directly on the head. After the initial grinding of the HF, bearings with a size of 0.25 mm are installed. After the second - 0.5 mm, and after the third - 0.75 mm. The latest size is 1 cm. There is no point in processing the crankshaft further.
To ensure that replacing the crankshaft liners without removing the crankshaft is successful, it is recommended to entrust the selection of parts to a specialist. It will correctly calculate the size and you won’t have to reinstall the parts again.
Video text
Subscribe to my channel “My Leisure” where I post various videos about my life and more
Subscribe to my channel “Earning money in the village” where I breed and keep pets, and also try to make money from it.
Sometimes it becomes necessary to replace the main bearing shells on an assembled engine, and if everything is clear with the connecting rods, then replacing the main bearings becomes a rather difficult operation. But after watching this video, you can replace the main bearing shells without the slightest problem, you just need to take a small bolt or screw that will fit into the oil channel and with its head it pushes out the liner when the crankshaft is turned. If there is no oil channel in the journal, then the liner is pushed out with a thin screwdriver or a knitting needle. Subscribe to my channel “My leisure” where I post different videos about my life and not only
Subscribe to my channel “Earnings in the village” where I do breeding and keeping pets, as well as trying to make money on it.
Sometimes there is a need to replace the liners on the assembled engine and if everything is clear with the connecting rods, the replacement of the molars becomes quite difficult. But after watching this video you can replace the bearing shells of the main bearings without the slightest problems; you just need to take a small bolt or screw that will fit into the oilcan and his hat pushes the liner, when turning the crankshaft. If there is no oil channel in the neck, then the liner is pushed by a thin screwdriver or spoke.
AutoNews / Reviews / Tests
How to Change the Crankshaft Without Removing the Engine
How to change the front crankshaft oil ?
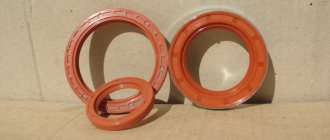
A leak in the front crankshaft oil seal is one of the most common failures associated with rubber elements included in the engine design. Oil seals are used to seal the points where the shaft exits the housing. In the case of the crankshaft, these elements are installed at the outlet holes of the cylinder block.
When is it necessary to replace crankshaft bearings?
The HF engine experiences heavy loads. Just look at the vibration on the axis, which invariably occurs during the operation of the crankshaft. It is clear that the sliding bearings also suffer, because they take the blow first.
- Physical wear is the main reason when an engine liner needs to be replaced. The surfaces of parts wear out, backlash and vibration increase. Naturally, in such conditions the engine is in danger of knocking.
- Rotation is the second reason. More details about this are written below.
Thus, replacement of liners is required in several cases. Problems can be judged by various signs. For example, by the absence or presence of abrasive inside the lubricant. Also, a symptom of half-ring wear is low interference when installing the connecting rod cap.
Regarding factors that lead to wear or turning:
- dirty or too viscous lubricant - impurities and abrasive particles reduce the properties of the lubricant, and in general its cleanliness is one of the key rules of prevention;
- constant overload of the internal combustion engine - you cannot drive for a long time at high speeds, from time to time you need to pause, slowing down to 80-90 km/h;
- incorrect installation of half rings during a previous repair - as a rule, this occurs due to weak tension (insufficient clamping torque), so tightening must be carried out using a torque wrench.
What are piston rings and their purpose
Piston rings are elastic, open elements that are installed in special grooves on the piston body.
They are made of high-strength steel or cast iron, and covered with an alloying material on top. The alloy coating further increases strength and also reduces wear rates. Typically, 3 rings are inserted into the piston: 2 compression rings (occupying the 2 upper grooves) and 1 oil scraper ring (the lower groove). The purpose of the compression rings is to prevent hot gases from breaking through along the piston into the engine crankcase. Oil scraper - removes excess oil from the cylinder mirror, preventing it from entering the combustion chamber. In addition, the rings reduce the temperature of the piston, transferring almost half of the heat from its surface to the cylinder walls.
When the piston rings no longer cope with the tasks assigned to them due to their wear, the car engine signals this by displaying the corresponding symptoms.
Signs of piston ring wear
Blue or black smoke from the exhaust pipe indicates that wear has reached a critical stage. This indicates that excess oil entered the combustion chamber past the oil scraper ring and burned there along with the fuel. Black smoke coming out of the crankcase ventilation tube indicates that the compression rings, due to wear, allow gases to escape from the combustion chamber into its cavity.
Critical wear is accompanied by a decrease in compression (the ability to maintain pressure) in the engine cylinders. This means that some of the gases formed during the combustion of the fuel mixture, which was supposed to push the piston, broke into the crankcase without performing useful work. This is what will lead to a drop in pressure in the cylinder, therefore, the engine will lose some power. Increased oil consumption is observed.
Compression is checked with a special device - a compression meter. When the nominal pressure values are unknown (there are no operating instructions), it is first measured in a dry cylinder, then a little engine oil is poured through the spark plug hole, and the measurement is made again. If the compression increases, then the rings need to be replaced. Similar signs can be observed in the case of their “occurrence”.
This problem, if the case is not very advanced, can be corrected with the help of special fuel additives. For an engine with a carburetor system, you can try cleaning it with a carbon remover spray that is injected directly into the carburetor. If removing carbon deposits from the combustion chamber has no effect, then there is only one way out - replacing the piston rings and cleaning the grooves.
Rotated liners: what does this mean and why do they rotate?
Rotating the engine bearings is a change in their position relative to the crankshaft journal or block. As mentioned above, this is caused by the colossal loads to which the parts are subjected. Shifting the bearings from their place immediately negatively affects the flow of oil. His pressure worsens, starvation begins and the power unit is destroyed. And all because the half rings are equipped with holes that must clearly coincide with the channels for the passage of lubricant.
The main reasons for cranking
There are several known reasons that cause elements to rotate:
- banal wear - the end parts of the sliding bearings wear out (support collars, stops, antennae), which are no longer able to hold the parts in one place;
- weak, incorrect fixation of the covers - the half-rings must be tightened with a certain torque specified in the passport data.
And of course, this arises due to a violation of the design operating conditions of the plain bearings themselves. In other words, due to a large and uneven load. This happens especially often with half rings with weak tension.
Rotating sliding parts can cause big troubles and therefore requires urgent intervention. The most dangerous is the shift of the main bearings. In this case, the power unit will definitely need an expensive overhaul.
It is noteworthy that when the connecting rod half ring rotates, it is simply updated. However, it is wrong to do so - because the resource of the mating connecting rod-pin pair in this case is reduced by almost 70%. Therefore, it is necessary to replace the connecting rod itself, in which a broken lock can often be found. And the most optimal method of repair is considered to be boring the crankshaft and replacing the complete liners, along with the connecting rods.
The crankshaft clamps the shaft on the liners
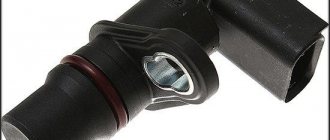
hi-electric.com What is a camshaft sensor in a car. What is a camshaft position sensor used for?
I bore crankshafts from trusted boring companies, and I don’t experience any problems when assembling the engine. But if you bored the crankshaft and the boring machine made a mistake, and the crankshaft is clamped by the liners, or, on the contrary, is very loose, then a problem arises in installing the crankshaft on the engine.
I’ll tell you how to fix it if the crankshaft is clamped by liners, both on the main journals and on the connecting rods.
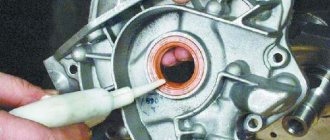
But first you need to install the liners correctly in the bed of the engine block, since if you install the liners incorrectly, the engine will jam, the photo shows how the liners should be installed correctly on a VAZ engine. But other engines also have liners installed.
Photo. Shows how to correctly install liners into the engine block.
After the liners are installed in the engine block, it is necessary to correctly install and select the thrust half-rings or rings (depending on the engine), in short, it is advisable to install or adjust the thrust half-rings so that there is no longitudinal movement of the crankshaft.
Now we place the crankshaft on the liners and insert the liners into the block cushions; the cushions must be put in their places and the liner lock must be placed to another liner lock. We lightly tighten the pillows, after all the pillows are put in place, we begin to tighten the pillows one by one, and after the pillow is tightened, be sure to try to rotate the crankshaft.
Photo. View of the foil in front of the lining between the pillows.
If, after tightening the cushion, the crankshaft is pinched and it does not turn, it is necessary to loosen the pinched crankshaft journal. This can be done with simple chocolate foil; the photo shows how to cut the foil correctly and how to place it to release the pinched crankshaft journal. It happens that one layer of foil is not enough, so add additional foil until the crankshaft begins to turn. This method is suitable for both main bearings and connecting rods. After picking up and tightening the foil, cut off the excess with a knife; the foil is placed on one side of the pillow, where there are no liner locks.
Photo. Shows how to properly place foil between pillows.
The difference between main bearings and connecting rod bearings
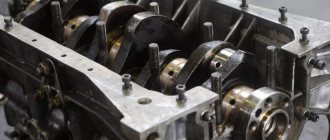
The radical semirings sit in the lower cavity of the BC. They are also located in separate beds, like the connecting rod ones. Their purpose is to facilitate smooth rotation of the crankshaft and serve as supports for it when the latter is installed in the BC of the power unit. They are in direct contact with the root journals. On 4-cylinder engines, 5 main plain bearings are usually used. They are equipped with grooves and holes for better lubricant supply.
The connecting rod bearings are installed at the very bottom of the pan. They are pressed into the connecting rod (head) caps. Mounted on connecting rod journals. Compared to radical half rings, they have a simpler design.
Specialists and experienced drivers are able to distinguish wear of main and connecting rod bearings by sound:
- the main ones knock dully, a metallic clang is heard - usually during sharp acceleration or at idle;
- connecting rod ones are almost the same, but the sound is much sharper, and the frequency of the noise increases with increasing speed.
Crankshaft grinding - how is this procedure performed?
Why is crankshaft grinding done?
Despite technical breakthroughs in various branches of science and technology, engineers and designers have not yet managed to eliminate the force of friction - the only factor that causes parts to wear out.
Due to the wear of the working surface of a large number of sliding bearings, conscientious and curious motorists are beginning to become interested in the issue of crankshaft grinding. Considering the extreme complexity and responsibility of this procedure, you can only trust grinding to a specialist who knows all the intricacies of this process, and he must own the appropriate turning equipment. The average car owner can only understand the reasons why there is a need to treat the crankshaft, and also follow the instructions that will help to take the car to a service station for engine repair as little as possible.
- Why is crankshaft grinding done?
- How is a crankshaft ground?
- How can you extend the life of a crankshaft?
Why is crankshaft grinding done?
The crankshaft (full name - crankshaft) is a part that converts the translational and rotational movements of the pistons into torque. The configuration of this mechanism is very complex. In simple terms, it is thanks to the crankshaft that you can drive a car. Without the use of such a design, not a single modern motor will work.
The main and connecting rod bearings are designed in such a way that it is necessary to use replaceable bearings made of a special alloy. When the parts wear out to a certain limit, the time comes when you need to disassemble the engine and install new liners, the thickness of which is slightly greater than the thickness of the liners that were originally installed. The journals become slightly smaller in diameter due to wear, but even then it will be impossible to fit the crankshaft on the replaced bearings.
The outer surface of the journal must be ground down until the diameter allows the crankshaft to be installed together with the newly installed liners. The process of adjusting the diameter of the connecting rod and connecting rod journals to “fresh” bearings is called crankshaft grinding. The diameter changes by tenths or even hundredths of a millimeter, and the total number of grindings is limited by the number of repair sizes of liners.
How is a crankshaft ground?
Domestic cars are an unlimited field for testing your capabilities regarding independent repair of any parts.
There are procedures that are impossible to perform, even if your garage is well equipped. Crankshaft grinding falls into the category of such impossible procedures, since to perform the work and obtain the correct result, you need to use special high-precision lathes with a complex design. Among other things, the mechanic who performs grinding must have special skills, which a person receives after undergoing special training. In order for the work to be done efficiently, the worker must be sufficiently experienced. You, as a car owner, will also not have to sit on the sidelines, since you will have to do the following: 1) Free the engine of all attachments, even from the gearbox and clutch with the flywheel;
2) Remove the engine from the engine compartment;
3) Unscrew the caps of the connecting rod and main bearings after the engine sump is opened;
4) Remove the covers and liners, and then dismantle the crankshaft;
5) Clean the crankshaft and then take it to a specialist.
To carry out grinding work, a special-purpose machine is used that allows you to change the axis of rotation. The grinding process must begin either with the processing of the connecting rod journals, or with those main ones that have worn out the most. Once the maximum amount of journal wear has been measured, the size to which boring will need to be determined will be determined. After balancing has been completed and the journals are aligned strictly along the axis of rotation, the outer surface of the journals must be machined to the required size. Upon completion of the crankshaft treatment, it must be washed, and the lubrication channels should be especially thoroughly cleaned. You can do this work yourself.
How can you extend the life of a crankshaft?
If you have already encountered the need to carry out this procedure, then you know exactly how expensive this operation is.
You also need to completely disassemble the engine, which also requires certain financial costs. Even if you indicate that the repair needs to be done urgently, you will not be able to use the car for several days, and after the repair is completed, there will be a break-in period when the driver needs to be extremely careful. In order not to enter the area of this rather complex repair work, you can choose one of two ways: every time the crankshaft wears out to a certain limit, buy a new car or carefully use an existing vehicle. For many reasons, the driver can directly influence the operating time of the engine. In order to avoid going to a service station for as long as possible, you just need to follow these simple rules:
1) Use your machine carefully, do not allow the engine to overheat, do not create excessive loads on the machine;
2) Replace engine oil and filters on time, and the oil must comply with the recommendations of the machine manufacturer;
3) Select oil additives carefully;
Selection of crankshaft liners
In most cases, the selection is entrusted to a specialist. But after studying the information in detail, you will be able to do this on your own. In addition to the fact that it is necessary to combine spare parts with the car model, the general condition of the vehicle is also taken into account.
Selection of main liners
Some useful recommendations for selecting a new HF when replacing the crankshaft liners:
- it is better to buy basic elements of the same color as the standard ones (used, old);
- Be sure to check the markings directly on the shaft.
A special identification color selection card is issued for main bearings. For example, for a 4-cylinder engine, the markings applied to the BC and the CV assembly are used. If marked C3, then you can install yellow and green elements. More details about the colors in the picture below.
And this is an identification card for 6-cylinder engines.
Selection of connecting rod bearings
And here, if the HF is new, the plain bearings are selected according to the diagram. If the color code is lost, you need to look at the markings on the connecting rod caps.
Below is an identification card for selecting connecting rod half rings for four-cylinder power units.
And this is the color map for 6-cylinder units.
The choice of bearings also depends on the antifriction coating. As a rule, it consists of several layers:
- biometallic with a steel base (1-4 mm) - lead, copper, zinc, tin, silicon and aluminum;
- trimetallic - lead, tin, copper.
Use the correct engine oil that meets all the requirements and approvals of the engine manufacturer. It is also necessary to update the filter promptly to prevent abrasive particles from entering the lubricant. It is also not recommended to overload the engine. All this will extend the service life of the liners by almost 2-3 times.
To bore the crankshaft or not
Now you need to determine whether the crankshaft should be bored or not, pay attention to the crankshaft journals, marks and wavy grooves are visible on the journals, run your finger along the journal, if marks and grooves are visible on the journal and by running your finger you will feel the slightest waviness, don’t even think about it, take it to boring crankshaft. But don’t buy liners for the crankshaft right away; after boring, the driller will tell you which liners to buy, as it happens that due to excessive wear on the crankshaft journals, they bore two sizes larger
Photo. Heavily worn-out crankshaft journal of the Volga
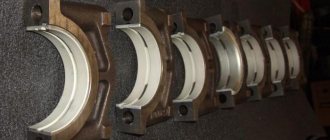
It rarely happens that the crankshaft journals look good, pay attention to the main bearings and if you see shiny abrasions on the bearings, this indicates that the crankshaft is weakened and has a large gap, and hanging in the bearings it fills with shiny strips
Photo. Liners with signs of heavy crankshaft wear
But don’t get confused, shiny stripes on the liners may also appear when installing the crankshaft when tightening the cushion with the liner, when the crankshaft becomes clamped and barely turns or jams. In this case, firstly, the grinder made a mistake when grinding the crankshaft, secondly, debris got under the liner, so when installing the liners, carefully wipe the beds (the place where the liner is installed is called the bed).
If you simply replace the liners without grinding the worn crankshaft, then it’s like throwing money away; the effect will be zero. Also, if the engine had very low oil pressure before the repair (the pressure light is on at idle), this already indicates that it is necessary to bore the crankshaft for repair bearings.
It’s better not to be lazy and take the crankshaft for boring, and pay a little extra money, than to simply replace the bearings.
You can't fool iron!
Using these tips, you can easily determine without a micrometer whether you need to grind the crankshaft or not.