How to remove the hub from the steering knuckle on a VAZ 2109
- Tools and equipment
- Work sequence
Removing the wheel hub is necessary to replace a failed bearing and requires certain plumbing skills and special tools. The bearing does not require adjustment during installation and installation work can be carried out independently.
In order to remove the hub on a VAZ-2109, the car must be placed on an inspection hole or a flat area, braked with the parking brake and installed bars or wheel chocks under the rear wheels. You also need to prepare stands for the car body.
In what cases is replacement required?
Given that the service life of the hub bearing on the VAZ 21099 is designed for several years, the need to replace it may arise much earlier than expected. The reason for this may be driving on bad roads, sharp turns at high speed, or dirt and moisture getting into the mechanism. And, of course, the greater the mileage of the car, the higher the percentage of probability of bearing failure.
When a bearing fails, the following signs of its malfunction are observed:
- whining sound when turning a wheel;
- when driving on a straight road, a crunching sound is heard from the side of the wheel and in the passenger compartment;
- There is a vibration in the steering wheel. Usually this indicates a pre-failure condition of the bearing as a result of its severe wear;
- while driving, you feel that the wheel is moving to the side;
- When you rock the wheel with your hands, clicks will be heard.
The need for a new bearing exists when play and extraneous noise appear. If the bearing is installed incorrectly, it will be sufficient to dismantle it and reinstall it in the correct position.
? Replacing the wheel hub of a VAZ 2109 with your own hands
Usually the hub is dismantled to replace the bearing. The decision to replace the hub is made after dismantling the bearing and inspecting the part.
Replacing the hub on a nine with your own hands
The sequence of work is as follows:
1. At the initial stage of work, the car should have its wheels on the ground. We fix the wheels from turning - we install shoes under them, and engage the gear. Remove the hub cap.
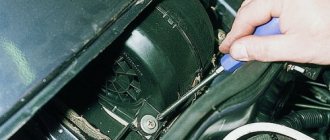
2. Using a socket wrench, unscrew the bearing mounting nut 1-2 turns (photo 1). We jack up the front (or rear) of the car until guaranteed gaps appear between both wheels and the ground. The wheels must be raised so that the anti-roll bar does not affect the suspension components and does not interfere with dismantling.
3. Dismantle the wheel, brake pad guide with caliper. After dismantling, the removed components should not hang on the brake hoses; they must be tied up.
4. Remove the already loosened nut and washer.
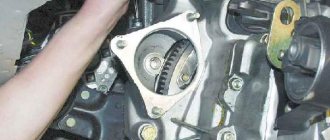
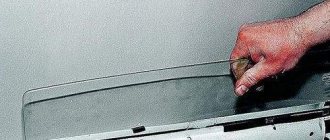
5. We dismantle the hub with a special puller or improvised means, for example, using a brake disc and bolts (M12x1.25, L=130 mm). To do this, we need to assemble them in accordance with photo 2. The bolts are installed in the holes of the brake disc and screwed into the threaded holes hubs. You need to hit the bolt heads with the brake disc several times and remove the hub.
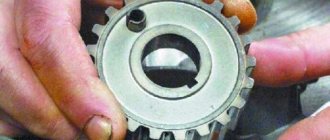
6. Due to the tight fit, the inner race of the bearing remains on the hub. To remove it, you need to use a special puller (photo 3) or a chisel (photo 4).
7. Inspect the hub, remove nicks and nicks with a file.
8. To dismantle the outer race of the bearing, it is necessary to remove the retaining ring with pliers (Photo 5) and remove the outer ring with a special puller (Figure 6).
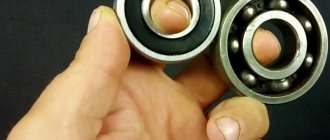
9. We check the hub by installing a new bearing on it. If the bearing fits easily, the hub must be replaced due to wear.
Thanks for subscribing!
10. Clean the seat of the outer race in the saddle and lubricate it. We press the bearing into the seat with a special puller, which transfers the force to the outer race (photo 7). You can mount the bearing with a hammer and drift, but you must have experience in such work.
11. Fix the outer ring with a locking ring (photo 5).
12. Press the hub into the bearing using a special device (Figure 8).
13. Reinstall the removed parts and components in reverse order. Tighten the bearing mounting nut to the torque specified in the technical requirements of the vehicle.
The front wheel bearing on front-wheel drive VAZs is changed in the same way as on most front-wheel drive foreign cars, because they use bearings of the same design. The bearing fits tightly into the steering knuckle housing, is fixed with a stopper on both sides (there are special grooves in the steering knuckle for retaining rings), and the hub is inserted into the bearing with an interference fit. The hub is not attached to the bearing in any way; it is held in place by a CV joint, which is inserted on one side of the hub and screwed on the other, thereby preventing the hub from coming out of the bearing.
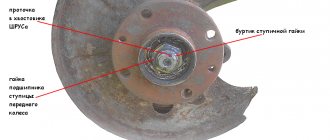
In order to replace the bearing, you must first remove the hub from the car. Before lifting the car on a jack, we tear off all the external bolts; unscrew the hub nut (number 14044271 in the picture) and the wheel mounting bolts, lift the car on a jack and remove the wheel. Now the entire assembly is in full view. All that remains is to stick out the steering knuckle along with the hub and wheel bearing, and perhaps even the entire strut assembly, and disassemble it. If you remove the steering knuckle from the rack, you will definitely need to do a wheel alignment, since all the angles will be broken, if you do not disconnect the rack from the steering knuckle, the bearing will be more difficult to remove, so it’s up to you to decide what to do in this situation.
Removing the steering knuckle
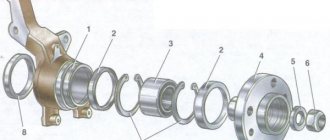
To remove the steering knuckle, you need to disconnect everything unnecessary. In this case, we need to remove the brake mechanism completely and disconnect the steering rack tip. After this, unscrew the steering knuckle from the ball joint and strut. The CV joint will stick out on its own, it is already unscrewed. The figure below shows all this schematically.
Now that the steering knuckle is assembled, let's start disassembling it.
- Unscrew the protective cover from the steering knuckle
- Unscrew the brake disc if you haven't already done so.
Now you need to pull the hub out of the bearing. The hub is not secured by anything; it is held only by the tension in the bearing. Usually the hub is simply knocked out, that's what I've always done. One person holds the steering knuckle, the second hits the hub with a hammer through the spacer, and after several blows the hub flies out. If only the hub came off, congratulations, you're in luck. Usually in 90% of cases, the inner part of the bearing remains on the hub, which is stuck to the hub, but it’s okay - it can be removed with a chisel.
What tools will you need for the job?
When replacing a bearing, the following tools are used:
- Bent type socket wrench, or extended head or socket wrench. Using one of these tools, the nut on the wheel hub will be unscrewed.
- Punch or thin chisel. They will come in handy if you need to bend the edge of the hub nut.
- Two-legged puller - in order to remove the inner bearing race from the wheel axle.
- Three-legged puller. The hub is removed from the wheel axle using a puller.
- Key according to the type of pin. To remove the pins holding the brake drum.
- A 13-14 wrench for unscrewing the nut on the parking brake.
- Puller-pliers. Assistant in reinstalling the retaining ring.
Additionally, you may need a hammer and a container for parts.
How to replace the front wheel bearing of a VAZ 2109 yourself
To replace the front wheel bearing of a VAZ 2109, you need to remove the steering knuckle from the car. How to do this is described in the article: Replacing the front hub of a VAZ 2109. Then we proceed to replacing the front wheel bearing of a VAZ 2109, to do this we perform the following procedure.
We press the hub out of the inner race of the bearing using a drift. The wheel hub is equipped with a double-row ball bearing, which does not require adjustment or lubrication during operation. When the hub is pressed out, the bearing is destroyed. Therefore, we press the hub out of the steering knuckle only to replace the bearing.
If the outer part of the inner bearing ring remains on the hub, press it with a puller. For ease of dismantling, there are special recesses on the hub.
Remove the retaining rings on both sides of the steering knuckle.
Using a mandrel, press the bearing out of the steering knuckle.
We install the outer retaining ring, having thoroughly cleaned it before doing so.
We press the new bearing into the steering knuckle using a mandrel. If there are no mandrels, you can use the rings of the old bearing.
Press in the bearing and hub only using a press or in a vice.
Do not drive the bearing with a hammer - this will lead to its destruction.
When pressing a bearing, force must be applied only to its outer ring, otherwise the bearing may be damaged.
Install the inner retaining ring.
Using a mandrel, press the hub into the inner ring of the bearing.
After replacing the bearing, install the steering knuckle in place. How to do this is described in the article linked above.
Causes and symptoms of hub wear
You will have to replace the front wheel bearing if you notice several signs of wear.
Sign
Your actions
This may manifest itself as wheel swaying. Play can be caused by loss of efficiency of both the hub itself and its bearing.
When driving, you may hear strange, extraneous sounds coming from the wheels. As the speed increases, the hum only increases, but after that, when the speed decreases, the noise remains at the same level. If the hum comes from one side, then the hub and bearing should be replaced only on that side. If on both sides, then replace both
Fast bearing heating
A rather dangerous diagnosis that leads to overheating of the calipers. As a result, they also fail. Plus, the brake fluid begins to boil faster, which leads to brake failure. Therefore, the problem should be corrected immediately
Checking the bearing for play
Diagnostics of the play will allow you to determine whether it is necessary to remove and replace the wheel bearing, or you can correct the condition of the unit and calmly continue to operate your VAZ 2109 for some time.
Checking for play
Checking the front wheel bearing play is a simple task that even a beginner can handle. It’s not worth going to a service station and spending money.
By following the instructions, you can easily determine the backlash.
- Raise the vehicle high enough so that the wheels are off the ground. You'll need a good jack.
- If there is an inspection hole, then you can do without a jack.
- Bleed the wheel. It is important to hold the wheel on both sides and clamp it as firmly as possible. You need to swing away from yourself in the same direction.
- If a slight play is felt, try tightening the bearing nut more firmly. Sometimes, while driving on bad roads, it loses its grip, hence the backlash.
- If tightening the nut does not help, you will have to replace the hub or bearing.
- It would be a good idea to check for play by swinging the wheel in different directions, pressing the wheel towards you with one hand, and shaking it away from you with the other.
- If such a swing shows that there is play, the culprit is no longer the bearing and hub, but the steering tips. They need to be replaced.
- Replacing the upper ball joint will be necessary if you pull the wheel with emphasis on its upper part and detect play.
- Pull the lower part already. Play indicates the need to replace the lower support.
Replacing the front wheel hub bearing of VAZ 2108, 2109, 21099 cars
The service life of front wheel hub bearings on VAZ 2108, 2109, 21099 vehicles and their modifications is within 40-60 thousand km. Depending on the operating conditions and the quality of the part, it may vary up or down.
In any case, after a characteristic hum appears when the car is moving from one or both front wheels, it makes sense to check the condition of the hub bearings and, in case of malfunction, replace them.
Necessary tools, fixtures and parts
— New front wheel hub bearing and new hub nut
It is recommended to replace the bearings on both front wheels at once, but based on practice, you can replace only one, the one that is humming.
— Wheel bearing puller (cup or other design)
Before carrying out work, it is imperative to acquire this puller, which will allow for a high-quality replacement of the bearing.
— Retaining ring remover
— Key or head on “17”
— Chisel and hammer
— Two bolts 10-15 cm long in diameter equal to the wheel bolts
Preparatory work
Using a punch or a screwdriver, bend the edge of the nut jammed into the groove of the outer CV joint shank. Use a 30mm socket with a wrench or a socket wrench to loosen the hub nut.
How to unscrew the wheel hub nut of a VAZ 2108, 2109, 21099 car
— Jack up both front wheels of the car
When the front of the car is raised, the anti-roll bar will not press the suspension parts, which will make it easier to replace the wheel bearing.
— We remove one of the front wheels.
— We clean the suspension elements from dirt
— Remove the brake disc
— Disconnect the tie rod end
— Remove the shank of the outer CV joint from the steering knuckle
To do this, we disconnect the ball joint (unscrew the two bolts of its lower fastening with a 17 key), finally unscrew the hub nut (there is a washer under it) and move the strut with the steering knuckle to the side and remove the CV joint shank from the hole in the bearing.
The procedure for replacing the front wheel hub bearing on a VAZ 2108, 2109, 21099
Removing the front wheel hub
Reattach the ball joint. Using two bolts 10-15 cm long, we fasten the wheel disk (or brake disc) with the back side to the hub, so that it has free movement along the bolts. We move the disk towards ourselves with a sharp movement and remove the hub.
Removing the front wheel hub using two long bolts and a disc
If you have a special puller, you can remove the hub using it. Remove the mud ring.
Remove the inner bearing race from the hub
We clamp the hub in a vice. Using a chisel and hammer, slide the ring along the hub and remove it. If necessary, we clean out the nicks on the hub using a small needle file. We install the mud ring and seal it on the hub.
Remove the bearing retaining rings
We use a retaining ring remover (pliers) and remove the front and rear retaining rings located in the grooves of the bearing mounting hole in the steering knuckle.
Pressing out the front wheel bearing
We use a special puller. At the same time, we rest the puller against the outer ring of the bearing. After pressing out, clean the bearing mounting hole in the steering knuckle. We clean the grooves for the bearing retaining rings.
Pressing the new bearing into the steering knuckle
Pre-install the rear retaining ring into the steering knuckle. When pressing, the puller should again rest against the outer ring of the bearing. Press it all the way into the retaining ring. After pressing, install the outer retaining ring of the bearing.
Press the hub into the bearing
When pressing, the puller must rest on the inner race of the bearing.
Reinstall all removed parts
Having disconnected the ball, we move the strut to the side and insert the CV joint shank into the bearing hole, attach the ball, put a washer and a new hub nut on the shank. Tighten the nut with a small torque. Attach the tie rod end. Install the brake disc. Install the caliper. Install the wheel and lower the car. Tighten the hub nut to a torque of 226-247 N.m. We fill its edge into the groove of the CV joint shank. Tighten the wheel bolts.
If necessary, we replace the hub bearing of the second front wheel.
Notes and additions
— The above describes the procedure for replacing the front wheel bearings without removing the steering knuckles from the car. There is also a way to replace the front bearings by removing the steering knuckle or the entire front strut. It should be taken into account that when separating the steering knuckle from the rack, the alignment angles of the front wheels will be disrupted. Therefore, before unscrewing the bolts securing the steering knuckle (also known as camber adjustment bolts) to the strut, their position should be marked.
TWOKARBURATORS VK -More information on the topic in our VKontakte group
Sequencing
- The hub nut is loosened using a 30mm socket and a wrench. After this, use a 22mm socket to slightly loosen the mounting bolts on the wheel.
- Wheel chocks are installed under the front wheels, and the car is in first gear. After this, the rear wheel with the faulty bearing is jacked up and removed.
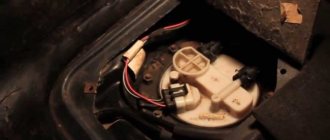
Brake drum cover visible
Removable using a 12mm socket
Removable using a puller
To do this, a puller or pipe is used.
The same puller is used to press a new wheel bearing into its place, after which the hub is reassembled and the wheel is installed in place.
The retaining ring is visible above the orange bearing.
Video: How to remove and replace a VAZ 2109
Bearing selection
To replace a wheel bearing, you will need to know about its parameters, dimensions, and characteristics specific to the VAZ 2109.
For the “nine”, a double-row angular contact roller bearing with tapered rollers is used. Axial clearances are pre-adjusted and filled with lubricant. Closed bearing type.
Based on the table, you can find the optimal bearing for the front hub of your car.
Parameter
Required indicator
Limit speed
Replacing the front wheel bearing of a VAZ 2109 - first steps
Regardless of the replacement method, the initial operations will be similar:
- Before putting the car on a jack, it is recommended to loosen the front hub nut.
- Then loosen the front wheel mounts.
- After removing the wheel, unbend the locknut collar.
- Next, tighten the bolts that hold the caliper, top and bottom, one at a time.
- Then use a screwdriver to straighten the pads in the caliper.
- We hang the caliper or move it to the side. Further operations will follow, based on the specific replacement option.