Removing the gearbox on a VAZ 2109 is necessary, first of all, when replacing the clutch, repairing the gearbox, eliminating a leak in the rear engine oil seal or the front gearbox oil seal. Also, removal is not necessary when replacing the release bearing and replacing the front starter bushing (if it is impossible to do the work directly on the car).
Although the weight of the box is relatively small (about 27 kg - without oil), it is still recommended to use the help of an assistant. Removal must be done on a “pit” or a lift.
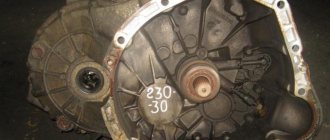
Removing the VAZ 2109 gearbox
First of all, you need to remove the mudguard and engine crankcase protection (if installed).
drain the oil from the box, remove the drive nuts and wheels. If removal takes place in a pit, it is necessary to jack up and hang the front part of the car on trestles or other reliable stands. Be sure to disconnect the battery terminals. The next order is:
- remove the clutch cable
disconnect the speedometer cable;
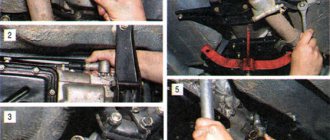
— with the car raised, unscrew the ball joints (it is recommended to unscrew the two bolts securing the ball joint to the “knuckle”);
— tear off and remove the left longitudinal brace;
- with the help of an assistant, pull the drive out of the box - one pulls the inner grenade with a pry bar
(to prevent disassembly of the drive in another place), the second one sharply pulls the wheel, pulling the drive out of the box (after removing one drive, in order to avoid turning and scattering of the differential, it is necessary to insert a special stopper or an old grenade into the box);
— unscrew the central nuts of the drives and remove them;
- remove the starter,
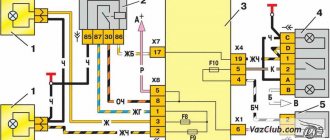
disconnect the ground wire
and reverse speed sensor connector
from the box, flywheel protective cover from below
and disconnect the gearshift link (having previously marked the position);
— then unscrew one by one the four mounting points of the gearbox to the engine;
— it is imperative to fix the engine by supporting it through a hydraulic jack from below, or by hanging it, resting it on the spar cups;
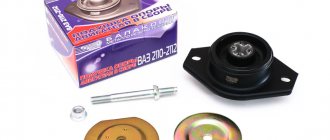
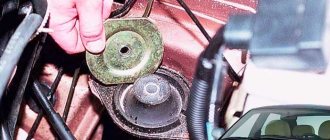
— holding the box, unscrew and remove all the supports (“pillows”) securing the gearbox to the body;
— together with an assistant, slightly shaking, try to move the box away from the engine; it needs about 10 cm for the input shaft to come out of the clutch disc and basket;
- When removing, be careful not to damage the clutch basket petals with the input shaft.
Removing the gearbox + removing the clutch
Well, to test my theory, you need to remove the checkpoint in any case.
To do this you needed:
— disconnect the starter and the wires going to it; — clutch cable; — remove the battery; — remove the flywheel shield, it is secured with 3 bolts; — disconnect the speedometer cable; — disconnect the minus from the gearbox; — pour the oil out of the gearbox, but I didn’t succeed because... The plug on the gearbox did not unscrew; I drained the oil through the CV joint attachment points.
— remove the hub nuts, unscrew the ball joints of the front wheels, pull the front wheel drives out of the gearbox (in my later practice, I did not unscrew the hub nuts, and for good reason); — disconnect 2 engine mounts (rear and left), while the engine must be supported by something, I put a jack on the 2nd one.
Engine on jack
+ the engine was wrapped with a safety rope, just in case, to maintain balance, because the engine remains supported on the front cushion and on the cushions holding the muffler.
Engine safety cable
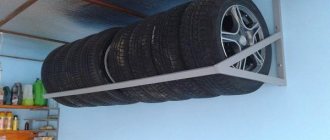
— and finally unscrew the 3 bolts and nut that connect the box to the engine. — as a matter of fact, you also need to unscrew the left lever for convenience, but we didn’t remove it. — to remove the gearbox, it’s best to support it from above with a cable at the eye, I don’t know why it’s made there, but it’s attached to the connection of the gearbox itself. It is also recommended to place a tire underneath to soften the descent of the gearbox, preferably with a small width.
I’ll add on my own that it seems easy to take off, but if you’re doing this for the first time, you can get a little carried away with some things. I rented the box with a friend around 5 o'clock.
Removed box
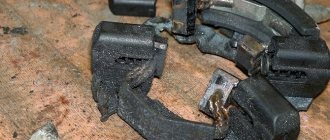
After removing the gearbox, it was noticed that the disc was intact, worn, but not critical
Clutch disc
The basket also has some wear.
Basket
Has a collar
Most likely the problem was with the release bearing, I remained of this opinion at the time of removing the gearbox.
Also on this day, my friend and I dismantled the left wheel drive. That is, they removed the CV joints (one because it came off on its own - it’s the outer one, its retaining ring broke.
and we removed the internal one, because When removing the gearbox, a technical plug was required). So, on the same day I managed to wash them and leave the assembly for the next day, because... It was too late
The next day (October 18), we made marks on the flywheel so that we could position it correctly, and removed it by unscrewing 6 bolts
and noticed that the rear crankshaft oil seal is leaking, well, of course, it needs to be replaced
We removed the rear cover and cleaned it, thereby preparing it for the installation of a new oil seal and a new gasket that secured the cover to the engine. They also cleaned the gearbox, so that it would be easier for me to sort through it in the future.
Also that day we went to the store and I bought the necessary spare parts:
— clutch assembly (releaser, clutch disc, basket) — clutch cable — 2 inner CV joint seals — clamps for 1 inner CV boot and a new boot with clamps for the outer CV joint — 4 CV joint for 2 CV joints — Varnish, paint, primer and rust converter for the wing - mastic to coat the body under the wing and the wing itself on the same side. - new transmission oil - Wd-40, sealant, new fasteners for the fender (7 brackets and 7 bolts) - and a cover for the clutch fork, as it later turned out to be for a 4-speed gearbox, but oh well, it costs a penny. - rear crankshaft oil seal
Installation
The VAZ 2109 manual transmission is installed after all problems and defects have been eliminated.
It is necessary to make sure that all components and parts are in good condition (clutch disc, basket, release bearing, etc.), check the alignment of the clutch kit, and lubricate the splined connection of the input shaft and the release bearing flange. When installing the gearbox, you must use the help of an assistant and perform the following steps:
- lower the engine, fixed with a jack or brace, by 10-15 degrees;
- lift and insert the box as far as it will go (it is unacceptable to tighten the box and the engine with bolts; you must manually achieve a tight fit of the gearbox close to the engine);
- tighten the four main fastening points and install the gearbox support;
- put on and adjust the clutch cable (the clutch pedal should be 1 centimeter above the brake pedal);
- install and connect the starter and reverse speed sensor;
- install flywheel protection, speedometer cable and ground wire;
- connect and adjust the gear shift mechanism (put it on the mark or put the gear selection lever in “neutral”, to first speed);
- assemble the chassis (insert the drive, screw on the ball joints, install braces);
- lower the car onto the wheels, tighten them and the central drive nuts (force 23 -25 kg/m, approximately 1-1.5 m lever length);
- Fill the oil up to the level.
What is a box and what is it for?
Let's figure out what it is and what it is intended for:
- A gearbox is needed to convert (change) the rotating (torque) moment that is transmitted to the drive wheels
- And also change the direction of torsion (rotation) of the wheels (providing reverse motion of the car)
- In addition, the gearbox makes it possible to disconnect the driveshaft from the crankshaft (and drive wheels)
- When the engine itself is idling (during starting, warming up and coasting)
- Manual transmission - as in our case (has an abbreviated name - manual transmission, as well as a common name - mechanics)
- The mechanics is a kind of multi-stage cylindrical gearbox, which provides for manual gear shifting
- According to the number of steps, four-speed, five-speed, six, seven and more speed gearboxes are distinguished (reverse gear is not taken into account)
- The main advantages (advantages) of a manual transmission are the simplicity of its design, operational reliability, the ability to be controlled manually in all driving modes and an affordable price.
- It is thanks to these qualities that the manual transmission is the most common type among gearboxes today.
What tool will be needed to remove
It is better to remove the box in a garage with a pit or on an overpass. If it is not possible to use a pit, then you will need a jack and stands to fix the car at a certain height. It will be quite difficult to do without an assistant, so it is better to agree with a person in advance.
You will also need:
- a set of keys;
- mount;
- rags;
- container for draining oil (at least 5 liters).
It is better to prepare all the tools in advance. In addition to wrenches, you will also use spanners. The rotating head will make removing the gearbox easier and simpler. It is also necessary to secure the car in a certain way so that there is access to the protection casing from below.
How to Remove the Box on a VAZ 21099 ~ VESKO-TRANS.RU
Installation and service of the VAZ 21099 box
The VAZ 21099 gearbox is presented in this car in different configurations. This device can have 4 or 5 stages.
Design features
Every VAZ 21099 owner should know:
- how to remove the box;
- what are the features of this device;
- what is the switching pattern?
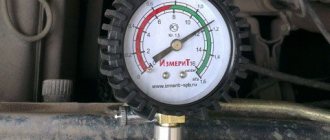
Auto mechanics advise using motor oil for the gearbox when driving a VAZ 21099 around town. There are several reasons for gearbox failure .
The appearance of noise in this device may be due to wear of teeth, bearings, or a decrease in oil level.
Gearbox repair involves adding oil and replacing failed parts.
If difficulties arise as a result of shifting gears, you will need to determine the cause of the breakdown:
- incomplete clutch release;
- deformed traction;
- loosening the screws securing the hinge;
- failed drive elements.
Such problems are resolved as follows.
- Straightening or replacing traction.
- Tightening the screws.
- Drive setup.
- Replacement of damaged elements.
Main works
If the VAZ gearbox does not work well, then it must be repaired. Often this procedure is carried out due to wear of the forks and gear shift rods. This leads to spontaneous switching off of gears. Auto mechanics include the following reasons for such a breakdown:
- presence of damaged or worn teeth;
- cracks or delamination of rubber elements;
- incorrectly adjusted gear shift drive.
To eliminate the above reasons, the following actions will be required.
- Replace damaged elements.
- Set up the drive.
- Install the cover.
If there is a crackling or noise when shifting gears, then check the clutch and locking ring. Often the last part is replaced by a new element. Auto mechanics identify several reasons for oil leaks in the VAZ 21099:
How to remove the VAZ 09 gearbox?
A box buzzed downhill
, rolled down the hill, turned on the first buzz, the back one buzzed. Brought home...Rozobr...
Read also: How to Remove the Ignition Switch on a BMW E39
Removing and installing a gearbox, How to quickly change a VAZ 2109 gearbox
our VK group our group in Odnoklassniki.
- wear of oil seals and rod;
- sealant damage.
These problems can be resolved in the following ways:
- replacement of seals, gaskets and other elements;
- tightening fasteners.
It is necessary to take into account that when repairing a gearbox, 1 device is changed by selecting the adjusting rings of the differential bearings.
Installation rules
Before you begin repair work, you need to figure out how to remove the gearbox. This device is disassembled to diagnose it. The gearbox is dismantled in a certain sequence. First, disconnect the battery terminals and drain the oil.
Then the crankcase protection is removed. The next step is to disconnect the ground wire. After loosening the nuts, the cable end is removed. Then the wire is disconnected from the relay and the starter is dismantled.
The finger is pulled out from the corresponding lever. The hinge is disconnected from the fist of the first element. The next step involves dismantling the CV joints. To do this, the first element is squeezed out and moved away from the gearbox. Then 2 CV joints are disconnected. The final stage is dismantling the gearbox .
Auto mechanics recommend moving the gearbox to a horizontal plane before performing this procedure. This procedure must be carried out without damaging the clutch spring petals.
Useful tips
It is extremely important to monitor the serviceability of the gearbox, and if signs of breakdown are detected, fix them immediately. Do it yourself or with the help of a car service - this is your personal decision.
When operating a car in city conditions, you have to change gears more often. Therefore, it is recommended to use motor oil here. This ensures that the synchronizers remain effective longer. Transmission oil is better suited for highways, increasing the life of bearings and gears, although the synchronizer lasts less.
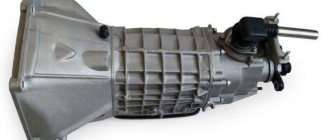
Internal structure of the box
Dismantling
To dismantle the box, we recommend that you rely on the instructions, strictly follow the sequence and reinforce your skills with visual videos.
- Disconnect the negative terminal from the battery and drain the oil from the gearbox system.
- Unscrew the bolts that hold the crankcase guard in place and remove it.
- Disconnect the ground (wire) from the clutch housing.
- At the end of the clutch cable, loosen the tension on the nuts slightly.
- Remove the cable end from the clutch lever.
- Disconnect the block from the traction relay.
- Disconnect the wire going to the starter traction relay.
- Dismantle the starter itself directly.
- Disconnect the drive rod from the joint tip. We are talking about traction, which switches gears.
- Disconnect the cable from the car's speedometer drive.
- Unscrew the tie rod ball joint.
- Remove and press the steering rod hinge pin out of the strut swing arm.
- The shank of the inner CV joint of the front wheel drive should be pressed out and moved to the side.
- Disconnect the second CV joint.
- Remove the clutch housing shield.
- Release the gearbox from the fasteners holding it to the engine.
- Remove the box.