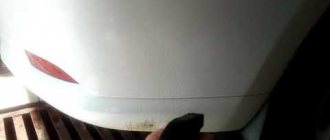
Not a single car is insured against body damage or paint chips. Defects not only do not look aesthetically pleasing, but also contribute to the appearance of corrosion in damaged areas of the body. Special polishes, aerosols, and pencils will help cover up, paint over, and disguise the chip. Let's look at how to remove chipped paint on a car body and hood. Timely removal of damage will extend the life of the car and protect the body from corrosion and premature destruction.
Simple body paint repair: tips
Professional body painting is expensive, but in some cases, with trouble-free operation, minor damage to the paintwork can be repaired on your own. Chips from stones, small scratches - all this is an integral part of any car if it is used and not stored in the garage as a relic.
It is important to know that damage to the paintwork on a car not only looks sloppy, but also carries the risk of rust, especially if the chip is deep and reaches the metal. Even very small damaged areas can be susceptible to corrosion. And as soon as rust appears on them, it can spread quite quickly (especially in the rainy off-season or “salty” winter with reagents) and expensive repairs simply cannot be avoided.
Therefore, any owner who cares about his car should, and in our deep conviction is obligated, to monitor such “little things” as damage to the body.
Even if at first glance they are frivolous and unnoticeable. see also
Recommendations for removing scratches from a car body yourself
But before you take a brush from a bottle of paint with the right color, it is important to arm yourself with some knowledge so as not to spoil the paintwork. Let's talk today about what you should focus on when repairing paint.
Preparation stage
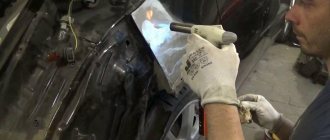
We will carry out the work on a Volkswagen Caddy. It has paint chipped around the rear door handle. We will not go into detail and show how this handle is removed. Let's move on directly to masking defects.
When should paint damage be repaired?
photo: autobild.de
The paint consists of several layers. If only the clear layer is damaged, the scratch can usually be sanded out. Sanding can be done either with a polishing wheel or by hand. In the second case it will simply take longer.
see also
How to paint your car yourself: Detailed instructions for action
The paintwork of a car consists of several layers. It is known that under the transparent coating (the outer layer of paintwork - varnish) there is a primer and, if you're lucky, galvanizing.
photo: popularmechanics.com
Layers of paintwork in section: varnish, paint, primer.
As long as small scratches are located exclusively in the area of the surface layer - clear varnish, they can be removed by careful polishing or a special scratch remover. But as soon as a chip or scratch penetrates into the underlying layers: paint, into the ground, or reaches the metal, nothing can be done with ordinary polishing.
photo: popularmechanics.com
Damage to the varnish.
Exaggeratedly speaking, depending on the depth of the damage, it is necessary to sand the area, treat it with a small spatula and paint it. For deeper scratches, more detailed work is required.
photo: popularmechanics.com
All layers down to the metal are damaged.
photo: flickr.com
Reasons for the appearance of defects on the car body
Scratches and chips on the paintwork of a car body are not always too obvious, but such damage can have an extremely negative impact on the condition of the vehicle, which is explained by the rapid development of corrosion areas on the metal.
Chips affect the varnish and base enamel down to the primer
The main reasons for the formation of chips on the car body are almost any external mechanical influences, which most often arise as a result of violations of parking rules or road accidents.
Defects in newly completed coatings arise as a result of:
- incorrect choice of paints and varnishes;
- poor-quality degreasing or application of paint on contaminants;
- lack of elimination of irregularities on the painted surface;
- violations in the technology of applying putty compounds;
- incorrect proportion of mixed materials;
- faulty compressor or spray gun.
Stones, branches and any other debris flying off from under the wheels of cars passing nearby can also damage the integrity of the body covering.
The faster you drive, and the shorter the distance from another vehicle, the greater the likelihood of chipping due to stones and other debris.
How to paint over a damaged surface yourself?
Important! Despite the fact that competently carried out independent repairs are the best choice in terms of price/quality ratio, it is worth understanding that it will not be possible to repair paintwork in the same way as a professional painter. And there are three important reasons for this:
1. Lack of appropriate materials for painting;
2. Lack of necessary professional equipment (for example, a spray gun) and space (boxes with high-quality ventilation, drying chambers, and so on);
3. Lack of relevant knowledge and experience. Despite the fact that painting damage with a miniature brush seems like a simple task, it is very easy to make it worse than it was if you didn’t know, and with an inexperienced hand.
Therefore, before starting work, it is necessary not only to practice, as they say, “on cats,” but also to know what needs to be done and why, in theory.
see also
How to remove scratches on a car
Attention: parts to be painted must be cleaned and degreased in advance. To do this, it is best to use a silicone remover or a degreaser like white spirit and its analogues.
If the chip is located at the junction of parts, then for a better result you will need to first remove elements that interfere with access, such as a bumper or other elements.
Depending on the type of damage and its depth, different repair kits may be required to paint the surface. For example, this could be a scratch or chip corrector, for those cases where the chip did not go deep under the paintwork, or a full set with a small bottle of paint (it must be selected according to the code), primer and varnish.
Important nuance! Working with brushes that come with paint bottles is sometimes not very convenient. Their bristles are rough, and the brush area is often excessive. It's easy to make a smudge or bump out of paint. For better results, forums and websites for car paint repairs advise using several brushes with natural bristles, different in size. The thinner the tip, the easier it will be to apply the paint - without mistakes or smudges. A regular toothpick will also work for painting. It should be used instead of a brush in the most delicate places.
Finishing
The surface around the pimple is painted with any easily washable paint. For example, water-dispersed. This will allow you to accurately control the position of the abrasive stone and not sand off anything that shouldn’t.
Repaired paint chip
First, take abrasive paper P1500. It is fixed on a small wooden block the size of a matchbox and slightly wetted. Sand the bump until streaks appear on the surface of the control paint. Check the quality of work by running your finger along the tubercle. Ideally, you should not feel the difference between it and the rest of the surface.
The protective paint is washed off, the 1500 sandpaper is replaced with P2000, which finally smoothes out the protrusion. The surface remains matte. Polishing is done with a paste applied to a soft cloth made of natural material. For example, flannel, flannel, felt. A felt buffing pad is too rough for this job.
The technology offered by Nussle is a long and painstaking process. But your time and energy will not be wasted. The location of the former chip is no different from the rest of the body surface.
Repairing deep chips from stone chips
photo: JAMIE WILSON
After washing the car, drying the body and degreasing the surface, we begin the repair.
Using fine-grit P600 or P800 sandpaper, carefully sand the edges of the chip. You can stick a small circle of sandpaper on the eraser of a pencil. This will allow for a smooth transition between the old and new paints. The area of touch-up will not be so noticeable. You only need to clean the edges of the chip, not the area around it.
Important! In order not to make things worse, before you start painting obvious chips in visible places (on the hood, on the wings, doors, and so on), first carry out the operation of painting over the chip in an inconspicuous place.
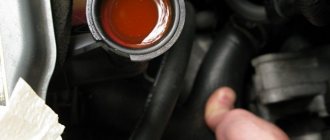
If it is not the primer that is visible in the chip (usually a white or gray layer), but the metal shines, you will have to reapply the primer before painting. This way the newly applied paint will stick better.
Shake/mix the paint well until it is uniform in color and consistency.
Important! Painting is best done in summer, in warm, dry weather. This way, the result of your labors will stay on the body much longer. If the temperature is low (not lower than 0 degrees Celsius, but not more than 10), it is recommended to heat the surface of the body with a regular hairdryer. But, again, in our opinion, this is a half-measure. It is better to carry out this type of repair in warm weather.
photo: 1GAI.ru
- Apply primer and let it dry according to the instructions;
- Thoroughly sand the areas with primer applied;
- Wipe the surface to be painted thoroughly to remove sanding residue;
- Apply paint from the center to the edges. The paint must be taken with a brush in small volumes (literally a drop on the tip of a thin brush), gradually filling the chip. It is recommended to paint chips in two or three stages, applying the paint in several thin layers with paint drying stages of 30-40 minutes between approaches;
- Apply paint with a bump. The surface to be repaired after applying paint should be slightly higher and adjacent;
- Once dry, the paint surface should be sanded down with very fine grit P2000 abrasive paper, removing excess paint and sanding down to a general surface level. It is necessary to rub the paint after first securing the sandpaper to some hard substrate, for example, a pencil. So the surfaces will converge to “zero”;
- Finally, apply polish to give the new paint the same shine as the original paintwork.
The above example is for paint mixed with varnish. It's easier to work with. We recommend that you take this version.
If the paint is not mixed with varnish, then after applying the paint and drying, you must polish it so that there is still room for the varnish. The latter is applied in several layers, also with a “heap”, and polished in the same way as was done in the example above.
How to prevent chipping in the future
Unfortunately, it is impossible to completely prevent the occurrence of chips, but there are several ways to minimize the likelihood of such a development. Among the most common solutions are the following:
- Protective polishing with compositions such as liquid glass or nanoceramics. The coatings have good durability and water-repellent effect. If the application technology is followed, the protection will last up to a year; it is recommended to treat the entire body as a whole.
- Good results are obtained by armoring the bumper and other body parts using polyurethane or vinyl film. In terms of efficiency, this option is considered the most reliable, but do not forget that before pasting it is necessary to remove all existing pockets of corrosion, otherwise rust will grow well under the film.
- Simple fly swatter deflectors can also be used as inexpensive hood protection. They perfectly divert the flow of small stones and insects, reducing the number of impacts on the paintwork.
In any case, no matter what means of protection you use, do not forget the basic rule: if you notice a chip, start repairing it. In this case, the car’s paintwork will thank you very much and will last much longer without the need for repainting.
AUTO captain:
06.02.2021
` 8399
★★★★★
Surface scratches
photo: chipex.co.uk
They can be easily removed using scratch removers. Polish for a few minutes and wipe off any residue with a damp cloth. Let dry for about 15 minutes. Done!
This “painting” will have to be repeated at certain intervals, depending on the activity of use.
We do not recommend painting small chips and scratches with aerosol cans. You can easily overdo it and paint over the original paint. As a result, it will most likely be impossible to do without a trip to a car service center.
Car color metallic or pearl
To ensure that the painted area is not noticeable, you need to choose the right color. To do this, you need to know how to determine the shade:
- The first way is to study the vehicle's documentation. In the technical passport of the vehicle, the painting code is indicated, using it you can find the coloring material of the desired shade.
- If the documentation for the car is not available, you need to remove the gas tank cap and go to the store. There the desired paint is selected by color.
- An alternative option would be to use the services of a colorist. A specialist using special templates will select the exact shade of color.
The surface of the car is painted using a spray gun or a spray can. The paint is applied to a dried, degreased surface in a dry, closed room. If dust or moisture gets onto the area being treated during painting, the painting will be damaged. After tinting the body, with a metallic or pearl color type, polishing is performed, which almost completely masks the area to be restored.
Spray can - painting technology
This method is suitable for getting rid of medium-sized chips. To eliminate defects with your own hands, you need to prepare: an acid primer in an aerosol can; a can of paint for cars; a primer for filling cavities; putty; varnish; enamel; scotch-brite; sandpaper; polishing paste and a stiff brush.
Step-by-step instruction:
- Clean the work area. Do not perform any work until dry.
- Using sandpaper, remove the layer of old paint and primer from the damaged surface.
- Remove rust with a converter and a stiff brush. Then reapply the converter, rinse with clean water and dry.
- Use putty to level each indentation. Sand the top with sandpaper.
- Treat the area around the recess with Scotch Brite (matting).
- Degrease and prime the work area.
- After the primer has hardened, apply a second coat of primer. Wait for the primer to harden. Sand any remaining unevenness with sandpaper.
- Apply a layer of acrylic primer to fill small cracks as much as possible.
- Cover the work area with three layers of toner primer, choosing a shade close to the color of the paintwork. Paintwork requires heating the paint canister to 36 degrees, followed by shaking the composition. It is necessary to shade the paint using arcuate movements.
- To fix the result, use varnish.
If the chip reaches the metal or the primer
Since removing a chip on the hood of a car (photos of the procedure are presented in the review) is not so easy, it is worth preparing in advance. It is worth considering that the process itself is quite labor-intensive and time-consuming. A positive effect can only be achieved in the warm season. If the trouble happened in winter, then it is worth fixing the chip or scratch in a well-heated garage or in a special box.
In general, the work requires:
- Auto enamel. It is sold in cans or bottles like women's polish. You can purchase car enamel in a specialized store that sells spare parts for cars. Here you have a chance to choose a coating that will ideally match the color of the body. It is recommended to choose auto enamel during daylight hours. For comparison, you should take the palette outside and compare it with the shade of the vehicle.
- Primer. This composition is required only if there are very deep chips through which metal is visible.
- Varnish. It will be quite difficult to make the surface perfectly flat without this product. Therefore, varnish should definitely be purchased.
- Matches and brush.
- Masking tape. The width of the strip must be at least 3 cm.
- Materials intended for polishing. In this case, it is worth using sanding paper or felt. It is also worth purchasing polish in advance.
Polish and anti-scratch – painting technology
Polish processing technology is suitable for surface cracks and medium-depth chips. Mixtures are made from wax, polymers, and epoxy resin, which form a film at the site of the defect. This method will not cope with deep scratches and cracks.
Instructions:
- Degrease the work area, having previously washed it of contaminants. Wait for the paintwork to dry completely.
- Treat the damaged area with a polishing mixture (separate the affected area from the non-working area with masking tape so that the composition does not get on the paintwork).
- Sand the recessed area to obtain a smooth surface.
- Wipe the damaged area with a polishing cloth, making circular movements. The surface should become matte.
- Fix the result with wax or Teflon polish designed to protect the coating.
Many chips on one part
If a part has a lot of chips, spot painting will not help solve the problem. Paint applied with a brush will be quite noticeable. For higher quality repairs, local body painting is carried out.
The part is disassembled, washed and worn out. After drying, it is completely polished with a polishing machine (coarse-grained discs are used first, after which they are changed to fine-grained ones). Some areas are treated with sandpaper. An acid primer is applied to the surface. After drying, an acrylic primer is applied. If the part has been damaged, an epoxy primer should be applied over the acrylic, which will give the surface mechanical strength.
After the primer has dried, the part can be painted. After the paint has dried, paint is applied to the painted part of the body. Upon completion of the paintwork, the repair area is sanded.
If part of the body cannot be disassembled, entire parts of the body are sealed with newspaper and tape.
Polishing
This procedure will help smooth out the transitions between the new and old lining, smoothing out any unevenness. Residues protruding from the surface should be smoothed down with fine-grained abrasives on a hard base. In this case, the body is washed with water. Car polish is used to restore shine.
The technology described above will allow you to restore the coating and save on the services of specialists. A primer with a degreaser will ensure a high-quality and durable result.