Published:
04.03.2017
Incorrectly set ignition does not have the best effect on the operation of the engine, worsening its performance characteristics. Many car owners, as soon as the first problems with the engine appear, due to lack of experience, decide that the cause of everything is a carburetor failure. In reality, the problem often lies in incorrectly adjusted ignition timing and can be eliminated if you know how to set the ignition on a VAZ-2109 (carburetor) using a simple set of tools.
Based on what signs can we conclude that the ignition timing on your car does not correspond to the recommendations stated by the manufacturer? In such cases, the following “symptoms” most often appear:
- Difficulty starting the engine;
- unstable idling and uneven operation of the power unit as a whole;
- a noticeable decrease in engine power, as well as its throttle response;
- increased fuel consumption;
- the appearance of dips in speed when accelerating the car;
- the presence of thick black smoke in the exhaust gases when starting the engine and while driving (indicates that the timing is too early and, as a result, poor fuel combustion).
Each of these signs is the reason that the engine begins to work less efficiently, and this, in turn, affects the operating comfort of the car as a whole. Therefore, we recommend that you read the guide on how to set the ignition on a VAZ-2109 car with a carburetor engine in order to apply this knowledge in practice, if necessary.
In garage conditions, even a driver who has no experience in car repairs can adjust the advance angle. To do this, you will need a 10" wrench and a strobe light or light bulb. Naturally, with the help of a strobe, setting the ignition of the VAZ-2109 (carburetor) will be more convenient and accurate, but with the help of a light bulb you can also achieve a satisfactory result. Next, we will look at how adjustment work is carried out using both options.
System design
Before we begin to consider the adjustment process, we consider it necessary to understand the diagram and principle of operation of the system. Vehicles of the VAZ 2109 model range are equipped with a non-contact ignition system. The connection diagram of all elements is as follows:
The operating principle of the system is not complicated. In order for a spark to begin to be produced, the motor shaft must turn. Simultaneously with its rotation, the camshaft will also turn. As a result of this, the sensor generates a signal that will be sent to the switch. The “K” terminal of the coil will connect to the common wire (to “ground”), as a result of which a spark will occur on the main wire. At the moment when the working distributor slider connects the main wire with one or another high-voltage wire on the corresponding spark plug, a spark will appear and the car engine will start.
If the setting is made incorrectly, the candles work in the wrong time modes. Consequently, such a violation becomes the cause of unstable operation of the entire power unit.
When it is necessary to adjust the ignition system
Adjusting the ignition timing is possible only using the marks of the crankshaft and camshaft. When replacing the timing belt (gas distribution mechanism), it is necessary to adjust the ignition system.
The repair instructions for the VAZ 2109 indicate that the timing belt is replaced every 60 thousand km. But car service specialists recommend tuning every 40-45 thousand km.
The belt must be inspected every 15 thousand km. For timely detection of defects (scuffs, tears, cracks, oiling). If any of them are found, the belt is replaced with a new one.
If the belt breaks in a car with an engine capacity of 1.5 liters, then the valves will not bend. If the engine is of a smaller volume, the valves will either rip off or bend. The repair will take much longer.
Preparatory activities and necessary tools
Installing the ignition of a VAZ 2109 carburetor begins with preparatory activities. In particular, you need:
- Warm up the car engine;
- Set the parking brake and install wheel chocks under the rear wheels.
Remember that you cannot ignore safety rules, because a car is a highly dangerous vehicle, and failure to comply with safety rules when driving, servicing and repairing it can cost you dearly.
An important point: before you start work, you should make sure that the carburetor is correctly configured on the car. It would not be superfluous to carry out a visual inspection of all elements of the system. If we are talking about a carburetor car, special attention should be paid to inspecting the condition of the distributor.
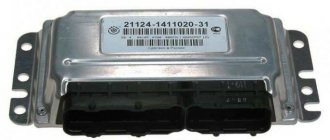
If you have a car with an injection engine, it is worth checking the ignition module for serviceability. The thing is that, as practice shows, it is this module that fails most often and is the reason for the inoperability of the entire system.
To complete the work we need:
- strobe;
- a set of keys.
What troubles can happen if there is a malfunction?
Incorrectly adjusted ignition timing can cause difficulties in starting the engine, discoloration of exhaust gases and improper operation of the car at idle speed.
This may be a sign of a problem with the ignition system, which produces an incorrect spark or no spark at all. Candles can be filled with oil. Much also depends on the correct setting of the angle, which can manifest itself as follows:
- High level of detonation during engine operation. It is easy to diagnose such a problem. The main symptom is a strange sound, like something is ringing when you press the gas pedal. This happens when the car is insufficiently maintained and in poor condition. The culprit here is the ignition timing, which occurs too early. This significantly reduces comfort and smoothness on the road. In addition, it can lead to possible deformation of the pistons. It is recommended to fix the problem immediately.
- Strange color of the exhaust or smoke from the chimney. This happens immediately after starting the engine. The smoke is most often black. The problem is in the early ignition of the fuel mixture.
- Reduced engine power. It appears mainly during acceleration and acceleration. It is characterized by a long pause between the moment you press the gas pedal and acceleration. It can take up to several seconds. In addition, the process of gaining speed occurs unevenly, with jerks occurring.
- Increased fuel consumption. It appears most often when the ignition is set incorrectly. It mainly happens late in the process, when the piston reaches the very top and the gasoline does not burn completely. Then it continues the combustion process when the piston is lowered.
- Rough operation of the engine at idle is one of the most common and common causes. However, such a problem can also occur if there are problems in other systems.
How to correctly set the ignition on a VAZ 2109 carburetor - detailed instructions
The setup process is as follows:
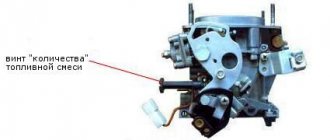
1. Start the car engine and ensure that the engine speed is approximately 800 rpm. To set the idle speed within such limits, it is enough to use a slotted screwdriver to adjust the screw responsible for the amount of fuel mixture in the carburetor.
2. After setting the idle speed to the above value, turn off the car engine.
3. Disconnect the rubber hose from the vacuum corrector. Carefully bend the hose approximately in the middle or plug it with a screw of a suitable diameter.
4. Connect the positive terminal of the strobe to the “+” terminal of the battery;
5. Connect the negative wire of the strobe to the “-” terminal of the battery;
6. Disconnect the spark plug wire from the socket of the first cylinder as shown in the image:
Disconnect the spark plug wire
7. Install the strobe sensor into the socket and connect the high-voltage wire to it;
8. Remove the plug from the clutch housing hatch:
Removing the stub
9. Turn on the ignition and start the engine. We direct the actively changing luminous flux generated by the strobe into the clutch housing hatch:
We direct the strobe into the clutch housing hatch
10. When the light is flashing, it seems that the mark located on the flywheel is stationary. If the ignition is installed correctly, the first mark should be between the technological notch and the previous mark on the scale.
Tags
11. If after the described operations it was discovered that the ignition adjustment of the VAZ 2109 is incorrect, we continue to work.
12. Using an open-end wrench, slightly loosen the fastening nuts of the ignition system distributor:
Mounting nuts
13. After loosening the fastening nuts, turn the distributor body to the right side - if it is necessary to increase the ignition angle, and to the left side, if it is necessary to decrease the angle.
14. Connect a rubber tube to the vacuum corrector and check that the ignition is installed correctly. If the normal result is not achieved, we make repeated adjustments. How to check the correct operation of the system will be described below.
Ignition adjustment
Before you begin adjusting the ignition, you need to prepare the engine. To do this, it should be warmed up for several minutes. After this, with the engine running at minimum idle, remove the silicone tube from the carburetor side so that it remains attached to the vacuum ignition timing regulator, and check if it is discharged. If there is no vacuum, you can turn off the engine. Next, plug the hole in the tube. To do this, it is advisable to use a regular bolt. After this, you can begin adjusting the ignition system.
First of all, you need to unscrew the three nuts on which the distributor is attached. The “nine” has a special hatch with a scale for adjusting the ignition angle.
The VAZ flywheel must be positioned so that the transverse mark is opposite the triangle located on the scale. This flywheel position is designed to keep the pistons of the first and fourth cylinders at top dead center, with the ignition timing equal to zero.
Next you will need a strobe light. It must be connected to the circuit according to the diagram applied to the device model. The usual connection diagram is as follows: The red wire from the strobe light must be connected to the positive terminal of the battery, and the black wire to the minus sign, and the metal clamp must be installed on the wire of the fourth cylinder.
Then you can check the installation. To do this, start the engine and point the detection device at the hatch with the scale. The mark located on the flywheel must correspond to the correct division on the scale, and the triangle must indicate the zero position. Slowly turn the distributor clockwise until the mark on the scale moves by 2 degrees (92 gasoline) or 6 degrees (for 95).
After installing the ignition, disconnect the strobe light and remove in sequence: the wires from the fourth cylinder, the battery and the coil. Connect the silicone tube back to the carburetor.
Next, you need to check whether the ignition system is set correctly. To do this, start the engine and warm it up to operating temperature. If everything is done correctly, the symptoms that were present before will disappear. If everything is still the same, you need to look for the problem in the carburetor.
Sometimes, for example, on a deserted country road, it is not always possible to find a strobe light. In this case, you can adjust without a strobe using a light bulb. To do this you need:
- Disconnect the wire going from the ignition coil to the distributor. You need to connect a wire from the lamp to it, and connect the second one to the car body.
- Just as when working with a strobe, unscrew the distributor mount.
- Start the engine. The lamp should light up. After this, you should slowly rotate the distributor until the light from the light bulb goes out. After this, you need to smoothly and carefully turn the distributor in the other direction until the lamp turns on. As soon as the light appears, the fastening can be tightened.
Incandescent lamp instead of strobe light
Many car owners will ask a completely fair question: how to adjust the ignition of a VAZ 2109 in the absence of a strobe light. Of course, it is more correct to work with a strobe, especially since in this case it is possible to carry out adjustment and adjustment work as accurately as possible. However, there is another method that is useful for those who, for one reason or another, do not want to purchase a strobe.
To work, we need an ordinary incandescent lamp designed for an operating voltage of 12V. The entire algorithm of actions is as follows:
- Disconnect the wire from the distributor that goes to the ignition coil
- We connect one terminal of an incandescent light bulb to the wire. We connect the second wire from the lamp to ground.
- As in the case when setting the ignition of a VAZ 2109 using a strobe light, use a spanner to loosen the distributor fastening nuts.
- Turn on the ignition. The incandescent lamp should light up.
- Gradually turn the distributor until the lamp stops glowing. After this, turn the distributor slightly in the other direction. As soon as the lamp starts to glow again, you can tighten the fastening nuts.
Of course, the method described above cannot provide the highest possible adjustment accuracy. However, with its help it is quite possible to achieve more or less correct and stable operation of the power unit.
Setting with a light bulb
If you do not have a strobe, then the torque can be adjusted using a conventional control lamp; in particular, you will need a 12-volt lighting source.
How to set the SOP torque using a control light:
- To correctly adjust the torque of the RCD in the Nine with a carburetor engine, you will need to crank the crankshaft until the marks coincide. To turn the crankshaft you will need a special wrench. If the key is missing, you can set the lever on the gearbox to fourth speed, and then manually turn the shaft until the marks match.
- To make the adjustment, you will need to connect the test light to the wire and switchgear with the coil. The second contact from the light source is connected to ground, that is, the vehicle body.
- Next, on the switchgear housing you will need to slightly loosen the bolts that secure it. Then you will need to turn the key in the ignition. If everything is working correctly, the light should light up.
- After completing these steps, you will need to turn the housing of the distribution mechanism; it turns until the light stops burning. After this happens, the distributor housing will need to be turned in the opposite direction. The adjustment procedure stops the moment the lamp starts to light again. When this happens, the distributor no longer needs to be touched; it will be necessary to tighten the bolts that secure it (the author of the video about the implementation of this method is Nail Poroshin).
How to adjust the ignition on a VAZ 2109 - an alternative method
In addition to the adjustment methods described above using a strobe and a light bulb, you should remember one more method - adjustment using a standard tachometer. We emphasize that this method, like the method using a light bulb, cannot provide high accuracy of adjustment. Moreover, it is characterized by one significant drawback - it is impossible to carry out the adjustment yourself; you will need to hire an assistant. So:
- Your assistant is located behind the wheel of the car. He turns on the ignition and monitors the readings of the standard tachometer on the instrument panel.
- You loosen the nuts securing the distributor and turn it a little.
- Your assistant turns the ignition key. The tachometer needle should quickly deflect and return to zero.
- You need to ensure that the distributor remains in a position in which the tachometer needle deflects.
You may notice that this method requires patience and quite a lot of time. As practice shows, it is not possible to adjust the ignition quickly and the first time using this method . Therefore, we recommend using it only in extreme cases.
How to set the ignition on a VAZ 2109 injector
Above we described the process of adjusting carburetor engines. However, there are VAZ modifications equipped with injection power units. How to set the ignition on a VAZ 2109 with such an engine?
First of all, you should pay attention that in the case of injection engines, they do not have a distributor and a Hall sensor. At the same time, the system provides two ignition coils at once, and, accordingly, two switches. The main difference between the injection system and the classic one is that the control signals are generated by a special electronic unit. The operating principle is as follows:
Operating principle of the injection system
Thus, there is simply no need for a distributor, because it is the electronic control unit that determines in which cylinder and at what point in time there should be a spark. Signals from the control unit are supplied to the inputs of the switches, and from them to the ignition coils. One switch is responsible for sparking in the first and third cylinders, and the second - in the second and fourth.
As in the case of engines with a carburetor fuel system, adjustment is carried out according to special technological risks. The ignition marks of the VAZ 2109 injector are shown in the photo below:
Ignition marks VAZ 2109 injector
Please note that it is not possible to configure the injection engine system yourself. The thing is that this operation involves making changes to the software of the microcontroller of the electronic control unit. Of course, each specific microcontroller has its own specific firmware. Moreover, there are also non-standard firmwares, for example, with settings for a sporty driving style.
Only an experienced specialist with certain knowledge can flash an electronic control unit. Therefore, if malfunctions occur in the ignition system of an injection engine, you should seek help from a trusted car service center.
SZ scheme
The ignition system used on the VAZ 2109 includes the following components:
- Switch;
- Candles;
- Distributor sensor;
- Ignition coils;
- Switch;
- Locking device. It does not allow the starter to turn on until the ignition is completely turned off;
- Locking and anti-theft device;
- Hall Sensor;
- The sensor-distributor roller, which is located horizontally and receives torque from the camshaft;
- System of spontaneous ignition shutdown, which is activated after 2-8 seconds;
- Switched current equalization system, which is required when the network voltage changes within the range of 6-18V;
- The system built into the switch, which regulates the time of energy accumulation in the coil, limits the current strength at low motor operating frequencies.
The ignition system operates with a voltage of up to 26 kV, the spark charge has a duration of 1.6-2.0 milliseconds, and the energy released during this time is 35-50 MJ.
Service
If you do not monitor the state of the system and lose sight of the presence of malfunctions and malfunctions, this can lead to certain consequences. Namely:
- Reduced reliability of the operation of the protective equipment, the occurrence of failures;
- Reduced technical characteristics of the engine, such as acceleration dynamics, maximum speed;
- A sharp increase in the amount of fuel consumed;
- Failure of SZ elements or the entire system.
Before you carry out SZ maintenance yourself, take into account several important recommendations
- Do not touch the ignition coil with your hands while the engine is running. This applies to wires, switch and other components.
- Do not test the SZ for performance using the “spark” method, as this can lead to injuries and costly repairs of the entire vehicle;
- Under no circumstances should you start the engine with a spark gap between the central terminal of the distributor sensor and the high voltage.
Maintenance
Maintenance of this system includes the following operations:
- Cleaning spark plugs from accumulated carbon deposits or replacing elements;
- Checking wires for insulation, quality of contacts and fastening;
- Ignition timing control, timing setting;
- Cleaning the rotor cover and distributor sensor when contamination occurs;
- Cleaning the rotor plate, electrodes of the SZ side terminals;
- Checking the quality of fixation of all system elements on the seats;
- Checking the wire fastenings.
Distributor repair
The ignition system on the domestic VAZ 2109 car is quite complex, although the principle of its operation does not cause serious difficulties even for beginners.
https://youtube.com/watch?v=A7WQ6fEN1Bg
Prevention and repair of the vehicle involves working with the electrical component of the car, so be sure to follow all established safety rules and rely on the recommendations specified in the vehicle’s operating manual.
Loading …
Verifying that the settings are correct
After we have dealt with the question of how to install the ignition on a VAZ 2109, we will consider the process of checking whether the adjustment work has been carried out correctly.
So, if configured correctly:
- during the process of rapid acceleration of the power plant (when the car is warm), there is no violation of the stability of its operation;
- When the car is moving at a speed of about 50 km/h in fourth speed and during sharp acceleration, there should be a short detonation of the engine. If there is no detonation, ignition is later; if it is present, but does not go through, it is earlier. We make the adjustment by turning the distributor in one direction or another.
Remember that it is often impossible to achieve stable operation of the power unit due to improper operation of the fuel system or even due to low quality gasoline. In this kind of situation, the best way out of it would be to set the carburetor to the most optimal operating mode and then adjust the ignition timing.
Very often, these ignition system malfunctions are caused by a trivial reason - an incorrectly set ignition.
How to regulate
Practice shows that most often problems with the ignition system are observed in older models with a carburetor type of power plant.
To perform the setup you will need the following tools:
- Screwdriver Set;
- strobe light (you can basically do without it, but with its help you can set the angle more accurately);
- 10mm wrench (suitable for both socket and socket wrenches);
- tachometer (it is available in almost any car multimeter).
I will give advice on installing the timing belt (the toothed belt that is placed on the camshaft).
If your eight or nine was assembled by a would-be master who installed the flywheel incorrectly and the top dead center mark turned out to be turned 180°, but then he realized that he had messed up and simply put the belt on the mark of the front pulley and not on the flywheel, but you don’t know this, then When you install the belt according to the marks on the flywheel and camshaft pulley, and try to start the engine, all the valves will bend. I know many cases when the timing belt of cars broke and people put the belt on the marks of the camshaft and flywheel and bent the valves, and all because when assembling the engine, the would-be master screwed the flywheel incorrectly.