A classic of the genre, VAZ 2106 '97. This is the second time the timing chain has been replaced on this car in a month, since the first time the client brought an “original VAZ” chain produced in a nearby basement. A month later it stretched and hello again. But we have all been praising the quality of our spare parts for a long time, so we had to consult with experts in the car market and choose the chain that received the least number of complaints. Operation will show!
In addition to the timing chain, we will change the air filter, the alternator belt, the tensioner shoe, the damper and all the sprockets, so the song goes away.
The client went on foot to get the tensioner, damper and alternator belt, since he did not immediately take care of the purchase.
Replacing the timing chain on a VAZ 2106
Replacing a timing chain, as well as replacing a timing belt, is not a very simple job, and is very responsible.
For novice car enthusiasts, it is better to carry out this operation under the supervision of mechanics or simply people experienced in this matter. It is better not to carry out this procedure without minimal knowledge and experience. Moreover, when replacing the timing chain, it may be necessary to replace other elements, in particular, the alternator belt, tensioner shoe, sprockets and damper. Tools required for work:
Removing the air filter housing from the carburetor.
You will need 8 and 10 wrenches to unscrew the nuts. When working, you should be careful not to drop anything, because in this case it will have to be removed, including dismantling the intake manifold.
Disconnecting cables, pipelines, covers, etc.
First of all, the distributor cover and the fuel supply pipe are removed. To do this, you will have to unscrew the valve cover fastenings (eight nuts in total, plus washers with plates), after which the fuel supply pipe, choke cable, and throttle valve drive are disconnected.
After removing the valve cover and gasket, carefully inspect the latter: it may well be that it will also have to be replaced.
Removing protection and draining antifreeze.
Remove the protection from below and pour the antifreeze into a previously prepared container.
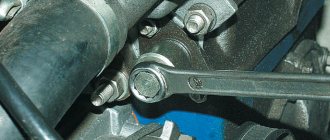
The next step is to loosen the generator (for this you will need a 19 mm wrench), as well as remove the clamps on the pipes and the clamp of the lower pipe of the water pump. All clamps are first loosened and then removed. We turn off the power to the temperature sensor on the radiator and the fan, then remove the radiator, including the thermostat and pipes.
Removing the generator belt.
The generator tensioner nut must be loosened and then moved forward using a pry bar. At this stage you can already remove the alternator belt.
Removing the crankshaft pulley.
Turning the crankshaft by the pulley, using a 36mm wrench, align the marks on the pulley and cover, on the bed casting and the camshaft sprocket. We unscrew the nut holding the crankshaft pulley to 36, lock the pulley (for this you need a special key or a complex combination of engaging fifth gear, pressing the brake pedal and unscrewing the nut). Once this nut is removed, the pulley can be removed and the camshaft cover can be removed. For the last operation you will need a 10mm wrench and a little patience (you need to unscrew three nuts and six bolts, plus three bolts at the bottom of the cover.
Removing the chain tensioner.
The chain tensioner is held in place by two fastening nuts. By unscrewing them, you can easily remove the tensioner.
Removing the camshaft sprocket mounting.
At this stage it is important to mark the position of the sprocket for alignment. Removing the sprocket is quite simple - just unscrew the fastening bolt
Removing the timing chain.
The fuse, the bolt on which the auxiliary drive sprocket is attached, as well as the tensioner fastenings are unscrewed with a 10mm wrench. Before removing the sprockets and timing chain, leave marks corresponding to their position (the reverse steps will be much easier).
Installation of new sprockets, crankshaft and auxiliary units.
Before installing a new chain, it must be thoroughly lubricated - this way it will last longer. After installation, it is advisable to temporarily hold it with some tool so that it does not fall.
Installation of new sprockets, crankshaft and auxiliary units is carried out in the reverse order. The camshaft sprocket is installed in such a way that all marks match and the descending branch of the chain is tensioned. The camshaft must be turned counterclockwise. Now we go back behind the crankshaft and tighten the chain. At this stage, you should check that the labels are correct and match. If they do not match, the chain can be thrown over the tooth and the installation process repeated.
Installing the chain tensioner.
Returning the chain tensioner to its rightful place is only half the battle. It is also necessary to tighten the mounting bolts and lock them. To check for correct installation, turn the crankshaft two turns. If the valves do not rest against the pistons and the marks match, then everything is done correctly.
At this stage, you need to return the crankshaft cover to its place (after having lubricated it with sealant).
We return the pulley to its place. We check again that the marks match and only after that tighten it.
Distributor installation.
We unscrew the nut to 13, take it out, turn the slider towards the contact of the 4th cylinder and install the distributor in place. We turn on the ignition.
The remaining operations are performed similarly to disassembly, in reverse order.
Necessary tools and accessories
The replacement work, although not particularly complicated, requires the removal of a sufficient number of elements from the car.
The tools you will need are almost all common and can be found in any garage.
Open-end and socket wrenches (for 10, 13, 14, 17, 19);
- Special wrench for the generator pulley nut (36 or 38);
- Powerful flat screwdriver;
- Wire;
- New chain;
- Rags;
- Chalk.
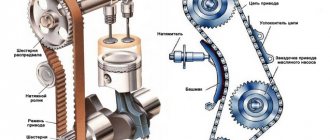
The chain drive requires constant lubrication, which is why it is located inside the engine under the drive cover.
Therefore, extensive preparatory work will be required to carry out the replacement work.
- keys from the standard set;
- universal pulley clamp;
- special key for “36”;
- empty, clean container for draining antifreeze.
Instructions for disassembling the mechanism
Self-replacement of the Lada Kalina thermostat step-by-step instructions
The first thing to do is remove the engine valve cover. Here you can see some signs of wear, for example, a chain dangling on the camshaft gear or a torn damper (or rather, its absence). It even happens that in the place where it stood, the chain selected a groove in the material of the head itself. For convenience, it is better to immediately align the round mark on the camshaft drive gear with the protrusion on its bed.
This is done by rotating the crankshaft with a 38mm wrench. For further disassembly, it is better to remove the radiator, first draining the antifreeze from it. There are craftsmen who replace the VAZ 2106 chain without removing the radiator, but this makes access to the timing mechanism very difficult, which will take up extra time. It is better to spend it on dismantling and installing the radiator, creating conditions for normal operation.
I'm VKontakte. I'm on drive2.ru.
Once access to the front of the engine is open, you need to loosen and remove the generator drive belt. Then, using a 38mm wrench, loosen the pulley nut in this way: engage 4th gear, and ask an assistant to press the brake, and then unscrew the ratchet. This method will save you from the need to insert various pieces of hardware into the engine to stop the rotation of the crankshaft. Further disassembly is carried out according to this scheme.
Installing the VAZ 2106 timing chain according to the marks.
- Remove the pulley from the crankshaft, clean the turnkey bolts on the 10th front cover of the cylinder block from dirt, and unscrew them. Three of them are located at the bottom and connect the cover to the oil pan. Remove it, clean off any remaining gasket, as well as the mating flange on the cylinder block.
Replacement
Timing chains VAZ 2106
- Unlock the bolts of the two gears, loosen them and unscrew them. Remove these gears, then use a 10mm wrench to unscrew the travel stop (located to the left of the crankshaft axis), and then remove the old chain. The crankshaft gear is removed last; be careful not to lose the key.
- Use a 13mm wrench to loosen the chain tensioner nut, use a pry bar to gently press the chain tensioner shoe so that the plunger goes in, and then tighten the nut again. This is done because previously the chain tension was greater; the tensioner will not allow you to install a new one.
- Replacing
the chain tensioner consists of unscrewing its working part (shoe) and replacing it with a new one, which is done in the next step. - chain
damper is replaced in the same way . You need to unscrew 2 bolts with a 10mm wrench, remove the old element, and install a new one in its place and screw it on.
Preparing for work
Having everything you need, you can start working.
On a carburetor car.
Next, we will look at how to replace the chain drive on a VAZ-2107 with a carburetor power system.
The VAZ-2107 is installed on a flat surface or in a garage, and is immobilized using wheel chocks and a handbrake.
To ensure good access to all the necessary elements, it is advisable to remove the radiator grille, drain the liquid and dismantle the radiator itself.
You don’t have to do this, but the ease of performing the work will significantly deteriorate. If there is a pallet protection, it will also have to be dismantled.
Then the generator drive belt is loosened and removed. Next, you will need to dismantle the pump drive pulley.
The valve cover is also removed from the engine, providing access to the camshaft sprocket.
Next, all adjustment marks are installed. To do this, you need to rotate the crankshaft until the marks on the camshaft sprocket match the casting on the head.
In this case, the mark on the crankshaft pulley should coincide with the lower of the three marks on the drive cover. The label you want is the longest.
After this, use a special wrench to unscrew the nut securing the crankshaft pulley, and this pulley is removed.
The bolt securing the camshaft sprocket is also unscrewed, having first bent the petals of the lock washer of this bolt with a screwdriver.
To easily unscrew this bolt, the gearbox must be set to 4th gear. Before removing the sprocket, you need to check the alignment of the marks again. After removing the sprocket, it is better to keep the chain taut. To do this, a hook is made from wire and the chain is hung with it.
Next, the tensioner is removed from the engine.
Read more about this here.
After this, you can begin to remove the cover. To do this, you need to unscrew the three bolts securing the pan to the cover, as well as the nuts and bolts securing it in the front of the engine.
Carefully prying it off with a screwdriver, separate it from the crankcase and remove it, after which you will have access to all the sprockets that drive the chain.
Before removing the remaining sprockets, it is advisable to put marks on them and the crankcase, which will allow them not to disturb their position during assembly.
https://www.youtube.com/watch?v=7FHVpGmOuNc
Using a 17 wrench, unscrew the bolt securing the auxiliary shaft sprocket, after which it is removed.
Then, using the same key, unscrew the bolt securing the tensioner shoe, after which it is removed.
To remove the chain from the crankshaft sprocket, you will need to unscrew the limit pin installed at the bottom. After this, it will be possible to completely remove the chain.
Installation of a new chain and assembly are carried out in complete reverse order. In this case, you need to carefully monitor the coincidence of all marks.
DETAILS: Changing the oil and oil filter on the classic VAZ 2101-VAZ 2107 with your own hands Changing the oil on a Zhiguli in 20 minutes
This is especially true for the auxiliary shaft sprocket; if its position is disturbed, you will need to install the ignition after assembly.
After final assembly, you will need to tension the chain, as well as check that all marks match by turning the crankshaft several times until the marks match again.
Features of replacement on an injection engine.
This describes the replacement sequence on a carburetor car. But the latest versions of the VAZ-2107 already came with an injection power system.
However, the differences in the sequence of replacement work on this engine are no different from the carburetor, with the exception of the need to remove the crankshaft position sensor during the preparatory work.
Usually, during such a long mileage for a classic engine, not only the chain itself is subject to wear, but also other elements associated with it. The process of such a replacement is simple, but labor-intensive, since you need to unscrew a lot of bolts and nuts, remove some components and parts, and this takes time. Therefore, it is recommended to change the VAZ 06 timing kit, which includes the following main and additional parts:
- new timing chain;
- gears - 3 pcs.;
- chain tensioner shoe;
- chain damper;
- front crankshaft oil seal;
- cylinder block front cover gasket;
- crankshaft pulley key.
Very often, when removing the crankshaft gear, the key falls out and is lost, especially if there is debris or just an earthen floor at the bottom of the inspection hole. Without this part, gear installation and assembly are impossible, and given that it is cheap, it is better to purchase it in reserve.
Assembly Features
Self-replacement of the expansion tank on a VAZ 2110
Assembling the mechanism and replacing the timing chain is performed in the reverse order. It is necessary to put in place the new crankshaft gear with the key, while checking the alignment of the marks on the cylinder block body and on the gear itself. Then install the remaining gears, putting a new chain on them, screw on the travel stop and tighten it. Considering that at the very beginning of disassembly, the mark on the camshaft gear coincided with the protrusion on its body, everything should remain that way.
Replacing the upper silent blocks of a VAZ 2106 without a puller.
The marks at the top and bottom must match. If this does not happen, you need to rearrange the chain along the gears by one or two links. The next operation is to tension the VAZ 2106 chain. Loosen the tensioner nut again with a 13mm wrench and rotate until you hear a characteristic click - the plunger will pop out and press on the shoe, which will tension the chain. After this, tighten the nut. Now you can replace the front cover of the cylinder block by replacing the oil seal located in it.
The procedure is simple: the old oil seal is carefully knocked out, and the new one is pressed in using a round adapter. Place the cover with the gasket on the bolts, and start tightening from the bottom three, having previously lubricated the oil pan gasket with sealant. Replacing the timing chain is completed by reassembling it, which will result in smooth and quiet engine operation.
Adjustment
According to the maintenance regulations for the VAZ-2016, the timing chain tension is checked and adjusted every 10,000 kilometers. Often, you have to tighten the tension more often, especially on older engines. If you notice that it is time to tighten the chain, you should do it immediately. Tightening may cause links to slip. As a result, you will get bent valves and damaged pistons, which means the need for a complete overhaul.
You will need to remove the valve cover to tighten the chain. Loosen the nut securing the tensioner. Then, using a spanner, turn the tensioner bolt half a turn. In this case, you can observe a visual displacement of the tensioner shoe. If it does not move, you will have to give the bolt several gentle blows with a hammer. This will free the stuck plunger. Afterwards, the engine is turned until the moment of greatest resistance. Tighten the tensioner nut. They start the engine and determine the quality of work by ear. If the chain is too elongated, it will not be possible to tighten it; in this case, you will have to install a new one.
We set the ignition by ear
As mentioned above, the best way to set the ignition is only with the help of a strobe light. But you still need to somehow get to the service station.
For such cases, a quick method of setting the ignition “by ear” is perfect:
- First, loosen the ignition distributor mounting nut.
- After warming up the internal combustion engine and without turning it off, rotate the distributor housing alternately in both directions.
- The speed should be approximately 2000 rpm.
- Listen to the engine. The best position is when the maximum possible number of revolutions is produced with smooth operation of the power unit without failures.
- Once this position is found, you can tighten the fastener.
Useful notes
If you have a “seven” with a carburetor, then after replacing the timing chain you need to adjust the ignition, because the drive sprocket of the ignition distributor-distributor (in common parlance, distributor) was also removed from its seat. Injection models do not require such adjustment.
Soviet and early Russian cars of the classic family were traditionally equipped with double-row timing chains. This provided increased reliability due to the fact that the break of one link did not provoke an instant collision of the piston with the valve in the open position. The disadvantage was the increased weight. In order to save money and simplify the design, the chain began to be made single-row. The resource of a double chain reaches 100 - 120 thousand kilometers, while a single chain is half as much. Some car owners are returning a double-row chain to their power units. True, for this you will also have to replace all the gears that mesh with the chain. Today, a set of such parts is quite difficult to find, so get ready for search work if you want to increase the reliability of the timing mechanism.
A double-row timing chain has a much longer life, but choosing a set of parts for its installation is much more difficult
The timing chain is a transmission mechanism, the condition of which the car owner must monitor especially carefully. It is not without reason that experienced drivers advise listening to their car. Extraneous noise with jingling notes is a sure sign that it’s time to open at least the cylinder head cover, crank the crankshaft and inspect the chain, at least externally. If there are alarming signs, the chain will need to be removed and replaced. Confidence, accuracy and these instructions will help you save a considerable amount of money, because replacing a chain or belt on a “classic” costs about 2,000 rubles in the country.
Let's sum it up
Taking into account the above, we can conclude that replacing the timing chain is a responsible procedure. At the same time, the answer to the question of where to change the timing chain can be either a trip to a specialized car service center or performing all the actions in your garage.
It should also be taken into account that during reassembly it is extremely important to ensure that the factory marks match. Ignoring this rule often leads to the fact that a fairly common situation is when, after the owner has changed the timing chain, the car does not start or the engine runs with obvious interruptions
In this case, re-disassembly is usually necessary, followed by correct marking.
Finally, we note that the price of replacing a timing belt compared to replacing a timing chain is slightly different. Replacing a timing chain at a service center is 40-60% or more more expensive compared to a similar replacement of a belt drive on various models. If you make the replacement yourself, then you need to be prepared for the fact that you may need to install a new chain, sprockets, tensioner and damper.
Article: 2101-1006020-86, additional articles: 21010100602086, 2101-1006020
Order code: 000891
- Buy with this product
- show more
- Buy analogues
- Passenger cars / VAZ / VAZ-21012 drawing
- » href=»/catalog/vaz-3/legkovye_avtomobili-30/vaz_2101-3/privod_raspredelitelnogo_vala-82/#part1933″>Camshaft sprocketEngine / Camshaft drive
- » href=»/catalog/vaz-3/legkovye_avtomobili-30/vaz_2101-3/privod_raspredelitelnogo_vala-82/#part1934″>Crankshaft sprocketEngine / Camshaft drive
- Passenger cars / VAZ / VAZ-21032 drawings
- » href=»/catalog/vaz-3/legkovye_avtomobili-30/vaz_2103-106/privod_raspredelitelnogo_vala-57/#part10227″>Camshaft sprocketEngine / Camshaft drive
- » href=»/catalog/vaz-3/legkovye_avtomobili-30/vaz_2103-106/privod_raspredelitelnogo_vala-57/#part10226″>Crankshaft sprocketEngine / Camshaft drive
- Passenger cars / VAZ / VAZ-21052 drawings
- » href=»/catalog/vaz-3/legkovye_avtomobili-30/vaz_2105-6/privod_raspredelitelnogo_vala-62/#part16779″>Camshaft sprocketEngine / Camshaft drive
- » href=»/catalog/vaz-3/legkovye_avtomobili-30/vaz_2105-6/privod_raspredelitelnogo_vala-62/#part16778″>Crankshaft sprocketEngine / Camshaft drive
- Passenger cars / VAZ / VAZ-21072 drawings
- » href=»/catalog/vaz-3/legkovye_avtomobili-30/vaz_2107-8/privod_raspredelitelnogo_vala-70/#part23371″>Camshaft sprocketEngine / Camshaft drive
- » href=»/catalog/vaz-3/legkovye_avtomobili-30/vaz_2107-8/privod_raspredelitelnogo_vala-70/#part23370″>Crankshaft sprocketEngine / Camshaft drive
- Passenger cars / VAZ / VAZ-21213 drawing
- » href=»/catalog/vaz-3/legkovye_avtomobili-30/vaz_2121-13/privod_raspredelitelnogo_vala-50/#part10001118″>Camshaft sprocketEngine / Camshaft drive
- » href=»/catalog/vaz-3/legkovye_avtomobili-30/vaz_2121-13/karter_maslyanyiy_i_kryshki_bloka-47/#part58462″>Camshaft sprocket Engine / Oil crankcase and block covers
- » href=»/catalog/vaz-3/legkovye_avtomobili-30/vaz_2121-13/privod_raspredelitelnogo_vala-50/#part58539″>Crankshaft sprocketEngine / Camshaft drive
- Passenger cars / VAZ / VAZ-212132 drawings
- » href=»/catalog/vaz-3/legkovye_avtomobili-30/vaz_21213-731/privod_raspredelitelnogo_vala-58/#part2009057″>Crankshaft sprocketEngine / Camshaft drive
- » href=»/catalog/vaz-3/legkovye_avtomobili-30/vaz_21213-731/privod_raspredelitelnogo_vala-58/#part2009059″>Camshaft sprocketEngine / Camshaft drive
- Passenger cars / AZLK / Moskvich-21412 drawing
- » href=»/catalog/azlk-9/legkovye_avtomobili-30/moskvich_2141-53/kolenchatyiy_val__vkladyshi_korennyh_podshipnikov_i_mahovik-62/#part148679″>Shaft sprocketEngine mod. 2106 / Crankshaft, main bearing shells and flywheel
- » href=»/catalog/azlk-9/legkovye_avtomobili-30/moskvich_2141-53/privod_raspredelitelnogo_vala-63/#part148701″>Camshaft sprocketEngine mod. 2106 / Camshaft drive
- Passenger cars / IZH / IZH 2126 with VAZ3 engine drawing
- » href=»/catalog/ij-7/legkovye_avtomobili-30/ij_2126_s_dvigatelem_vaz-307/privod_raspredelitelnogo_vala-13/#part945909″>Crankshaft sprocketEngine / Camshaft drive
- » href=»/catalog/ij-7/legkovye_avtomobili-30/ij_2126_s_dvigatelem_vaz-307/privod_maslyanogo_nasosa-34/#part946279″>Camshaft sprocketEngine / Oil pump drive
- » href=»/catalog/ij-7/legkovye_avtomobili-30/ij_2126_s_dvigatelem_vaz-307/privod_raspredelitelnogo_vala-13/#part945910″>Camshaft sprocketEngine / Camshaft drive
- Passenger cars / IZH / IZH 27173 drawings
How to remove a sprocket from a ZMZ 406 crankshaft
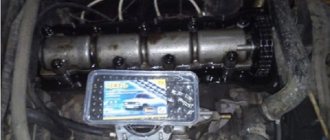
A 2001 Volga arrived for refurbishment with the engine stuck at idle. The mileage is 66,666 kilometers, no joke, the engine stopped at exactly this figure). Removing the client's heart from the car
Here it is, handsome, the front and bottom of the engine, as usual, covered in oil. I really don’t like snot on domestic engines. We will get rid of this by collecting everything correctly.
We put the engine on the stand and begin disassembling. We remove all attachments, simultaneously carrying out troubleshooting of all rubber goods; all hoses and collapsed rubber bands of the idle air control will be replaced. There are no photos of the entire process, but I’ll draw your attention to some points.
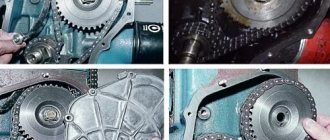
Before removing the crankshaft, we press the crankshaft sprocket, there is no need to cut it with a grinder or hit it with a chisel, we do everything simply and conveniently with a puller
Good old Johnny to help us, or any other suitable size.
An autopsy showed that the Chukchi died from the opening of a scuff on the liners, especially strong ones on the connecting rods. There were no scuffs on the crankshaft, apparently, the crankshaft was saved by low speeds, then it turned out that the oil on the engine had not been changed for about 50,000 kilometers - thanks to my grandfather for the car, the previous owner.
ZMZ crankshaft. A very successful design with double counterweights. It withstands oil starvation well, due to the characteristics of the oil channels, they retain a relatively large supply of oil in the cavities.
The crankshaft was measured with a micrometer and installed on prisms: minimal wear, no runout. We begin to unscrew the oil channel plugs and be sure to thoroughly rinse everything, regardless of operating conditions, and blow it with a compressor.
For good cleaning, it is better to use a brush after soaking the channels with gasoline.
I assemble the plugs onto the red thread locker and tighten them with a torque of 40 N*m. We buy standard bearings and leave the crankshaft alone.
The pistons, considering the fairly low mileage, are in excellent condition, there are practically no scuffs and wear. We soak it in gasoline, clean the piston grooves, adjust the weight distribution to the gram, well, I don’t like the factory tolerance of 10 grams, although, to be fair, all the pistons from the factory fit within this tolerance.
It was decided to retire the rings and install a new set.
Handsome guys, I love it when everything is clean and beautiful.
Go ahead. Now a little about the improvements. There is such a good guide from the Third Rome publishing house, and it points out one constructive flaw: But the advice to insert a tube didn’t really impress me, so the solution was found by a person under the nickname s100no, for which many thanks to him (the idea with threads in the holes for the bolts in the oil sump it was also taken from him). So, we implant the jet from the carburetor into the hole, having previously cut the thread
Cutting threads is extremely inconvenient, so we use this extension for the tap.
We take the jet and screw it in, after lubricating it with red thread locker.
We do the same procedure with the oil supply hole for the upper hydraulic tensioner (everything is described in detail in the s100no), in addition, there will now be an ISAI mechanical tensioner, and it has a special groove for draining the oil, directing the stream to the timing chain, so reduce the oil supply slightly in this place it won’t hurt, but there we use a jet with a larger outer diameter.
We also place it on the clamp and tighten it.
There are a couple more places where the jet can be implanted, in particular the shaft that goes to the oil pump, but they considered this not advisable due to the small gap between the shaft and the liner. There are a lot of letters, but the blog is not rubber. Continued here.
Source
Diagnostics of the crankshaft damper pulley
How to identify and replace the crankshaft damper pulley in advance?
The most effective option for neutralizing engine vibration is to use a torsional vibration damper (also called a crankshaft pulley with damper). They are common in diesel engines, but are also found in high-power gasoline engines. As a result of installation, auxiliary equipment is largely freed from dynamic loads.
When using a conventional all-metal crankshaft pulley instead of a damper one, vibrations are transmitted to the auxiliary equipment, which leads to their premature failure. In addition, this may even affect the operation of the engine and subsequently require major repairs.
What happens if the chain length increases?
It will not be possible to adjust the idle speed of the VAZ 2106 engine; its operation will be uneven and unstable. You can double-check all components, including power and ignition systems, a hundred times, set valve clearances, measure compression, but problems cannot be eliminated.
Please note that all links in the timing chain have different wear, therefore, the valve timing is constantly changing
There is also noise from the chain, as its links fall into the sprocket. It is also possible that the damper, limiting pin or corner of the shoe may break. But the worst thing is the timing chain jumping several teeth. Typically from 1 to 5.
Even if it slips a couple of teeth, the most favorable outcome is to stop the engine. And the saddest thing is the bending of the valves. For this reason, it is necessary to monitor the condition of the VAZ 2106 timing chain and promptly replace and tension it.