The standard door trim on the VAZ-2107 is not very attractive and often spoils the whole picture of the interior. Many owners of “Sevens” tune their cars, and one of these types of modernization is replacing the door trim. The VAZ-2107 car is equipped with cheap materials that are not reliable and begin to wear out over time. Let's pay attention to the question of how to replace the door trim on a VAZ-2107 car, what is needed for this, as well as how to dismantle the standard door panels.
Salon VAZ 2107 - description
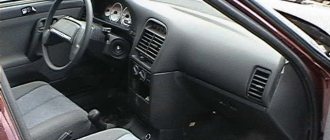
The “Seven” is equipped with a relatively comfortable interior, in comparison with other cars of the classic rear-wheel drive VAZ series. It has anatomical seats with high backs and headrests, an anti-glare dashboard and an electrically heated rear window.
The plastic from which the instrument panel and other interior elements are made is not of high quality and has a chemical smell that does not really erode, especially on new cars.
The salon is quite spacious. It is illuminated by a lamp located on the roof of the car and controlled using a manual switch. In addition, there are door switches that are installed in the door pillars. Note that the interior of the VAZ 2107 has many ergonomic flaws. For example, the ignition switch is located to the left of the steering wheel, which is inconvenient for a right-hander. There is also no rubber seal around the door perimeter, which is why the doors close with a specific knock.
As for the dashboard, it has a simple design and provides the motorist with only the necessary information, namely: engine and oil temperature, amount of fuel and revolutions, as well as the current speed of the car. The center console contains only the most basic components, in particular: air deflectors, heater control unit and cigarette lighter.
A distinctive feature of the VAZ 2107 is the presence of an analog clock. The buttons for activating the headlights, heated rear window and fan are located under the gearshift lever, which is not very common. The disadvantages of the Seven's interior also include the fact that the steering wheel is not adjustable at all, and the seats can only be moved on a slide.
How to remove a door lock
To dismantle the door lock on the “seven”, use the same tools as when disassembling the door. The process itself consists of the following steps:
- Remove the door trim.
- Use a flat-head screwdriver to disconnect the lock power button rod. Using a flat screwdriver, disconnect the lock power button rod
- Using a Phillips screwdriver, unscrew the groove fastener from the end of the door, and then move it away along with the seal. From the end of the door, unscrew the groove fastener and remove the part along with the seal
- Unscrew the fasteners of the interior door handle.
- Unscrew the lock fastener. The door lock is secured with three screws using a Phillips screwdriver.
- We remove the mechanism along with the handle and rod. After unscrewing the fasteners, remove the lock along with the rod and handle
Tuning door cards
The door map, similar to the seats for the six, does not look the best after prolonged use. The fastening elements of the upholstery fabric are made using plastic caps. The latter, after a certain time, begin to creak.
To improve the interior area of the doors, ordinary plywood is often used, which reaches a thickness of 4 mm. It acts as a frame. As for the finishing, a backing is placed, which consists of foam rubber. Its thickness is 10 mm.
When the driver plans to equip the doors with speakers, then along with the standard holes intended for handles and window lifters, it is necessary to make holes for the dynamic heads.
The stages of tuning door panels consist of:
- dismantling old cards;
- removing old upholstery;
Removing the old casing
- dismantling old maps (you need to mark them on a sheet of plywood);
- transfer panel parameters onto a sheet of plywood using a regular pencil;
- door card blanks;
- production and stitching of covers;
- door upholstery (stitched from a material such as, for example, leatherette);
- gluing the cover and fixing the finishing material. For these purposes, use a regular stapler and glue.
- remove the window handle by pulling out the fixing bracket;
- Unscrew the bolts under the plugs and remove the door handle (armrest);
- remove the trim from the door opening handle;
- remove the speaker (if installed);
- remove the door card by pulling it towards you.
Redrawing from an old map
cutting out workpieces using a jigsaw and processing protruding elements;
Cutting out new door cards
READ How to Remove the Outer Door Handle of a Passat B6
Gluing new skin
As for fastening the improved panels, it is made using special bushings that have internal threads. To do this, special holes are initially made on the cards in the required places. Then the fastener is inserted. With this installation of upholstery material, it is possible to get rid of knocks and squeaks while moving and while listening to music.
Door card repair video:
Dismantling the front door of VAZ 2101-2106.
Dismantling the door trim of a VAZ 2107
Old VAZ 2107 door cards are removed as follows:
Seats
This is perhaps the most important element in the car interior. While driving on long trips, the driver should not experience discomfort from an uncomfortable seat. This can lead to increased fatigue, as a result of which the trip will turn into torture.
The factory seat of the VAZ 2106 is not particularly comfortable compared to modern cars. It is too soft and lacks lateral support. Over time, the foam rubber becomes obsolete and begins to fail, the springs weaken, and the casing breaks.
We talked above about re-tightening the seat trim, but there is a second option, which today is very often chosen by Zhiguli owners - this is installing seats from foreign-made cars into the car. The advantages of these seats are obvious: comfortable seating with lateral back support, high seat back, comfortable headrest, wide range of adjustments. It all depends on which model of seats you choose. It is worth noting that often only the front seats are subject to replacement, because choosing a rear sofa is very difficult.
As for choosing suitable seats for the VAZ 2106, any that fit the dimensions of this car will do, because the fastenings will still have to be redone during installation. To modify the fasteners suitable for installing new seats, you may need a welding machine, a metal angle, an angle grinder, or a drill. All this is necessary to form new supports on the interior floor that coincide with the seat slides, as well as for the manufacture of brackets. What kind of fastenings you make depends on the seats and your creativity.
List of car models whose seats are popular for installation in the VAZ 2106:
Photo gallery: results of installing seats from foreign cars
It’s up to you to decide which seats to install in your car instead of the standard ones, which ones suit your liking and budget.
If we talk about the disadvantages associated with the installation of foreign seats, we can highlight the following: possibly a decrease in the free space between the seat and the door; you may have to stop moving the seat on the slide; there may be a slight displacement of the seat relative to the steering column.
There are also more serious difficulties associated with installing non-original seats. The seat back may be very high and the height of the seat will not fit. In this case, you can shorten the back of the seat itself. This is a labor-intensive process:
It is preferable to immediately select seats that fit all dimensions.
Overall, you will gain more than you lose: a comfortable seating position is the most important aspect for a driver!
How to Remove the Rear Door Trim of a VAZ 2107
Replacing door trim on VAZ 2101-VAZ 2107
Welcome! Car door trim. like oil it definitely gives the car a different look when you sit inside because if you take it out we can see the inside of the door as well as the wires (if the doors have power windows) this is often not a good thing but who , like some non-beauty buyers, does the wrong thing to make a sports car (that's why everything is pulled out of the interior, only the steering wheel. not one driver's seat), but still not many people need it for this reason, the car will chopped for a very long time (you sweat and see even for life) to take its place in the salon, closing this case, our client has the details of which to install as oil.
When should I replace my door trim? Someone who decides for themselves when they need it, someone changes, provided that the backing is torn, and someone because the oil is very dirty (nettle paint), as if it was annoying if you had very dirty oil, as then, do not rush to the car dealership and do not pick up the last ones, try to wash off traces of dirt from the previous one, if necessary, use special plastic cleaners, in other words, they clean the leather of the car. In the interior they are now well cleaned, Renew the color of the appearance of the parts if you use them frequently, they protect the parts from premature aging, and there are no appearance of small cracks.
Door card manufacturing process
It is very easy to make cards on the VAZ-2107 door with your own hands, especially if you have a handy tool. Before starting work, you will need to have patience and time, since it can take up to 3-4 hours to make one upholstery.
The standard card is used as a template for making a new one. To do this, just attach the template to a sheet of plywood, then mark and cut out the base (it is better to use a jigsaw for cutting). On the prepared base, you should mark and cut holes for attaching handles and levers. When tuning the doors of the “seven”, you can simultaneously install an electric drive on the window lifts.
During the work process, special attention should be paid to the correct marking of the holes for attaching the card. If you make a mistake by a few millimeters, the product will not fit well on the door.
After the base is ready, you should use sandpaper to process the sawn edges. This is necessary to ensure that the base is as smooth as possible. We continue tuning the door trim of the "seven", for which we take a piece of foam rubber (it is best to use two-layer foam rubber, consisting of a base and fabric) and cut it out according to the card template.
It is important to know! If tuning involves installing speakers and a shelf on the door, then you should first make the frame of these products. How to make podiums for the VAZ-2107, you can learn about Honor in the corresponding material.
The shelf can be made separately, then sheathed and installed on the door card. It is much easier to make such a shelf than to make a whole product along with the door card.
Foam rubber is glued to the plywood using special superglue. After the foam rubber has been glued to the door card, you can begin covering it. You can sheathe it either with a single piece of material or in sections, you just need to sew them together with a “French seam”, which is durable and attractive in appearance. The pattern is made so that there are 50 mm allowances on all sides. This is necessary in order to avoid the appearance of “bald” places along the edges if there is not enough material.
The skin is stretched onto the card according to the following scheme:
After covering the card, you can trim off any excess material. To prevent the upholstery from tearing at the place where the brackets are attached during operation, it is recommended to leave a small margin on the back side. Tuning of this kind is quite simple, and is carried out by analogy for all remaining doors. Such a simple modification will significantly improve the appearance of the interior and transform the “Seven” for the better. Below is a photo of car doors with the trim altered. By analogy, you can do it for your car.
Interior lighting
Additional lighting in the interior of the VAZ 2106 will not be superfluous; it has long been known that the factory light is far from ideal. It is proposed to use the ceiling lamp from cars of the Samara family (2108–21099). You can install an LED lamp in this lamp, the light from it is quite strong and white.
You can install it on the ceiling lining (if your car has one) between the sun visors:
How to remove the door trim of a VAZ 2107
1 - door hinge fastening screw; 2 - impact screwdriver; 3 - door stop; 4 - door hinge. The arrow shows the direction of impact on the screwdriver
Knock out the limiter fastening pin 3 (Figure 1) and disconnect the limiter from the car body pillar.
While holding the door in the open position, use an impact screwdriver to remove 2 screws 1 securing hinges 4 of the door to the body pillar.
The door installation must be done in reverse order. Before final tightening the hinge screws, adjust the gaps between the door and the car body.
Need for replacement
The standard upholstery looks very cheap, which spoils the external design of the domestic car. "Sevens" after 2000 are equipped with the same type of trim as earlier versions of this model. The standard skin is thin fiberboard, which is covered with cheap black polymer.
The standard upholstery is attached to pistons, which become unusable every time they are removed, resulting in the need to replace them. You can replace the standard cheap upholstery on a VAZ-2107 with more advanced materials, which will brighten up the interior of the car. We will find out further what it is to replace the door trim of a VAZ-2107 with your own hands.
Rear sliding window drive
Rear sliding window drive
1 — window lifter handle; 2 — handle lining; 3 — window lift mechanism; 4 - roller; 5 — pressure plate; 6 - screw; 7 - tension roller
Operations for disassembling and assembling rear doors differ from operations for front doors in the removal and installation of fixed and sliding windows. The sliding glass of the rear door has only one bracket, on which the cable is attached with two screws 6 using a pressure plate 5.
— It is necessary to remove the sliding glass after removing the fixed glass through the top.
— To remove the fixed glass, first lower the sliding glass and, after unscrewing the top screw securing the pillar, remove it complete with rubber seals.
READ How to remove the Volvo XC90 fuel filler flap
— During assembly, it is necessary to adjust the stroke of the sliding glass.
Old VAZ 2107 door cards are removed as follows:
- remove the window handle by pulling out the fixing bracket;
- Unscrew the bolts under the plugs and remove the door handle (armrest);
- remove the trim from the door opening handle;
- remove the speaker (if installed);
- remove the door card by pulling it towards you.
Disassembling the front doors
Door disassembly is required in case of replacement of parts and assemblies.
View of the inside of the door of a VAZ-2105 car
1- door lock button; 2- decorative plug for the door handle fastening screw; 3 — handle of the door lock opening mechanism; 4 — window lifter handle.
How to remove a VAZ 2103 door card
To remove the door trim, you must first remove the decorative plug 2 from the handle attached to the armrest. Under the plug there is a screw that needs to be removed. After this we dismantle the handle.
We remove the decorative rosette 1 from the inner door opening handle 3. To do this, you need to pry it off the trim with a screwdriver and remove it from the handle.
Door lock release handle
1 — decorative rosette; 3 — door opening handle
Now you need to remove the door lock button 3. To do this, use a sharp knife at point 2 to pry the button cover 1 and pull it out.
Door lock button
After dismantling the cover, you can pull out bracket 1 securing the button to rod 2 and remove button 3.
Door lock button
1 - bracket; 2 — rod of the door lock button; 3 — door lock button.
Now it's up to the window lifter handle.
Window lifter handle
1- window lifter handle; 2 - window handle trim, 3 - socket.
The window lifter handle consists of 3 parts. 1 - the window lifter handle itself, 2 - the trim of the window lifter handle, 3 - the socket. In order to disassemble and remove the handle, it is necessary to slightly recess the socket 3 under the trim 2 into the door trim and move the trim along the handle until it exits the annular recess on the axis. The direction is indicated in the figure by an arrow. Remove the window handle 1 and the socket from the axle.
In my case, it was still necessary to remove the screws securing the door trim, which were installed by the previous owner. In the general case, it is necessary, overcoming the resistance of the spring plastic holders, to remove the door trim. The location of the plastic holders on the door trim is shown in the figure below.
Location of spring plastic door trim holders
Next, remove the top seal of the sliding glass.
We unscrew the screw securing the front guide channel of the sliding window and remove it together with the upper seal.
Now you need to remove the lower seals of the sliding glass. The picture shows the seals along with decorative chrome molding (it was not installed on later models). It is necessary to remove it using dermantine strips inserted under the molding. You can place a small plastic spatula under the molding and use it to remove it. You need to do everything carefully, because... The chrome strip bends and dents easily, which is very noticeable later.
Remove the two fastening screws and remove the rear sliding window guide channel.
Loosen the window lift tensioner pulley bolts.
Now you can remove the sliding glass from the top.
Unscrew the three nuts securing the window regulator mechanism and remove it.
We unscrew the two screws securing the door lock drive handle and remove it along with the rods, having first disconnected them.
Attaching the door lock handle
1 — handle fastening screw; 2 - internal handle.
Unscrew the three screws securing the lock to the door. We take out the lock, having first disconnected the rods from it.
Front door assembly.
Reassembling the front doors must be done in the reverse order of disassembly.
When installing a window regulator, it is necessary to ensure that the cable is laid correctly on the drum (the turns of the cable should not overlap each other). After installing the window lift mechanism and correctly laying the cable on the rollers, adjust the tension of the cable with the tension roller, the stroke of the sliding window and make sure that the operation is smooth.
Before installing the door trim, it is necessary to check the presence and integrity of the plastic spring holders. If they are missing or broken, we install a new holder.
Replacing the interior door handle on a VAZ 2107
Ontacte Ontacte Instagram page.
Removal: 1) Remove the skin. You will need to remove the plugs at the beginning of the operation using a screwdriver that covers the screws that secure the door handle to the machine, and after removing the plug, remove the screwdriver and use it to remove all the screws that secure the handle. and then remove it from the car door.
2) After removing the handle, continue to remove the handle that raises and lowers the car door window, use a screwdriver as shown in photo No. 1 to press the socket out of the pad, and then slide the pad off. along the lowering and rising of the glass handles to remove it (see photo 2), then remove the handle itself from the slots it is installed on (see photo 3), and finally remove the socket under the handle that you pressed on a little earlier (see photo 4).
3) Then unscrew the door trim using a screwdriver at the location indicated by the arrow, and then remove it by sliding the handle onto it.
The note! This sheathing is only held on by the two antennas (indicated by the arrows in the photo below) and is very easy to remove, but don't overdo it and break the antenna mounts!
4) And at the end of the operation, unscrew the screwdriver attached to the door in seven different places using a screwdriver, as you can see in the small photo below, already showing where the fasteners that hold the trim are held. in the same places and stick it with a screwdriver, when all the holders are removed or broken, remove the body and then replace all the broken holders with new ones.
The note! If your car also has a windshield trim and you don't know how to remove it, read the article that details how to remove it called "Replacing Your Car Door Trim"!
Installation: The new door trim is installed in its place in the reverse order of removal.
Extra If you want to take a closer look at the process of removing the trim from a car door, take a look at the video clip below, but the trim itself is attached to the door a little differently, that is, using screws, which you won't have, well, if this is done at home, since the cladding will never be added, the door has not been added to this side
How to remove the front door trim on a VAZ 2106-2107
Quite often, due to problems with the locks and closing mechanism of the front doors, it is necessary to remove the trim. In fact, this work is very easy to do and will take a maximum of 5 minutes to complete. Do you need two screwdrivers to remove it?
- with flat blade
- cross (curly)
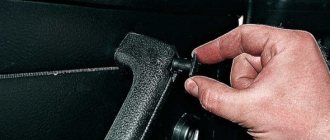
First, you need to use a flat screwdriver to pry off the plastic insert, which is a decorative plug for the internal door opening handle:
Then we remove it completely, since in the future it will interfere with removal:
READ How to remove a strut on a Ford Transit
Then you need to remove the window lift control handle, having first freed it from the plastic retainer:
Next, unscrew the three bolts securing the door handle, which are clearly shown in the picture:
And we remove it, since it is no longer attached to the door6
Now all that remains is to carefully pry the door trim from any angle with a thin screwdriver, and carefully, overcoming the resistance of the clamps, remove the trim - tear it off the clips.
Next, carefully pry it up along the entire perimeter in the same way or with a little effort we pull it towards ourselves, the upholstery should come out quite easily and simply:
As you can see, this procedure on VAZ 2106-2107 cars is performed quite simply and does not require much effort. Installation is carried out in reverse order. If anyone is interested.
Front instrument panel
The instrument panel is most often subject to alterations, because it is not only a decorative element, but also the driver’s “working area”. It contains car control elements, an instrument panel, a control panel and elements of the heating system, and a glove box. The instrument panel is constantly in the driver's field of vision. What car enthusiasts come up with in the process of improving the instrument panel: they cover it with leather or Alcantara; covered with flock or rubber; install multimedia devices; additional sensors; They make illumination of the panel, controls, glove box, in general, what only your imagination can do.
In order to apply a new coating to the panel, it must be removed from the vehicle. This procedure is very labor-intensive, so it is recommended to do the work as a whole when you remove the panel to install soundproofing materials.
By the way, any owner of a VAZ 2106 knows that the heating system here is imperfect and, in severe frosts, problems with glass fogging may arise, and sometimes it’s just cold in the cabin. To improve the operation of the heater, the instrument panel often also has to be removed. Therefore, it is necessary to clearly understand in advance what type of work you are going to do before starting to disassemble the interior, so as not to do the work twice.
Dashboard
On the dashboard there are 5 round instruments, very characteristic of the VAZ 2106. To improve the instrument panel, it is proposed to cover it with material or apply a coating, just like the panel. To do this, the shield must be removed and all devices removed from it.
In the devices themselves, you can change the weak factory backlight to LED, choosing the color of the LED to your taste. You can also change the dial. You can choose a ready-made one or make it yourself.
The white dial of the device, combined with a good LED backlight, will be easy to read in any light.
Glove box
The illumination of the glove box can be improved using an LED strip, which is attached to the top inside the box. The tape is powered from the factory end switch.
Materials for upholstery
When choosing fabric, you need to take into account quality, wear resistance, price, and color. The fibrous structure should stretch, this will allow the fabric to be securely fixed to the panel. Possible varieties:
- Genuine Leather. It looks beautiful, but is expensive. Creates sound insulation and withstands humid and harsh climates. The ease of care is dictated by the fact that the fabric does not absorb dirt and does not deteriorate when using aggressive detergents.
- Eco-leather or substitute. It has high wear resistance and is durable. The characteristics are identical to the natural base, only the substitute does not tolerate the effects of chemical detergents. With improper care, microcracks appear, which are then filled with dirt.
- Alcantra. Consists of thin and viscous fibers. The material has a high rate of moisture rejection, so it does not shrink. After the Alcantura is stretched on the panel, it will take the shape of the structure and will not sag over time. There is only one minus - the low level of sound insulation.
- Vinyl and leatherette. They provide strength and durability, and they are also very convenient for reupholstering. The material transmits sound well, so you will need to install an additional layer of insulation.
- Carpet. This is an artificial automotive fabric. This lining will last for many years. It withstands temperature changes, repels dirt, cleans quickly, and blocks the growth of fungus.
Let's start with the hood and trunk
There is a misconception that the noise of the hood is solely for the comfort of others, in fact:
- It eliminates metal vibration and muffles engine noise penetrating into the cabin
- Serves as thermal insulation in winter
- You also insulate the trunk (see Soundproofing the trunk in a set of measures to reduce noise in the cabin) not only for the sound of the subwoofer, at the same time you dampen the sounds penetrating into the cabin from the outside
- Plus, you create an acoustic space in which the subwoofer will sound better, since its cover no longer vibrates and does not distort perception
- Under the hood, the engine compartment shield is processed first. Vibroplast should be heated with a hairdryer before application to improve plasticity.
- Then you apply it and roll it with a roller, otherwise air bubbles may remain, which then over time will lead to corrosion and lag of the material
- Glue Splen on top, in the same order the materials go to the hood cover
- Only Vibroplast is glued between the ribs, and splen is a continuous layer, photo below
On the left we see vibration isolation, and on the right they are already applying a continuous sheet of foil Splen
- In the trunk, the lid is treated like the hood, but it is better to add an extra layer of sound insulation to the wheel arches, they make the most noise
How to replace the door trim on a VAZ 2101-VAZ 2107?
Removal: 1) To remove the trim, at the beginning of the operation you will need to remove all the plugs that cover the screws securing the door handle to the car with a screwdriver, and after the plugs are removed, pick up a screwdriver and use it to remove all the screws that attach the handle and then remove it from the car door.
2) After the handle has been removed, proceed to removing the handle that raises and lowers the window at the car door. To do this, use a screwdriver as shown in photo number 1 to press the socket away from the lining, then slide the lining along the handle for lowering and raising the glass and remove it. (see photo 2), then remove the handle itself from the slots on which it is put on (see photo 3) and finally remove the socket itself, which is located under the handle and which you pressed out a little earlier (see photo 4).
3) Next, use a screwdriver to pry up the door handle trim in the place indicated by the arrow and then remove it by threading it along the handle itself.
Note! This facing is held on by only two tendrils (Indicated by arrows in the photo below) and is very easy to remove, but just do not overdo it with force and do not break the tendrils of its fastening!
4) And at the end of the operation, pry up the trim that is attached to the door in seven different places using a screwdriver, as you can see in the small photo below, it is already indicated in which places the holders are located that secure the trim, in the same places and pry it off using a screwdriver a When all the holders are removed or broken, remove the trim and then replace all the broken holders with new ones.
Note! If your car also has a trim that is located under the glass and you don’t know how to remove it, then study the article that describes its removal in detail, and it’s called: “Replacing the door trim on a car”!
Installation: New door trim, installed in its place in the reverse order of removal.
Additional video: If you want to study in more detail the process of removing the trim from a car door, then watch the video that is located just below, but in it the trim itself is attached to the door in a slightly different way, that is, using screws that you will not have , well, if they do, then it was done homemade because the trim has never been attached to the door in this way.
New life for the car interior
Today there are a huge number of workshops on the service market that will help restore the interior of any car.
By placing your car in the hands of professionals, you will receive high-quality results for such types of services as:
You will, of course, be satisfied with the result, but the cost of these services is often high. Therefore, it is not advisable for owners of old domestically produced cars to shell out money from their pockets for interior repairs, which sometimes turns out to be more than the cost of the car itself. Only car restorers can afford such a luxury, but they pursue completely different goals.
But this does not mean that you can forget about the idea of restoring the salon of your faithful friend. The stores have a fairly wide range of inexpensive and high-quality materials that can be used for DIY repairs. Having examined the range of automotive, construction and furniture accessories stores, we can choose what is suitable for us to restore the interior.
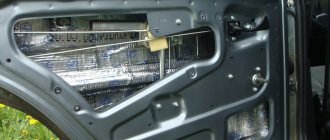
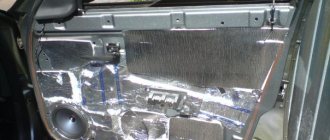
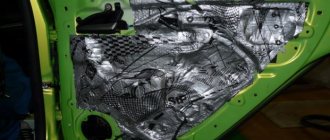
Soundproofing doors
It is necessary to disassemble the door not only because of damage to the cladding; sometimes this is done to increase sound insulation. The driver's door is soundproofed first. This procedure will reduce the level of extraneous noise, ensure silent closing of the structure, and improve the sound of music. The silence is broken not only by the bustle of the street, but also by the operation of the propulsion system, transmission, and suspension elements.
Before installation, raw materials for insulation and adhesive are selected. You need to purchase material based on bitumen or mastic using aluminum foil. Good glue has sealing properties, which help protect metal body parts from corrosion. Types of building materials for automotive insulation:
- Bimasts are multilayer raw materials. Their thickness is from 2 to 4 mm. External covering: fabric or paper.
- Vibroplast is flexible and elastic, has high vibration and sound insulation rates.
- Vizomat MP is a material with the addition of foil and aluminum fibers. Absorbs vibration shocks well.
Any material can be used for door trim. Installation of sound insulation is carried out before the door element with trim is installed in place. The selected material is attached to the panel.
Why sound insulation is needed
Sound insulation allows you to muffle extraneous noise penetrating into the car from the outside, and also reduce vibrations created by the suspension and engine:
- Firstly , silence will allow you to enjoy your favorite music from the new audio system
- Secondly , it allows you to talk freely in the car without raising your voice
- Thirdly , today scientists, having studied the effects of noise on the human body, have proven that increased noise levels negatively affect health - it increases irritability, reduces reaction, which is life-threatening on the road
- In addition, noise constricts blood vessels, which greatly increases the load on the heart, and constant stress over time leads to angina and heart attack.
- This means that car sound insulation is not only about comfort, but also about health.
The process of manufacturing and installing a door card with trim
Making a door fragment with trim is no more difficult than dismantling the old one. To do this, you will need a standard set of tools, as well as: glue, soundproofing products, and a drill with attachments. First, a piece for covering is cut out from the purchased fabric, and an old piece of material is used in the form of a pattern. If measurements are taken from a panel structure, then you need to leave an allowance of at least 1–2 cm at the edges. It is important to immediately cut holes for the handle, speakers, and fasteners. Manufacturing instructions:
- The fabric is stretched, folds are straightened, holes for fastenings are drilled.
- The fragment is cut out with an allowance of 1 cm, then fixed with glue to the plywood.
- The finished element is mounted in the door using clips.
How to remove the door card on a VAZ classic 2106
For cladding, it is better to use a solid sheet; otherwise, you need to make sure that the fasteners do not get into the joints.
Sources:
https://auto-park24.ru/remont/kak-snyat-obshivku-dveri-vaz-2107.html https://foreXS-online.ru/remont/kak-snyat-obshivku-dveri-vaz-2107.html
Features of dismantling the casing
Equipment with fasteners will help you remove and then fix the cladding. Required:
- screwdrivers;
- knife;
- key to 8;
- clips;
- hardware.
If replacement of the skin was required because the inner panel was deformed after an accident or cracked, then you can replace it with a piece of plywood. The main thing is to cut out an identical layer. Instructions on how to quickly remove the door trim on a VAZ 2106:
- The handle is removed. To do this, two bolts are unscrewed: lower and upper.
- The bracket that holds the window regulator is pulled out.
- The speakers are removed (if any).
- A knife is used to remove the clips holding the cladding panel.
- The trim is removed from the door card.
It’s easy to install a new element using the same algorithm, just in a different order.