01/26/2022 6,781 VAZ 2106
Author: Ivan Baranov
All owners of domestic cars face the need to adjust the ignition. Especially when it comes to older vehicles. This material will help you learn how to adjust the distributor of a VAZ 2106 car and in what cases this may be required.
[Hide]
PURPOSE OF THE DEVICE
One of the most important subsystems of a gasoline engine is the ignition system. The fact is that normal operation of the engine is possible only if the combustion of the fuel-air mixture occurs in a timely manner. Otherwise, the entire work algorithm is disrupted.
During operation of the device, voltage is generated. It is served on candles. It is on them that the spark necessary to ignite the mixture is formed. As a result, the engine starts working and the car moves in the right direction.
For all the processes described above to become a reality, a distributor is needed. In this system it performs the following functions:
- Acts as an initiator of spark formation. This occurs due to the opening of contacts.
- The device directs the generated voltage to the desired spark plug.
- The distributor can, if necessary, change the moment of sparking. This parameter is determined by the driving mode selected by the driver. Also, a lot depends on the quality and type of fuel.
- The device is capable of storing energy in a bobbin.
As you can see, the part performs many functions. It is not surprising that without its normal operation, the operation of the engine is impossible.
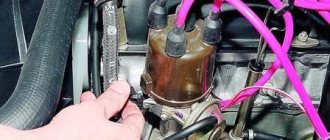
Checking with a light bulb
It will simplify your work when using a strobe. The lamp requires a 12-volt lamp.
The procedure is as follows:
- one contact from the light bulb is connected to the wire running from the coil to the distributor;
- the second is applied to the mass;
- the central (high-voltage) short-circuit cable is installed there;
- start the engine and loosen the bolts on the distributor;
- the housing must be rotated to the right until the lamp goes out;
- then it is turned slowly to the left - when the light flashes, the distributor is fixed.
To better understand how torque is set, we suggest watching this video:
>
Distributor design
The distributor circuit assumes the presence of such elements as:
- low voltage current breaker;
- high voltage current distributor;
- centrifugal ignition timing regulator;
- vacuum ignition timing regulator.
The distributor circuit is designed so that at a certain moment the breaker opens the primary ignition circuit, as a result of which a high voltage current is created in the secondary winding of the ignition coil. Through the distributor, this current is transmitted to the spark plugs in certain cylinders. The regulators automatically adjust the ignition timing, which depends on the current operating mode of the engine.
The distributor breaker is an electromechanical part and consists of the following parts:
- shaft;
- movable contact plate;
- movable contact plate;
- capacitor;
- frame.
The breaker shaft consists of two main parts. On one of them, depending on the type of breaker, cams are installed, the number equal to the number of cylinders in the engine. This distributor device is not very reliable, since a large number of contacts, as well as the presence of moving parts, lead to regular problems with this unit.
The distributor device, as well as its use in general, are outdated from the point of view of modern electrical equipment, but in our country there are still a lot of carburetor engines, so the problem of the performance of this unit is currently relevant.
As for where the distributor is located in the car, most often it can be found under the hood next to the engine, near the cylinder head or on it. Although the exact location of the node depends solely on the model of the machine.
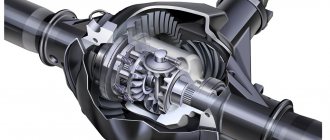
Purpose and types of distributors
The main distributor of the “six” is located on a horizontal platform made to the left of the engine valve cover. The unit shaft, ending with splines, enters the drive gear inside the cylinder block. The latter rotates by the timing chain and at the same time rotates the oil pump shaft.
The distributor performs 3 functions in the ignition system:
- at the right moment it breaks the electrical circuit of the primary winding of the coil, causing a high voltage pulse to form in the secondary;
- alternately directs discharges to the spark plugs according to the operating order of the cylinders (1-3-4-2);
- automatically adjusts the ignition timing when the crankshaft speed changes.
Various modifications of the “sixes” were equipped with different types of distributors:
- VAZ 2106 and 21061 were equipped with engines with a working volume of 1.6 and 1.5 liters, respectively. Due to the height of the block, distributors with a long shaft and a mechanical contact system were installed on the model.
- VAZ 21063 cars were equipped with a 1.3 liter engine with a low cylinder block. The distributor is a contact type with a shortened shaft, the difference for models 2106 and 21063 is 7 mm.
- The updated VAZ 21065 series was equipped with contactless distributors with a long rod, working in conjunction with an electronic ignition system.
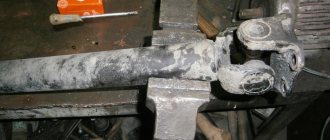
The difference in the length of the drive shaft, depending on the height of the cylinder block, does not allow the use of the VAZ 2106 part on a 1.3 liter engine - the distributor simply will not fit into the socket. Installing a spare part with a short shaft on a “clean six” will also not work - the splined part will not reach the gear. The rest of the filling of the contact distributors is the same.
As a young, inexperienced driver, I personally encountered the problem of different lengths of ignition distributor rods. On my Zhiguli VAZ 21063, the distributor shaft broke off on the road. At the nearest auto store I bought a spare part for the “six” and began installing it on the car. Result: the distributor was not inserted completely; a large gap remained between the platform and the flange. Later the seller explained my mistake and kindly replaced the part with one suitable for the 1.3 liter engine.
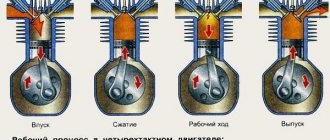
Operating principle of the distributor
In many ways, the operating principle of the distributor remained unchanged for many years. In VAZ cars, such as VAZ 2109, 2106, 2107, 2108, an ignition system of this type was used almost until the end of the last century.
The basis of the work is the connection of the distributor with the engine crankshaft. When the piston in the first cylinder takes the position corresponding to TDC, the breaker contacts open, a high voltage appears in the ignition coil, directed through a slider located in the distributor cover to the spark plug of the first cylinder.
There the combustion of the fuel assembly occurs, and the crankshaft continues to rotate. In addition to moving the pistons, it causes the breaker cam to rotate. When in another cylinder another piston occupies a position corresponding to TDC, at this moment the breaker contacts in the distributor open again, and a high-voltage voltage is generated in the ignition coil and supplied to the desired spark plug.
Advantages of contactless systems
For an ignorant car enthusiast, the main argument in favor of BSZ is the fact that at the moment not a single manufacturer produces cars with a contact-cam spark generation system. Foreign brands abandoned it in the distant 80s of the last century, and in the Russian Federation mechanical ignition lasted until the 90s. The reasons for the refusal are quite clear:
- sparks constantly flashed across the contacts, causing them to burn and require frequent cleaning;
- the contact group wore out quite quickly, on average it was enough for 15-20 thousand kilometers, after which the element had to be replaced;
- the wear of the bearing on which the contacts were located made itself felt, which caused unstable operation of the power unit;
- the springs of the balance weights were stretched.
DETAILS ABOUT THE MOST IMPORTANT ELEMENTS OF THE TRAMBER DEVICE
VACUUM REGULATOR
It is this device that can change the OZ if necessary. As soon as the motor load changes, appropriate adjustments are made to the operation of the distributor device parts.
The vacuum regulator of the distributor is a closed cavity. To ensure better performance, the design is divided by a diaphragm. One cavity goes directly to the carburetor.
When a vacuum occurs, the diaphragm begins to move. As a result, pressure is exerted on the movable disk and the breaker cam. The response time of the latter is adjusted depending on the current situation.
OCTANE-CORRECTOR
This is a very important element in the distributor design. Without it, the entire system could not function normally. The unit changes the SOP depending on the fuel that is currently being used.
By its design, this distributor element resembles two plates with an arrow. The same arrow is installed on the engine. There are special lines on it, through which the ignition angle is adjusted. It is almost impossible to do without this part when refueling different types of gasoline.
Distributor malfunctions
The following signs indicate that the distributor is malfunctioning:
When there is a spark on the central wire, but not on the spark plug wires, this indicates a breakdown of the slider.
- the car jerks periodically when driving;
- Unstable engine operation at idle;
- the engine does not start at all;
- the knocking of the piston fingers is heard while accelerating;
- the speed increase dynamics decreased;
- fuel consumption has increased.
In most cases, the causes of distributor failure are:
Breakdown of the roof and ignition coil occurs due to large gaps in the contacts of the distributor cover and slider, spark plugs and bad candlesticks.
- burnout of the runner;
- oxidation or shorting of contacts under the cover;
- breakdown of the distributor cover;
- failure of one of the sensors;
- problems with the shaft bearing and other problems.
In each of these cases, replacement is required. But at the same time, for almost any car, it is possible to change not the entire distributor, but only its failed part, which is an advantage, since it significantly reduces the cost of repairs.
The most basic check of the distributor is a visual assessment of the condition of the slider, contacts and cover.
In a contactless distributor, the main malfunction is the failure of the hall sensor or inductive sensor.
To check the ignition system and distributor, among other things, observe the spark on the unscrewed spark plug after starting the engine. In garage conditions, you can also check using measuring instruments or indicators.
The distributor capacitor is also one of the parts that often fail. It helps to increase the voltage supplied to the spark plugs when the engine starts. And in order to check it, you need to disconnect it and touch the “ground”, and if a characteristic crackling sound is heard and a voltage drop is observed, the capacitor is working, if this does not happen to the replacement part.
A distributor is always a dismountable unit that can be disconnected, removed from the car, disassembled into components, a problem can be detected and eliminated by replacing the damaged part.
The design and principle of operation of a distributor breaker or distributor - video
The VAZ-2106 car is mainly equipped with a classic electric ignition system.
On the modified VAZ 21065 model, contactless systems were installed. In the classic form, B117A coils are used, in the non-contact system - 27 3705, the main difference of which lies in some details and winding data. The history of the production of the famous VAZ “six” VAZ 2106 dates back to 1976. From the very beginning of its production, a classic of the domestic automobile industry, equipped with an 80 hp engine. forces, has become the most popular and sought-after model among car enthusiasts.
Preparing to replace the BSZ
The work of removing the old ignition and installing a new one does not require any special tools, devices or devices. An inspection ditch is not needed, and the entire operation can be carried out outdoors in good daylight. It is enough to have the following tools:
- a 13 mm open-end wrench for unscrewing the distributor fastening nut;
- using 10 and 8 mm wrenches, remove the coil;
- flat and Phillips screwdriver;
- pliers;
- electric or hand drill with a drill to match the diameters of the switch mounting screws.
Advice. To make the work easier, rent or from a friend a socket wrench with a long handle, which fits onto the ratchet nut and is used to rotate the crankshaft manually.
It is much more convenient to turn the crankshaft with this key
To get started, perform several preliminary disassembly steps:
- Open the hood and disconnect the negative battery terminal.
- Remove the high-voltage wires from the spark plugs and distributor cap.
- Unscrew the spark plugs.
- Place a screwdriver into the spark plug hole of cylinder 1 and turn the crankshaft until the piston reaches TDC. In this case, the mark on the shaft pulley will be opposite the longest mark marked on the cylinder block.
First thing you need to do is disconnect the battery
Advice. If you do not have a wrench for the ratchet nut, the crankshaft can be turned by rotating the suspended rear wheel of the car. Don't forget to secure the car with wheel chocks, release the handbrake and engage 4th or 5th gear.
When the 1st piston is at TDC, the marks on the pulley and block must match
Having matched the marks and prepared new parts, you can proceed to the main stage of work.
Electronic ignition VAZ 2106
Ignition system. 1. Insulator; 2. Ignition coil housing; 3. Insulating paper windings; 4. Primary winding; 5. Secondary winding; 6. Primary winding insulating tube; 7. Output terminal for the end of the primary winding; 8. Contact screw; 9. High voltage terminal; 10. Cover; 11. Terminal “+E” for the output of the beginning of the primary and end of the secondary windings; 12. Central terminal spring; 13. Secondary winding frame; 14. External insulation of the primary winding; 15. Fastening bracket; 16. External magnetic circuit; 17. Core; 18. Contact nut; 19. Spark plug insulator; 20. Rod; 21. Spark plug body; 22. O-ring; 23. Heat sink washer; 24. Central electrode; 25. Side electrode of the spark plug; 26. Distributor roller; 27. Roller oil deflector clutch; 28. Washer; 29. Wire for power supply and distributor; 30. Cover locking spring; 31. Vacuum regulator housing; 32. Diaphragm; 33. Vacuum regulator cover; 34. Nut; 35. Vacuum regulator spring; 36. Vacuum regulator rod; 37. Cam lubrication wick; 38. Ignition timing regulator support plate; 39. Distributor rotor; 40. Side electrode with terminal; 41. Distributor cover; 42. Central electrode with terminal; 43. Angle of the central electrode; 44. Central rotor contact; 45. 5-6 kohm resistor to suppress radio interference; 46. External rotor contact; 47. Ignition timing regulator spring; 48. Centrifugal regulator plate; 49. Weight of ignition timing regulator; 50. Insulating sleeve; 51. Breaker cam; 52. Lever insulating block; 53. Breaker lever; 54. Stand with breaker contacts; 55. Breaker contacts; 56. Movable breaker plate; 57. Capacitor 0.20-0.25 µF; 58. Engine start distributor housing; 59. Bearing of the movable plate of the breaker; 60. Oiler body; 61. Terminal clamp screw; 62. Bearing lock plate; 63. Distributor; 64. Candles; 65. Ignition switch; 66. Ignition coil; 67. Generator; 68. Battery; 69. Sensor-distributor; 70. Switch; 71. Ignition timing; 72. To power supplies; 73. I. Ignition coil; 74. II.Spark plug; 75. III. Ignition distributor; 76. IV. Scheme of the classical system; 77. V. Scheme of operation of the centrifugal ignition timing regulator; 78. VI. Diagram of a contactless system.
Ignition installation for VAZ-2106
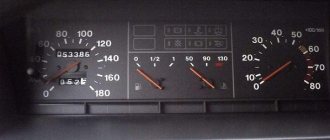
Before installing the ignition system, it is necessary to check the gap of the breaker contacts, which should be within 0.35 ± 0.05 mm. If the gap does not correspond to these parameters, then it will be necessary to install it using a twelve-sided wrench measuring 39 mm. A control lamp helps to set the ignition correctly on the VAZ 2106.
If there is no test lamp available, then you can install it on a spark by connecting a spare spark plug, which will help prevent system failure during work. The ignition is considered to be correctly set when the spark in cylinder I or IV jumps between the first and second exhaust marks. It is worth adding that in the event of oxidation of the breaker contacts, the control lamp will light constantly, regardless of the position of the distributor body.
The most common cases of malfunction of the VAZ 2106 electronic engine start include: failure of the 900706U ball bearing in the distributors, especially the latest years of production, which are equipped with a vacuum corrector diaphragm, breakdown of the distributor cap, slider and resistor in the slider.
The destruction of the ball bearing leads to uneven operation of the car engine at idle and it stops working at full power, while the tachometer needle can “walk” across its entire scale, regardless of engine speed. This situation can be corrected by performing a few simple steps:
- disconnect the vacuum hose from the distributor;
- Having tied a strong knot at its end, put it away so that it does not dangle;
- use a bar to press the vacuum corrector rod in accordance with Figure 24a; if the bar does not fit between the bend of the rod and the body, then its end is made slightly narrower, as shown in Figure 27b;
- re-adjust the gap in the breaker contacts, as described above;
- set the ignition angle to +7°30'
Now you can drive as with the ignition distributor of the first editions, but it is worth considering that in this case there will be an increase in fuel consumption by approximately a third and an increase in exhaust toxicity.
In many ways, the correct operation of the engine starting system depends on the spark plugs installed on it. With just a visual inspection of the spark plugs, you can determine the malfunction of the piston group, ignition and power systems. A spark plug with an oily working surface cannot be restored.
You can try to restore the spark plug by installing it on the second or third cylinders of a well-heated engine, or sandblast the working part. It is recommended to replace spark plugs after every 30,000 km. mileage
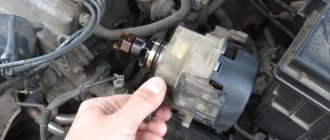
Instructions for connecting short circuit
To carry out the operation of removing and replacing the short circuit, you need to prepare:
- heads or keys for “8” and “10”;
- extension;
- small wrench or ratchet.
The short circuit is located in the left corner of the engine compartment.
The replacement procedure consists of the following steps:
- First, remove the central high-voltage wire from the ignition distributor (distributor).
- Next, you need to use the key set to “8” to disconnect the supply wires from the short-circuit contacts. To correctly connect the wires after installing a new unit, it is better to remember how they are connected or mark them.
- At the next stage, you need to unscrew the two nuts securing the clamp that holds the short circuit housing.
- After unscrewing the clamp nuts, you can remove the coil.
- Next, a new product is installed, all wires are connected according to the marks.
Assembly is carried out in reverse order.