Main malfunctions of the VAZ 2106 ignition system and their causes
VAZ 2109 ignition system, device, principle of operation
Failures in the VAZ 2106 ignition system occur quite often. They can be caused by a variety of reasons, but their symptoms are almost always the same:
- inability to start the engine;
- unstable operation (triplication) of the engine at idle speed;
- reduction in engine power;
- increased gasoline consumption;
- appearance of detonation.
The reasons for such situations may be:
- failure of spark plugs (mechanical damage, breakdown, exhaustion of service life);
- mismatch of spark plug characteristics (incorrect gaps, incorrect heat rating) with engine requirements;
- wear of the conductor, breakdown of the insulating layer in high-voltage wires;
- burnt contacts and (or) distributor slider;
- formation of carbon deposits on the breaker contacts;
- increasing or decreasing the gap between the breaker contacts;
- breakdown of the distributor capacitor;
- short circuit (break) in the bobbin windings;
- malfunction in the group of contacts of the ignition switch.
How to adjust the position of the distributor
If detonation is heard slightly or is absent altogether, then you should turn the distributor. So you need to adjust the ignition until the process settles down to one and a half seconds.
It is worth telling several possible situations of development of events when carrying out this procedure.
So, the ignition order of the VAZ 2106 is as follows:
- When detonation is very fast, that is, disappears after a few seconds, this indicates a normally performed adjustment. If it is after five seconds, then there is no need to make any adjustments.
- Prolonged detonation. To slow down this process, you need to stop and loosen the distributor body, and turn it one compartment forward. Continue these steps until the process continues for the desired period of time.
- No detonation occurs. This is not the correct “symptom”. In this situation, you need to turn the distributor towards minus.
Ignition adjustment of VAZ 2106: preparatory work
If malfunctions occur in the operation of the ignition system, it becomes necessary to adjust it. It is possible to adjust the ignition system either independently or in specialized service centers.
To accurately adjust the ignition, you need a strobe device, which allows you to adjust the car’s ignition in such a way that the internal combustion engine power is maximum, fuel consumption is minimal, and emissions into the atmosphere are within the permissible limits.
How to set the ignition on a VAZ 2106 with your own hands
For independent work on adjusting contact ignition, you will need the following tools and equipment:
- socket wrench set to “13”;
- voltmeter or 12 volt test light;
- spark plug wrench (for installing and removing spark plugs of a car’s internal combustion engine).
Adjustment is carried out on the first or fourth cylinder
Please note that on the VAZ 2106, the ignition is set using marks located on the gas distribution mechanism cover (short - advance angle 10°, medium - advance angle 5°, long - advance angle 0°)
So, in order to understand how to set the ignition on a VAZ 2106 yourself, you need to study the procedure for performing the work. Let's look at how to set the ignition of a VAZ 2106 to the first cylinder:
- Having unscrewed the spark plug of the first cylinder, close the spark plug hole with a rubber plug;
- using a spanner wrench, turn the crankshaft to the compression stroke position in the first cylinder (the rubber plug will be squeezed out);
- continue to turn the crankshaft until its mark coincides with the mark on the timing belt (the middle mark is fuel grade “92” or “95”, the long mark is fuel grade below “72”);
- Unfasten the latches and remove the ignition distributor cover;
when the crankshaft is rotated correctly, the distributor rotor will be rotated to a position in which its outer contact will be directed towards the first cylinder on the distributor cap (when the marks of the cover latches are aligned relative to the internal combustion engine, they should be parallel);
- we connect the wires of the voltmeter or control light to the terminal of the ignition coil connected to the low-voltage wire of the distributor and to ground;
- Having turned on the ignition, you need to slowly turn the distributor clockwise until the lamp goes out or until the voltmeter shows zero;
- rotating the distributor counterclockwise until the lamp lights up, fix it in this position by tightening the fastening nut;
- Turning off the ignition, put the distributor cap back in place;
- using a special strobe device, check whether the ignition is set correctly;
- Also, while driving, you need to make sure that the detonation that occurs disappears as the car accelerates.
Repair of VAZ 2107 distributor
On VAZ 2107 (2105) cars, both a contact and non-contact distributor can be installed, much depends on the year of manufacture of the car. Since the principle of disassembling the breaker-distributor on the “Classic Seven” is exactly the same as discussed above, in this section we will analyze how to properly troubleshoot.
First of all, we inspect the distributor cover:
- there should be no chips or cracks on its surface, both outside and inside;
- the coal on the spring should move freely, without jamming;
- there cannot be burnt contacts on the cover, and the internal contacts must not show signs of wear.
If the condition of the cover is in doubt, it is better to replace the part immediately, especially since it is very inexpensive.
The runner must also be visually intact, without external defects. We check the performance of the part using a multimeter, measure the resistance of the conductive part (resistor) - it should be in the range of 5 to 6 kilo-ohms.
The condition of the contact group is determined by external inspection - the contacts must close tightly, without gaps, and not have signs of burntness or severe wear. If the contacts are slightly burnt, we smooth out the unevenness on them with a file; a badly burnt CG needs to be changed.
The weights on the shaft should move easily, without jamming, and return to their place under the influence of springs. If jamming is observed in the mechanism, the moving joints should be lubricated with machine oil.
The shaft itself should not show signs of wear, and if there is wear on it, it needs to be replaced.
The vacuum ignition timing regulator (VROZH) is easy to check: we draw in air through the fitting with our mouth; if the device is working properly, the “vacuum regulator” rod begins to move.
The distributor bearing should not bite, rotate as desired, or have any play.
Repairing the VAZ 2107 distributor is easy to do yourself; besides, distributor spare parts are always available in auto stores, and they are very inexpensive.
Installing the distributor and adjusting the intercontact gap
When installing a breaker-distributor, it is important to install it so that the OZ is close to ideal
Installation of breaker-distributor
The installation process is identical for contact and non-contact distributors.
Necessary tools and means:
- 38 mm wrench;
- 13 mm wrench;
- control lamp.
The installation procedure is as follows:
- Using a 38 mm wrench, turn the crankshaft by the pulley mounting nut to the right until the mark on the pulley coincides with the middle mark on the timing cover.
- We install the distributor into the cylinder block. We set the slider so that its lateral contact is directed clearly towards the first cylinder.
- We connect all the previously disconnected wires to the distributor, with the exception of the high-voltage ones.
- Connect the hose to the vacuum regulator reservoir.
- Turn on the ignition.
- We connect one probe of the control lamp to the contact bolt of the distributor, and the second to the “ground” of the car.
- We turn the distributor body to the left with our hands until the control lamp lights up.
- We secure the device in this position using a 13 mm wrench and a nut.
Adjusting the breaker contacts
The stability of the power unit, its power characteristics and fuel consumption depend on how accurately the intercontact gap is set.
To adjust the gap you will need:
- 38mm wrench;
- slotted screwdriver;
- flat probe 0.4 mm thick.
Contact adjustments are performed in the following order:
- If the distributor cover and slider are not removed, remove them in accordance with the instructions above.
- Using a 38 mm wrench, turn the engine crankshaft until the cam on the distributor shaft opens the contacts to the maximum distance.
- Using a 0.4 mm feeler gauge, measure the gap size. As already mentioned, it should be 0.35–0.45 mm.
- If the gap does not correspond to the specified parameters, use a slotted screwdriver to slightly loosen the screws securing the contact group stand.
- Use a screwdriver to move the stand towards increasing or decreasing the gap. We take measurements again. If everything is correct, fix the stand by tightening the screws.
- We assemble the breaker-distributor. We connect high-voltage wires to it.
If you are dealing with a contactless distributor, you do not need to make any contact adjustments.
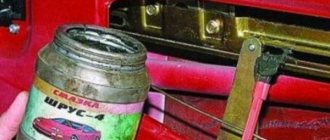
Distributor lubrication
In order for the breaker-distributor to serve as long as possible and not fail at the most inopportune moment, it must be looked after. It is recommended to visually inspect it at least once a quarter, remove dirt from the device, and lubricate it.
At the beginning of the article, we said that there is a special oiler in the distributor housing. It is needed to lubricate the shaft support sleeve. Without lubrication, it will quickly fail and contribute to shaft wear.
Clean engine oil is used for lubrication
To lubricate the bushing, you need to remove the distributor cover, turn the oil can so that its hole opens, and drop 5-6 drops of clean motor oil inside it. This can be done using a special plastic oil can or a medical syringe without a needle.
Video: distributor lubrication
Systematically maintain the distributor of your “penny”, repair it on time, and it will serve for a very long time.
Repair of VAZ 2108 distributor (replacement of the vacuum regulator)
In distributors of VAZ 2108-09-099 cars, the VROZH quite often fails. Its performance can be checked without removing the PR from the engine - we suck in air through the hose, and if a vacuum is not created, the regulator should be changed.
The ignition timing regulator can be replaced on site without removing the distributor:
- unscrew the two screws of the distributor cover, and together with the high-voltage wires, move the cover to the side, disconnecting only the central wire;
- we pull out the slider, it can be removed by hand;
- Using a thin screwdriver, pull out the latch that secures the VROZH rod; you need to remove the fastening element carefully so as not to lose it;
- unscrew the 2 screws securing the “vacuum unit” and remove the device;
- We install the new part in place and put everything back together.
Replacing the VROZH can also be done by removing the distributor, which will even be more convenient. Remove the distributor as follows:
- disconnect the high-voltage wires from the PR cover;
- use a thin screwdriver to hook the retaining springy wire on the connector and remove the plug going to the distributor from the bottom left;
- we pull off the hose from the VROZH, make a mark on the PR body or notice how it stood;
- unscrew the three nuts that secure the distributor itself, and then remove the breaker - distributor.
Reinstalling the distributor is simple - the camshaft spline has a groove shifted to one side, and therefore the PR is installed in only one position, it is impossible to make a mistake here. During installation, you need to pay attention to the rubber O-ring - if the rubber has hardened, the part must be replaced. And in any case, the seal should be coated with an oil-resistant sealant, in which case oil leakage will be almost 100% avoided.
Switch
The last element in the circuit, the presence of which is required by a contactless electronic ignition system, is a switch. The ideal place in which it can be installed in a VAZ 2107 is between the washer reservoir and the left headlight. There is a flat area on which we will install the switch, with the radiator facing the body. Having leaned the switch, we mark the places for drilling holes in the body, through which we fasten it with self-tapping screws; in this case, you need to screw the black (neutral) wire from the connection block under one of the screws.
After completing all the work described above, you should once again carefully check the connection of the wires according to the circuit diagram. If everything is done correctly, you can try to start the engine. Usually there are no problems with this; all that remains is to adjust the ignition to ensure the most efficient operation of the engine.
When is it necessary to set the ignition by marks?
Setting the ignition by marks is necessary when replacing:
- timing belt (scheduled or after a break);
- camshaft gears, pump, tension roller;
- crankshaft pulley;
- flywheel.
In addition, the ignition is checked and adjusted if problems arise with the timely ignition of the mixture. Most often, such problems are caused by the timing belt stretching or “licking” its teeth. If the belt “jumps” even one tooth relative to the mark, the engine will operate in emergency mode.
Preparatory stage
To set the ignition on a VAZ 2107 car, no special conditions are required; the operation can be done both in the garage and on the street, including in winter. For work, prepare the following set of tools:
- flat screwdriver;
- metal probe 0.35 mm thick;
- open-end wrench size 13 mm;
- a car light bulb designed for a voltage of 12 V with wires soldered to it;
- a wrench with a long handle designed to turn the crankshaft;
- key for unscrewing spark plugs.
Ignition tuning tool
Ideally, it is better to have in your arsenal a device for setting the ignition on a running engine - a strobe light. It is equipped with a lamp that flashes simultaneously with the moment of spark formation in the cylinder, which allows you to see the position of the notch on the crankshaft pulley at idle speed and clearly adjust the advance angle.
This is what a strobe looks like, which is convenient for adjusting ignition timing
Important point. The ignition is set in order to ensure that the spark appears in a timely manner and the engine starts, after which additional adjustments will be required. But the latter will not bring you the desired result when there is no compression in the cylinders or problems with the carburetor make themselves felt. If these faults are not eliminated, the engine operation will remain unstable, no matter how you configure the spark generation system.
PURPOSE OF THE DEVICE
One of the most important subsystems of a gasoline engine is the ignition system. The fact is that normal operation of the engine is possible only if the combustion of the fuel-air mixture occurs in a timely manner. Otherwise, the entire work algorithm is disrupted.
During operation of the device, voltage is generated. It is served on candles. It is on them that the spark necessary to ignite the mixture is formed. As a result, the engine starts working and the car moves in the right direction.
For all the processes described above to become a reality, a distributor is needed. In this system it performs the following functions:
- Acts as an initiator of spark formation. This occurs due to the opening of contacts.
- The device directs the generated voltage to the desired spark plug.
- The distributor can, if necessary, change the moment of sparking. This parameter is determined by the driving mode selected by the driver. Also, a lot depends on the quality and type of fuel.
- The device is capable of storing energy in a bobbin.
As you can see, the part performs many functions. It is not surprising that without its normal operation, the operation of the engine is impossible.
How to install contactless (electronic) ignition
Installing electronic ignition is the easiest way to improve engine performance. Replacing with a contactless system provides the following advantages:
- Confident cold start;
- Stable engine operation at any speed;
- High reliability;
- Increases the service life of spark plugs;
- Powerful spark;
- No gap adjustment or centrifugal adjuster required.
The finished kit includes a distributor with a Hall sensor, a special ignition coil and a switch. It is possible to leave the old high-voltage wires.
The electronic ignition system includes: an ignition coil, a distributor, a switch and a set of wires
To install contactless ignition to replace the old one, we need a key for “13” and “10”, two screws for fastening the switch and a strobe for adjusting the advance angle.
The order of work performed:
- We bring the crankshaft pulley to the mark on the engine cover, the piston of the first cylinder should be at TDC.
- Disconnect the negative terminal of the battery.
- Remove the cover from the old distributor and note the position of the slider relative to the engine. This will help you quickly install and configure the new distributor.
- We disconnect the wire coming from the ignition coil, unscrew the lock with a key set to “13” and remove the distributor from the engine block.
- We install the new distributor according to the marks made, trying to align the marks on the body and the position of the slider. Do not tighten the fastening completely.
- We replace the ignition coil with a new one and install the switch under the hood. Place the electronic unit in a dry place, away from heated parts. For example, on the wing or engine shield.
- We connect the wiring according to the diagram in the instructions for the BSZ. We connect high-voltage wires.
- Close the distributor with the lid and tighten the fastening nut. The system is installed and ready to use. All that remains is to adjust the ignition timing.
Adjustment how to set
It is recommended to use a special tool - a strobe light - to adjust contactless ignition. But if it is not there, you can use the following method.
- We set the distributor slider: unscrew the first spark plug, plug the hole with a finger and turn the crankshaft pulley. If air begins to press on your finger, it means you are on the compression stroke. At this moment, position the distributor so that the slider faces the first cylinder.
- Seize the moment of ignition. To do this, connect the central wire from the coil to the spark plug and short it to ground. Turn the distributor against the movement of the slider until the spark jumps from the spark plug. This point should be in the area where the slider interacts with the first cylinder.
- Set the ignition timing completely: with a warm car in second gear, give the gas sharply to the floor. When detonation is heard, set it later, if not, then set it earlier.
Setup video
Contactless ignition uses two important devices - a switch and a Hall sensor. The distributor and sensor must be compatible with each other. The new ignition coil must be an oil-filled type. It is better to take the wires for connecting the system from Niva.
In my free time, I read a lot, play airsoft (a team military sports game) and amateur radio communications. Lots of professional connections. My strengths: communication skills, endurance, responsibility.
Contactless distributor
The device of the distributor, functioning with the electronic ignition mechanism, is similar to the design of a mechanical distributor. This device also has a slider, a plate with a bearing, a vacuum corrector and a centrifugal regulator. However, the contact group and capacitor are replaced by a Hall sensor and a metal screen fixed on the shaft.
The contactless distributor in the 2106th model works as follows:
- A permanent magnet and Hall sensor are located on the moving section. A screen with slits rotates between them.
- As soon as the magnet field is blocked by the screen, the voltage is zero at the terminals and the sensor is inactive.
- When the roller rotates and overcomes the slot, the magnet field reaches the sensor surface. In turn, a voltage is generated at the output of the element, which is sent to the electronic unit (switch). The latter sends a signal to the coil, which generates a discharge going to the ignition slider.
The non-contact dispenser is more durable in operation. The bearing and Hall sensor fail less often due to the lack of mechanical stress.
DETAILS ABOUT THE MOST IMPORTANT ELEMENTS OF THE TRAMBER DEVICE
VACUUM REGULATOR
It is this device that can change the OZ if necessary. As soon as the motor load changes, appropriate adjustments are made to the operation of the distributor device parts.
The vacuum regulator of the distributor is a closed cavity. To ensure better performance, the design is divided by a diaphragm. One cavity goes directly to the carburetor.
When a vacuum occurs, the diaphragm begins to move. As a result, pressure is exerted on the movable disk and the breaker cam. The response time of the latter is adjusted depending on the current situation.
Features of UOZ
The ignition timing angle, or as it is usually designated, the ignition timing, has a number of features that must be taken into account for the stable operation of all components in the engine. The following features are noted:
- In engines that are injected, the OZ is installed independently, since the system has a similar function. The angle at the moment the motor is running is determined. The system is based on the readings of a three-dimensional function and engine load. The operating mode of the engine (winter-summer) and the speed at which the crankshaft rotates is also important. If all indicators correspond to the optimal parameters, the control system independently selects and sets the ignition timing;
- The optimal SOP for a particular engine, in turn, is determined by the speed at which the crankshaft operates. A special feature is the fact that a higher number of revolutions ensures a reduction in the time required for ignition;
- Temperature indicators also affect SOP. Low slows down oxidation processes, as a result of which the likelihood of an early ignition timing increases; high determines late ignition timing.
- The loads that the engine experiences are large and guarantee that there will be a high level of cyclic filling of the cylinder. In this case, it will be necessary to reduce the ignition timing. If this is not done, an explosion may occur in the engine, that is, detonation.
special instructions
In order for the work done to be of the highest quality, it is necessary not only to follow the step-by-step repair steps, but also to correctly carry out the first drive of the car. Its acceleration should not exceed 50 km/h. The test drive should be carried out on a flat road (it is better to choose an asphalt one).
After reaching a speed of 50 km/h, the speed switches to 4th. The gas pedal needs to be pressed sharply. Then you should pay special attention to such an indicator as “ringing of fingers” (or detonation). If it disappears in 1-2 seconds, then the ignition timing is set correctly and there are no problems with the operation of the components. The speed during this test should be 60 km/h.
It will be necessary to check all the actions performed for the absence of errors or carry out the work from the first steps if an incessant detonation knock is clearly audible. This is a signal that early ignition is taking place. In this case, it is recommended to first turn the toggle switch one division against the clock - to “minus”.
If detonation does not follow, you can make another turn, but this time in the “plus” direction - clockwise. It is planned to automate the process of adjustment work or subtuning if necessary - a vacuum regulator is used for this purpose. This method takes into account possible loads on the engine, which makes work easier.
Ignition installation steps
To understand how to set the ignition of the VAZ-2109, (2105, 2106), just read the instructions described below. The design of these models is almost identical. To implement this task, it is necessary to study the design features of the system. The adjustment is carried out in three stages:
1. First you need to unscrew the spark plug above the first cylinder. The empty connector must be closed with a plug or finger; in the process, start turning the crankshaft with a wrench until you find the compression stroke. 2. The ignition crankshaft pulley has a special line, which should be located at the same level as the mark located on the front cover. 3. The distributor should be installed in such a position that the slider is placed parallel to the cover to which the high-voltage cable connector is connected.
Let's look in detail at how to set the ignition of a VAZ 2106 (2105, 2109) and what is needed for this. First you should prepare the following tools: a 13mm wrench, a voltmeter or a light bulb for control. The gas distributor cap has three special marks. They are used to adjust the ignition timing. The labels correspond to the following values:
- short position for an angle of 10 degrees;
middle position - 5;
long label - 0.
Typically, the pulley rim also has a TDC mark. Opposite it, a tide is placed on the hub. The ignition timing value is adjusted only for cylinders 1 and 4. Sequence of stages:
Remove the spark plug from cylinder 1 and plug the hole with a finger or plug. Using a wrench, turn the crankshaft until pressure builds up in cylinder 1 to push out the plug. Then continue turning the crankshaft until one of the marks aligns with the mark on the timing cover.
If the car is operated on 92 (95) grade gasoline, align the mark with the middle mark; if you use fuel with an octane rating of less than 92, place the mark opposite the long strip. Disconnect the distributor. After performing the above operations, the distributor rotor should be in a position in which the outer contact is directed towards the 1st cylinder.
By aligning the marks, you should get an imaginary line running parallel to the motor axis. If you cannot achieve this result, you must proceed with the following operations. First, unscrew the distributor fastening nut using the appropriate wrench, lift the distributor to the top and turn the mechanism to the desired position by turning the rotor axis. Place the part in place, fix it, but do not fully tighten the fastening segments. Next, we will look at the immediate steps of how to set the ignition.
- Prepare a test light (voltmeter). Connect one wire to the output of the coil, to which the low-voltage cable of the distributor should be connected. And connect the other wire to body ground.
Turn on the ignition. At this moment the warning lamp should light up. Next you need to make it go out. If the lamp does not light, skip the next step.
Turn the distributor clockwise until the lamp stops burning (no voltage).
Slowly turn the distributor counterclockwise until the control lamp lights up (voltage appears). After this, fix the location of the part and tighten the fastening segments.
Turn on the ignition and place the distributor cap in its original place.
What is called ignition timing: main points
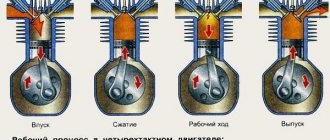
The fuel mixture in the cylinder ignites quickly, but not instantly - a certain amount of time passes (about a second) from the moment the spark is formed and the gases expand until the system is activated. During this time, the piston has time to fire, travel the necessary distance and take part in the ignition process. In order to understand what is called the ignition timing angle, it is necessary to understand how the car ignition system as a whole works.
The moment of ignition occurs at the moment when the piston is on the compression stroke and gradually, smoothly approaches TDC. Then the combustion process occurs of a mixture formed from air (not pure oxygen) and gasoline (or diesel fuel, depending on the type of engine used), which form gases characteristic of the reactions taking place. They actively and without stopping push the piston entering the assembly in a downward direction - this moment is called the power stroke.
The energy generated (released) at the moment of direct combustion transforms into another form - mechanical energy that directly starts the crankshaft. The moment of ignition in 95% of cases is determined by its position relative to TDC. In various diagrams or graphs that discuss this process, it is customary to denote the angle in degrees.
Important to remember! If the angle deviates slightly from the normal value towards an increase, then the moment when ignition occurs is called early. Downward changes guarantee later ignition. In these cases, it is necessary to adjust the ignition timing.
All work is divided into several actions that must be performed sequentially. Their order is as follows:
- The engine will need to be turned off (it must cool down if the problem occurs on the road);
- Control is carried out to ensure that the car does not stand in gear (a standing brake is used for this);
- The car key is removed from the ignition;
- You will need to search for marks that should be located next to the timing belt gear;
- The same mark is revealed on another part - the flywheel;
- Then the adjustment of the ignition timing continues - it is necessary to disconnect the wire (it is high-voltage, you should remember this) that approaches the spark plug from the cylinder closest in distance to the radiators (the first one);
- You will need to insert a new spark plug into the wire;
- For convenience, it should be attached to a ground, which may be a hose holder that supplies fuel, located on the valve cover;
- Next you will need to remove the cover from the toggle switch;
- The crankshaft key is placed on the nut located on the flywheel (the operation is performed on the left side of the car);
- The crankshaft will then need to be turned towards you! (if you twist away from you, the flywheel will unscrew);
- While rotating the flywheel, it is necessary to observe the distributor slider, adjusting its position if necessary so that it is in the contact area of the first cylinder.
How to set the ignition timing You should also take into account the values for the marks:
- long – 00;
- average length – 50;
- short – 100.
They vary and depend on the type of engine and make of the car.
After the marks have been set and all the necessary measurements have been made, the key should be removed from the flywheel. The toggle switch cover needs to be returned to its place. At the next stage of work, the car’s ignition can be turned on.
The motor must remain off (not running). Next steps:
- The nut securing the toggle switch is released (it, in turn, turns counterclockwise);
- Then the toggle switch turns, but in a clockwise direction (you will need to perform the action until a spark jumps) It is recommended to repeat the action 2-3 times;
- The toggle switch is fixed in the position where the spark appears;
- The wire (high voltage) is returned and attached to the spark plug of the first cylinder.
The final step is to check the ignition timing setting visually and then during actual movement (driving a car).
Attention! Before the first movement after adjustment, it is necessary to warm up the engine to the recommended (operating) temperature.
How to disassemble the mechanism at home, see the video below (the author of the video is Roman Romanov).
Signs of a faulty ignition coil, symptoms of problems
The main signs of a faulty ignition coil are:
- The vehicle will not start.
- Reduced motor performance.
- Dips at certain speeds.
- Misfires.
- Coil overheating.
- The Check Engine light is flashing.
It is worth noting that the following factors can contribute to coil failure:
- Insulation damage due to high voltage. This phenomenon can be observed when the voltage is exceeded.
- Overload that occurs when the spark plug or high-voltage wire is faulty.
- Strong vibration and heating, which results in a violation of the insulation of the device. The ignition coil is distinguished by the presence of several layers of insulation. If they are damaged, an insulation breakdown occurs, which leads to a short circuit or even a circuit break.
Checking the coil
In the process of checking the performance of the coil, the first thing to do is check the voltage supply to it.
For this purpose, the voltage supply is turned on and then it is measured between terminal B+ and ground. This value is 12 V. If voltage is not supplied to the coil, then the reason for its absence should be sought in the lock. If normal voltage is present and there is no spark on the spark plugs, it is necessary to measure the resistance of the windings. To do this, the contacts of the measuring device are applied to two side terminals. For the primary winding, the resistance value should be 3-4 ohms.
The resistance of the secondary winding is within 7-9 Ohms. The coil cannot be checked for the presence of a spark by leaning the high-voltage wire against the motor body, since in this case the gap becomes so large that the increased resistance causes breakdown of the winding of the unit, and this leads to failure.
ADJUSTMENT SET IGNITION
The ignition installation on the VAZ 2105 significantly affects the stability of the engine. If it is set incorrectly, various problems arise. If it is early, the following unpleasant moments may occur:
- Detonation appears in the engine, and when accelerating, your fingers “knock” a lot;
- Problems when starting the internal combustion engine - the starter turns with difficulty, there is a kickback;
- The engine shakes when the speed increases;
- Idle speed floats.
Late ignition also has many signs of unstable engine operation, causing quite a lot of trouble for car owners:
- Loss of internal combustion engine power;
- Popping sounds in the carburetor or muffler;
- Dips when pressing the gas pedal;
- Increased engine heating;
- Long engine start.
How to set the ignition on a VAZ 2105 is of interest to many novice car enthusiasts. The adjustment process is not difficult at all, and it is quite easy to do it yourself. What tools are required depends on the methods by which the adjustment will be made.
How to adjust the ignition on a VAZ 2105? There are several ways to set the ignition on a VAZ 2105:
- Using a strobe light;
- I use a 12-volt automotive light bulb;
- Experimentally with the engine running;
- Just by the marks.
Tags When making adjustments on their own, few car owners use a strobe light. At a minimum, it costs 600 rubles, and adjusting the ignition of the VAZ 2105 is so simple that purchasing the device is not justified. The cost of work at a car service center to install the ignition is around 100 rubles. Therefore, sometimes it makes sense to entrust the work to specialists - they have sufficient experience and will do everything quickly and efficiently.
LOOK BY BULB
To set the ignition on a VAZ 2105 using a light bulb, you will need tools and accessories:
- A 12 Volt light bulb screwed into a socket from which two wires come;
- Open-end or combination wrench 13;
- Key for turning the ratchet by 38.
We carry out the work with the engine turned off in the following order:
- We remove the distributor cover, do not pull out the high-voltage wires;
- To set the ignition on a VAZ 2105 according to the marks, turn the crankshaft with a ratchet wrench until the mark on the c/shaft pulley aligns with the middle mark on the front cover of the internal combustion engine. There are only three marks on the cover, and the middle one will indicate an advance of 5 degrees. You also need to take into account that when combining the marks, either the first or fourth cylinder can be set. The cylinder is checked by the slider - the slider should point towards the first cylinder (if you look at the distributor cover);
- We loosen the distributor body with a 13mm wrench - now it can move freely along the axis;
- We connect one end of the wire from the light bulb to ground, the other end to the low voltage circuit in the distributor circuit (possibly with contact “K” on the coil);
- Turn on the ignition by turning the key in the lock and begin to turn the distributor in both directions. As it rotates, the light will turn on and off. You need to find the position in which the lamp starts to light up. It is in this position that you need to secure the distributor with a 13 key;
- The adjustment is completed - turn off the ignition, put the distributor cap in place, remove the light bulb and start the engine to check. When you press the gas pedal very sharply, you should barely hear “fingers” - this will be a sign of the correct setting.
EXPERIMENTALLY BY HEARING
You can use the “old-fashioned” method and make adjustments by ear:
- We start the engine;
- Loosen the nut securing its body by 13, while holding the distributor from turning;
- We try to turn it in one direction or another;
- We find the moment when the engine reaches maximum idle speed;
- Move the body slightly clockwise;
- We fasten the nut to 13 and check the operation of the engine while running. If the adjustment is not satisfactory, we do it again.
Repair of VAZ 2109 distributor
One of the most common problems with the VAZ 2109 distributor is failure of the Hall sensor. If the sensor is faulty, the engine stops starting; we replace this part as follows:
- remove the distributor from the engine;
- unscrew the cover (two screws);
- dismantle the vacuum regulator;
- unscrew the screw holding the sensor connecting block;
- unscrew the fasteners of the upper bearing holder, it is secured with two screws;
- remove the bearing assembly with the sensor, remove the Hall sensor from the holder (two screws);
- we install a new part, assemble the distributor, and put it in place.
After repairing the VAZ2109 distributor, you may need to adjust the ignition; it is done very simply:
- loosen the three nuts of the PR housing itself;
- with the engine running, gradually turn the distributor in one direction or the other, apply gas with the throttle - we find the position in which the engine picks up speed faster, without dips;
- Then we tighten the nuts and check the car while driving. If it was not possible to find the desired position immediately, repeat the operation.
Related articles:
- How to bleed the clutch on a Nissan Qashqai During the operation of the car, air can enter the hydraulic clutch system, which causes poor pedal depressurization, or it “falls in” when pressed, often with [...]
- Replacing the wheel hub of a Ford Focus 2 Replacing the wheel bearing (HS) on a Ford Focus-2 is not very difficult; if you wish and have certain skills, you can do the work yourself. In this article we will look at how […]
- Friction discs in an automatic transmission: replacement, cost Like any parts in a car, friction discs wear out over time, and they can fail for other reasons. This article will look at the symptoms of a malfunction [...]
Checking the ignition angle while the vehicle is moving
It is best to check the functionality of the ignition system after any adjustments while driving. This is due to the design characteristics of the fuel dispenser and the octane number of the gasoline used. It happens that the ignition angles set according to the signs do not provide sufficient dynamics and throttle response. Adjusting the ear when detonation starts will help:
- We accelerate the car to a speed of 45-50 km/h on a flat section of the road;
- We turn on direct gear (on the fourth VAZ 2106) and fully press the accelerator pedal;
- A characteristic ringing sound (detonation) should appear, which will disappear after 2-3 seconds, and acceleration will be smooth and powerful without failures;
- If detonation does not disappear during the entire acceleration, the ignition angle is “early”;
- The complete absence of hum and slow dynamics indicate a delayed spark in the cylinders;
- We adjust the position of the distributor in place, turning it 3-5 degrees;
- When the adjustment is completed, the position of the distributor body relative to the block is marked with a line or paint.
Ignition adjustment work must be carried out regularly. The service interval for a simple contact ignition system is 15,000 km, for an electronic one – twice as long. The condition of spark plugs and high-voltage cables is also regularly checked. All installation operations are easy to do yourself; you don’t need a garage. The ability to independently repair the ignition of a VAZ 2106 is always useful on a long trip or in winter, when problems arise with starting.
Source
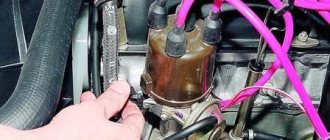
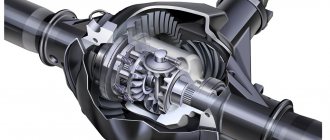
Purpose and types of distributors
The "six" main distributor is located on a horizontal platform to the left of the engine valve cover. The splined shaft of the unit fits into the drive gear inside the cylinder block. The latter rotates through the timing chain and simultaneously rotates the oil pump shaft.
a special platform is provided for installing the distributor on the cylinder block
The distributor performs 3 functions in the ignition system:
- at the right moment, it breaks the electrical circuit of the primary winding of the coil, which is why a high voltage pulse is formed in the secondary;
- alternately directs discharges to the spark plugs in accordance with the operating order of the cylinders (1-3-4-2);
- automatically adjusts the ignition timing when the crankshaft speed changes.
The distributor distributes impulses between the spark plugs and ensures timely ignition
A spark is supplied and the air-fuel mixture is ignited before the piston reaches the top end, so that the fuel has time to burn completely. At idle, the advance angle is 3-5 degrees; with increasing crankshaft speed, this figure should increase.
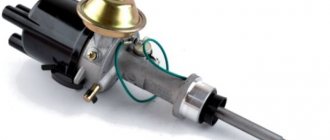
Various modifications of the “six” were equipped with different types of valves:
- VAZ 2106 and 21061 were equipped with engines with a displacement of 1.6 and 1.5 liters, respectively. Due to the height of the block, distributors with a long shaft and a mechanical contact system were installed on the model.
- VAZ 21063 cars were equipped with a 1.3-liter engine with a low cylinder block. Contact valve with a shortened shaft, the difference for models 2106 and 21063 is 7 mm.
- The updated VAZ 21065 series was equipped with contactless distributors with a long rod, which work in conjunction with an electronic ignition system.
The difference in the length of the shafts of 7 mm is explained by the different engine sizes used on the “six”
The difference in the length of the crankshaft depending on the height of the cylinder block does not allow the use of the VAZ 2106 part on a 1.3-liter engine - the distributor simply does not fit into the socket. It will also not be possible to install a spare part with a short shaft on a “clean six”: the splined part will not reach the gear. The rest of the distributor contacts are the same.
As a young, inexperienced driver, I personally encountered the problem of different lengths of ignition distributor rods. On my Zhiguli VAZ 21063, the distributor shaft broke on the road. At the nearest auto store I bought a spare part for the “six” and began installing it on the car. Result: the distributor is not fully inserted, leaving a large gap between the platform and the flange. The seller subsequently explained my mistake and kindly replaced the part with one suitable for the 1.3L engine.
The problem with the "spark"
A fairly common malfunction, especially among car owners of old domestic cars, is associated with loss of spark. It causes a lot of problems for car owners.
As was written above, initially doubts when the spark disappears fall on the contacts of the distributor. But there are other reasons for this. In general, you need to be able to immediately determine if the spark has disappeared, whether this has happened before or this is the first time.
Why is there no spark
So, there may be several options for the spark to disappear. And all of them are connected, whatever one may say, with electrical equipment. The ignition system does not provide full efficiency, and as a result, the power of the internal combustion engine is lost.
More symptoms: the engine jerks while driving (2-4 thousand rpm), it starts hard, popping noises are heard in the exhaust system, the former throttle response has disappeared.