- What types of towbars can you buy on a Chevrolet Niva?
- Do-it-yourself tow bar installation
- Connecting the towbar socket to the car
- Traffic police requirements for towbars in 2022
- Fine for a towbar installed incorrectly
- Registration of tow bar for Chevrolet Niva
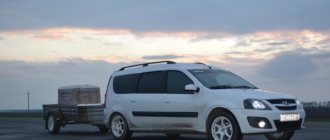
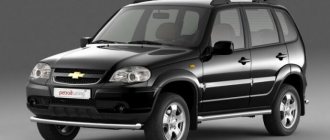
Chevrolet Niva is one of the most popular inexpensive cars in the Russian Federation. You definitely won’t have any problems purchasing and installing a towbar on this model. We talk about how to choose a towbar and install it correctly in our article.
Standard towbar equipment
Not a single Niva Chevrolet car is equipped with a factory tow bar. But such an element can be installed at a vehicle service center or independently. Note that in the lower rear part of the machine there are already technological holes for installing a standard tow kit yourself.
This measure is largely justified, since independent drilling of the bottom of the vehicle can damage the integrity of the entire structure of the rear part of the vehicle, which will have an extremely negative impact on the further process of operation.
You can purchase a tow bar at any specialized retail outlet that sells automotive parts and components. Make sure that the trailed one is made specifically for the specific Niva model. To do this, you need to know the year of manufacture of the vehicle.
The cost of a towbar varies depending on the manufacturer and its design features. The original device will cost significantly more, since it differs from others for the better in its performance. The original towbar is made of high-strength steel, and all connections on it are made using professional equipment, are processed with high quality or are completely absent (monolithic design). It is highly reliable.
The standard equipment of the tow hitch consists of:
- towbar;
- wiring;
- socket for connecting trailer electrical equipment;
- installation kit: bolts, screws, washers and nuts;
- certificate of conformity, which fully confirms the safety of the device;
- instructions.
Additionally, the kit may include a spare ball, which is used to connect to the seat on the trailer stem, as well as a chain for more reliable fixation.
About installation
Before installing a tow bar on a Chevrolet Niva with your own hands, you need to prepare the car:
- Place the car on an overpass or inspection hole.
- De-energize the vehicle.
- Remove the luggage compartment trim.
By and large, any car enthusiast can install a tow bar on a Chevy Niva with his own hands if he has at least some experience in car repairs. The towbar comes with a passport with installation instructions. The only thing to keep in mind is that from 2022, the rules for making changes to the design of the car have been tightened. Now, even on the road, you may be asked for the appropriate papers.
Connecting two lights to the connectors
We connect the wires to the connectors of the right and left lamps with division of the current load, since the current consumed by the lamps located on the trailer is divided into the right and left branches of the car lamps. A connection using this scheme will be more secure. The load on the wires of twin lamps is reduced: it was tripled, but will become doubled, which is much safer.
This method is similar to the previous one. It differs only in the need to connect a double number of wires to the contacts; the number of mounting sleeves will increase.
According to this diagram, the towbar socket is connected to the car in compliance with the safe operation of the car.
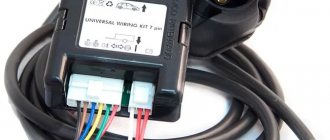
This scheme is called universal. It is recommended for wide use. The towbar socket is connected using a separate wiring harness for controlling the taillights, foglights, and license plate lights, which is connected directly to the mounting block.
The connection point for each wire of the trailer's electrical wiring is located before the fuse terminal, which means there is no additional load on it. To prevent short circuits, the additional harness must be equipped with its own safety block and placed in the trunk of the car.
In this case, the complexity of the connection lies in the fact that it is necessary to lay a wiring harness in the car interior to connect the socket, and additionally spend money on purchasing additional wires.
If the car device has a check of the state of lighting devices and electrical wiring using microprocessors, then the additional harness for the trailer must be connected using special microswitches. This installation work is quite complex and requires the participation of an experienced auto electrician.
Features of connecting the trailer hitch, connection diagrams for the 7-pin device, color designations, plug connection diagram, towbar socket connection diagram.
- How many types of sockets are there?
a) Three types of sockets are available for passenger cars. Thirteen-pin, used in Russia. American or European 7 pin. And there is a special connector.
b) There are two types of sockets on sale. Russian for 13 pins and American for 7 pins.
- What does contact mean, oh?
a) wire going to the left turn signal.
b) Right turn signal wire.
c) A wire that turns on the right and left turn signals.
- Why do they put caps on sockets?
a) The cover is needed to prevent unnecessary wires from being connected to the device.
b) It serves as a protection that protects the outlet from external influences. The cover is needed when the tow bar is not connected to the trailer.
- What contacts can be spliced to simplify the assembly process?
a) You can splice the contacts of two headlights, reverse lights, brake lights, fog lights and side lights. They all turn on synchronously.
b) Any contacts are allowed to be connected. This will make the work easier.
- What does contact mean, oh?
a) Connection to the rear fog lamp.
b) Connection to the vehicle's brake lights.
Top 5 best manufacturers of towbars for cars such as VAZ 2110, Toyota Hilux
Very often, motorists have to transport large loads. Placing them on the roof of a car like a VAZ 2110 is inconvenient and unsafe. That is why you have to deal with connecting the trailer. This must be done correctly - through the tow bar. But in order to make a reliable connection, you will need to buy a device from good manufacturers who have long proven themselves on the market on the positive side. Poor quality equipment will lead to serious consequences - if the turn signals on the trailer turn off, a traffic accident may occur.
List of the best manufacturers:
- Bosal. The manufacturer provides its customers with a wide range of products. All components are qualitatively connected. The best components are used. Instructions for use are always provided with the device. It is clear and visual.
- Thule. The company is also known under the Brink brand. The models are quick-release, so you don’t have to spend a long time fiddling around with connecting and disassembling. The quality of materials and workmanship is very good. The brand has reliably proven itself.
- Auto-Hack. This model has reasonable prices, but the quality of construction is one of the best. You can find a wide selection of products in stores. Quick release models are also available.
- Baltex. People with domestic as well as Chinese cars can purchase. The workmanship is good, but somewhat inferior to previous models. The fasteners are made of stainless steel, and therefore you can drive with a trailer in the rain without any problems.
- Avto S. Suitable for Chinese and Russian cars, both Toyota Hilux and Lada Vesta. The prices are very low.
Varieties
It is not difficult to install the metal component of the tow bar, that is, this entire structure, on the car. Plus, some cars come from the factory with a trailer hitch, that is, a towing device (this is our tow bar, but you already know that).
But you need to connect the towbar socket to the car. Otherwise, it will be impossible to connect the trailer. More precisely, you will perform a mechanical connection with a special lock. Only the trailer lights will not be able to function. If you drive out onto the road in this condition, you risk receiving a serious fine.
When buying a trailer plug or a car towbar socket, be guided by what type of connector they have. By purchasing everything at the same time, there will be no problems with the choice. And when purchased separately, the connector may turn out to be different.
In general, towbar sockets are of two types:
7-pin. This is a European standard scheme that is widely used on domestic cars and our trailers. The connection is quite simple, which is why this type of wiring has gained such popularity;
13-pin or 13-pin socket. A variation designed to connect a car's towbar to trailers such as a motor home. That is, towed devices that need to provide not only connection to lighting devices, unlike 7-pin ones.
Since in most cases a conventional trailer is installed for transporting goods, it is logical to use 7-pin connectors.
But don't be alarmed if the factory trailer plug or the standard towbar socket differ in the number of contacts. For such situations, a special adapter or adapter is provided according to the 7/13 or 13/7 scheme. Accordingly, if the pinout is the same, you won’t have to use any additional adapters.
The emergence of a new Niva
Everything changed with the appearance of a new model in the AvtoVAZ lineup - the Chevrolet Niva:
- The manufacturer has provided attachment points for the trailer hitch;
- They have been reinforced and equipped with threaded connections;
- For operation without a towbar, the attachment points were initially sealed with special tape.
Note! The automaker entered into agreements with trailer hitch manufacturers, which led to the unification of parts for the coupling device, thereby protecting the cars and their owners. This applies not only to the Chevrolet family - installing a towbar on a Priora station wagon has also become safer.
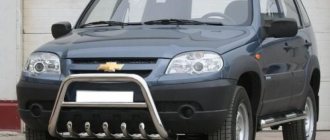
Thanks to this, every owner of new AvtoVAZ cars can independently purchase and install a trailer hitch kit. In addition to towing, the towbar often serves as additional protection for the underbody, as well as making stickers for the headlights, protecting the glass from flying stones.
Useful tips
- Due to the fact that a breakdown of the structure while driving can cause a lot of trouble. Avoid butt welding metal. Therefore, it is preferable to attach steel strips to the edges of the beam by cutting holes in them to the size of the pipe section, putting them on its ends, and then welding them.
- Do not use an angle grinder without protective glasses, and do not cook without a mask: take care of your eyes.
- If you want to paint a new towbar with your own hands, then first, thoroughly prepare its surface for painting. To do this, pickle it with any product that contains phosphoric acid to convert rust. Then sand the surface with waterproof sandpaper, pouring water on it to wash away the waste. Dry the assembly, degrease it with solvent for nitro paints or acetone, and cover it with adhesive primer from a spray can. Dry the soil according to the instructions. Sand with 400 grit sandpaper and water until the surface is evenly matte after the water dries. The surface is ready - dry, degrease with alcohol or B-70 gasoline (the solvent will smear the fresh soil). Then you can paint. After this preparation, your paint will last a very long time.
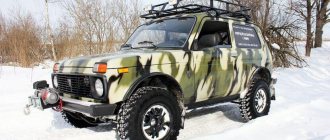
Chevrolet Niva tow bar. What is it and how to install it?
Reading the article will take: 1 minute
Among all the additional devices installed on domestic cars, the Chevrolet Niva tow bar is considered the most common. The car itself allows the use of a tow hitch, as it is an SUV. The manufacturer does not equip cars with towbars, but provides this opportunity to the dealer or the car owner himself.
Purpose and design of the tow bar
In the minds of the vast majority of car owners, the trailer hitch installed on a passenger car performs only one single role - attaching the trailer. In fact, its functions can be expanded a little.
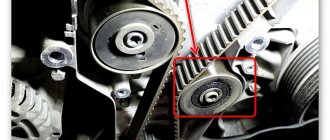
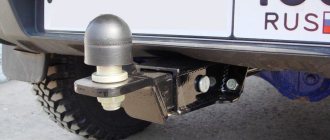
- Provides a hinged connection between the trailer and the vehicle.
- Serves as a power bracket for securing the torus during towing.
- Provides protection to the bumper and exhaust system when driving off-road.
- Gives the exterior a certain style.
Despite the apparent simplicity of the device, it is divided into several component units. The metal frame is made of longitudinal and transverse elements. It is attached to the body in several places and forms a rigid structure with it. The articulated connection between the trailer and the car body is realized using a ball.
A socket is used for the plug connection of the electrical wiring.
How to install a Chevrolet Niva tow bar
Owners of Chevrolet Niva cars received a certain advantage over owners of other brands of domestic cars. The fact is that the factory provides the possibility of installing a towbar and technological holes are made in the car body.
Accordingly, manufacturers of towing devices maintain the correct “geometry”, which allows the frame to be installed along the intended holes. This greatly simplifies the task of self-assembly, since there is no need to drill the body or side members.
It is most convenient to carry out all installation work from the inspection hole, since the future tow bar will be attached to the bottom from below. Theoretically, this work can be done with a couple of jacks. In general, it is necessary to provide access to the underbody at the rear of the vehicle.
Installation process
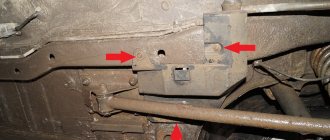
Finding technological holes that are made at the factory is quite problematic. It is necessary to place the towbar in the same way as it will subsequently be attached. Its mounting holes will tell you where to look for fastening points. They are closed with tape.
The towbar is secured with bolts and nuts. First, the cross slats are secured. They are screwed to the side members. After this, the longitudinal rail is attached. If the towbar was sold disassembled, then it is necessary to install and secure the ball. As practice shows, installation does not cause any problems if the device was purchased from a dealer or another supplier that sells spare parts for Niva Chevrolet.
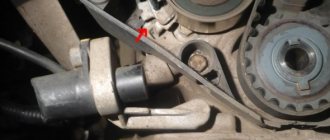
To connect an outlet, you must have basic knowledge of the laws of electric current. The socket is installed on a special bracket located near the ball. Each wire is connected to a separate plug. There are 7 wires in total. Under no circumstances should wires be connected to the rear light power circuit solely by matching colors. First you need to test the connection in any way.
- Turn signal wire (Left).
- Fog lamp.
- Weight.
- Turn signal wire (Right).
- Marker light (Left).
- Stop.
- Marker light (Right).
The wiring from the towbar should be routed inside the trunk on the left. The rear left lamp is dismantled and the wires are connected in accordance with their purpose. The joints are carefully insulated. After installing the flashlight in place, you need to check that the socket is connected correctly.
You should remember the rules for distribution of cargo on the trailer, maximum load and maximum speed on the highway.
chevniva.ru
Operational risks
For this reason, towbars were not produced either, which provoked the growth of all kinds of handicraft industries.
Their “products” suggested 2 types of do-it-yourself installation of a trailer hitch on a car:
- Attaching the towbar to the rear bumper guides;
- Attaching the trailer hitch to the side members and the car body.
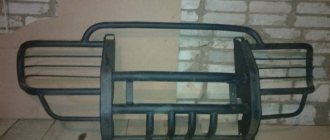
The photo shows how to install the trailer hitch on the bumper brackets
In addition, the “handicraftsmen” also took into account the desires of the owners to equip their Nivas with gas cylinder equipment, which included installing a cylinder in the rear of the body. For this reason, the design of the trailer hitch attached to the side members looked rather unusual.
Installing a towbar on a Niva 21214 with gas equipment provided only this option
Towbar attachment points that have been torn out “with meat” are a natural result of incorrect installation
Read news about the new Niva
- LADA Niva – Operating manual – Official LADA website
- Read everything that is known about the future Niva in the Analysis section in Avto.ru Magazine
- LADA 4×4 3 doors from 523,710 rub. – Prices and configurations – Autocenter Vladimir on Rokadnaya: LADA dealer in Vladimir (Vladimir region)
- Electrical diagrams of Chevrolet Niva VAZ-2123, wiring harnesses
- What to choose Chevrolet Niva or UAZ Patriot
- The modernized Lada Niva Legend (4x4) 2021 was shown on the Internet
- Lada 4×4 Bronto - sales stopped, new details » Lada.Online - all the most interesting and useful about LADA cars
- Description of the instrument panel Lada 4×4 (VAZ 2121, 2131) » Lada.Online - all the most interesting and useful about LADA cars
Comments 11
I remember I came to buy a trailer. The towbar was in the trunk. While my wife was filling out the paperwork, I installed the towbar. I connected it according to his instructions - it turned out to be wrong. I connected it according to the trailer instructions - everything works. They could have messed up the wiring in the trailer - I don't know.
By the way, I didn’t know about the rubber plug; I ran the wiring through the left air duct. It needs to be redone.
In principle, they’ve already suggested it, but I’ll add some little additions for completeness...
The colors in the car are:
Driver's side light Black - Red foot Green reverse Orange/black rear fog lights Yellow dimensions Blue-black left turn
Passenger side light Blue is a right turn
The right turn signal cord stretches through the standard rubber bands to the lights, remove the rubber band, thread the connector, wind up the wire, insert the connector into the headlight, wrap it around the rubber band with electrical tape to the standard wiring, and return the rubber band to its place, under the plastic trim across the trunk, secure the blue wire with electrical tape and that’s it ...
In the towbar socket the numbers are signed, but... 1) left side 2) rear PTF 3) weight 4) right side 5) reverse 6) feet 7) dimensions
I recommend starting with the marker pin (in the center of the socket)
I pull the entire tourniquet outward in a different way than in the picture. a) On the driver’s side, inside the wing, at the canopy, remove the air duct clapper, swaying upwards and pulling... b) Spray everything with water... c) Having wound all the wires at the end with electrical tape, pull the cable through a thin round elastic band, where the black and yellow wires pass d)
We intercept it from below under the elastic band and pull it all back into the cabin. This way we pull the harness through the rubber band and do not interfere with the reinstallation of the flapper valve. If the valve is not installed, then there will be an incredible amount of dust in the cabin(!) e) We tie 60 centimeters to a broaching wire and push it back down, closer to ourselves, sitting in the trunk, the harness passes in the area of the ventilation in the bumper, but closer to the driver ( you need to get there, it’s a matter of skill and luck) e)
Chevrolet Niva 80 tired ponies › Logbook › Installing a towbar socket with your own hands
Having seen a towbar for a Chevy car in a local BBC store and priced at 2,300 rubles, it was decided to take it, because a trailer is sometimes a very useful thing