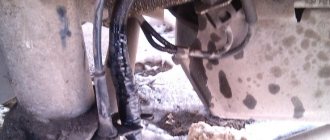
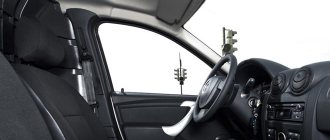
The interior of Priora 2 (after the latest restyling) is significantly different from the previous version of the car. The interior now has a more stylish dashboard (dashboard) with the ability to install a modern multimedia system. If you are engaged in independent modifications or repairs of your car, then you will need instructions for removing the central lining (together with the tunnel, it is also called the “beard”).
The plastic center console is attached to the panel (dashboard) with 6 screws. To gain access to the lower two mounting screws, you will have to remove the tunnel cover:
- Remove 2 screws under the heater and air conditioning control unit;
- Remove the gearshift knob cover by prying it off with a flat screwdriver and remove the 3 screws under the cover;
- Unscrew the 2 lower screws securing the center console .
To remove the remaining four screws securing the center console:
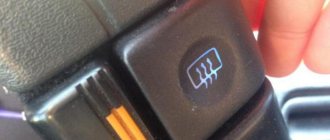
- Remove the upper block of buttons and the plug by prying them off with a flat screwdriver or a plastic spatula;
- Remove the 2 upper console mounting screws;
- Remove the 2 middle console mounting screws .
All that remains is to pull the center console towards you and disconnect the connectors with wires at the back. Installing the plastic cover is done in the reverse order. The process is also shown in the video:
Let us remind you that after removing the center console, it can be covered with vinyl film.
The whole interior is rattling, I bought a model and I want to tighten the panel, tell me how to tighten it, the creaking is fucked
And what glue to use
by Adminrive · Published 04/05/2017
If you paint the stamps with Bolonchik it will last a long time
by Adminrive · Published 04/18/2016
We are selling two Prioras 2011
by Adminrive · Published 07/29/2013
- Comments 5
- Pingbacks 0
where are the side air ducts, there are two bolts
Alexander, and she can’t stand on anything anymore?
Sergey, hold on, I just don’t remember where else
Sergey, at the bottom in the corners there is a bolt I sometimes tighten them up
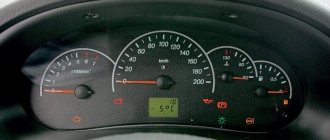
Description of indicators and icons on the instrument panel
The instrument panels of the 1st and 2nd generation Priors are different. Starting from the second generation, Lada Priora receives a full-fledged on-board computer, and in some trim levels even navigation. In addition, some functions are added, which is why there are more icons on the panel.
Priora first generation
Most indicators are standard on all vehicles. Therefore, their designation will be the same even on foreign cars.
| Indicator number | Designation |
| 1 | Tachometer |
| 2 | Starter protection |
| 3 | No charge from generator |
| 4 | Left turn signal |
| 5 | Speedometer |
| 6 | No oil pressure |
| 7 | Right turn signal |
| 8 | Parking brake |
| 9 | Antifreeze temperature indicator |
| 10 | Fuel level indicator |
| 11 | Fuel reserve indicator |
| 12 | Daily mileage reset key |
| 13 | Alarm indicator |
| 14 | EUR malfunction indicator |
| 15 | High beam headlights |
| 16 | Side light |
| 17 | Airbag warning lamp |
| 18 | Immobilizer |
| 19 | Odometer |
| 20 | Unfastened seat belt |
| 21 | Insufficient brake fluid level |
| 22 | Critical wear of brake pads |
| 23 | ABS malfunction |
| 24 | Check Engine - “check the engine” |
Knowing the symbols is necessary in order to notice malfunctions in time and take appropriate measures to eliminate the problem or deliver the car to a car service center.
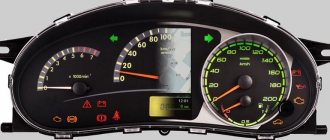
Lada Priora second generation
Since many indicators were discussed above, for Priora 2 only new icons that were not included in the previous table will be described.
| Number | Designation |
| 1 | Cruise control on |
| 2 | Speed limiter enabled |
| 3 | Indicator requiring the brake pedal to be pressed (for AMT) |
| 4 | Stability control indicator |
| 5 | Stability control disabled |
| 6 | Insufficient tire pressure |
| 7 | One of the doors is open |
| 8 | AMT malfunction |
The presence or absence of certain indicators on the Lada Priora instrument panel depends on the configuration. For example, those related to a car with AMT will be inactive for cars with a manual transmission.
Technical improvements
Firmware or chip tuning
In order to improve the speed and agility of your car, you can flash the ECU of the Lada Priora for not very much money. This is done by qualified specialists. Using the firmware, you can customize the car as you wish, whether it is an economical car or a fast car.
Exhaust installation
As you know, a catalyst was installed on the Lada Priora. On cars with high mileage, it often gets clogged and fails, which slows down and slows down the car; replacing it is quite expensive. But there is a way out: replacing the exhaust with a spider without a catalyst. After replacing the catalyst with a spider. The Priora ECU will need to be re-flashed. For a more complete tuning of the Lada Priora exhaust, you can lay out the entire exhaust route. Which is not a cheap activity.
Replacing camshafts
Replacing camshafts with sports ones will increase the speed of the car and make it easier to accelerate and improve dynamics. Such work should be carried out in trusted service stations with subsequent adjustment of the electronic engine control unit.
Lightweight flywheel
Installing a lightweight flywheel will allow the engine to spin faster, thereby gaining speed faster. It was noted that when installing a lightweight one, the car has to move away at higher speeds.
Perforated brake discs
When replacing brake discs, it is best to immediately install perforated brake discs for the Lada Priora. These discs are very well ventilated, which allows them to heat up less and protects the pads from rapid wear.
Self-locking differential
A self-locking differential is installed in the gearbox, which allows both front wheels to spin simultaneously. As a result, a more reliable start from a place is ensured. Installing such a differential is quite difficult; the difficulty lies in adjusting it.
Tuned instrument panels for Lada Priora
Owners of Lada Priora cars are not always satisfied with the functionality of the standard dashboard. Therefore, they come to the decision to replace the shield with a tuned one. This shield provides the following capabilities:
- on-board computer;
- built-in ECU diagnostics with description of error codes;
- more pleasant lighting;
- electronic indication of speed and tachometer parameters.
The leading manufacturers of such instrument panels are Flash, Itelma and Gamma.
The most functional and pleasant is the instrument panel from the Flash company, while Itelma is the official supplier of electronics to the Lada conveyor.
It is worth considering that a tuned instrument panel is quite expensive. Some samples can cost up to 35-40 thousand rubles.
Characteristics
- Post office. Delivery to your locality depends on the distance from Tolyatti. On average 5-14 days in Russia. Delivery cost from 200 rub.
— Russian Post 1st class. Delivery to your locality depends on the distance from Tolyatti. On average 2-6 days in Russia. Cost from 250 rub. and the weight of the parcel is no more than 2 kg.
- Transport companies . We cooperate with many transport companies. During our work, we found out which companies carry out their activities efficiently and inexpensively. Transport companies deliver within 1-10 days across Russia and 5-14 days to Kazakhstan.
— TK PEK (pecom.ru) — One of the large transport companies. Many branches throughout Russia. Delivery from 300 rub.
— TK Ratek (rateksib.ru) — Shipments throughout Russia and Kazakhstan
— TC Business Lines (dellin.ru) — you must send your passport details
— GTD (Former KIT)
— Dispatch across Russia and Kazakhstan.
— ZhelDorExpedition (jde.ru)
— Energy (nrg-tk.ru)
— Pickup . You yourself come and pick up the goods from our office/warehouse. Only by prior appointment.
Notification: Upon dispatch, we will notify you and send you an invoice number (identifier) by which you can track your cargo. Upon arrival at the transport company's branch warehouse, managers will notify you about the arrival of the cargo, the delivery amount and the address by phone and/or SMS.
Russian Post. An arrival notification will be sent to your email address.
2) Online payment via Yandex:
Source
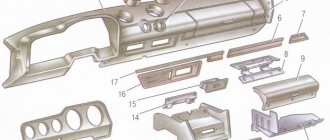
Removing and installing the instrument panel on a Priora
When performing work on installing an alarm system, replacing backlight lamps or the panel itself, it is necessary to remove it.
The replacement work is the same for Lada Priora 1 and 2, since their panels have only minor differences. In this regard, in order to unify and simplify the repair and maintenance of the car, the manufacturer made this procedure identical.
Required tool:
- Phillips head screwdriver;
- flat screwdriver;
- plastic tool for disassembling the interior.
To make a replacement, you must perform the following procedure:
- Under the steering column, remove the lower trim covering the fuse box. To do this, rotate the three clamps 90 degrees.
- Unscrew the four screws securing the instrument panel trim. Two above and two below.
- Remove the decorative trim of the instrument panel.
- Unscrew the two screws securing the panel. Tilt it and disconnect the electrical connector.
- Remove it from the dashboard.
Installation of the instrument panel is carried out in the reverse order.
Conversion of Priora 1 torpedo into Priora 2
It's been so long since I wrote anything... a long time ago... does anyone miss you?
Well, okay, let’s get straight to the point)) I’ll say right away that work is going on and by the way, work is not only on the panel, it’s slow for certain reasons, but things are going and that’s the most important thing))
At the time of purchasing the Priora panel, there was a rush to install the panel from Priora 2, but since it is expensive, and the panel from Priora 1 came across to me very cheaply for my area, so I didn’t even think about refusing)) besides, I immediately had an idea do like Foks91 - buy a kit for converting Priora 1 into Priora 2 - Torpedo Priora 2. Upgrade kit. However, the price stopped me)) and I also didn’t like the fact that the monitor was installed a little far away, which would not be very convenient when using a tablet, and then I accidentally came across people making a visor for a tablet from a Kalina 2 Lux visor - this option interested me, if anyone is interested, I can provide a link send it to the VK group, this is not an advertisement))
Everything seems to be fine, but I liked the option that was a concept, but they didn’t sell it due to a large number of alterations, so the decision immediately came by itself - that means I’ll do it myself)) I took the huskylab post in which he described the alteration as the basis for the alteration for your panel - Installing a Kalina 2 visor on a Priora, thank you very much for your advice on my questions))
In general, after that, I started looking for a visor with nozzles, but when I saw the prices, I was a little taken aback - the prices were 1400-1800 rubles for a visor without nozzles + delivery, and the nozzle separately was not found anywhere... We started thinking about buying a ready-made one, then, suddenly, by chance in Krasnoyarsk in LADA-Detal I found a visor assembly for 725 rubles - I just grabbed it without hesitation))
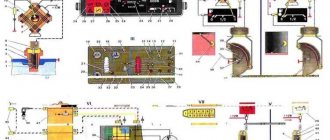
Error codes on the instrument panel of Lada Priora
For the first generation Priora, the manufacturer left a built-in self-diagnosis system for the dashboard itself and the engine ECU. To enter this mode, you must do the following:
- Hold down the daily mileage reset button and turn on the ignition while continuing to hold the button.
- The arrows will begin to move and all the icons will light up. The panel self-diagnosis mode will turn on. If one of the indicators does not light up and the arrow remains in place, the instrument panel is considered faulty and requires replacement.
- Use the buttons on the steering column switch to cycle through the modes. The inscription “Ver” shows the dashboard firmware version. And numbers in the “-*—” format indicate the error code.
- To exit the diagnostic mode, just turn off the ignition and turn it on again.
The interpretation of error codes is presented in the table below:
| Code | Decoding |
| 2 | High mains voltage |
| 3 | Open circuit in the FLS circuit |
| 4 | Problems with the coolant temperature sensor - open circuit |
| 5 | Violations in the work of DTOZH |
| 6 | Engine overheating |
| 7 | Oil pressure too low |
| 8 | Problems with the braking system |
| 9 | Low battery charge |
| E | EEPROM memory error |
You should not completely trust such a diagnostic system. Her testimony is indirect and often does not correspond to reality.
A good way to diagnose a Priora engine is to use scanners like the ELM327. Only such devices can accurately display error codes.
Installation
Replacing the old instrument panel without CAN with a dashboard with navigation without CAN (2170-3801010-50) is carried out without modifications. We remove the old panel and install a new one in its place, insert the connector with wires, connect the antenna (we fix it on the roof) and, if necessary, change the right steering column switch.
If the old instrument cluster without navigation, but with CAN, and instead of it it is planned to install a new dashboard with navigation with CAN (2170-3801010-60), then you need to rearrange contacts 10-11 to 28-29 (if after connecting it still does not work, change 28 and 29 places). See instrument cluster pinout.
After installing the new instrument panel, the mileage will be reset to zero.
Navigation in the instrument panel runs on Windows CE 6.0 along with Navitel software. It is possible to update the software and download navigation maps from a USB card via a special USB input. Operating the car will become much more pleasant, the only drawback is the high price.