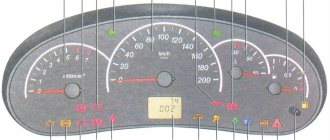
04 July 2016 Lada.Online 143 422 42
After the next update, the Priora began installing a restyled dashboard in the car’s interior. A large display has become located in the center, which can display not only on-board computer information, but also navigation. We'll tell you how to change the old instrument cluster on a Priora or Kalina to a new instrument panel.
Priora instrument clusters
In this group you can buy a Priora instrument cluster
Dashboard Lada Priora
The driver receives almost all information about the state of the car's systems by monitoring the arrows and indicators on the dashboard. The VAZ instrument cluster on the dashboard of different models may vary greatly, but it necessarily reflects such basic parameters as:
vehicle speed (speedometer);
engine speed (tachometer);
coolant temperature in the engine cooling system;
presence and quantity of fuel in the fuel tank;
total vehicle mileage (odometer) and daily mileage;
operation of turn signals, high and low beams and battery charging.
Over the years, the Tolyatti enterprise produced passenger cars under the brands “Zhiguli”, “Niva”, “Sputnik”, “Samara”, “Oka”, and cars supplied to some foreign countries were called “Riva”. Nowadays, the company’s own products bear the Lada logo, and a boat with the inscription “VAZ” is used as an emblem. The first “kopecks”, outwardly similar to the Italian Fiat 124, rolled off the plant’s assembly line back in March 1970, and since then the plant’s model range has only expanded. As models and modifications changed, instrumentation and instrument panels changed accordingly. In general, VAZ dashboards can be divided into several groups:
classic cars (VAZ 2101-VAZ2107)
family "Samara" (VAZ 2108, 2109,21099);
cars of the tenth series (VAZ 2110, 2111,2112, etc.);
modern modifications of Priora, Grant, Kalina.
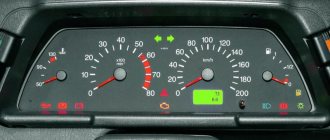
The most interesting of the “classics” is the dashboard of the VAZ 2107, on which, in addition to the dial speedometer and tachometer, the following elements are installed:
a voltmeter showing the current voltage of the car’s electrical network;
dial gauge coolant temperature marked with white, green and red zones;
turn indicators and light signaling;
Check icon (for diagnosing engines with an injection ignition system);
light indicator of the minimum amount of fuel in the tank;
dial gauge of fuel level in the tank;
Onometer and daily mileage sensor.
A special feature of the “seven” dashboard is the presence of an econometer - a device that allows the driver to choose the optimal driving mode in terms of fuel economy.
Instrument cluster Lada . In Samaras, dashboards can be of two types: low and high. Their installation depends on the parameters of the installed torpedo and includes:
dial temperature sensor with graduation and digital designation of initial (50) and critical (130) temperatures;
voltmeter with minimum (8) and maximum (16) voltage graduations;
fuel level sensor with light indicator of the minimum gasoline level (0-1/2-1);
econometer with two-section scale (yellow-white);
odometer and trip meter;
light indicators for low battery, opening of the air damper, critical reduction in the level of brake fluid, activation of the brake brake, turn signals, high and side lighting, heated rear window.
Almost all cars of outdated models had a VAZ mechanical dashboard installed. The speedometer needle showed values transmitted from the engine via a cable. The readings of the light indicators were directly connected to the sensors of the engine and other components and assemblies directly, through the electrical circuit of the car. Technical progress does not stand still and outdated mechanical-electrical panels are being replaced by more advanced and accurate electronic devices. The installation of electronic panels is primarily dictated by compatibility with many other electronic devices of a modern car, as well as the presence of on-board computers. For example, on VAZ Priora cars equipped with the latest electronic panels, you can conduct a self-test by pressing the speedometer reset lever and turning on the ignition. Thanks to this test, you can find out the correct operation of the dial indicators and liquid crystal display, and identify errors in the operation of engine sensors (indicated on the display in the form of numbers). Thus, the instrument panel turns from an element designed only to display current information into a tool for diagnosing vehicle systems. The first Lada dashboard with electronics was installed on the “ten”. The evolution also consisted in the fact that the dashboard of the Lada Priora was located entirely inside the car, although it was illuminated from the inside by lamps. All modern models and modifications of VAZ cars are equipped with electronic instrument panels with LED backlighting and LCD displays that display more than three dozen parameters.
Tags: Priora instrument cluster, Lada Priora dashboard, Priora tidy, Lada Priora instrument cluster
Source
The exclamation mark is on - what to do?
We have noticed that new topics often appear on car forums where drivers ask about the exclamation marks that are displayed on the Lada Priora panel. They rarely specify where it is lit and what is depicted on the icon. In this section we have collected a small FAQ Below are all the exclamation marks that can light up on the instrument panel of a VAZ 2170 car. The designations of these icons are as follows:
- The red exclamation mark in the circle (bottom) is lit. The indicator indicates that there is a problem with the vehicle's brake system. This is usually a low brake fluid level. Add it to the tank and, most likely, the sign will stop lighting. If this does not happen, then it is worth checking the system for damaged components. When igniting, the indicator lights up for 4 seconds and then goes off.
- The red exclamation mark in the triangle/circle (above) is lit. Modern versions use a triangle instead of a circle. The indicator tells us about defects in the operation of the brake force distributor. Use extreme caution if the light comes on while driving.
- Exclamation mark next to the steering wheel icon. When illuminated for a long time, it indicates a malfunction in the electric power steering (EPS). Like other icons, it lights up when ignited and goes out after a few seconds if the system is working properly.
Sometimes the indication is caused by faults in the electronics. Terminals are coming off, contacts are oxidized, defects in the on-board computer are a few reasons for the random appearance of icons. To avoid damaging one of the systems, check the electronics first. To do this, it is enough to dismantle the device on the Lada Priora and see if the terminals are securely seated in the sockets. If the brake system indicator lights up, first check the fluid level in the reservoir, and only then fill in new antifreeze.
Life hack: dashboard of a Lada Priora car, everything you need to know
Priora has several panels, depending on the year of manufacture, plus non-standard ones made specifically for it. Everyone knows how important it is to know the instantaneous status of instruments and machine parameters.
The panel, also known as the control panel, on a Lada Priora car is, in fact, brief information about the condition of the car at the moment. It contains all the basic information, from movement speed to indicator readings on malfunctions of the main units and components of the machine. When something in it doesn’t work, it’s immediately alarming, because it’s current information. A description of all the icons and their meaning can be found below in the article. Technology is gradually developing, so the dashboard is becoming more and more technologically advanced. But since the Lada Priora is a low budget car, the panel on it is of the same quality. On the first devices, the backlight often does not light up, or is only half lit. Of course, this doesn’t look good on Priora.
The instrument panel on the Priora car changed with the restyling of the 2nd Lada car. And Lux cars come with navigation. In fact, its basic functionality remains the same - all basic information is visible. Here you can monitor the operation of the engine, monitoring the speed, and understand that it is time to take the car for maintenance when one of the lights comes on. The price of a first (1) and second (2) generation part starts from 6,000 rubles and above. Tidying saves you from speeding, helps you refuel on time and prevent the Priora from boiling.
Product delivery options
Note! Below are the shipping methods available specifically for this product. Payment options may vary depending on the shipping method. Detailed information can be found on the “Delivery and Payment” page.
Parcel by Russian Post
Available payment methods:
- Cash on delivery (payment upon receipt)
- Using cards Sberbank, VTB, Post Bank, Tinkoff
- Yandex money
- QIWI
- ROBOKASSA
Standard instrument panel - article number and price
The original car tidy exists in three types.
- the first is an option for a pre-restyling car;
- the second panel is for a restyled car;
- and the third is the “Lux” option for the restyled one, which has become faintly similar to all previous torpedoes.
Each of them contains standard elements such as a tachometer, so their functionality does not decrease. . Who wants to do tuning of the instrument panel, this option is for them.
Priora first generation
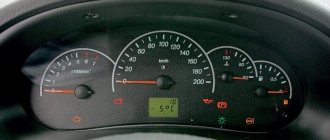
The instrument cluster for the first generation Lada Priora received catalog number 2170-3801010. Cost – about 6,000 rubles. Everything is standard with it - from left to right there are four arc scales with red arrows: odometer, speedometer, coolant temperature, fuel level. Below the speedometer there is a small on-board computer display, and above the arches are all the indicators, including the direction indicators.
Priora 2
For the Priora “Lux” variation there are two more “subtypes” - with or without a CAN bus. Different subtypes were made so that the panel could be connected to any car. Catalog number – 2170-3801010-50 without tire, 2170-3801010-60 with tire. It is distinctive in that it contains an elongated display with a screen that can highlight the navigator.
The catalog number of the combination for the “Norma” assembly is 21720-03801010-20. Cost – 6,500 rubles. Like the “Lux” version, it received a brighter speedometer and odometer, and the coolant temperature along with the fuel level indicator is hidden at the bottom of the speedometer and odometer. The base will not create a route on the display, but will show all the information in color.
Development of a sniffer and study of the CAN bus protocol
After I have access to listen to the CAN bus, I need to decipher who is transmitting what to whom. The CAN packet format is shown in the figure.
All utilities from the can-utils set can parse CAN packets themselves and provide only useful information, namely:
The data is transmitted unencrypted, which made it easier to learn the protocol. On the Raspberry Pi I wrote a small server that redirects data from candump to TCP/IP in order to parse the data stream on the computer and display it beautifully. For macOS I wrote a simple application that adds a cell to the table for each device address and in this cell I can already see what data is changing.
I press the power window button, I found a cell in which the data changes, then I determined which commands correspond to pressing down, pressing up, holding up, holding down.
You can check that the command works by sending from the terminal, for example, the command to raise the left glass up:
cansend can0 181#0200 Commands that transmit devices via the CAN bus in VAG cars (Skoda Octavia 2011), obtained by reverse engineering: // Front Left Glass Up 181#0200 // Front Left Glass Down 181#0800 // Front Right Glass Up 181#2000 // Front Right Glass Down 181#8000 // Back Left Glass Up 181#0002 // Back Left Glass Down 181#0008 // Back Right Glass Up 181#0020 // Back Right Glass Down 181#0080 // Central Lock Open 291#09AA020000 // Central Lock Close 291#0955040000 // Update Light status of central lock (When you send a command to open/close the lock, the LED on the lock control button does not change state so that it shows the real status of the central lock, you need to send an update command) 291#0900000000 I was too lazy to study all the other devices, so in this list, only what was interesting to me.
Icons on the factory dashboard
All indicators should light up like a Christmas tree for three seconds when the engine starts. If some icon remains, it means the system is signaling a breakdown. To make it easier to understand all the indicators, here is a schematic picture:
1,5,9,10 are already known scales that display the main parameters that can change. 19 – on-board computer display. Further:
- 2 – Icon indicating the operation of the braking system.
- 3 – Battery condition. If the light remains on, the battery is discharged or the charge level is too low.
- 4.7 – Doublers for direction indicators (“turn signals”).
- 6 – Oil level (indicates low level).
- 8 – Handbrake. Lights yellow when the lever is tightened.
- 11 – “Gasoline light bulb.” Lights up when there are only 10 liters left.
- 12 – Button for switching on-board computer modes.
- 13 – “Emergency”.
- 14 – Electric power steering (indicates a breakdown).
- 15 – High beam on.
- 16 – Side lights/low beam.
- 17 – Airbag condition (malfunction).
- 18 – Immobilizer (if you hear a beep and the icon itself blinks, the immobilizer is faulty).
- 20 – Seat belts not fastened.
- 21 – Unsatisfactory condition of the service brake system.
- 22 – Disabling the airbag.
- 23 – ABS malfunction.
- 24 – “Check”, “Check Engine” - engine failure.
Possible faults
The instrument cluster does not always tell the truth, and sometimes its readings can mislead the driver - they may seem absurd. For each common malfunction, a brief commentary will be given on the possibility of eliminating them:
- The fault lamp does not light up (check the lamp);
- the lamp is on - check the sensor, reset the error via the diagnostic connector.
If none of the above measures help resolve the problem, carefully inspect the wiring - damage to it may cause the light bulb to activate or deactivate.
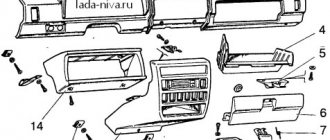
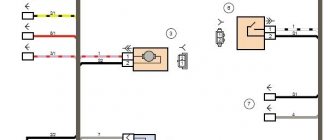
Pinout of the instrument panel of a Priora car
The panel pinout looks quite complicated, but there is a more simplified diagram that will help you figure out the wires connected inside:
- EUR
- "emergency light"
- Engine oil
- Handbrake
- Immobilizer
- Airbags
- Headlights and dimensions
- Right turn signal
- Left turn signal
- Electronic control unit
- Pad wear sensor
- Seat belts (closing sensor)
- ABS
- Reset button
- Brake system, brake fluid
- ABS
- High beam headlights
- Torpedo shield lighting
- "Weight"
- Thirtieth terminal
- Fifteenth terminal
- Fuel consumption
- Forward key
- Back key
- Ambient temperature sensor (minus)
- Ambient temperature sensor (plus)
- Fuel level
- Speed sensors
- Coolant temperature
- Odometer
- Diagnostics of the shield (service)
- Generator regulator
Why is a CAN bus still needed, and the principles of its operation?
A modern car has modern on-board electronics with a huge number of control and executive modules, these include all kinds of controllers, sensors, etc..., and for the exchange of information, reliable and fast data transfer was required for communication between devices.
The modern CAN bus provides a duplex system for the simultaneous reception and transmission of digital information, processing it in one unit, where the data transmission speed plays an important role. The implementation of the canbus is a twisted pair cable and has made it possible to significantly reduce the electromagnetic fields that arise during the operation of the generator and other important vehicle systems.
Typically, CAN bus wiring is orange, distinguished from each other by different colored stripes (CAN-Higt is black, and CAN-Low is orange-gray).
With the advent of the CAN bus and the beginning of its use, the circuit of automobile conductors was freed from a certain number of conductors, which provided communication between the control controller between the diagnostic connector, the engine, multimedia (navigation systems on Android OS), the vehicle security system, etc...., using the KWP 2000 protocol.
Vehicle control protocol using the KWP 2000 CAN bus
The data processing speed via the CAN bus can be up to 1 Mbit/s, and the processing speed of information between vital systems in the car, for example, the ABS braking safety system, the engine transmission is 500 kbit/s. In addition to the main systems, the car has an equipment system that includes airbags, multimedia for the car, control units in the car doors, etc.. can be 100 kbit/s.
When exchanging information between any control units and using a transceiver, the signals for receiving and transmitting information are amplified to the required level.
CAN bus topology and waveforms
Each block connected to the CAN bus has a certain input resistance, as a result of which a CAN module load is formed. The load on the central CAN bus depends on the simultaneous connection and use of actuators and electronic control units of the vehicle and various sensors, for example - the resistance of the power unit connected to the CAN bus is on average 68 Ohms, information and command systems “COMFORT equipment” from 2.0 up to 3.5 kOhm. When the entire system is de-energized, the load resistance of the modules operating via the CAN bus is also turned off.
Fragment of a CAN bus with load distribution in the wires: CAN High CAN Low.
System, automotive control units, in addition to various load resistances, also have a data transfer rate, which can lead to an obstacle when processing different types of impulses.
To solve the technical problem of pulses of different characteristics, a gateway converter is used for communication between buses.
The converter is the so-called gateway interface, in a car it is used in the control unit or as a separate unit, etc... The converter interface is used for various input / output of information from the OBD diagnostic connector, via a specific wire connected to the diagnostic connector and connecting the central control unit with the OBD connector via CAN bus.
OBD is a unified diagnostic connector with a lot of conveniences and advantages for scanning a car for errors and diagnostics.
Block diagram of the gateway CAN interface.
As shown in the picture, communication in the car of the CAN bus electronic blocks occurs using different blocks, but doing one thing, the CAN bus power unit, the information command system and the Comfort system, depending on the brand of the car and their composition, the blocks may differ , but the essence of the idea remains unchanged.
How to enable self-diagnosis of the instrument panel
Using the panel you can “dig into the brains” of the Priora:
- Hold the button under the fuel gauge and turn on the ignition. The display should indicate the start of the test.
- Press the button again. The display should show the operating system version.
- Click again. The system should show error codes:
- (2) – High voltage level;
- (3) – DT malfunction;
- (4) – DTOZH malfunction;
- (5) – DTV malfunction;
- (6) – Motor overheating;
- (7) – Low oil level;
- (8) – Malfunction of the brake system;
- (9) – Battery discharge;
- E – Brain error, EEPROM.
- If necessary, reset the error: hold the button for three seconds.
- Release the button. Click again. All indicators should light up.
- Leave all the buttons. After 30 seconds, the self-test will automatically complete.
Source