When to change antifreeze in Solaris?
Factory recommendation: First replacement 210 thousand km or 120 months. Then every 30 thousand km or 24 months.
Our recommendation is slightly different: If you plan to drive after 200 thousand km and, if possible, avoid problems with the pump, then it is advisable to replace the fluid earlier. Why? Let's figure it out.
- In the manual, the resource is considered in time and mileage. If there are no questions by time, then the mileage figure needs clarification. When the car is mainly driven on the highway, without being in city traffic jams, you can focus on mileage, but usually the opposite is true. In this case, the engine operating time - engine hours - increases significantly and by 200 thousand km the antifreeze already loses a significant part of its properties. It is necessary to take into account that in traffic jams the coolant temperature is higher than on the highway. The difference is almost 10 degrees. You can notice how often the radiator cooling fan comes on during hot weather. Sometimes it works almost non-stop. All this negatively affects the life of the liquid.
- As for the entry in the manual: Then every 30,000 km or 24 months. The entry is strange and only valid if the cheapest coolants are used. If you use high-quality products, such a recommendation will not be correct. The timing and periods of replacement can be significantly extended.
- Another point that is also important is the cleanliness of the radiators. This does not mean inside, but outside - the radiator honeycombs themselves. We have two radiators in front. First the air conditioner radiator, then the main one. If they are clogged, this also affects the operating temperature of the fluid, and therefore its service life.
The bottom of the radiator is clogged with dirt
- Check whether you have radiator protection and in what condition it is. Small plastic part under the bumper.
Without it, radiators clog much faster.
Replacing the expansion tank Hyundai Solaris
photo report
Repair Hyundai Solaris
at a Hyundai car service in Moscow
- Model: Hyundai Solaris RB
- Body type: sedan
- Year, mileage: 2013, 59,000 km
- Gearbox, drive: manual, front
- Engine: 1.4 petrol
Reason for contacting the Hyundai Solaris "Auto-Mig" car service:
- replacing the expansion tank Hyundai Solaris
Description of the problem:
- coolant reservoir broken
Diagnostics revealed the following:
- how this happened is not known for certain, but the fact is that the tank is broken and the frame of the engine cooling fan is cracked. Most likely there was a minor accident, but not everything was replaced and the owner came to us to finish the car.
Completed work:
- replacing the fan frame and expansion tank
- adding antifreeze
replacing the expansion tank Hyundai Solaris
Parts used:
- 25350-1W050 — cooling fan diffuser with expansion tank
The cost (price) of replacing the coolant expansion tank on a Hyundai Solaris can be checked with an auto repair shop technician
servicekia.ru
How do you know if the fluid needs to be replaced or not?
If you bought a used car, you shouldn't look at the mileage. In Solaris it is very easy to twist. You can find out that it is twisted only by indirect signs. Mileage data is stored in only one chip, into which the new mileage is recorded.
The second reason why you should not rely on odometer readings is the possible replacement of the radiator. If the radiator was changed (let's say the car got into an accident or a dog was hit, which happens quite often), then we can assume that the cheapest antifreeze was poured in. For some reason, many people think that they can fill in any color as long as they want it. As a rule, they take the cheapest one.
Recommendation: If the antifreeze does not have a clear factory color, REPLACE IT WITH A NEW one - one that you will be absolutely sure of! If you have a car with a transparent history, use the recommendations above.
How much and what kind of coolant to pour into Hyundai Solaris
The Hyundai Solaris cooling system, including the interior heating system, must be filled with 5.3 liters of liquid.
From the factory, Hyundai Long Life Coolant liquid with Korean specification MS-591-08 is poured into the Solaris cooling system. Green coolant Hyundai R9000-AC001H (Crown LLC A-110) with JIS K 2234 standard and Hyundai MS 591 specification is also suitable as a top-up. Since it is CoolStream A-110 that is poured into cars assembled in Russia. Instead of the original, for a complete replacement, you can use red G12++.
The design of the machine’s motor includes parts made of aluminum, so they must be protected from oxidation and freezing by a liquid made on the basis of ethylene glycol.
The liquid for use in aluminum radiators must have a freezing point of at least -40°C.
The percentage of antifreeze concentrate in water for different temperature conditions is given below:
- down to -15°C – 35%;
- down to -25°C – 40%;
- up to -35°C – 50%;
- to -45°С – 60%.
It is prohibited to use ethanol and methanol as antifreeze, as well as to add it to the recommended coolant. It is also not recommended to use mixtures in which the antifreeze content is more than 60% or less than 35%, since the efficiency of such mixtures is low.
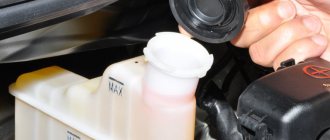
Where to see the fluid level and color
If the car is cold and you just want to see the color of the fluid, it is more convenient to do it here.
On a warm car, the fluid level can be viewed here.
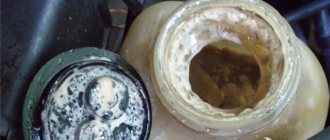
Over time, the tank becomes cloudy, and it becomes difficult to see the level and, even more so, understand the color of antifreeze. In this case, even with a warm car, you can remove the cap from the reservoir and determine the fluid level using the hose. If you look into the tank, you can see the color.
How to check the quality of new antifreeze?
Unfortunately, the situation on the market today is such that when buying even a well-known brand, it is advisable to check the quality of the purchase. Fortunately, this is very easy to do - just heat the liquid to a boil and see at what temperature it boils. It has been noticed that all the raw materials boil very early, but the high-quality ones do not boil before 107 degrees C at atmospheric pressure.
The temperature can be measured using, for example, a multimeter or an infrared thermometer
An infrared thermometer can give an error in the range from 3 to 7 degrees. This needs to be kept in mind.
Only 95, sometimes even below 90
If you do not check the liquid by temperature, check it visually by color. Counterfeit goods, as a rule, always very quickly lose their original color and become colorless or brown.
Reason to think about replacing
If you are unlucky with antifreeze or you have already bought a car with such liquid, the system needs to be flushed. How to do this is written below.
2272-4-9-05
Pour coolant through the filler neck until the liquid flows into the expansion tank.
Pour liquid into the expansion tank 3–4 cm above the L mark. Close the expansion tank lid.
We start the engine, stop it after two minutes of operation and add liquid to the filler neck of the cooling system. Close the filler cap of the cooling system and warm up the engine. We stop the engine and after it has cooled down, check the coolant level and bring it to normal.
[We save up to 5,000 rubles on Hyundai Solaris maintenance] [Hyundai Solaris maintenance for 15 thousand kilometers] [Hyundai Solaris maintenance for 45 thousand kilometers] [Hyundai Solaris maintenance for 60 thousand kilometers] [Do it yourself Maintenance - general recommendations] [Safety rules for carrying out vehicle maintenance yourself] [ Tools required for maintenance of Hyundai Solaris]
Hyundai Solaris coolant replacement
CAREFULLY
removing the radiator cap
• Do not open the radiator cap when the engine is running or hot. This can cause damage to the cooling system and engine, and may cause serious injury due to the release of hot coolant or steam. • stop the engine and wait until it cools down.
When removing the radiator cap, use extreme caution. Wrap the lid in a thick cloth and slowly turn it counterclockwise until it stops. step aside while the pressure in the cooling system is released. Once you are sure the pressure has been released, press down on the radiator cap using a thick cloth and continue to rotate counterclockwise to remove the cap. • Even if the engine is stopped, do not remove the radiator cap or drain plug until the engine and radiator have cooled. Until this point, hot coolant and steam escaping under pressure can cause serious injury.
CAREFULLY
The operation of the electric motor (cooling fan) is controlled by engine coolant temperature, coolant pressure and vehicle speed.
Sometimes it can work even when the engine is stopped. Extreme care must be taken when working near fan blades to avoid injury from the rotating fan blades. When the coolant temperature drops, the electric motor switches off automatically. This is normal.
Check the condition of all cooling and heating system hoses and their connections. Replace any worn or bulging hoses.
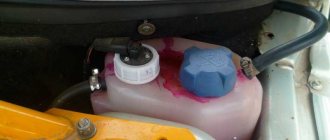
The coolant level should be between the F (full) and L (low) marks marked on the side of the coolant expansion tank.
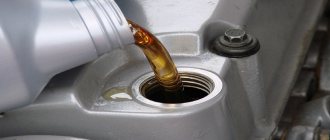
Replacing antifreeze
Replace on a cold engine. If the fluid is drained not because of replacement, but for repair purposes and will be reused in the future, then the CONTAINER SHOULD NOT BE OUT OF OIL!!!.
Swollen hose due to oil
1) The TV has a special hole for draining liquid. If you do not completely unscrew the plug, the antifreeze will drain out neatly.
You can then remove the lower radiator hose. There is also some old antifreeze left in it, but this is no longer necessary.
2) Now you need to remove the remaining old antifreeze from the expansion tank. This can be done with a bulb with a long spout or a syringe with a hose.
3) Before adding new antifreeze, the question may arise: Do I need to flush the system? If the manufacturer’s tolerances and recommendations have been followed, and you don’t see something similar in the photo below, you can immediately fill in new antifreeze.
If you have something like this, it is advisable to flush the system. There are a lot of ways and methods. The cheapest and most accessible one will be described here. It's usually enough. Others may be needed only in case of “global incidents”: for example, when oil from the engine or sealant for radiator repair gets into the antifreeze. This type of repair should be avoided, as it can clog the entire system from the radiator, engine and all the way to the stove.
If rinsing is required, use distilled water. Buy it with a reserve, because you may have to repeat the washing procedure more than once.
4) Fill in new antifreeze or distilled water (if flushing is required).
5) When the level in the neck reaches the top, go to the expansion tank and top up to mark F
6) Start the car. If this is flushing the system, it is not necessary to warm up the machine until the fan operates, but it is necessary to warm it up to operating temperature. You can do this by taking it for a ride or simply adding engine speed on the spot; you can do it at idle speed, but it will take longer to warm up. THERE IS NO NEED TO WORRY ABOUT THE PUMP, which is operating on water at this moment. NOTHING WILL HAPPEN TO HER. We flush the system until the water in it becomes clear.
If this is not flushing, then we warm up the engine before the fan operates. It should work at 96 degrees. On the dashboard, the temperature is displayed in rectangles. Our task is to ensure that they remain in the middle area. If they tend upward towards the letter H and the fan does not work, the engine needs to be turned off and the problem dealt with.
7) After that, all that remains is to once again add antifreeze into the tank to the upper mark F and that’s it, the antifreeze replacement is complete.
Hyundai Solaris Removal installation replacement repair Cooling system Hyundai Solaris instructions
Hyundai Solaris manual > Cooling system Hyundai Solaris
Hyundai Solaris Cooling system
Cooling system: 1 – radiator outlet hose; 2 – coolant pump pulley; 3 – thermostat cover; 4 – hose connecting the expansion tank to the filler neck; 5 – filler cap; 6 – radiator supply hose; 7 – radiator; 8 – expansion tank.
Elements of the cooling system (view from the left side of the engine): 1 – fan impeller; 2 – fan casing; 3 – additional resistor; 4 – radiator; 5 – radiator supply hose; 6 – filler neck; 7 – inlet hose; 8 – outlet pipe; 9 – coolant temperature sensor; 10 – heater radiator supply hose; 11 – heater radiator outlet hose; 12 – liquid supply tube to the pump; 13 – hose for supplying fluid to the throttle assembly heating block; 14 – hose for draining fluid from the throttle assembly heating unit.
The cooling system is liquid, closed type, with forced circulation. It consists of an expansion tank, a coolant pump, an engine cooling jacket, a thermostat, connecting hoses and a radiator with an electric fan. A heater radiator is connected to the cooling system. The system is filled with coolant through a separate filler neck attached to the intake manifold and connected by hoses to the outlet pipe of the cylinder head and the radiator.
Fan casing with expansion tank
The expansion tank, mounted on the cooling system fan casing, is made of translucent plastic, which allows you to visually monitor the level of coolant in the tank. The tank serves to maintain a constant level of coolant in the cooling system.
Hoses 1 and 2, connected to the fittings of the expansion tank cap, connect the tank to the filler neck of the cooling system.
When heated, the liquid in the cooling system expands, and some of it is forced into the expansion tank. As the engine cools, liquid from the reservoir flows into the cooling system. The tightness of the cooling system is ensured by the inlet and outlet valves in the filler cap.
Filler neck and filler cap.
The exhaust valve maintains increased (1.1 bar), compared to atmospheric pressure, in the system on a hot engine. Due to this, the boiling point of the liquid increases and steam losses are reduced. The intake valve opens when the pressure in the system decreases as the engine cools down. If the filler cap is lost, do not replace it with a sealed cap without valves.
Coolant pump: impeller; pump housing; hub.
The circulation of liquid in the cooling system is ensured by a centrifugal-type vane pump, the impeller of which is driven by a poly-V-belt from the auxiliary drive pulley. The pump is attached to the cylinder block on the right.
Coolant pump elements: 1 – roller; 2 – hub; 3 – control hole; 4 – plug of the cavity for accumulating liquid; 5 – body.
The pump housing has a roller that rotates in a sealed bearing that does not require replenishment of lubricant. A hub and impeller are pressed onto the ends of the roller. The shaft seal is ensured by the pump seal. There is a cavity in the lower part of the pump housing, the outlet of which is closed with a plug. With significant wear of the seal, when liquid seeps through the sealing roller, liquid gradually accumulates in the cavity. When the liquid completely fills the cavity, it will begin to flow out through the control hole in the cavity. This indicates the need to replace the pump, since it cannot be repaired. The pump pumps coolant through the cooling jackets of the engine block and cylinder head. Through the outlet pipe located on the left end of the cylinder head, the liquid enters the radiator of the cooling system, the heater radiator and the throttle assembly heating unit. From the radiator of the cooling system, the liquid returns to the pump through the thermostat, and from the heater radiator and the throttle assembly heating unit - through a tube located on the front wall of the cylinder block under the intake manifold.
Location of the thermostat on the cylinder block (for clarity, shown on a removed engine): 1 – coolant pump; 2 – cylinder block; 3 – tube for supplying fluid to the pump from the heater radiator and the throttle assembly heating unit; 4 – thermostat cover.
The thermostat helps accelerate engine warm-up, automatically maintains its thermal conditions within specified limits, and regulates the amount of fluid passing through the radiator. A metal cylinder with a heat-sensitive filler is installed inside the thermostat. The cylinder is hermetically sealed with a rubber insert. When heated, the filler melts and increases its volume, squeezing the insert. The rubber insert is deformed and pushes the rod, opening the thermostat valve. When the engine is cold, the thermostat valve is closed and blocks the flow of coolant through the radiator of the cooling system. In this case, all the liquid circulates in a small circle, which includes the engine cooling jacket, exhaust pipe, heater radiator and throttle body heating unit, and then returns through the tube to the pump.
Thermostat: thermostat valve; sealing gasket; drain valve.
As the engine warms up, when the coolant temperature reaches 82±1.5 °C, the thermostat valve begins to open, allowing a flow of liquid into the radiator of the cooling system. At a temperature of 95 °C, the thermostat valve opens completely (full stroke of the valve stem is 8 mm) and the liquid enters the radiator of the cooling system, where it releases heat to the surrounding air. The movement of liquid through the engine cooling jacket and the radiator of the cooling system forms a large circulation circle. The thermostat valve closes at a liquid temperature of 80 °C. Fluid circulates constantly through the throttle body heating unit and the heater radiator and does not depend on the position of the thermostat valve.
Radiator: drain plug; left radiator tank; radiator inlet pipe; right radiator tank; radiator outlet pipe.
The radiator of the cooling system consists of two vertically located plastic tanks connected by aluminum tubes with cooling plates arranged in one row. The liquid enters the radiator through the pipe of the left tank, and is discharged through the pipe of the right tank. To drain the coolant from the system, there is a drain at the bottom of the left tank hole closed with a stopper.
Fan with casing assembly: fan casing; fan impeller; additional resistor.
The electric fan is installed in a casing behind the radiator. The operation of the fan is controlled by the engine electronic control unit (ECU), which, through relay K3 or K8, ensures rotation of the fan impeller at one of two speeds (low and high) depending on the operating conditions of the engine.
Additional fan resistor
The operation of the fan at low speed is ensured by an additional resistor installed on the radiator shroud.
Coolant temperature sensor
The coolant temperature sensor is screwed into the hole in the exhaust pipe of the cooling system. The sensor provides information to the temperature gauge in the instrument cluster, the engine overheating indicator and the electronic unit of the engine control system.
Cooling system Hyundai Solaris
Order the paper book “Hyundai Solaris repair manual”
Download the e-book “Hyundai Solaris repair manual”
www.hyundai-solaris.dv13.ru
Video clip: Replacing antifreeze
In the video, the replacement is carried out on a Kia Rio 3. Technically a complete analogue of the Hyundai Solaris.
Before starting work, turn the temperature regulator to the hottest position.
Set the regulator to the hottest position
Your browser does not support the format
Articles and numbers of antifreeze
0710000400 - original Korean Hyundai/Kia antifreeze in a 4l canister. 0710000200 - the same antifreeze, but in a 2 liter canister.
R9000AC001K and R9000AC001H are original antifreezes used in Russia. The last letter of the number means the difference in the antifreeze packaging: K - Kia, N - Hyundai. Canister volume 1 l.