The electric motor of the heater fan (“stove”) on VAZ 2108, 2109, 21099 cars and their modifications is a commutator, DC motor with excitation from permanent magnets. Has three rotation speeds. The speed is selected by a four-position switch on the instrument panel. Below are the electrical diagrams for connecting it.
Wiring diagram for the electric motor fan (“stove”) of VAZ 2108, 2109, 21099 cars with a “low” instrument panel and mounting block 17.3722
Wiring diagram for the electric motor fan (“stove”) of VAZ 2108, 2109, 21099 cars with a “high” instrument panel and mounting block 2114
Notes and additions
— The fan electric motor can be connected to the on-board network either directly (highest speed) or through an additional resistor having two resistance spirals (0.23 Ohm and 0.82 Ohm). If both spirals are included in the chain, the speed is low, if one is 0.23, the speed is average.
More articles on electrical equipment of VAZ 2108, 2109, 21099 cars
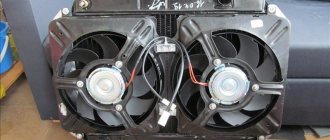
The stove on the VAZ 2121, 2131 has a number of advantages and disadvantages. One of them is associated with an electric fan, which not only blows weakly, but also makes a lot of noise and whistles during operation. Replacing it with a new type fan will solve only part of the problems. As practice shows, it is better to install an additional fan from the figure eight “snail” type.
The point of the modernization is to install on the Niva an additional electric fan from the VAZ 2108, which will be located in the engine compartment inside the air intake, where it is normally positioned at figure eight. Let us remind you that the standard Niva 4x4 fan is located inside a plastic box in the cabin.
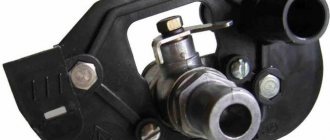
You will need: a figure-eight stove fan with a casing (catalog number: 2108-8101091).
The fan control can be left as standard, then there will be the least amount of modifications. Or use additional parts from the VAZ 2108:
- an additional heater resistor (article: 2108-8101081), which will need to be placed in the air intake next to the fan;
- fan speed switch (2108-3709608), which is mounted on a panel in the SUV interior.
Heater Air Ducts and Control Parts
1 – window for air supply to the feet of the driver and passenger; 2 – crane control rod; 3 – heater casing; 4 – draft of the foot heating flap; 5 – heater valve; 6, 10 – side nozzle; 7, 9 – side nozzle air duct; 8 – air duct for heating the windshield; 11 – central nozzle; 12 – draft of the glass heating damper; 13 – control handle for the valve and heater damper; 14 – control handle for the heated windshield damper; 15 – control handle for the foot heating damper; 16 – heater control damper rod; 17 – internal ventilation duct; 18 – windows for heating the feet of rear passengers
Diagram and explanations for it
Below is a diagram of the parts that make up the heater system of a VAZ 2110 car.
Detailed diagram of the VAZ 2110 stove design
It is worth saying that recirculation operates in the “tens” heater system, as the diagram tells us. In simple words: air circulates inside the VAZ 2110, and is not taken from the street. The main advantage is that dust and unpleasant odors do not enter the cabin from the street. There are more disadvantages to such a stove system - the glass quickly fogs up. It is recommended to open windows more often if the outside temperature allows it. Air stagnation negatively affects the health of the driver and his companions. The heater gear motor can rarely be repaired, so it should be replaced immediately.
The diagram shows how automatic heating control occurs
For VAZ 2110 owners who want to modify the heater system or carry out electrical repairs, an automatic control circuit will be useful.
https://youtube.com/watch?v=videoseries
https://youtube.com/watch?v=videoseries
Revision instructions
Remove the air intake box (popularly called “boot”):
- In the interior, unscrew 4 nuts using a 10mm wrench;
- In the engine compartment, an assistant holds the bolts with the same key;
- Remove the air intake.
Remake the “boot” and install a fan in it:
- Cut off part of the plastic a little from the side so that the fan housing does not interfere with the hood lock;
- We cut off all the protruding parts of the fan mount and place it inside the “boot”;
- Secure the fan, securing its housing with sealant.
- We close the space around the fan nozzle with suitable material to prevent air outflow;
- We install the casing with the fan in place, laying the wires;
- We check that the hood closes without problems.
The result should be a design as shown in the video:
The damper can be left in place, but if it is removed, there will be no additional obstruction to the air flow into the cabin.
DIY repair
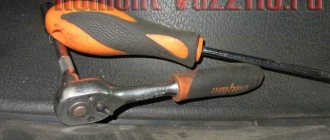
To carry out repairs yourself, you need to use the following tools:
- a Phillips head screwdriver;
- 10mm wrench.
When dismantling, you need to remove the plastic trim, which is located on the outside of the windshield. To remove it, you need to open the hood and remove the 5 bolts that secure the trim to the body. Remove the rubber seal from the engine compartment and pry the casing with a screwdriver to get to the motor and oven fan. Now you can remove the motor. It is attached to the body of the VAZ 2108 with two bolts.
When the clamps are disconnected, you can turn off the power and disconnect the positive wire of the furnace under the dashboard. The negative one is attached over a special thread and pressed down with a special nut. You need to unscrew the nut by touch and fold back the negative wire. By disconnecting the wires, you can remove the motor and install a new fan. The entire structure is assembled in reverse order.
It is important to note that breakdowns associated with the stove also depend on which panel is installed on the VAZ - low or high. Both have their downsides. For example, on a high one the central flap does not open completely. It is she who is responsible for supplying cold and hot air to the car interior. To solve this, you need to adjust the damper. And to get to it you need to disassemble the dashboard.
If we talk about the low panel, this is where the thermostat often breaks. Of course, if it wears out, the oven will not work. It is recommended to change it every two or three years. And if replacement does not solve the problems, it is worth replacing the hoses that connect the stove and radiator.
Photo gallery “Stove removal and repairs”
In the photos provided below you can see in more detail how the furnace repair scheme occurs.
Choosing a stove
Car heaters are divided into two categories depending on the connection method:
- stoves that are connected via the cigarette lighter;
- stoves that connect directly to the heating system of the car itself.
The first option is no different from a regular home heater. It consumes a lot of energy and is not very convenient to operate - it will not be possible to set the parameters using the standard means of the machine.
The second option is more economical and will be more convenient to use in the future. Let's stop at this option.
Design Features
For the VAZ 2110, it is possible to install two types of stoves - new and old. Regardless of the engine used (injection or carburetor), there are no fundamental differences in the designs of the stoves.
But what is the difference between the new and old type stoves? Let's try to figure it out.
- Radiator design. This is the main difference between the devices. Therefore, when replacing a radiator from an old one to a new one, be sure to take into account the installation nuances;
- The controller knob on stoves is slightly different. Old-style heaters have a main problem - they have been discontinued. They cannot be an analogue for 4 and 5 position controllers, which began to be equipped with dozens of them in the fall of 2003;
- The micro-gear motors for the stoves are different, starting in September of the same 2003. The difference lies in the shaft position sensors (resistors). Therefore, when making repairs, make sure that the devices are truly interchangeable and that you bought old-style resistors for your old stove, not new ones. Otherwise the gearmotor will not work.
Direct installation
Before starting installation, you need to let the motor cool down. It's better to let it cool naturally. Then you need to drain the coolant into a previously prepared and clean container. It will still be useful, so it is better to make sure that it remains as clean as possible.
Next, take the new additional pump to the Gazelle stove and tighten the screws from the impeller side. The rubber gasket, which you will definitely find there, needs to be coated with a silicone-based sealant to prevent leakage. Then assemble this structure back, but throw away the screws, and instead install thin long bolts under ordinary nuts. This way you can make the connection as tight as possible.
Removing and disassembling the heater on a car with a VAZ-21124 engine
| EXECUTION ORDER |
|
|
|
|
We do not disconnect the steam exhaust hose from the heater radiator, since its fastening clamp is difficult to access. It is easier to disconnect this hose from the expansion tank pipe (see Removing the expansion tank) and remove the heater housing along with the hose.
|
|
|
|
|
- Unscrew the nut of the upper fastening of the heat shield of the steering rack cover.
|
|
When dismantling the heater electric motor assembled with the impeller, remove the cover of the air purification filter entering the interior ventilation and heating system.
You can also dismantle the heater motor in a car, but to do this you will have to perform all the operations necessary to remove the heater housing assembly. You can only not remove the body from the engine compartment, but only pull it out to a sufficient distance.
| EXECUTION ORDER | |
|
|
- We take out the screws...
|
- To remove the heater core...
|
|
|
- We take out the screws and remove the lock washers located under them.
|
The heater components are not subject to further disassembly. If they fail, it is better to replace them with new ones. There is no point in separating the body parts, since they usually do not fail until the end of the vehicle's service life.
We install the removed components and parts in the reverse order.
When installing the heater housing assembly on a vehicle, you should be prepared for the fact that the heater housing is difficult to fit into place. The installation of the housing should begin from the middle of the engine shield, directing the right (along the direction of the car) part of the housing, first towards the starboard side and down, and then up. It is better to carry out the installation with an assistant.
| previous page20.2.7. Car bodies with VAZ-21114 and VAZ-21124 engines | next page 21. Applications |
Car modifications
VAZ-2108 . The base model of the car, it was equipped with a 1.3-liter carburetor engine, was equipped with both a 4- and 5-speed gearbox.
VAZ-21081 . Modification of a car with a derated 1.1 liter engine and a 4-speed gearbox.
VAZ-21083 . Modification of a car with a 1.5 liter carburetor engine. This car was equipped with a 5-speed gearbox.
VAZ-21083-00 . A modification of the VAZ-21083 car as standard, an index of this length began to be assigned in 2001.
VAZ-21083-01 . Modification of the VAZ-21083 car in the “norm” configuration.
VAZ-21083-02 . Modification of the VAZ-21083 car in the “luxury” configuration.
VAZ-21083-20 . Modification of the VAZ-21083, but with an injection 1.5 liter engine. The car was equipped with a 5-speed gearbox.
VAZ-21083-21 . Like the previous model, but in the “norm” configuration.
VAZ-21083-22 . Modification of the VAZ-21083 car with an injection engine and a 5-speed gearbox in the “luxury” configuration.
VAZ-21083-37 . A sports model with a 1.5-liter fuel-injected engine and a 5-speed gearbox. Designed for participation in the NGS "Lada Cup"
VAZ-210834 "Tarzan" . A prototype of an all-wheel drive SUV, developed in 1998 based on model 21083. The car was made as follows: on the frame of the VAZ-21213 Niva, on which the suspension, steering, engine, gearbox and transfer case were already installed, the body from the VAZ-21083 was installed . The junctions between the frame and the body were covered with plastic covers that look like thresholds. The wheel arches were also enlarged, on which linings were installed, and the bumpers were changed.
VAZ-21084 . Pilot production batch of cars with a larger 1.6-liter engine. It was a VAZ-21083 engine, but with a block increased in height by 1.2 millimeters, in which the head was slightly modified and a new crankshaft and camshafts were installed. The piston was also modified, the new pistons were cut by 1.8 millimeters in height, and their diameter was 82 millimeters.
VAZ-21085. Modification with an injection 16-valve engine from a VAZ-2112 with a volume of 1500 cm3 and a power of 92 horsepower. The car was equipped with a 5-speed gearbox.
VAZ-21086 . Export VAZ-2108 with right-hand drive for countries with left-hand traffic.
VAZ-21087 . Export deformed modification of the VAZ-21081 for countries with left-hand traffic.
VAZ-21088 . Export modification of the VAZ-21083 model with right-hand drive.
VAZ-2108-91 . A modified V8 with a two-section VAZ-415 rotary piston engine, 1.3 liters and 140 horsepower.
VAZ-2108 X. The development of this modification began in 1985 by order of Aeroflot. A total of 10 cars were produced, which were designed to measure runway friction coefficient. Based on the information received, the braking distance of aircraft is predicted, and in the case of a wet runway, the speed at which aquaplaning begins. The dispatcher transmits the data from these measurements on board the landing aircraft.
The main reasons for poor operation of an electric furnace
VAZ 2110 stove diagram
Before you can directly begin to find a solution to a problem, you need to be able to identify it quickly and effectively. First, it is advisable to consider the general structure of the furnace. So, the heater furnace consists of the following components:
- mounting block fuse;
- incendiary lock;
- ignition switch together with its unloading relay;
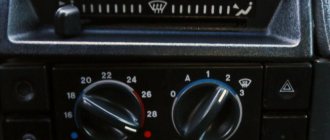
- a special switch that regulates the operating mode of the furnace electric motor;
- additionally built-in resistor;
- stove motor;
- heated rear window of the car, which contains a heater adjustment button with a light indicator;
- a special functional element for heating glass.
VAZ 2110 stove wiring diagram
One of the reasons for the malfunction of the electronic circuit of the furnace may be the lack of functional activity of the heater electric motor at both low and high speeds. In this situation, you must proceed as follows:
- First you should make sure that the fuse has not accidentally blown;
- If a blown fuse is detected, it will urgently need to be replaced with a new one.
Note. Before proceeding directly to replacing the old fuse with a new one, it is necessary to first and without fail establish the cause of the burnout. If this is not done, the service life of the new fuse will most likely be short.
- There may also be a break or damage to the wiring at the point of its connection;
- to eliminate the above reason, it is necessary to check the electrical circuit according to the furnace diagram;
- after which, it is necessary to eliminate the impulse, if it took place;
- if the heating switch does not function, then the most likely cause is a stuck pusher or burnt contacts;
- to accurately diagnose a switch malfunction, you need to check the voltage level at the side terminals while changing the position of the switch in space (to do this, it is enough to apply current to the main terminal);
- if during diagnostics a change in voltage is not detected when changing the position of the switch knob, then it must be urgently replaced;
- there are a huge number of possible reasons for the electric motor to fail to operate: broken electrical connections or armature winding, immobilized cleaning brush, oxidation and/or contamination of the armature commutator;
VAZ 2110 heater radiator diagram
- It’s not difficult to revive the movements of the brush again; just disassemble it and then clean it;
- restoring the wires will also not be difficult, because the main thing is to find the location of the defect;
- if several of the above provisions do not produce results, then there is only one way out - a complete replacement of the heater electric motor;
VAZ 2110 stove electrical diagram
- sometimes, which is extremely rare, the cause of the malfunction may be the mounting block;
- There are many reasons for the faulty state of the mounting block, but the main ones are: at the soldering site, a complete or partial break in the electrical circuit, fire of current-carrying paths;
- The circuit should be checked according to the furnace diagram, otherwise it will simply be impossible to detect breaks and faults;
- the final practically probable cause may be an internal break in the circuit of the auxiliary (additional) resistor (see How to replace the heater resistor on a VAZ 2110);
VAZ 2110 stove wiring diagram
To eliminate a malfunction associated with the operation of the resistor, it is necessary to check its circuits.
A decrease in armature rotation in the electric motor is one of the reasons for the malfunction in the general circuit of the furnace. In this case, it is necessary to be able to find and eliminate micro-causes, and in particular:
- in case of clogging or oxidation of the collector system armature, the number of rotations of the electric motor will also be reduced;
- to eliminate the above problem, you will need to perform a general cleaning of the collector system;
- sometimes a short circuit may occur in the area between the turns of the armature winding, and to eliminate this cause, it is necessary to check the amount of incoming current;
- everything is very simple, if there is a short circuit of the turns, then the input current will exceed 4.5A;
Note. It is necessary to measure the incoming current only after a preliminary check of the objectivity of the ammeter readings.
Electrical diagram of the stove and main faults
In the “nine”, the VAZ heating system operates using an electric drive. The instruction manual for the VAZ 2109 high panel shows an electrical diagram of the stove's operation. The interior heater connection diagram consists of:
- fan motor;
- the ignition switch, which turns on the stove;
- operating mode switch;
- additional resistor;
- fuse mounting block (fuse F4 is responsible for the stove in the “nine”).
When the VAZ 2109 stove does not heat well in the cabin, there can be a lot of reasons for this.
Typical faults
As with any mechanism, problems can occur in the heating system (video author - Andrey Kuzemsky).
If the VAZ 2108 heater motor is broken, you can understand this by comparing some symptoms:
- If the motor does not work when switching operating modes, the cause of the breakdown may be hidden in the resistor. When repairing, you need to replace the resistor with a new one, because it cannot be repaired.
- If the fuse is blown, you need to check the insulation of the armature located on ground. There may be a short circuit.
- If, when switching modes, the VAZ 2108 heater fan rotates at the same speed, this may be a consequence of contamination or oxidation of the collector. In case of repair, it is worth cleaning the collector and, if nothing has changed and the fan continues to act up, you can replace the bearings.
If the VAZ 2108 stove motor does not even show signs of life, then the reason is not in its design, but in a broken circuit. To find out if this is true, you can use a voltmeter.
Troubleshooting the VAZ heater (stove) system
When the heater (stove) on VAZ cars stops working, especially in winter, you may lose the ability to drive a car altogether. Sometimes, after severe frost, it is impossible to clean the glass for viewing, and if the heater does not function, even getting to the service station will be problematic.
But, as a rule, the stove can be repaired on site without resorting to the services of specialists. Using the diagram and troubleshooting rules, you can do it yourself.
Heating system elements
The stove diagram clearly shows the location of its main functional elements. It should be noted that the design of the stove on the VAZ-2108, 2109 and 21099 models is the same. Many car owners know that the heater in these models is not fully developed. As a result, the interior is not heated properly, so a decision is made to modify the stove with your own hands. Just in this case, it is important to know the design of the heater so as not to confuse anything.
The design of the stove of the VAZ-2109 car, whether it is a high panel or a low one, is absolutely identical. Therefore, the information presented will be useful to owners of this model with any instrument console.
Knowing the main points and what is located where, you can already try to independently deal with the problems that arise and fix the malfunctions that appear, while saving money and time on trips to the service station.
The VAZ 2108 stove fan, like other important parts, is the key to the car’s heating system. Like any other system, this one has its own nuances and can suddenly break down. The solution to some popular problems, even those related to replacing the product, can be found below in the article.
What is a stove fan
A car heater, which is popularly called a stove, is designed to perform a simple and at the same time important function - heating the interior. In addition, the device helps eliminate fogging of windows in cold and damp weather. During normal operation of the heating system, the temperature in the interior of the “nine” should be maintained at +20 ˚С with the same indicators outside, but only with a minus sign. In the legs, with maximum heating mode, the value should be maintained at +25 ˚С. One of the important components of the stove, in addition to the radiator, is the fan. The purpose of this device, its malfunctions and repairs should be considered in more detail.
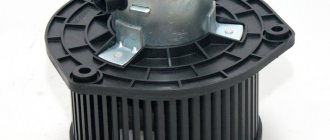
Purpose of the device
The purpose of the motor is to increase the efficiency of the heating system and air circulation in the car. Its operation is based on air intake from outside and its subsequent supply into the cabin through the radiator. As a result of the air flow passing through the heat exchanger, the air enters the cabin already warmed up.
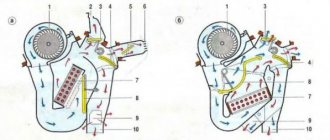
Heater operation diagram: a - VAZ 2108; b - VAZ -2108–01: 1- fan impeller; 2 — air duct for heating the windshield; 3 — windshield heating flap; 4 — damper for heating the driver’s feet; 5 — central nozzle flap; 6 - central nozzle; 7- radiator; 8 — heater control damper; 9 — driver’s foot heating window; 10 - internal ventilation duct
Where is the motor located on the VAZ 2108/09
The heater motor on the VAZ 2108/09 is installed in a niche in the engine compartment in front of the windshield, which is radically different from the design of the heater of classic Zhiguli cars, which have a fan installed in the cabin. The unit is an electric motor with an impeller mounted on it, through which air is pumped into the cabin.
The heater motor on the VAZ 2108/09 is installed in a niche in the engine compartment in front of the windshield
Connection diagram
To make it easier to find possible faults with the fan, an installation diagram may sometimes be required, the main components of which are:
- fuse mounting block;
- egnition lock;
- additional resistor;
- fan motor;
- operating mode switch.
The heater motor connection diagram consists of a fuse mounting block, an ignition switch, an additional resistor, a fan motor, and an operating mode switch
Internal structure and principle of operation
The heating system installed on the VAZ-2109 has its own differences and features compared to other cars in the AvtoVAZ line.
The heater consists of a pair of plastic casings (on the right and on the left), which are connected to each other along the entire perimeter with clamping brackets. A special flagellum is placed in the grooves of the casings to seal it well. The fan supplies air flow to the interior of the machine. The VAZ-2109 stove is designed so that the fan can be easily removed independently from the engine compartment.
An electric motor of type 45.37230 is attached to the casing, and a fan is located on its shaft. To obtain its desired rotation speed, additional resistance was provided. It was attached to the left side of the hole in the heater casing using a screw.
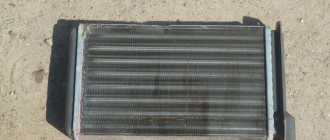
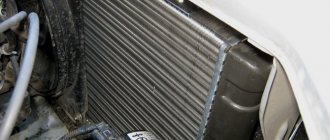
Heating system radiator
A radiator is built into the stove body to heat the air flows, which then blow into the cabin. Using three screws, this element of the system is screwed to the right casing and sealed with a polyurethane foam gasket.
The radiator design is a combination of:
- 2 rows of tubes.
- 2 rows of cooling plates.
- 2 plastic tanks.
It has two pairs of pipes, it is connected to the cooling system by rubber pipes, where coolant circulation is ensured using a pump. In the valve casing, on the axis of the supply line, there is a plate valve, which has a hole; it allows the coolant to pass through. The valve lever is connected by a rod to the handle lever, which also controls the process of heating the air flow. If you turn this lever, the hole in the valve will open the line for coolant to enter the radiator.
To ensure uniform heating of the car interior, the stove has two central nozzles, as well as left and right, to which air ducts are connected.
Exhaust ventilation
The car is equipped with exhaust ventilation, which circulates air from the interior to the street. It is located behind the body openings for the side windows.
Air also passes out through the deflectors when the car moves. The ventilation process is carried out due to the vacuum that occurs at the deflectors during movement. Air is sucked out from the rear of the cabin under the deflector trim; for this purpose, the rubber valves are pressed out and the air flow goes out through the deflector hole to the street.
Rubber valves are needed to prevent outside air from entering the car interior.
Modernization of the damper on the VAZ-2110
Malfunctions with the damper often result in the interior heating very poorly and slowly. The error is the VAZ-2110 heater control unit. The controller is not working properly. The device does not issue a command to extend the flap. In this case, it is recommended to check the temperature sensor. The controller handle is set to its extreme position and then unscrewed several times from left to right. The air flow temperature must be adjusted manually. In this way, the operating condition of the sensor is checked in one of the extreme positions of the handle. If the air flow changes the temperature in the extreme position of the knob, the sensor must be replaced. If warming does not change, the cause must be looked elsewhere.
The engine runs at one speed
In this case, it may be a malfunction of the button, a burnt-out resistance, or a motor malfunction (break of one winding). If the button is working properly, and the stove fan only works at high speed, then the first thing you need to check is the ballast resistance. It is checked in the same way as a fuse; if it breaks, measure it.
On the “seven”, you can only check it by removing the stove body, since it is located inside the body. In earlier models it is located under the dashboard in the middle, a little closer to the driver.