Tail lights occupy a special place in the car lighting system due to their functional purpose and ability to change the appearance of the car using tuning. Safety on the road largely depends on the performance of the rear lights, since it is from the light devices located in the rear of the car that drivers of vehicles behind can understand what maneuver the driver of the car in front intends to take. The rear lights of the VAZ 2107 have their own characteristics that must be taken into account when operating and maintaining the vehicle.
- No mass
- Lamp burned out
- Contacts have oxidized
- Broken wiring
Video: how to improve the performance of the rear lights of a VAZ-2107
- parking lights
- Stop signal
- Reversing light
- Rear fog lights
- Tuning the rear lights of the VAZ-2107
Video: how the rear lights of the “Seven” are transformed after tuning
Connection diagram
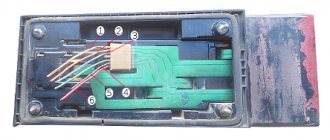
All rear light bulbs of the VAZ 2107 are located on one printed circuit board with a six-pin connector cut directly on this board.
A block with wires of different colors is placed on this connector:
| Contact number | Purpose | Wire color | |
| Left light | Right light | ||
| 1 | general | black | |
| 2 | stop signal | red | |
| 3 | side light | brown | yellow |
| 4 | fog light | black and yellow | |
| 5 | reverse | green | |
| 6 | turn indicator | black and blue | blue |
All wires are assembled into bundles that go to the mounting block and are connected to blocks Ш12 and Ш13. After passing through the fuses (located in the mounting block), the wires go to the corresponding switches - both manual and automatic (brake signal).
You can see the connection diagram in more detail in the figure below.
Total information
| Options | VAZ 2107 | VAZ 21074 | VAZ 2107-20 | VAZ 21074-20 |
| Weight of the equipped vehicle, kg | 1060 | 1060 | 1060 | 1060 |
| Payload, kg | 400 | 400 | 400 | 400 |
| Permitted maximum weight, kg | 1460 | 1460 | 1460 | 1460 |
| Ground clearance of a vehicle with a permissible maximum weight, with tires 175/70 R13, not less, mm: | ||||
| to the front suspension cross member | 162 | 162 | 162 | 159 |
| to the rear axle beam | 157 | 157 | 157 | 154 |
| Permissible weight of cargo on the additional (top) luggage rack, kg | 50 | 50 | 50 | 50 |
| Maximum speed, km/h: | ||||
| with permissible maximum weight | 148 | 148 | – | – |
| with driver and passenger | 150 | 150 | 150 | 150 |
| Acceleration time from standstill to 100 km/h, s: | ||||
| with driver and one passenger | 17 | 16 | 17 | 16 |
| with permissible maximum weight | 19 | 17,5 | – | – |
| Minimum turning radius along the track of the outer front wheel, m | 5,6 | 5,6 | 5,6 | 5,6 |
| The greatest rise overcome by a car with a permissible maximum weight without acceleration in first gear, % | 36 | 36 | 36 | 36 |
How to improve and brighten
The taillights of any car are a sign of driving safety. They are the ones who show the cars behind us what we are going to do or are already doing. On a clear day, the brightness of the standard lamps in the flashlights may not be enough, so it makes sense to increase this brightness.
Such a modification does not threaten any troubles, since it is impossible to dazzle even with bright “stop lights” or “turn signals”. How to increase brightness at minimal cost? The simplest option is to replace the standard lamps with halogen ones, which create a greater luminous flux.
Such lamps can be installed on the reverse gear, brake light and turn signal. You shouldn't put them on the fog light. This power will simply melt the glass during prolonged operation.
Important! When installing such lamps, the fuses responsible for their operation may blow out. The issue is resolved by installing fuses of a higher rating.
But, of course, they will not fit into the rear light fixtures. It takes a decent amount of time to ignite them - up to 5 seconds. or more, and the taillight lamps must react with lightning speed. We don’t want the brake light to come on when someone drives into us. And a turn signal that blinks once after performing a maneuver will not add safety. In addition, installing expensive ignition units on brake lights is stupid, to say the least.
But “halogen” lamps, of course, are not the best option - incandescent lamps, especially halogen ones, do not tolerate constant switching on/off and will quickly burn out. The best option is an LED light source, which creates an increased luminous flux.
A more labor-intensive option is to install LEDs or LED strip yourself. It is good because it will not only increase the brightness of the light fixture, but also improve its appearance.
Tuning with LEDs
We will be tuning with LED modules and an LED strip with 5050 LEDs with a power of 0.21 W each.
We remove the rear lights, remove the glass and circuit board from them and put them aside. Naturally, we will not modify the glass. Now, from plexiglass or any other suitable material, we cut out the inserts for the brake signal window and turn signal. We will leave the standard lamps in the fog light and reverse signal.
Now we cut the tape into strips of 9 LEDs. We cut strictly in the places indicated by the manufacturer - they are most often marked on the tape with scissor icons.
In total, you will need 5 segments for the turn signal and two for the side light. We solder the segments together, observing the polarity (marked on the tape). For turns and dimensions, of course, separately.
There will be three modules in the braking signal; we also solder them together. Using double-sided tape, glue the turn strips and above them one marker light strip onto the insert. We install the insert itself in place and fix it with sealant. We lead the power wires through the reflector into the hole for the turn signal lamp - it won’t be there anyway.
Important! We connect the tape responsible for the side light so that it glows red. To do this, you need to supply power to the +12V and R contacts.
We do the same with the modules - we glue them onto the brake light insert, and glue the insert into place using sealant.
Now, using the same sealant, we glue the second tape of the side lights to the place indicated by the arrows in the photo. Naturally, we glue it with the edge to the partition.
We remove the turn signal, side light and brake signal bulbs from the board. We solder the wires from our new lighting devices to the corresponding tracks of the board (see photo from the “Connection diagram” section). At the same time, we observe the polarity: minus of the tape and modules - to the ground track, pluses - to the tracks that powered the corresponding light bulbs.
We install the board in place, assemble the flashlight, install it on the car, and connect the power connector. Turn it on and check it.
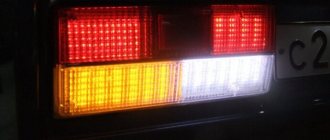
In the photo the brake light is on and the side light has turned into a strip. The brake light appears yellow, but is actually bright red - it's just poor camera color rendering. The turn signal is not turned on, and the problem is very clearly visible: the LEDs shine through the glass, which, to put it mildly, is not entirely aesthetically pleasing. We were clearly in a hurry with the installation of the lantern. Well, we'll have to solve this issue with tinting. It will not only hide the LEDs, but also decorate the car.
Tinting
This operation can be carried out in two ways: using a tinting film and a special tinting varnish. We'll try both.
Varnish tinting
We go to a car store and buy a special tinting varnish. We remove the headlight, remove the glass from the headlight. Some people simply cover the body with masking tape and tint it directly on the car, but we won’t do that. Wash and dry the glass thoroughly.
Carefully read the instructions for the varnish (it is in an aerosol can) and cover the glass with the first layer, spraying the varnish from a distance of 25-30 cm. After the layer has dried, apply the second one and after it has dried, check the result by assembling the headlight and connecting it to the on-board network.
The main thing is not to overdo it with tinting. On the one hand, a thick layer of varnish will have a very presentable appearance, on the other hand, it will greatly weaken the light of the light bulbs. We will paint without fanaticism, in two layers. The LEDs and red glass of the brake lights are not visible through it - that's enough. We install the lantern in place and admire it.
Film tinting
You can tint with film by car, so we won’t remove the light fixture. Just wash the glass thoroughly. We cut a piece of film to the size of the lantern with an allowance of a centimeter on each side.
Spray the glass with a weak soap solution, remove the protective layer from the film and apply it to the glass. Using a rubber spatula, carefully rub the film from the center to the edges, expelling water from under it. We cut off the excess with a stationery knife or sharp scissors and grind the edges.
Another tuning option with self-installed discrete ultra-bright LEDs is presented in the video below. Here the side light is combined with a brake signal.
Workflow Description
In order to complete the work, it is necessary to prepare everything necessary and ensure comfortable working conditions.
Preparation
As part of this stage, the following activities are performed:
If the low beam on a VAZ 2107 has disappeared and as a result of the check it is found that the lamps are to blame, then you should purchase new products. This model uses the AKG12-60+55 modification with an H4 socket; this marking indicates that the product has a power of 60 W for high beam and 55 W for low beam; you can purchase such an element at any store that deals in spare parts for domestic cars.
- The work must be carried out in a dry place with good lighting, the ideal solution is a garage, but you can even do it outside if the weather permits and there is no precipitation.
- No special tools are required, which is an undoubted advantage of this type of work.
The working process
Everything is quite simple and takes very little time:
A huge advantage of the work is that, unlike modern models, access to the headlights is not limited in any way; this greatly simplifies doing the work yourself and allows you to achieve the best result, since you are in complete control of the process.
Replacing the low beam lamp on a VAZ 2107 begins, as on any other car, by removing the terminal from the battery. Make it a rule to disconnect the battery when doing any work on the electrical part of the car, this will prevent problems that may arise from short circuits and damage to individual elements, and you will definitely not be electrocuted.
- If there is no low beam on a VAZ 2107 on only one side, then you can replace one lamp, although experts advise installing two at once, since the light may vary. One way or another, the work begins with any headlight that is convenient for you, first wipe the inside, since most often it is dirty and debris can get inside later.
- First of all, it is necessary to remove the plug, which covers the installation site of the light bulb and serves as protection against moisture and dirt getting inside the housing. This element is removed very simply: grab it and turn it counterclockwise until it comes off, usually this happens in half or even a quarter of a turn.
Then you need to remove the connecting block with the wires, this should be done very carefully: grab the connector body and pull in the direction from the base. If, then you can very easily break contacts, and you will also have to eliminate this problem.
After liberation, you can take out the old lamp, because it is no longer secured by anything
Please note that when removing the new unit and installing it in place, you must not touch the glass part, as this will cause the areas touched to burn. Handle the chuck and be careful to avoid problems
Assembly is carried out in reverse order, so there is no point in describing this process separately.
There is only one thing left - to check the operation of the system, and if everything is fine, then you can completely assemble the structure.
Fine for tuning rear lights
We have just slightly modified the rear lights of our VAZ 2107. How legal is this, and if not, what kind of trouble can you run into? In principle, there are no direct instructions regarding rear light devices in Russian legislation, so theoretically this type of tuning (within reasonable limits) can be carried out.
In practice, this is usually what happens: if tuning does not turn the car into a sparkling Christmas tree, the signals from the rear light devices have the desired color, are distinguishable and understandable to other road users, then the traffic police will not touch the driver even with moderately tinted windows.
But if you really want to, you can still issue a fine of 500 rubles or cancel the technical inspection, since Russian legislation prohibits changing the design of the car’s lighting fixtures. “It is prohibited to change the number, color and power of light bulbs, as well as to cover them with different films.” And the rear light is also a lighting device.
So if we are going to tune, we should do it wisely, without fanaticism and guided by common sense. In the end, it is our own safety.
PS Recently, traffic police officers have seriously taken up cars with “sports” tuning (probably, these often cause accidents). Therefore, even a taillight tuned to look like a “sports” one can lead to serious troubles.
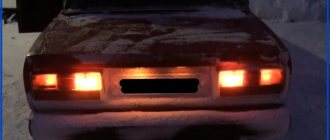
With a rear light, the photo of which is shown below, it will be extremely difficult to get out of a fine, or even from more serious troubles (changing the design of the car).
Main differences from LADA 2105
- A more powerful engine with a volume of 1.5 liters and a power of 77 hp. With. (for carburetor versions);
- A modified, often chrome-plated radiator grille with a larger area (in the last years of production, the LADA-2104 was equipped with the same ones for unification purposes)
- The structure of the rear lights has been slightly changed (5-section instead of 6-section in 2105);
- More comfortable front seats with integrated headrests (in the last years of production, the LADA-2105, 2104 were equipped with the same ones for unification purposes);
- Some of the cars produced were equipped with a rigidly molded interior headliner and plastic ventilation linings for the rear pillars;
- Modernized front instrument panel (in particular, a tachometer and speedometer with digitization up to 180 km/h were added, as well as an oil pressure indicator (until 1988, after which it was replaced by an econometer);
- Added cold air deflectors (“torpedo”) located in the center. While a stream of hot air can be directed into the legs (through the interior heater), through these deflectors a stream of cold air can be directed into the face (only at speed, with the pressure of the oncoming air flow);
- Plastic bumpers with chrome plates instead of more massive aluminum ones (in the last years of production on LADA-2105, 2104, for the purpose of unification and reduction in cost, the same ones were installed);
- Changed shape of the hood (in the last years of production, the LADA-2104 was equipped with the same ones for unification purposes);
- Slightly changed shape of the trunk lid (without stampings), since 2008 they began to install a trunk lid with stampings, like the VAZ-2105, due to the unification of production;
- Some interior details have been changed: door upholstery, door lock buttons, radio panel (“beard”), gearshift knob, steering wheel shape (which later became uniform due to unification);
- The electrical system circuit differs (there are also differences between individual modifications depending on the type of engine).
Why the lamps do not light up or blink - typical faults
Why may the lamps in the rear lights of the VAZ 2107 not work or blink? Most often this can be caused by the following reasons:
- the lamp burned out;
- fuse is blown;
- poor contact in the connecting blocks;
- rotting or burning out of tracks on the flashlight's printed circuit board;
- poor contact in lamp sockets;
- break or short circuit in the wiring to the rear lights of the VAZ.
We’ve figured out how to replace lamps (see the section “How to change lamps”), let’s move straight to the fuses. They are located in the mounting block, and this block can be found in the engine compartment immediately behind the windshield opposite the passenger. In the photo below it is indicated by the number 5.
Using the plate below, we find the fuse responsible for powering the problem light bulb, check it, and, if necessary, replace it with an insert of the same rating.
Numbering of fuses responsible for the rear light bulbs of the VAZ 2107
| Number | Denomination, A* | What nourishes |
| F1 | 8 (10) | reverse lamp, heater, rear window wiper, rear window heating warning light |
| F8 | 8 (10) | direction indicators in hazard warning mode |
| F9 | 8 (10) | fog lights, generator voltage regulator (in some modifications) |
| F10 | 8 (10) | direction indicators, instrument cluster illumination, indicator lamps on the instrument panel, instruments for the carburetor electro-pneumatic valve control system |
| F11 | 8 (10) | brake signal, interior lighting |
| F14 | 8 (10) | side light (left headlight and right rear light), license plate light, engine compartment lamp |
| F15 | 8 (10) | side light (right headlight and left rear light), instrument lighting, cigarette lighter, glove box |
* in the “Rating” column the rating of the fuses of the old mounting block is indicated in brackets.
Healthy. As you can see from the table, each fuse powers something else. If this “something” works, you don’t have to go into the mounting block.
Well, you can find the right fuse using the pictures below.
Now let's move on to the lanterns. Remove the cover (see section “How to change lamps”), pull out the power supply, and remove the board. We carefully inspect the contacts of the block and clean them if necessary. We inspect the connector contacts on the board, and if necessary, clean them with a student eraser (not sandpaper!).
We inspect the tracks and, if necessary, repair them using a soldering iron and a thin mounting wire. We pull out the lamps, inspect the sockets and contacts of the sockets. If necessary, we clean or tighten the springs (if the lamp is “dangling”).
Well, the wiring. We carefully inspect the power harnesses for the lights, paying special attention to the places where the harness passes through the body and through its ribs. We restore the frayed insulation with electrical tape; if it breaks, use a soldering iron (not twisting!) and electrical tape.
Healthy. It wouldn’t hurt to inspect the contacts of the Ш12 and Ш13 blocks of the mounting block - the wires responsible for the rear lights are connected to them (see section “Connection diagram”).
So, we figured out the rear lights of the VAZ 2107. Now we can independently replace the light bulbs in them, and, if necessary, repair them.
What to do if there is no charge, weak charge (battery is discharged)?
If the battery of your VAZ 2107 is discharged, then one of three elements may be “to blame”: the generator, the voltage regulator, and the connections between them. Determining “who is to blame” can be very simple, even without additional devices. How this article will help.
We carry out testing using standard equipment
To monitor the operation of the generator on the “seven” there are two instruments: a voltmeter and a control light on the instrument panel. With their help, you can track the cause of your troubles.
1) Turn on the ignition without turning on the starter
and look at the warning light. It should shine at full intensity, as in the photo. The voltmeter needle, normally, stands on the white part of the scale (photo). Let's say everything is OK - go to point 2 - start the engine.
The battery charge control lamp is on
Position of the voltmeter needle before starting the engine (ignition on)
The lamp does not light, the voltmeter needle remains at zero when the ignition is turned on.
Check fuse No. 10 in the mounting block. 99% of the time it will be burnt out. In this case, all other lamps on the instrument panel will also be de-energized. Replace it with the same one and test again. If the fuse burns out again, you need to look for the cause, that is, a short circuit. We check whether the wires from the generator are disconnected, whether the insulation is frayed somewhere, etc. Diagram 3 at this link will help you find the reason
The lamp does not light up, the voltmeter needle shows normal
We check the wires on the generator to see if the wire has come loose from terminal “61”. If everything is normal there, you need to check whether there is a “plus” on this wire using a test lamp, an indicator screwdriver or a multimeter.
Terminal “61” of the VAZ-2107 generator
If there is a “plus”, we check the “tablet” (aka “chocolate”) and the generator.
There is no “plus” - you will have to remove the instrument panel and check the lamp. Replace the burnt out one. How to remove the panel, watch the video
2) Start the engine
The control lamp should go out, the voltmeter needle goes into the green sector and is located from the middle to the right edge (photo). If everything is so, then most likely the generator is working normally.
The voltmeter shows normal voltage (charging is present)
The lamp remains on or dims slightly
If you give it gas, it goes out at high speeds and lights up again when they decrease. The voltmeter needle is in the white sector and goes to the edge of the green when the speed increases. The generator output is faulty. The same conclusion if the lamp continues to light at any speed, and the voltmeter needle is in the white sector and even goes to red.
Voltage too low (motor running). Weak charge
Read, it may come in handy: If the electric motor of the heater (stove motor) of the VAZ-2107 does not work
CUSTOM LED rear lights for VAZ-2107
Back in the spring, I ordered taillights from a guy from the Omsk region dens99, completely handmade, using a CNC machine to cut out a board for LEDs and lenses.
I think it turned out very nice
In terms of design, I used a layout he already had that he made for someone for the lights on a VAZ-2106, but I added my own twist to it☺️ this is the dynamic inclusion of dimensions
.
How these lights were made and how they work can be seen here:
Since these lights do not have fog lights (there is already a replacement for them)
and there is a wire for a constant plus for the operation of the modules, then after going through the diagram I found the most convenient way to drive a constant plus for the lights.
In block in block Ш13
we rearrange the fog light wire into the empty socket
from 1 to 4.
But in order for a permanent plus to appear there, we make a jumper in block Ш4 from 4 to 7
nest.
Now, when connected to a standard block on wire 4, instead of the fog light signal, a constant +
(in the future I want to use a time relay so that when the ACC mode is turned off, after a few seconds the power on this wire is lost and excess voltage does not go into the trunk)
For connection I used 6-pin connectors
Well, a little comparison with previous lanterns
But unfortunately, I can’t take normal photos that convey the real glow... Since it shines purely red. And in the photos it turns into white and orange; from the side you can more or less catch the color.
Well, at night there’s just fire)
All the signals are informative, and the reverse brightness is enough to see in the mirror at night through the 5% toner where you are going) how all the signals shine can be seen in the video above ☝️
You can watch his other works on his channel, there is all the information for contacting him:
Good luck to everyone on the roads ☺️
Removing and replacing rear lights
The procedure for replacing rear lights is as follows:
- First you need to turn off the ignition, open the hood and disconnect the terminals from the battery.
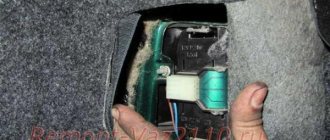
- Then open the trunk of the car and remove the protective cover on the headlight, disconnect the mount and disconnect the wiring connector from the contacts on the board. Be careful not to damage them.
- Using a size 8 socket wrench, you need to unscrew the four nuts that secure the taillight. Having done this, under the nuts of the studs you will be able to see the tips of the ground cable.
- Next, you need to carefully remove the taillight from its seat. To change the diffuser, it must be removed from the optics body.
- The procedure for installing and assembling optical elements is performed in reverse order.
Photo gallery “Changing headlights with your own hands”
Methods for troubleshooting
Troubleshooting is not a complicated process and even novice car enthusiasts can do it (the author of the video is Avtoelektika VC).
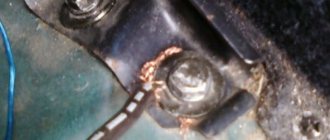
First of all, you should check the integrity and condition of the wiring.
Using a multimeter, you need to test the wiring. Damaged or torn sections should be replaced intact or soldered. If there are traces of oxidation processes on the contacts, they need to be cleaned.
If the LEDs burn out, they need to be replaced in pairs. If the breaker fails, it must be replaced with a new one, as it cannot be repaired. Before replacing, turn off the vehicle's power by removing the negative terminal from the battery. Then disconnect the power wires from the breaker. Next, you need to loosen the lock nut and unscrew the main nut securing the switch to the bracket.
Replacing the brake light switch
Before installation, the new frog should be checked for functionality. This can be done using an ohmmeter. We connect the device to the device and measure the resistance. When the contact is closed, the resistance should be zero. If you press the rod, the contacts should open; the resistance in this case tends to infinity.
Taillight tuning ideas
How can you improve the rear optics in the Seven:
- Installation of sports optics. This lantern includes four round and two rectangular light elements.
- The next option is to use Skyline headlights. Such devices are equipped with three round light indicators, as well as two rectangular lights and brake lights that are located above them. In this case, the body of the product is made of transparent plastic, which is coated with chrome.
- Installation of so-called eyelashes instead of traditional lights. The main difference between the cilia is their original shape, as well as the presence of diode direction indicators. As practice shows, they burn well even in bright sun.
- Using glass tinting as tuning. You can buy tinted optics that are ready for use, or you can tint them yourself. The tinting procedure itself can be carried out using a film or a special varnish. It should be noted that it is better to install more powerful lighting sources in tinted devices to ensure good visibility of the signals.
- You can also use diode headlights in the classic version. You can also buy such products at an auto store or install LED elements yourself. One of the main reasons why owners of “sevens” choose this option is the speed of operation, as well as good brightness.
Rear lights on VAZ 2107
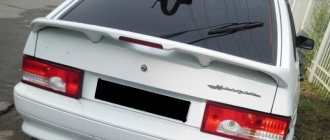
LADA 2107 is one of the most popular cars of the classic series. The VAZ 2107 model was produced by various factories in our country and abroad for 30 years, starting in 1982. The car was positioned on the market as a luxury version of the five, in the design of which certain changes were made. In particular, the rear headlights had a different look, and textile inserts were made in the interior and seats with integrated headrests were installed.
The VAZ 2107 differed favorably from other cars in this series; its lighting equipment, installed on the stern, was much more informative than that of other models. There are still quite a lot of such cars in Russia and neighboring countries and they often become the object of tuning. The standard rear lights are replaced with ones that are more suitable for the new image of the model.
History of creation
VAZ 2107 is a modified luxury version of the VAZ 2105 car. The first models were presented to the country's leadership in 1978, and serial production began much later, as was already said in March 1982.
The VAZ 2107 was exported under the names Lada Nova, Lada Riva, Lada Signet, Lada 1500.
In 2001, a model configuration program was developed. VAZ 2107 was available in “norm” and “standard” versions, and for VAZ 21074 – “norm” and “luxury”.
From 2002 to 2012, the VAZ-21070 (modification of the VAZ-2107) was produced in Ukraine (LuAZ, ZAZ and KrAZ). In May 2008, the assembly of the VAZ 2107 was established at Argun in the Chechen Republic. Since March 2011, the production of the “Seven” has been mastered by the Izhevsk Automobile Plant.
In April 2012, the AvtoVAZ concern decided to finally stop production of the classic VAZ2107 sedan. This decision was made due to the greatly decreased demand for this model, as well as due to the acceleration of work in Izhevsk to prepare production for the release of the Lada Granta. The last VAZ 2107 sedan rolled off the assembly line on April 17, 2012. In Egypt, LADA 2107 was assembled until the beginning of 2014.
Production of the 2104 station wagon, unified with the sedan in terms of power plant, exterior and interior of the front part of the body, continued until September 17, 2012.
In March 2022, the analytical agency Autostat conducted a study, according to the results of which the VAZ 2107 sedan became the most popular passenger car in Russia. At the time of the study, this model was driven by 1.75 million Russians.
There are no particularly sharp turns in the history of the VAZ 2107 production. Good exterior and interior design has been positively received for many years. The only major change was the use of distributed injection on this model.
COMPONENTS FOR SEVEN MODERNIZATION
With the saturation of the spare parts market, the turn has come for accessories necessary for tuning cars. For the VAZ 2107 model, small companies in our country and abroad have launched the production of various types of lighting equipment. Flashlights are mainly designed to fit a standard size and are easily mounted in place of the standard ones without altering the factory mounts.
For the VAZ 2107, taillights are currently produced that use different devices: mainly the usual incandescent lamps or LEDs. The latest products have a higher cost, but at the same time they have a number of advantages?
- low power consumption;
- short response time;
- high information content of signals.
Even on the brightest day, the position and direction indicators, as well as the reversing light, perform their functions well.
Technical characteristics of the “Seven” injection engine
In carburetor systems, the creation of a combustible mixture is carried out directly in the chambers of the carburetor itself. However, the essence of the operation of the injection engine on the VAZ 2107 comes down to a different approach to forming the fuel-air mixture. The injector sharply injects the fuel itself into the working cylinders of the engine. Therefore, such a system for creating and supplying fuel is also called a “distributed injection system.”
The injection model VAZ 2107 is equipped from the factory with a separate injection system with four injectors (one injector for each cylinder). The operation of the injectors is controlled by the ECU, which regulates the flow of fuel to the cylinders, obeying the requirements of the microcontroller.
The injection engine on the VAZ 2107 weighs 121 kilograms and has the following dimensions:
- height - 665 mm;
- length - 565 mm;
- width - 541 mm.
The power unit without attachments weighs 121 kilograms.
Injector ignition systems are considered more convenient and modern. For example, the VAZ 2107i has a number of important advantages over carburetor models:
- High engine efficiency thanks to precise calculation of the amount of fuel injected.
- Reduced fuel consumption.
- Increased engine power.
- Stability of idling, as all driving modes are controlled via the on-board computer.
- No need for constant adjustment.
- Environmentally friendly emissions.
- Quieter engine operation thanks to the use of hydraulic compensators and hydraulic tensioners.
- You can easily install cost-effective gas equipment on the “Seven” injection models.
However, injection models also have disadvantages:
- Difficult access to a number of mechanisms under the hood.
- High risk of catalytic converter damage on rough roads.
- Capriciousness regarding fuel consumed.
- The need to contact a car repair shop for any engine malfunctions.
Table: all 2107i engine characteristics
| Year of production of engines of this type | 1972 - our time |
| Supply system | Injector/carburetor |
| engine's type | Row |
| Number of pistons | 4 |
| Cylinder block material | cast iron |
| Cylinder head material | aluminum |
| Number of valves per cylinder | 2 |
| Piston stroke | 80 mm |
| Cylinder diameter | 76 mm |
| Engine capacity | 1452 cm 3 |
| Power | 71 l. With. at 5600 rpm. |
| Maximum torque | 104 Nm at 3600 rpm. |
| Compression ratio | 8.5 units |
| Oil volume in crankcase | 3.74 l |
The VAZ 2107i power unit initially used AI-93 fuel. Today it is allowed to fill AI-92 and AI-95. Fuel consumption for injection models is lower than for carburetor models and is:
- 9.4 liters in the city;
- 6.9 liters on the highway;
- up to 9 liters in mixed driving mode.
The car has economical fuel consumption due to the use of an injection system
What oil is used
High-quality maintenance of an injection engine begins with the choice of oil, which is recommended by the manufacturer itself. AvtoVAZ usually indicates in the operating documents of such manufacturers as Schell or Lukoil and oils of the following type:
- 5W-30;
- 5W-40;
- 10W-40;
- 15W-40.
LANTERN DEVICE
The rear headlights are an original unit containing the following elements:
- sockets for installing incandescent lamps;
- built-in reinforcing deflectors,
- printed circuit boards for connecting lights to the power and control system.
All modern lighting equipment necessary for tuning a VAZ 2107 car has standard connectors. The taillights easily connect to the on-board network without any modifications. This simplifies the task of car owners in installing this type of product with minimal time. Flashlights produced for this model fully comply with the requirements of the state standard.
The design of the vehicle provides the following signals on the rear lights:
- side lights – red;
- direction indicator – orange;
- brake light - red;
- The reverse indicator is white.
The light panels are quite large in size, which ensures they are highly informative for traffic participants. They are clearly visible at a considerable distance, and the meaning of the signals in the perception of drivers has an unambiguous interpretation.
Troubleshooting procedure
Lamps fail most often. It's best to start with them. If they are working properly, remove the plugs from the frog and connect them together. The plugs should have +12.
If there is no voltage, check the fuse. If the fuse is intact, check connector Ш12. By applying 12V to pin 3 of the Ш12 connector, voltage should appear. Check the voltage at the fuse contacts. If there is voltage on the fuse on both sides, we try to apply +12 directly to the frog plug. If the lights come on, change the fuse box.
We recommend: Replacing the Opel Astra alternator belt - we consider it in order
The fuse box can only be repaired in specialized workshops. In this case, the board track could have burned out.
When there is voltage at the frog plugs, but the lights do not light up, we check 12V directly at the contacts of the lights board. If there is voltage, but the lamp does not light, check the connector contact. When there is voltage at the board contact, but the lamp does not light up, remove the lamp and check for the presence of 12V directly on the current of the conductive surface of the base. If there is voltage and the contact is clean, check the housing part of the base. If necessary, replace the flashlight board.
It is extremely rare for the brake light wire to break. The wiring harness comes out from under the instrument panel and runs along the floor of the car under the carpet. Both brake lights are connected in parallel. We check the integrity of the wire from the frog to the lights. If necessary, replace a separate stop wire.
COMPONENTS FOR CAR TUNING
The production of spare parts and accessories for the VAZ 2107 has long ceased to be the exclusive domain of a limited number of supplier enterprises. On store shelves there is a large selection of additional equipment for car tuning. Rear headlights for the specified car model are present in the most extensive range.
Component manufacturers offer the following types of flashlights:
- Sports version with four separate round and two rectangular signals. They are arranged in the form of separate modules, and the plastic body can be painted to match the color of the car body.
- Skylain lights have an unusual appearance with three round indicators, and in the upper part there are rectangular turn and reverse signals. The visible part of the body is made of high quality transparent plastic and has a chrome finish.
- Rear headlights of the Ciliac type for the VAZ 2107 differ from other designs by the presence of LED direction indicators, which prevent the signals from being illuminated even in bright sunlight. The device is very popular among car owners due to its unusual shape.
- Tinted lamps are designed specifically for lovers of unusual color schemes. They feature round signals with powerful lamps that are clearly visible in any lighting conditions.
- LED rear lights of a classic design, made in carbon color. The indicators in the device are located closest to the color scheme of the original device. The diodes have high brightness and short response time.
The rear lights of a VAZ 2107 car must first of all inform traffic participants about the driver’s intentions and actions. High information content of signals will help to avoid misunderstandings on the roads, and in some cases, emergency situations.
INSTALLATION OF LIGHTING DEVICES
Installing components on a VAZ 2107 car will not cause any particular difficulties. The procedure is as follows:
- Open the trunk and use a screwdriver to remove the canopy cover that closes it from the inside.
- Use a wrench to unscrew the fastening nuts and unplug the electrical connector.
- Carefully remove the flashlight unit from its seat and clean it of dirt with a rag.
- We install new taillights instead of the old ones and secure them, after inserting a sealing gasket.
Upon completion of the installation of the lights, we connect them and check their functionality in all modes. The installation of new lighting devices on a VAZ 2107 car that complies with regulatory documents does not require registration.
Stop signal
The brake light switch is located on the brake pedal hanger holder . The brake light is turned on as follows: when you press the brake pedal, the spring in the switch presses the control pin. At the same time, the contacts in the switch close the brake light circuit. When the brake pedal is released, the pin returns to its original position and the brake light goes off.
If the brake lights do not work on a VAZ-2107, you should make sure that the cause of the malfunction is not in the switch. To do this, you need to unscrew the ends of the power wires and place a jumper between them: if the brake lights turn on, the switch should be repaired or replaced. To replace the brake light switch, you must turn it clockwise 90 degrees and remove it from the mount. After installing the new switch, make sure that the neck of the switch fits snugly against the brake pedal and turn it 90 degrees counterclockwise. The new switch is adjusted automatically when the brake pedal is pressed. The switch operates normally if the brake light is turned on no earlier than the brake pedal has been moved 5 mm, but no later than it has been pressed 20 mm.
Fuse F11 is installed in the brake light circuit, which, in addition, is responsible for the operation of the interior body lighting.
Some VAZ-2107 owners install an additional brake light so that the signals given by the driver are more visible on the road. This type of brake light is usually placed on the rear window inside the cabin and operates on LEDs.
To enhance the “visibility” of the car on the road, an additional brake light can be installed