The flywheel from a VAZ 2106 car is removed for replacement or repair if the ring gear is damaged or if the friction surface is damaged or severely worn.
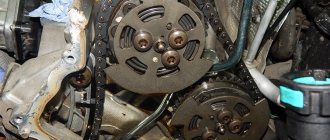
The flywheel is installed at the rear end of the crankshaft and secured to it with six bolts: 1 - ring gear; 2 — fastening bolt; a is the friction surface. You will need: a screwdriver, a 17mm socket wrench, a torque wrench. 1. Remove the gearbox from the VAZ 2106 (see section 5 “Transmission of the VAZ 2106”).
2. Remove the clutch housing with the pressure plate and the driven clutch disk from the flywheel (see section 5 “Transmission of a VAZ 2106”). 3. Screw the bolt into the lower left threaded hole of the clutch housing mount, secure the flywheel from turning by resting the screwdriver against the ring gear and resting it on the installed bolt and bipod of the steering mechanism, and unscrew the six bolts securing the flywheel.
4. Remove the support washer while holding the flywheel. 5. Remove the flywheel. 6. Check the condition of the ring gear; If the teeth are damaged, replace the flywheel. 7. The surfaces of the flywheel mating with the crankshaft and the clutch driven disc must be free of scratches, burrs and completely flat. If there are scratches on the working surface 3 of the flywheel under the clutch driven disc, grind this surface, removing a layer of metal no more than 1 mm thick. Then grind surface 2, maintaining the dimension (0.5+0.1) mm and ensuring parallelism of surfaces 2 and 3 relative to surface 1. The tolerance for non-parallelism is 0.1 mm. After grooving, install the flywheel on the mandrel, centering it along the mounting hole with the emphasis on surface 1, check the runout of planes 3 and 2. At the extreme points, the indicator should not show runouts exceeding 0.1 mm.
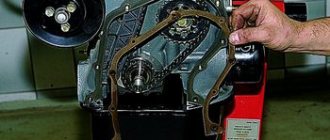
8. Install the flywheel and the removed components and parts on the VAZ 2106 car in the reverse order of removal. The flywheel can be installed on the crankshaft in two opposite positions, determined by the location of the mounting holes. However, at the factory it is balanced together with the crankshaft, so it must be installed strictly in its original position. For correct installation, a mark is made on the flywheel
in the form of a conical hole, which should be oriented when installed in the same direction as the connecting rod journal of the fourth (first) cylinder.
If the crankshaft was turned after removing the flywheel, set the piston of the fourth cylinder to the TDC position of the compression stroke (see “Installing the piston of the fourth cylinder to the TDC position of the compression stroke”). and install the flywheel on the crankshaft, turning it with mark a
vertically upward. Tighten the flywheel mounting bolts evenly crosswise with the torque given in Appendix 1. “Tightening torques for threaded connections of VAZ 2106”
Welcome!
The engine flywheel is one of the most important parts in the design of a car engine, and therefore, if the flywheel is heavily worn, or if it is installed incorrectly, the car begins to “slip” when starting from a standstill - this means that when starting from a standstill or while driving, the speed is the engine will jump and the car itself will not accelerate, but will only roar.” Therefore, the flywheel must be changed in a timely manner, since driving on a worn one will bring pleasure but only bring discomfort.
Note!
To replace, you will need to stock up on: A screwdriver, as well as an L-shaped socket wrench and, if possible, take a torque wrench with you!
When should you replace the flywheel?
It must be replaced when:
How will the car behave with a worn flywheel?
- As noted earlier, the first thing that will most likely happen is that the clutch will slip on the worn flywheel.
- And also, most likely, when starting from a stop, the car will move, but this will be accompanied by strong vibration, which as a result will be transmitted to the entire car.
Dual mass flywheel
The damper flywheel has the more common name “dual-mass”. The dual-mass flywheel is used as a torsional vibration damper. The dual-mass flywheel consists of two cast-iron discs connected to each other by a complex spring system.
A dual-mass flywheel is used to absorb torsional vibrations, which ensures uniform operation of the entire transmission. This engine flywheel is particularly reliable, but when carrying out maintenance, it is strongly recommended to carefully check the condition of this flywheel.
Poor starting is the main symptom of a faulty crown
The main purpose of the flywheel ring is better seen when paired with the starter driven gear. Together they form a “spur tooth” that converts high starter speeds into the most efficient CM, which is then transmitted to the crankshaft.
One of the main symptoms of a faulty crown is considered to be poor starting of the internal combustion engine. The fact is that the car will start at half a turn and silently only if the teeth of both elements are involute, smooth, identical and hard, as required by engineering. Of course, the rim itself must be welded straight, without any crookedness or obliqueness.
Note. So, from the fact that the rim has a different thickness around the circumference, a grinding noise occurs, and from the unevenness of the teeth, a howling and poor engine starting occurs. All the energy of the battery in such cases will be spent on heat and noise, but not on the CM.
A priori, the teeth on the starter driven gear are made with a special chamfer. Accordingly, the teeth of the crown also have similar chamfers or the sharp edges are rounded to match these chamfers. Otherwise, if this is not ensured, the ring tooth will rest against its sharp edge, preventing the starter gear from quickly engaging.
Engagement torque and recommended stylus sizes
The teeth are “given” a certain time to engage, and this time will not be enough if the flywheel ring or driven gear has any defects.
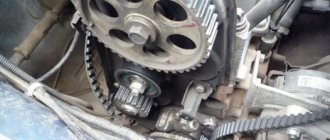
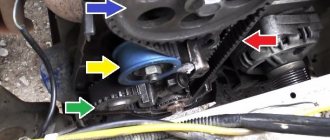
Withdrawal procedure
- Remove the clutch pressure and driven discs.
- Using any available method, we mark the position of the flywheel on the shaft.
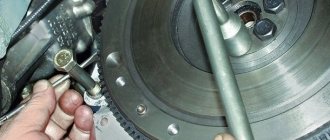
- Using a 17 mm socket wrench, unscrew the six bolts securing the flywheel, holding it from turning with a mounting blade or screwdriver, resting it against the protrusion of the cylinder block.
- Remove the washer and flywheel.
- If necessary, remove the upper cover of the clutch housing from the guide bushings.
Symptoms of a problem
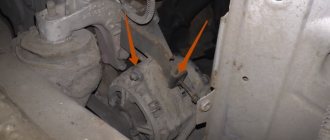
Although the input shaft support bearing is an inexpensive part, replacing it is a labor-intensive process. And this is connected not so much with the difficulty of dismantling the rolling unit itself, but with the need to remove other parts and assemblies of the engine. To avoid wasting hard work, bearing failure must be correctly diagnosed. Signs indicating this type of malfunction:
- Noise coming from a running engine when the clutch is depressed. A similar rustling or rustling noise also appears when the release bearing fails. And if the noise from the latter is detected even with slight pressure on the petals of the spring diaphragm of the clutch basket, then the gearbox support bearing will make extraneous sounds only when the clutch is completely disengaged.
- Wear or jamming of the bearing due to lack of lubrication leads to the fact that the input shaft of the gearbox is subject to the action of torque even while the driven disk is completely removed from the flywheel. In fact, this manifests itself with the same symptoms as with a clutch that “drives” - it is difficult to engage first gear when starting from a stop, jerks appear when changing gears while moving, etc.
- An irregular knock that appears from the gearbox indicates destruction of the bearing cage. In this case, the balls can spill out or clump together, causing an unpleasant sound and causing an imbalance in the crank and gearbox input shaft.
Installation procedure
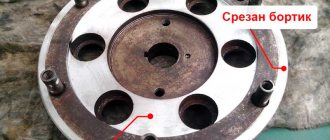
We install the flywheel in the reverse order in accordance with the mark made during disassembly. Before tightening the flywheel mounting bolts, apply thread locker to their threaded part. The flywheel must be installed on the crankshaft in only one position. If the mark made has been erased, the flywheel can be installed on the shaft according to the factory mark - for this purpose, a hole is drilled on the outside of the flywheel. When installing the flywheel on the crankshaft, the mark should be located opposite the crankpin of the fourth cylinder. Do not confuse the mark with the balancing holes, which are made with a larger diameter drill.
Flywheel design and purpose
Since the flywheel is a gear reduction element, it is a large driven gear. Since the flywheel is used in several vehicle systems, its design includes the following elements:
- flywheel ring teeth - necessary for transmitting rotation;
- internal seating surface - the part is attached to the internal combustion engine shaft;
- lateral surface - due to the tight fit of the clutch drive disc to it, rotation from the engine is transmitted to the gearbox.
Flywheel installation location
On the one hand, intense engine wear requires the use of parts made of carbon and alloy steels. On the other hand, the outer diameter of the crown exceeds 25 cm, which sharply increases the cost of the part. To increase maintainability and reduce the price of the flywheel, an assembly unit is used:
- cast iron disc with a large mass;
- a gear rim made of alloy or carbon steel, attached to its outer part with tension.
Flywheel design with crown
This design allows engine repairs to be much cheaper. For example, a flywheel for a VAZ 2108 costs an average of 2,000 rubles, and a crown costs 300 rubles. In addition, with uniform one-sided development of teeth from engagement with the bendix, the toothed rim can simply be turned over without buying a new consumable.
The main nuances of operating the flywheel are:
- the gear is used briefly at the moment the internal combustion engine starts;
- after which, the part transmits rotation from the crankshaft to the gearbox;
- pulls out their dead spots due to the inertia of the piston;
- smoothes out uneven angular speeds of the crankshaft, preventing engine wear.
During the factory production of a prefabricated flywheel, technologies are followed and high-tech equipment is used. After the working surfaces have worn out, the flywheel ring gear is usually replaced in the garage, so it is very difficult to ensure the service life declared by the manufacturer.
How to replace the flywheel crown of a VAZ 2109
- To remove the transmission without draining the oil and disabling the drives, you need to remove two trailing arms (“sabers”).
- Dismantle the starter, disconnect the rocker, two gearbox supports. Then disconnect the ground wires of the reverse sensor.
- After disabling the cross-travel levers, there will be enough construction to disconnect the box from the engine.
- Place the removed gearbox on the floor. The flywheel and clutch are now free to access.
- Fix the flywheel (there is a special lock for this), unscrew its bolts. If you don’t have a special tool, you can do something similar with your own hands. As an option, drill holes in the north pillar guide and bolt it to the flywheel using the basket mounting bolts. This device makes it possible to avoid turning the flywheel.
Self-replacement of the VAZ 2109 flywheel crown
They differ in the number of teeth on the crown of the VAZ 2101 - 129 teeth, on the crown of the VAZ 2110 - 128 teeth.
Crown 2101-1005115 VAZ 2101-2107 Weight - 0.62 kg Outer diameter - 277.5 mm Landing diameter - 256.795 mm Width - 12 mm Number of teeth - 129 Module - 2.1166
Crown 2112-1005115 VAZ 2110-2170 Weight - 0.672 kg Outer diameter - 278.5 mm Landing diameter - 256.795 -0.07 mm Width - 12 mm Number of teeth - 128 Module - 2.1166 Flywheel weight - 6.5 kg
Crown 2108-1005115 VAZ 2108 - 2115 Weight - 0.556 kg Outer diameter - 273.9 mm Landing diameter - 254.795 +0.725 Width - 12 mm Number of teeth - 128 Module - 2.1166
Typically, the VAZ 2109 flywheel lasts a long time and rarely breaks. The exception is wear on the teeth of the crown of this unit. Quite often, this breakdown occurs due to poor-quality crown material, in which case the part must be replaced.
What is a flywheel in a car?
In fact, the engine flywheel is an integral part of several independent systems. Its functions include:
To better understand the principle of its operation and the capabilities that a particular device implements, it is necessary to consider each application case separately.
DIY replacement process
If you still have a great need to replace the flywheel crown with your own hands, perhaps my instructions will help you.
First, let's define the difficulties, let's assume that the flywheel has already been removed:
1) The crown sits firmly, you can’t just remove it, you need to heat it and then knock it down.
2) It is important to plant the new crown evenly, just like the old one was attached. We also heat it up to dress it, but the main thing is not to overheat it.
Well let's get started.
We shoot down
First, we need to heat the flywheel, and then knock off the damaged crown from it. Of course, many don’t bother and just “hit it cold”, but it may not work on all models, I mean that if it works on a VAZ, then on a foreign car it can stall. Therefore, the easiest way is to put the flywheel in the oven and heat it to 200 - 250 degrees. He will lie there for about 20 - 30 minutes.
After this, take a soft chisel, preferably made of copper or brass, and use a hammer to remove the crown, simply knock it down (and to be honest, a heated one can be removed by hand). If we talk about the VAZ, then it has a side on one side, you need to hit it from it. If everything is done correctly, it will come off in a few blows with a hammer.
We stretch
This is where it gets more complicated - you won’t be able to simply hammer in a new crown (on a cold one), you will split it or damage it. It is MANDATORY to heat it up! The main thing is not to overheat, because you can change the metal if you heat it red hot, thereby reducing the strength.
My advice to you is to put it in the oven again and heat it up (250 degrees), you can put it on one or two electric stoves, but I don’t advise you to use direct fire.
We know from a physics course that if you heat a metal, it expands, and this part is made in such a way that when heated, it will change dimensions, and then simply and easily sit in its rightful place. Often you don't even need to hammer it in. The main thing is to plant it up to the stopper side!
After the metal has cooled, it will sit firmly on the flywheel disc (you can’t pull it off). That's all the replacement is.
Now we are watching a detailed video, I think it will help you.
That's all, read our automotive website.
Similar news
- Is there an automatic clutch? Let's look at the technical details...
- DIY brake caliper repair. Plus detailed video
- Spark plug gap. What should it be and what does it affect?