Most motorists know that the gas distribution mechanism of gasoline and diesel engines is a rather important component of the car. Due to the specifics of its operation, the timing belt has a number of typical breakdowns, the main one of which is rightfully considered to be the replacement of the drive connecting the crankshaft and camshaft. On many cars it is made of a high-quality rubber belt, which needs to be changed every 50-60,000 kilometers, but a chain drive also has its place and sometimes requires refreshment. The replacement procedure is not particularly difficult, however, setting the timing marks often causes some problems for motorists. To prevent similar problems from occurring among readers of our resource, in today’s article we will pay attention to the procedure for setting timing marks, the features of this process and its essence. Ready? Then carefully read the material presented below.
Why is it necessary to set the labels correctly?
For the correct operation of the gas distribution mechanism of a car, it is necessary that the closing and opening of the valves occur in a strictly defined sequence. The slightest inaccuracy in the operation of the camshaft and crankshaft leads to the fact that the gas exchange process in the cylinders is disrupted, and the engine stops working in the correct mode.
A timing belt is a rubber part that during operation can wear out, crack, tear, etc. Therefore, it is necessary to replace the element in a timely manner.
When installing a new one, you should set the labels correctly. This is necessary to ensure that the engine operates correctly from the first seconds of startup. If installed incorrectly, serious problems can occur, including engine failure.
When to determine
Setting the cylinder piston to TDC is used in the procedure for determining the ignition timing, replacing the timing belt and/or pulleys, and adjusting the clearance in the valve drive mechanism.
It is also necessary when adjusting valve timing (opening and closing angles of intake and exhaust valves, feed advance angles, opening angles of start valves and launch control spools).
This procedure must be carried out when repairing the engine with its disassembly (for example, during a major overhaul).
Tools needed for work
Installing marks is not an easy process and if done incorrectly, you risk spending a lot of time installing the part. And that's not the worst thing. There are cases when careless drivers break the engine and other mechanisms of the car.
First of all, stock up on the necessary tools:
- Socket head.
- Jack to raise the car.
- Keys No. 17 or 19 - depends on what kind of car you have.
Advice: it is better that you have all key diameters starting from No. 10.
Large flat head screwdriver.
Labeling
Before starting work, you need to understand that it is important that during the process of replacing the timing belt, the pre-set risks do not go astray. Otherwise, you will have to go deeper into the settings and spend more than one hour installing the part.
When installing the timing belt, it is important to align the pistons so that in the first cylinder the piston is at the highest point of the first cylinder. In this position, the piston is at its maximum distance from the crankshaft. This is the position the engine is in when the marks are correctly set. In this position it is necessary to change the timing belt.
The number of marks, as well as their location, may vary depending on your engine type.
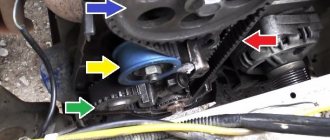
The following marks can be distinguished:
- Mark on the flywheel.
- Mark on the pulley.
- Camshaft mark (two on a 16 valve engine).
They all must match before replacing the timing belt. In order to set the correct position, rotate the crankshaft by the bolt securing the pulley to it. Please note: turning the camshaft pulley is prohibited.
After you have set TDC, replace the belt and tighten the tensioner.
At the end of the work on installing the belt, rotate the crankshaft several revolutions, check if the marks have gone astray. Repeat the adjustment if necessary.
Camshaft end play
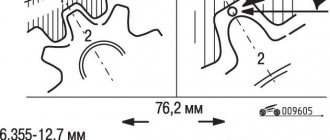
The M-21 engine is installed on the GAZ-21. I began to disassemble it when, in addition to oil, water also began to flow from under the pump. I removed the textolite gear and found scuffing and significant wear on the metal surface of the gear hub facing the cylinder block. The mating surface of the thrust washer also shows signs of severe wear in the form of deep round grooves. The other side of the thrust washer is completely normal, and it seems that during operation the camshaft is pulling very strongly back towards the flywheel, milling the thrust washer with the hub. There is also a suspicion that the length of the spacer sleeve is not enough, and the mentioned interference, leading to milling, appears already during installation of the gear. When a quick measurement is made with a caliper, the thickness of the spacer sleeve exceeds the thickness of the thrust washer by the specified 0.1-0.2 mm, but the fit of the camshaft itself is confusing. It is not installed flush with the block (meaning the surface in contact with the thrust washer), but rather recessed by 0.5-1.0 mm. Attempts to tug the camshaft with hands showed it to be completely immobile. What's happening? Who is guilty? and What to do?
At the front end of the first RV support there is a hole connected to an lubrication groove. It is intended to LUBRICATE the thrust flange assembly you mentioned. When this hole is clogged, WEAR in this place occurs very quickly. Clean the hole, replace the gear and flange. Just remember that flange-bushing pairs come in two thicknesses. Don't miss out, it's better to buy it as a set.
Recipes for “thermonuclear” mixtures for decoking rings You buy oil and a filter, or simply time the decoking to coincide with the next oil change. You measure compression. In the evening, being in a lyrical mood, you turn out the candles and pour about
50 ml of a mixture of 1/4 oil and 3/4 acetone. According to some rumors, instead of acetone, kerosene and a ten-minute flush for the oil system are also suitable. It is advisable not to pour sand into the cylinders when pouring. Slowly, without using the starter, you turn the crankshaft three to five turns. Place the pistons approximately in the middle position. You add more
50 ml. You cover the engine from dust, close the hood, and go home to listen to slow music. Half the battle is done. The next day, slowly crank the crankshaft again and, just for fun, see if the solvent is pouring out of all the spark plug holes. Disable the Hall sensor. With the spark plugs turned out, you crank the engine with the starter, having previously taken care of a suitable rag in the path of the muck flying out of the pots. Rebuilding the ignition system. You start the engine without being surprised if it doesn’t want to start right away. Still, you start the engine and for half an hour, or better yet a whole hour, you are stunned to look at the bluish exhaust at idle. Having waited for the exhaust to become more or less transparent, or having completely lost patience, WITHOUT LOADING THE ENGINE, you go to the pit and change the oil and filter. You measure compression. If you have risen and leveled off, then you buy Coca-Cola and ride around, pleased with yourself. If it remains the same, you buy something that you usually drink out of grief - it means that the money and effort are wasted and the usual decarbonization does not cure this, but most likely, changing the rings and rebuilding the head will do. While driving, 0.5 liters of clean water is poured into the carburetor through a thick medical needle by gravity. It seems that superheated water vapor removes carbon deposits. The guys wrote that after this the engine definitely stops smoking. It is only advisable to change the oil after this (with flushing, of course) and run along the highway for 300-400 km.
Replacing a timing belt without marks
In some cases, it is necessary to install the belt if there are no marks.
For this you will need:
- Calipers.
- Screwdriver
First of all, remove the belt protective cover and unscrew the spark plugs.
Let's take a closer look at the process of replacing a belt without marks on an 8-valve engine.
- It is necessary to align the camshaft in the overlap, for example, it is convenient to select the second cylinder. To do this you will need a caliper and a screwdriver. Slowly turn the camshaft clockwise and observe the overlap position. To do this, use a barbell. Place it on the expansion joints and rotate the camshaft until the expansion joints are at the same height. That is, the position of the barbell should be straight, not beveled.
- After determining the overlap, it is necessary to set the TDC (top dead center) of the second cylinder. Insert a screwdriver into the spark plug channel. Slowly rotate the engine, only in the direction of engine movement, so that the piston rises up. At a certain point, you will feel that the flywheel begins to rotate easily. After this, you need to feel the lower and upper points with your hand and set the upper one.
- After adjustments, put on the new belt so that it matches, you may need to turn it a little. And also pull it tight.
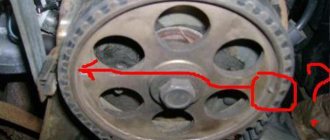
- The next stage is checking the belt installation. Rotate the flywheel and look for a mark on it. Set it to the top position and check the marks on the camshaft. If the adjustment is made inaccurately, the risks will disappear.
On a 16-valve engine (2 camshafts), the installation is carried out according to the same principle.
Volgovsky camshaft (camshaft) on UAZ
I myself installed a camshaft from 31 Volga on a UAZ. The consumption became a little more, and the power doubled, in the end I was very pleased. Now I have a new loaf, I will do the same: a shaft from Volga 31, a carburetor from Niva with a dry “pot” and a selection of jets. As a result, the consumption is 14 liters, on a good highway 110 km/h, in the mud without problems.
Rocker shaft - what to look for when buying
I bought the rocker shaft assembled. He was lying there, so he was waiting in the wings. All, of course, in a DHICK layer of lubricant. Well, we know how to lubricate, they love this job and don’t skimp on the appropriate lubricant. The technology there, or the tolerances, is not necessary, but lubricating the part before sending it to the distribution network - WE CAN’T DO IT WITHOUT THIS, probably specifically so that flaws and DAMAGES are less noticeable.
Okay, I'm starting to WASH UP this grease. This is a responsible matter - you cannot wash it out of the thin channels or from the shaft itself - the khan of the entire mechanism. Well, I wash it, and along the way - my eyes are open - I look at the details. And I see something HORRIBLE: 2-3 mm burrs are nothing! The oil holes in the rocker arms are not DRILLED in the middle of the height of the thread for the adjusting bolts, but at the very top edge! That is, the thread of the bolts will IMMEDIATELY COVER them - and hello! And the bolts themselves are absolutely ATAS. There is either NO ring groove around the radial holes, or there is some hint of one. Again - OIL WILL NOT GO!
I thought I’d go in the morning and change it, but then I changed my mind. Well, why suffer in vain? I corrected the holes in the rocker arms with a drill - it was difficult, but it worked. And I made grooves on the bolts using a grinder as a sharpener, securing it to the table and holding the bolt in my hands. It worked out too. And I put the shaft itself in gasoline this evening, now I’ll go look at it so that it doesn’t die! And I will collect it all.
Consequences of incorrect labeling
If the timing marks are set incorrectly, serious consequences for the car can occur.
The most common cases:
- Due to misaligned timing, valves can become deformed during engine operation, and the damage will accumulate.
- The valves will become deformed - bent. Although this will not happen in an 8-valve engine.
- Due to deformation of the valves, the cylinder head may be damaged. As a result, the guide bushings will fail, and cracks may appear on the main power elements.
- The piston mechanism may burn out due to incorrect placement of the timing marks.
- There will be an oil residue on the spark plugs. Plus, the ignition moment of the fuel mixture worsens.
- And also other unpleasant consequences arise.
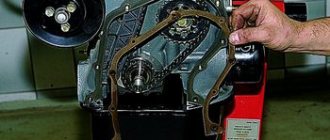
Final removal of the drive chain
Further steps to remove the timing chain on the Gazelle engine look like this:
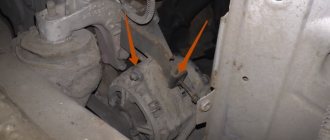
- Unscrew the hydraulic tensioner fasteners. You need to take out two elements - upper and lower. They are removed the same way.
- Remove the tensioner housing.
- Remove the cover that covers the chain. To do this, unscrew the 7 mounting bolts. Be careful not to destroy the crankshaft seal and head gasket.
- After unscrewing the upper hydraulic tensioner bolt, you need to remove the lever and sprocket.
- Remove the chain guide.
- Unscrew the bolts securing the gear to the camshaft flange (there are two in total on the ZMZ-406 engine).
- Bend back the locking plate, while keeping the intermediate shaft of the ignition system from turning.
- Install a screwdriver and use it to remove the gears and the lower edge of the chain.
If difficulties arise, you need to remove the rubber seal, which is located between the bushing and the gear. The second gear can only be dismantled using a two-valve puller.
How to understand that the marks are knocked down, symptoms
After replacing the belt, a situation may arise that the marks were installed incorrectly. How to determine this is described below.
- Traction and throttle response disappear.
- The car begins to accelerate more slowly.
- The engine gets very hot.
At the end of the article, we would like to note that not every car owner can correctly set the timing marks. It is necessary to have information about the operation of the engine and its design features. If you don’t want to spend a single hour setting up the mechanisms, we recommend turning to specialists.