What you need to know in order to correctly measure the gap
Adjustment of the valve mechanism is carried out only after setting the cylinder pistons to the TDC position, with both valves (intake and exhaust) closed.
In this case, the rocker arms can move freely. To adjust, you need to use a wrench to loosen the lock nut of the adjusting screw, which is tightened after completing the adjustment procedure. Here you should be extremely careful, because as a result of improper tightening, the gap size may change up or down. Therefore, it is very important to tighten the lock nut correctly, and then re-check the gap size. Therefore, all cylinders must be checked
Rotate the crankshaft exclusively clockwise; for greater accuracy of its installation, be sure to use a special key or crank handle.
Adjusting valves with a rack - logbook Lada 2107 i 2006 on DRIVE2
After replacing the valve stem seals, I adjusted the valves with a dipstick (supposedly 0.15, but it’s a remake, I don’t know how much it actually is).
Since everything had been removed and had become out of place, after 100 km I re-adjusted it and not in vain (in some valves the dipstick slipped like... in short, easily, there was a gap of more than 0.20).
I adjusted it with a rack with an indicator.
VAZ classic car - 1 pc. Rail with indicator - 1 pc. Keys 17 and 13 - 2 pcs in total. Tube key 10 for removing the valve cover - 1 pc.
Screwdrivers: Phillips and Phillips - 2 pcs.
We remove the excess to remove the valve cover.
Align the crankshaft and camshaft to the marks
On the indicator, the arrow takes an arbitrary position, by rotating the scale we set the arrow to 0 and raise the rocker (there is a special spatula, but I use a screwdriver).
We look at the readings, there should be 52 divisions (depending on the temperature, there is a table of values). If it is more/less, then we put 0 in the place that the arrow occupied when the rocker was raised, and after the rocker is released, you will see how much to adjust .We release the lock nut and adjust, when we have brought it to 52 (or whatever you have) we counter (with practice you will understand how to do this so that the arrow remains at the desired value, well, it’s like with a feeler gauge, but it’s easier). We check by raising the rocker, the arrow should go to 0 , and so on for all 8 valves.
I turn the kv in 4th gear by the wheel, since there is no key for this, and it’s not convenient for them on the injector)
Well, I changed the burnt-out metal-graphite ring (another seller of a large spare parts store for VAZ, doesn’t know that the Euro 2 comes with a ring from 2110). Now you can hear the burnt-out muffler)
Instructions
Before starting work, allow the engine to cool completely. Check the timing marks and chain tension - correct if they do not meet the standards. The instructions will describe the method of adjustment using a micrometer.
Carburetor pan VAZ 2106
Adjustment using the old-fashioned method (with a feeler gauge) is performed in the same sequence, with the exception of the point about measuring gaps.
- Remove the carburetor pan and remove the hose from it.
- Disconnect the accelerator pedal drive.
- Remove the valve cover of the Six power unit.
- Remove the ignition distributor cover.
- Turn the engine by the flywheel. Turning is done with a special key. Removing the spark plugs will make the turning procedure easier. As a result of turning the power unit, the marks on the camshaft sprocket should align with the mark on the bearing housing. For complete reliability, you can check the coincidence of the marks on the crankshaft pulley and the engine.
- Mark the marks on the camshaft sprocket with a marker. Marks are applied on top of the factory ones every 90 degrees.
- Screw the rack onto the camshaft bed mounting. It must be securely fixed.
- Place the indicator on the rack.
- Place the indicator on the edge of the adjustable valve cam.
- Engage the cam using the special grip and pull up. There should be a change in indicators by 52 divisions.
- If there is a deviation in the indicator, the gap needs to be adjusted. Using a size 17 wrench, you need to unscrew the lock nut 1-2 turns and use a size 13 wrench to adjust the gap. After this, carry out another check of the adjustment with a micrometer. If everything is correct, tighten the locknut. After this, you need to re-check the gap - the gap may have decreased after tightening the locknut. When adjusting the gap, you need to leave a margin.
All engine valves are adjusted in this way. To get to the valves you need to crank the engine. There is a clear procedure for adjusting the valves. It is indicated in the adjustment table.
Gap table for correct engine valve adjustment.
At the end of the procedure, it is advisable to crank the engine and check the clearances again. The structure is assembled in the reverse order. Be sure to replace the disposable valve cover gasket.
We repair a VAZ 2106 car ourselves:
- Adjusting the ignition of a VAZ 2106 on your own
- Tuning VAZ 2106 on your own
- Do-it-yourself VAZ 2106 starter repair
Operating procedure and maintenance.
7.1. A lever micrometer can be used either as a regular micrometer or as a clamp with a predetermined size.
7.1. Place the workpiece between the micrometer screw and the heel, clamp it, take readings from the micrometer head drum, press the lever, pressing the clamped workpiece with the lever, take readings from the indicator reading device. Add up the readings taken from the reading devices taking into account the signs.
7.4. After finishing work, wipe the measuring surfaces of the micrometer and lubricate them with industrial oil.
7.5. Wash, lubricate and adjust the micrometer pair at least every 25,000 measurements.
How to adjust valve clearances on foreign cars
First of all, using the repair and maintenance instructions for your car, we determine the engine type. The fact is that some foreign cars can have up to ten types of engines on one car model. The tool required for adjusting and installing timing marks is also indicated there. However, in most cases a set of wrenches and feeler gauges is sufficient. Let's look at the features of adjusting clearances on a Mitsubishu ASX 1.6 with a gasoline and diesel engine.
Gas engine
This is what a Mitsubishu ASX 1.6 engine with a gasoline engine looks like.
To do this, follow these steps:
- Remove the plastic engine casing (held on by rubber latches).
- We remove the ignition coils and valve cover.
- We set both camshafts according to the marks (the nominal clearances of the intake and exhaust valves are also indicated here). We set the marks of the engine camshaft
- Using feeler gauges, we measure the gaps “Second and fourth cylinder - intake valves”, “First and third cylinder - exhaust valves”. We record the measurement results.
- Rotate the crankshaft 360 degrees. Then we align the marks on the camshafts and measure the clearances of other valves. We check the size of the engine valve clearances
- We remove both camshafts, take out the adjusting cups and use the given formula to calculate the size of the new cups. We adjust the valve clearances
- We install new cups and install the camshafts in the cylinder head.
- Apply sealant to the indicated places and tighten the valve cover. Apply sealant and tighten the engine valve cover
Adjusting valve thermal clearances
Some engines, during normal operation, tend to increase valve clearances as a result of wear. This is a safe phenomenon, since it is difficult not to notice the knocking that has begun.
It’s much worse, and unfortunately this is how most motors behave when the gaps decrease over time. Therefore, to avoid zeroing the gaps and burnouts of the plates, adjustments must be made strictly according to the factory regulations.
We use a probe
The easiest way is to remove the valve cover, move the cam away from the valve being tested and try to insert the flat feeler gauge from the kit into the gap.
Typically, the thickness of the probes has a pitch of 0.05 mm, which is sufficient for measurements with acceptable accuracy. The size of the gap is taken to be the thickness of the largest probe that still passes into the gap.
Using a staff and indicator
On some motors, usually those with rocker arms (levers, rockers) in the drive mechanism, it is possible to install a device in the form of a rack, on which sockets are provided for mounting a precision dial indicator.
By bringing its leg to the lever opposite the stem, you can swing the rocker, free from the cam, manually or with a special fork, reading the readings on the indicator scale with an accuracy of about 0.01 mm. Such precision is not always necessary, but adjustment becomes much more convenient.
What to do if you need HBO
The propane-butane mixture has a much higher octane number than traditional gasoline for general use. Accordingly, it burns more slowly, warming up the exhaust valves during release. The gaps begin to decrease much more than the engine developers envisioned, assuming the use of gasoline.
You need to know this: How to understand that a valve has burned out: causes, signs and consequences
To avoid premature burnout of the plates and sockets, the gaps during adjustments are set to be larger. The specific value depends on the engine, usually the addition is 0.15-0.2 mm.
More is possible, but then you will have to put up with noise, reduced power and increased wear of the gas distribution mechanism when operating at partial loads. The best solution would be to use gas engines with hydraulic compensators.
Preparatory work
Before starting the adjustment, you should perform the following operations:
- remove the air filter housing from the carburetor;
- remove the pipes and wires that prevent the dismantling of the timing cover;
- unscrew the nuts securing the timing cover;
- remove the timing cover.
Tip: for convenience, it is worth removing the distributor cover, this will make access to the valve mechanism easier. You also need to unscrew the spark plugs - without them there is no compression in the cylinders and it is much easier to turn the crankshaft.
When access to the valves is ensured, you can begin adjusting the thermal clearances. It should be remembered that the gap value of 0.15 mm was set by the designers for a cold engine. Therefore, before carrying out work, you must wait until the engine has cooled down. In addition, working on a hot engine can cause burns.
Adjusting the valves on a VAZ 2107 carburetor and on an injection model is absolutely no different. The only exceptions are engines on which hydraulic clearance compensators are installed. In this case, no adjustment is required.
Adjustment Tools
The adjustment procedure begins with disassembling the valve cover and parts that prevent access to it.
Necessary tools for preparing the gas distribution mechanism for adjustment:
- 1/2 inch ratchet wrench with extension and socket for “10” and “8”;
- universal screwdriver;
- pliers.
To adjust the thermal clearances of the valves, the following tool is required:
- Ratchet key to “38”;
- Open-end wrench 17;
- Open-end wrench 13;
- The probe is 0.15 mm thick (for an injection engine - 0.20 mm).
Purpose of valves in an engine
During operation, the engine consumes air and fuel and emits exhaust gases. The valves allow air-fuel mixture to enter the cylinder (through the intake valve) and exhaust gases to be removed (through the exhaust valve). The alternation of intake and exhaust cycles is called the engine duty cycle. It consists of four measures.
- Inlet. Inlet valve is open. The piston moves downwards and, due to the vacuum created in the cylinder, carries with it the air-fuel mixture, which enters through the open intake valve.
- Compression. Both valves are closed. The piston moves upward (toward the spark plug) and compresses the air-fuel mixture.
- Working progress. Both valves are closed. The spark plug produces a spark that ignites the air-fuel mixture. During combustion of the air-fuel mixture, a lot of gas is formed, which pushes the piston down.
- Release. The exhaust valve is open. The piston moves up and pushes exhaust gases out of the cylinder through the open exhaust valve. The engine operating cycle consists of four strokes, during which the working mixture enters, is compressed and burns, then the exhaust gases are removed
The meaning of valve adjustment
The opening of the valve is controlled by the camshaft cam. When the engine is running, the valve heats up and elongates, which can cause it to not close completely. To compensate for this elongation, there is a gap between the valve and the camshaft cam. The point of adjusting the valves is to set the required value of this gap.
Signs of improper valve adjustment
Signs of improperly adjusted valves include:
- Extraneous metallic knocking noise from under the valve cover.
- Reduced engine power.
- The smell of pure gasoline in the exhaust gases.
Adjusting the valves on VAZ 2107 cars is mandatory after repairing the gas distribution mechanism, as well as after a mileage of 10–15 thousand kilometers.
Purpose and design of the valve mechanism of the VAZ 2101
The operation of an internal combustion engine is impossible without a gas distribution mechanism (GDM), which ensures timely filling of the cylinders with the fuel-air mixture and removes its combustion products. To do this, each cylinder has two valves, the first of which is intended for the intake of the mixture, and the second for the release of exhaust gases. The valves are controlled by camshaft cams.
In each operating cycle, the camshaft cams alternately open the valves
The camshaft is driven by the crankshaft via a chain or belt drive. Thus, the piston system ensures time-distributed intake and exhaust of gases in compliance with the sequence of valve timing. The rounded tips of the camshaft cams press on the rocker arms (levers, rockers), which, in turn, actuate the valve mechanism. Each valve is controlled by its own cam, opening and closing it in strict accordance with the valve timing. The valves are closed using springs.
The valve consists of a rod (rod, neck) and a cap with a flat surface (plate, head) covering the combustion chamber. The rod moves along a sleeve that guides its movement. The entire timing belt is lubricated with engine oil. To prevent lubricant from entering the combustion chambers, oil seals are provided.
Springs, valve stem seals and valves have to be changed periodically
Each valve timing must strictly correspond to the position of the pistons in the cylinders. Therefore, the crankshaft and camshaft are rigidly connected through the drive, with the first shaft rotating exactly twice as fast as the second. The full operating cycle of the engine consists of four phases (cycles):
- Inlet. Moving down in the cylinder, the piston creates a vacuum above itself. At the same time, the intake valve opens and the fuel-air mixture (FA) enters the combustion chamber under low pressure. When the piston reaches bottom dead center (BDC), the intake valve begins to close. During this stroke, the crankshaft rotates 180°.
- Compression. Having reached BDC, the piston changes direction of movement. As it rises, it compresses the fuel assembly and creates high pressure in the cylinder (8.5–11 atm in gasoline engines and 15–16 atm in diesel engines). In this case, the inlet and outlet valves are closed. As a result, the piston reaches top dead center (TDC). In two strokes, the crankshaft made one revolution, that is, it rotated 360°.
- Working progress. A spark ignites the fuel assembly, and under the pressure of the resulting gas, the piston is directed to BDC. During this phase the valves are also closed. Since the beginning of the working cycle, the crankshaft has rotated 540°.
- Release. Having passed BDC, the piston begins to move upward, compressing the gaseous combustion products of the fuel assembly. At the same time, the exhaust valve opens, and under the pressure of the piston, gases are removed from the combustion chamber. In four strokes, the crankshaft made two revolutions (rotated 720°).
The gear ratio between the crankshaft and camshaft is 2:1. Therefore, during the operating cycle the camshaft makes one full revolution.
The timing belts of modern engines differ in the following parameters:
- upper or lower location of the camshaft;
- number of camshafts - one (SOHC) or two (DOHC) shafts;
- number of valves in one cylinder (from 2 to 5);
- type of drive from the crankshaft to the camshaft (toothed belt, chain or gear).
The first carburetor engine of VAZ models produced from 1970 to 1980 has four cylinders with a total volume of 1.2 liters and a power of 60 hp. With. and is a classic in-line four-stroke power unit. Its valve train consists of eight valves (two for each cylinder). Unpretentiousness and reliability in operation allows it to use AI-76 gasoline.
Video: operation of the gas distribution mechanism
Gas distribution mechanism VAZ 2101
The gas distribution mechanism of the VAZ 2101 is driven by the crankshaft, and the camshaft is responsible for the operation of the valves.
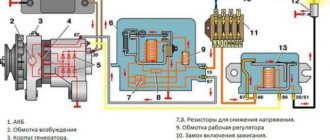
Gas distribution mechanism VAZ 2101: 1 - crankshaft; 2 — crankshaft sprocket; 3 - drive chain; 4 — tensioner bushing; 5 — tensioner adjustment unit; 6 — camshaft sprocket; 7 - camshaft; 8 — valve rocker (lever); 9 - valve; 10 — bushing for the adjusting bolt; 11 — adjusting bolt; 12 — chain damper; 13 - sprocket that controls the operation of the breaker - ignition distributor and oil pump
The torque from the engine crankshaft (1) through the drive sprocket (2), chain (3) and driven sprocket (6) is transmitted to the camshaft (7), located in the cylinder head (cylinder head). The camshaft lobes periodically act on the drive arms or rockers (8), driving the valves (9). Thermal clearances of the valves are set by adjusting bolts (11) located in the bushings (10). Reliable operation of the chain drive is ensured by the bushing (4) and the adjusting unit (5), the tensioner, and the damper (12).
The power strokes in the cylinders of the VAZ 2101 engine have a certain sequence.
The working strokes in the VAZ 2101 cylinders have a certain sequence: numbers indicate the stroke numbers, arrows indicate the direction of movement of the pistons in the cylinders
Adjustment features for an injection engine
The VAZ-2109 valve adjustment described above (carburetor) is also suitable for an injection engine. The only difference lies in the preparatory process. When preparing for work, several other actions are required, namely:
- remove the throttle cable;
- remove the breather hose.
Now you know how to correctly adjust the VAZ-2109 valves. An injector or carburetor powers the engine - this does not play a significant role, because the design of the engine itself remains the same.
The procedure for measuring the gap and adjusting it is very simple and requires the owner to perform it in the correct order. The entire procedure can take no more than 30 minutes.
How to adjust valves on a VAZ 2107 with an injector and carburetor
Valves
Adjusting the valves of the VAZ-2107 is a special procedure that is carried out after a certain period of time in order to extend the life of the car. To adjust them correctly, you need to follow the order and sequence of necessary actions. The reliable engine of domestic classics can be carburetor or injection. However, there is no big difference in adjustment. The operation is simple enough even to do it yourself. In addition, you can go to a service station, where an experienced technician will do this. The adjustment is carried out in several steps, since the valves need to be adjusted in a certain sequence
Why is valve adjustment necessary?
The seventh model Zhiguli was produced from 1982 to 2012. There are several modifications of the car with carburetor and injection engines. They have different volumes and characteristics. Regardless of the type, the classic engine needs regular repairs.
What is it for?
When driving a car, while the valves are operating, they change depending on the temperature. In general, everything is going towards the fact that they are gradually expanding. The valve stems are thus lengthened, which changes the size of the gaps between the ends and the pusher cams. With a long mileage, such an increase can reach critical values. To prevent such a process, periodic adjustment of the valves is necessary. With its help, unnecessary gaps are reduced to normal sizes.
Wear problems
The displacement of valves from their seats entails several negative factors:
- Increased fuel consumption due to unstable operation and interaction of pistons and valves. In the process of shifting the location of the valve, it does not perform its function so accurately; the overall efficiency decreases, causing mechanical losses in operation, which in turn leads to an increase in the car’s fuel appetite;
- Increased natural wear of engine parts. Parts made of steel are subject to constant impact and wear out over time. However, wear processes can be stimulated by inaccuracy in the placement of parts, and valves serve as a striking example. As the required clearances increase, wear increases and, accordingly, the overall engine life is reduced.
Therefore, engine valves require periodic adjustment in order to maintain the wear resistance of the entire vehicle system. In modern engines equipped with hydraulic compensators, the valve adjustment procedure is not required; the 402 engine does not belong to this series and requires periodic adjustment.
On video how to adjust valves on a 402 engine:
Adjusting VAZ valves: diagram, DIY repair procedure
Hi people. In this article we will look at how to adjust valves on a classic car. Owners of domestic cars of the VAZ 2101, 2102, 2103, 2104, 2105, 2106, 2107 family have to deal with such engine operation when valves can be heard knocking. In this case, you need to find the reason why they are knocking and adjust it. They also need to be tuned; there were various works to repair the internal combustion engine, for example, replacing a valve, piston, gasket, etc.
Adjustment of valves
If knocking, unstable operation, or increased vibration occur, you should pay attention to the valves.
If the valve timing of the gas distribution mechanism is disrupted, they do not operate accurately, that is, the full volume of gas does not enter the working area of the cylinders, complete combustion of the fuel-air mixture in the working chamber does not occur, and the cylinders are not purged. This is all accompanied by the appearance of a shock load on the camshaft cams on the drive lever and the shaft rod. Fuel and engine oil consumption also increases. What happens if you drive with unadjusted valves? Answer: rapid wear of engine parts, increasing cost and repair time.
The greatest danger to a car engine is a gap that is less than permissible. Too little clearance between the drive lever and the camshaft cam prevents the valve head from sitting tightly in its seat on the cylinder heads. Through a valve that is not seated, gases from the burnt fuel-air mixture are knocked out of the combustion chamber. Because of this, the exhaust valve cap around the perimeter begins to burn.
Rubber oil deflectors, also known as oil deflectors, also burn out due to a burnt valve cap, which leads to increased engine oil consumption. If the wear of engine parts is large, then it may be better and easier to do an engine swap with your own hands or at a service station.
Manual adjustment of internal combustion engine valves
In the process, special adjustment screws of the rocker arms are adjusted. On some vehicle models, adjustment can be made using the head of a special adjusting bolt. You must use a specific key
It is very important to do everything correctly. Let's look at the setup process using the VAZ 2107 as an example.
Before making adjustments, it is necessary to remove the spark plugs from the cylinders (this requires a special key), then remove the air filter, cylinder head cover and timing belt protection (the number of elements whose removal is required depends on the specific car model). The entire gas distribution mechanism opens before us. In order to perform valve adjustment as efficiently as possible, it is necessary to evaluate the tension of the timing chain. If it is loose, the chain should be tightened.
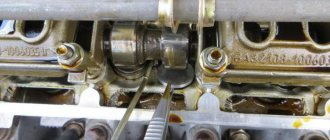
The procedure begins by setting the first engine piston to the initial compression stroke position (TDC). To do this, you need to find a long mark on its body and a mark on the crankshaft pulley, and combine them (the mark on the timing gear should coincide with the mark on the timing case). To adjust, you will need a set of feeler gauges and wrenches “13” and “17”. Directly, the process itself:
- In the installed position of the power unit, the thermal clearances of valves 6 and 8 are adjusted.
- We check the gap using a feeler gauge, which we place between the valve rocker and the cam. Ideally, it should enter with little effort, in which case the valve does not need adjustment. If the probe slips or does not enter, the valve needs adjustment.
- Take the key set to “17” and loosen the locknut.
- Using the key set to “13” we adjust the valve mechanism.
- As soon as the gap is adjusted, it is necessary, using a wrench set to “13”, to hold the bolt for adjustment, and with a wrench set to “17”, tighten the lock nut.
- After tightening the locknut, check the gap with a feeler gauge and adjust it if necessary.
- After the second valve is adjusted, it is necessary to turn the crankshaft clockwise 180. With this position, the clearances on valves 4 and 7 are adjusted.
- The next time you turn the crankshaft 360 from the starting position, valves 1 and 3 are adjusted, and when you turn 570, valves 2 and 5 are adjusted.
- All work is carried out by analogy with the adjustment of 6 and 8 valves.
Starting the power unit after the procedure will provide an opportunity to evaluate how correctly it was carried out. In this case, the quality of valve adjustment must be assessed under different engine operating modes.
Valve adjustment process
The procedure for adjusting valve thermal clearances is the same for carburetor and injection engines. The only difference is the thermal clearance of the valves. On a carburetor engine, the clearances on all valves are set to 0.15 mm when the engine is cold, and on an injection engine, 0.20 mm. Adjustment begins with setting marks on the crankshaft and camshaft.
By turning the nut securing the belt drive pulley (drive disc on an injection engine) with a special wrench to “38”, we align the mark in the form of a mark on the pulley with the protrusion on the front cover, while the mark on the camshaft sprocket should coincide.
In this position, the piston of the fourth cylinder is at TDC (0 0 kV) and the eighth and sixth valves are adjusted (numbering from 1st to 8th starts from the radiator).
- the dipstick is inserted between the camshaft cam and the working surface of the valve lever;
- use key 17 to loosen the locknut to allow free movement of the adjusting bolt;
- by rotating the adjusting bolt with wrench 13, achieve a gap value at which the feeler gauge will move with little effort;
- holding the wrench 13 against turning the adjusting bolt, tighten the locknut.
It must be borne in mind that when tightening the lock nut, the resulting gap may “move” to a larger or smaller direction, so it is important to re-check the thermal gap after fixing the adjusting bolt.
The next pair of valves is adjusted by turning the crankshaft by 180 0, and the camshaft sprocket will turn by 90 0. The mark on the sprocket will be located at the junction of the lower and upper camshaft beds.
Why are valves needed?
The task of the gas distribution mechanism is to “drive” as much of the fuel mixture as possible into the combustion chamber and remove exhaust gases from it into the exhaust system as efficiently as possible. It is this task that is performed by the valves that ensure engine operation on the intake and exhaust strokes.
There are two types of valves installed in the cylinder head:
- inlet Responsible for getting the gas-air mixture into the cylinders;
- exhaust outlets responsible for the timely removal of fuel combustion products.
Each engine cylinder is equipped with a valve mechanism, and, depending on the configuration used, their number ranges from 2 to 5.
- The two-valve system is used on older type engines and consists of 1 intake and 1 exhaust valve.
- The four-valve system is the most popular, and almost all modern engines are equipped with it. In it, the valves work in pairs.
- The five-valve system is found on certain Audi engine models, and is not popular. The reason for this lies in the high complexity of the gas distribution mechanism and the virtual absence of advantages over a standard four-valve engine.
Best gap gauge sets for 2022
To understand which set of styli is best to buy, you need to look at the most popular models presented in the rating of quality tools. You can also find reviews of frequently purchased products and descriptions of the best new products.
Inexpensive models
The most affordable sets of styli are models from the budget price category. In most cases, such tools are not ultra-precise, so they are used for simple work. The cost of inexpensive products starts from 100 rubles.
Interaction of gas distribution mechanism parts
The camshaft, rotating, presses the cams onto the adjusting washers, which are located in the pushers mounted on the ends of the valve stem. Thereby pushing the parts whose caps are located in the valve seats. The seats and caps are very precisely ground to each other, this is done so that at the moment when the cap of the part is completely seated, a hermetically sealed connection is formed into the saddle. The channel is completely blocked.
This is why the engine runs stably and produces the required power, saving fuel. As the engine operates, the working surface of the cams wears out, they lose their dimensions, and the gaps increase.
Because of this, the caps do not fully adhere to their saddles, as a result of which the tightness of the saddle-cap connection is lost. In order to restore this tightness, adjustment of the VAZ valve clearances is required. For this purpose, adjusting washers are used. These washers themselves are round in shape and the circumference diameter is the same as that of the pusher (pos. A in the figure above). The photo below shows some examples of these round washers:
Here are eight washers of different thicknesses. The thickness is written on the washer itself in millimeters. Valve clearances are adjusted by selecting washers of the required thickness. Sometimes you have to change these washers several times, each time inserting a washer of a different thickness, until the valve clearance reaches the desired size.
They are usually sold in sets starting from a thickness of 3mm, the next size is 3.05mm. And so on every 0.05mm, up to a size of 5mm.
Adjustment features and dimensions
The main condition in this matter is that the engine must be cold. Those. its temperature should be no more than 20 degrees Celsius.
We will carry out further actions by looking at the figure below. For ease of operation, it is better to unscrew the spark plugs! This will make it easier to operate all the mechanisms and shafts involved in this process, since there will be no compression. Turn the crankshaft so that the mark on the camshaft pulley coincides with the mark on the rear cover of the gear shaft (tendril).
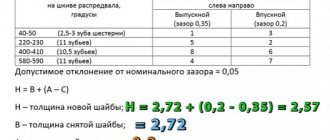
We must immediately examine the remaining marks in the crankshaft area. They should be located exactly as shown in the figure. This means that the piston of the first cylinder is in the TDC position. Next, you need to turn the crankshaft by about forty to fifty degrees, this is necessary so that the camshaft cams turn from the pushers.
Using feeler gauges, you need to measure the gaps of the 1st, 2nd, 3rd and 5th valves. The gaps on the 2nd and 3rd valves should be (0.2+-0.05mm.). On the 1st and 5th valves the gap should be (0.35+-0.05mm). If some gaps do not correspond to the standard, then they are brought to the required dimensions by replacing the adjusting washers, selecting them until the goal is achieved.
After this, you need to rotate the crankshaft 360 degrees, i.e. one full turn and check the clearances on the 4th, 6th, 7th and 8th valves. On the 4th and 8th cylinders the gap should be (0.35+-0.05mm). On the 6th and 7th cylinders, the clearance should be (0.2+-0.05mm). Well, accordingly, if there are incorrect gaps, we correct them in the same way as the first time.
How to adjust valves on a classic with a micrometer
How to adjust the valve clearance of a VAZ-2107 and not harm the engine
Thousands of instructions are ready to answer the question “how to adjust the valves on a VAZ-2107.” All car repair shops do this work, but many of them do not take into account the factors described in this article, and as a result of the valve operation, the valves knock even louder. About how to make adjustments and not make things worse, as well as little-known “pitfalls” of the VAZ 2107 valve mechanism in this article and the attached material.
What are valve clearances?
From physics courses we know that at high temperatures bodies can expand and at low temperatures they can contract. The same thing happens to engine parts when it cools down or is in operation.
If you carefully study the nature of the operation of the valve mechanism, you will notice that the camshaft has cams that at certain times pass through the rocker, opening or closing the valve. To reduce losses, they are in close contact and must ensure long-term opening of the valve, as well as hermetically sealed closure of the internal volume of the motor cylinder.
However, it is impossible to leave a zero gap between the rocker and the cam, since the rocker decreases from cold temperatures and increases at high temperatures, so it must be maintained at 0.15 mm to ensure normal engine operation when reaching the rated temperature.
How to adjust valves?
Adjusting valves on VAZ 07 cars and the entire family of “classics” is a simple procedure that only requires the driver to have a standard set of tools, as well as a feeler gauge to check the clearance.
Feeler gauge for adjusting clearances in the valve mechanism of a VAZ “classic”
The car must be placed in the garage on a flat surface and a valve cover gasket must be purchased in advance, since it is disposable.
Valve adjustments are always made with a cold engine. The most important requirement is that the temperature should not exceed 36 degrees and it is advisable to have a garage in which the temperature is within 20 degrees Celsius.