Gasoline consumption multiplied by its cost can be the decisive argument in choosing a car, but it is often not enough to know how much fuel is burned according to regulations and in reality. When the indicator gives a signal that there is little fuel, and especially if it fails and the light does not light up at all, the most important question arises: how to find out how much gasoline is left?
How many liters of gasoline are consumed per 1 km?
When driving in different cycles, this volume of fuel was enough for us to travel approximately 715 kilometers. We count: 60/715 = 0.084; 0.084*100 = 8.4 liters per hundred km.
Interesting materials:
What does it take to demolish an old house? What does it take to fire a CEO? What does it take to marry a foreigner? What does it take to get married to a prisoner? What is needed to register a child at the place of residence? What should you eat after exercise? What should you exclude from your diet? What should you eat to gain weight? What should you eat to avoid diabetes? What should girls eat when drying their bodies?
Folk tricks
A stationary device that could measure the amount of fuel in the tank with an accuracy of up to a liter is not included in any of the most complete configurations of modern cars. But among car enthusiasts and specialists, on automotive forums, you can find a lot of advice on determining these residues: from rocking the car to evaluate the sound (the less gasoline, the louder the splashes) to weighing it and comparing it with the weight in the owner’s manual. One of these original algorithms for measuring fuel residues is to drain it from the tank into a measuring container, and then pour it back into the tank.
Of course, there are more reasonable methods that are suitable in road conditions.
Common problems
FLS failures are recorded based on noticeably erroneous readings or their complete absence. In the most common case of a mechanical connection with a float and an analog potentiometer, the indicator needle begins to twitch, increasing or decreasing the readings. This is almost always associated with mechanical wear of the contact group of the variable resistor.
The second common case is a change in the density of the float due to degradation of the material or filling it with fuel. Up to complete drowning and constant zero readings.
If electronic sensors malfunction, they simply stop giving readings. Sometimes this is due to wiring, which is less protected from external influences. Indicators fail much less often.
Features of application
The above types of FLS are contact ones. Contact sensors are too unreliable for measuring fuel levels such as ethanol, biodiesel and methanol. The fact is that the moving elements are coated with oxide. As a result, sensor readings are no longer accurate. The same thing happens in tanks filled with gasoline, but oxidation occurs more slowly. If the car uses non-traditional fuel, then a non-contact FLS, which is a magnetic position sensor ( MAPPS ) placed in a sealed container, is placed in its tank.
Whatever type of sensor it is, it has one feature: the float begins to fall after the fuel itself drops below a certain level. This implies a certain measurement error, which is highest as the fuel tank is filled.
The purpose of the fuel level indicator in a car
It is necessary to distinguish between a pointer and a sensor. The first is located on the dashboard and is a dial or digital indicator.
The numbers are in any case duplicated by an analog scale, no matter in the form of a display section or a separate device with a magnetoelectric drive of the needle. This is more of a tribute to tradition than a necessity, but it is accepted.
The pointer is connected to the sensor, and the electrical characteristics of both devices are selected in such a way that the error is minimally acceptable at any point on the scale.
It is not at all necessary to have a linear characteristic of the indicator and FLS. Moreover, they are almost always nonlinear. But when two characteristics are superimposed on one another, and an additional nonlinearity of the scale is added to them, then the displayed information can be trusted.
In the case of computer processing of the sensor signal, you don’t have to worry about the reliability of the readings. The software controller is capable of implementing any most intricate function, even one that cannot be expressed analytically. It is enough to calibrate the readings, which is what is done during development.
The most complex shape of the tank, where, depending on the position of the fuel level, the movement of the sensor’s setting element is influenced by greatly different amounts of liquid in units of volume, is set in the device’s memory in the form of a table.
Moreover, the owner can always enter his own correction factors during the customization procedure for an even more accurate reading. This is how universal on-board computers installed as additional equipment usually work.
Device location
The FLS is always located directly in the fuel tank. Its design is resistant to gasoline or diesel fumes, and access is through a flange at the top of the tank, usually combined with a service port for the fuel pump.
Replacing the device
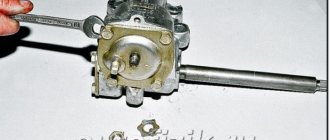
If you need to install a new fuel sensor by replacing the old one, then there is no need to go to a service center - you can perform the procedure yourself. You just need to have all the tools at hand.
How to replace the FLS:
- If the car is gasoline, you need to disconnect the negative terminal of the battery at the very beginning.
- Remove the luggage compartment trim and rear seats to gain access to the sensor.
- Remove the protective plate by twisting the screws and thoroughly wipe the surface, removing dirt around the sensor.
- Disconnect all connected electrical circuits, first leaving markings on each to prevent future errors.
- Tighten the screws securing the FLS and carefully disconnect the device. If the meter is installed in the fuel pump, it may need to be disassembled.
- Thoroughly clean the area where the new device will be installed from dirt and glue, ensuring a good seal.
- When installing the sensor, it is important to accurately align it with the gasket and, if necessary, carefully treat the gasket with glue.
- Perform all steps in reverse order, except for installing the trim and rear seats.
Once the connection is complete, diagnostics should be performed. First you need to fill the tank full and make sure that the arrow shows an increase in fuel volume. Then you need to drive at least 30 kilometers and check for leaks and smell of fuel. If everything is in order, then all that remains is to put the seats and trim back in place.
Most actions with the sensor can be done independently. However, you should not disassemble the device and repair it if you do not have experience working with similar devices. It is better to contact the service and get qualified help.
What to do if the fuel level indicator does not work
It is always important for the driver to know how much mileage the remaining fuel in the tank will last him. The calculation of specific values of instantaneous or average mileage, the number of liters of fuel in the tank, and reserve kilometers is carried out by the on-board computer, but the initial information is supplied to it by the fuel level sensor (FLS).
Since the shape of the tank is unchanged, the volume has a known functional dependence on the level.
Method number 4. "Old School Accounting"
Now let's talk about methods for calculating fuel consumption that can boast the highest accuracy. They have two disadvantages. Firstly, to find out as accurately as possible the fuel consumption of your car, it will take more than one day. Secondly, you will need a notebook, a pen, and the ability to remember to write down the current odometer readings and the amount of fuel filled at each gas station.
However, there is also a significant advantage - the highest accuracy of the result obtained.
Algorithm:
- It is best to start taking notes when the warning light on the panel lights up, or when the tank is full.
- At each subsequent refueling, we record the mileage and liters filled.
- We drive like this for a very long time - the longer, the more accurate the result will be.
- When you get tired of recording, we count the total mileage and liters spent during the time when the records were kept.
- We substitute the obtained figures into the same formula, and we get a very accurate average fuel consumption.
It is advisable to make calculations when the condition of the gas tank is the same as it was in the first point, when the accounting began.
Using diagnostic mode
If your car has a dashboard from the Renault family, which selectively includes LADA, Nissan and some others, you can find out how much gasoline is in the tank, accurate to the nearest liter, in the panel diagnostic mode.
To run diagnostics on the device, you need to:
– before turning on the ignition, hold down the daily mileage reset button for 5 seconds, then turn on the ignition and release the button when the instrument needles begin to move;
– use the same button to switch the diagnostic mode of the instrument panel, finding the gas pump icon in the upper right corner.
Below this icon a number is displayed that exactly corresponds to the volume of fuel remaining in the gas tank.
You can check whether the diagnostic mode of the instrument panel will work on a specific car experimentally.
Method number 2. "Full tank and gas station"
This method differs from the previous method only in its simplicity. In terms of accuracy, it is the same - not very, so to speak.
Algorithm:
- We fill up the gas station with a full tank.
- We reset the daily mileage.
- We drive in the same way as stated above - about 100 km in your usual mode.
- We stop at the nearest gas station and fill the tank full again.
- We write down how much we refueled this time (V), and how far we drove from the previous refueling (S).
- We substitute the resulting numbers into the same formula and get the mileage in liters per hundred.
This method is simpler in that you don’t need a canister, and you don’t have to fill the gas tank from it (you also need a funnel for this). But its accuracy is similar to the first method.
Causes of malfunction
The reasons why the fuel level sensor does not work or it shows incorrectly are the following faults:
- The float has lost its seal. This situation is relevant when a ball made of fragile plastic is used as a float, which can crack as a result of mechanical stress or as a result of operating the car in severe frosts. In this case, the float will be inside the liquid or, more often, it will simply sink and fall to the bottom. The result will be a constant reading from the device that there is no fuel in the tank. Repair measures include replacing the float or the entire assembly. Another rare option is that the float can simply detach from the lever on which it is attached and “go off on its own.”
- Deformation of the lever that holds the float. As a result, the float may lose mobility or reflect incorrect information. Often this situation occurs when the fuel module is inaccurately removed from the tank, but sometimes even as a result of long-term operation of the car on roads with uneven surfaces, that is, with constant vibrations while driving. You can try to return the lever to its original shape, but most often the corresponding lever is simply replaced with a new one.
- Damage to the sensor housing. As a result, the readings of the resistive elements may change or the lever that takes the corresponding readings may be damaged. In this case, the reason why the sensor does not show the fuel level correctly is the use of low-quality gasoline or mechanical shock loads on the part.
- Failure of resistive elements. This is a fairly common reason why the fuel level sensor does not work. Elements on the rheostat fail for natural reasons, that is, as a result of abrasion during long-term use. It is possible that the wear is partial, for example, in the middle. In this case, the instrument needle will twitch. It is also possible that there is no contact between the sliding element and the resistive track due to damage or wear of the resistive coating or loosening of the slider foot pressure. With such a malfunction, the arrow will lie at zero.
- Lack of electrical contact in a certain section of the circuit. As a rule, on contacts that are oxidized either by moisture or fuel. The wires, their insulation, or breakage may be damaged. There are also sometimes problems with electrical connectors.
- The signal wire has a short to ground. In this case, the value of its resistance will be distorted and tend to zero. With such a malfunction, the level sensor incorrectly displays the level, transmitting information that the tank is completely filled.
- The fuse responsible for the operation of the fuel level sensor has blown. The fuse number must be found in the electrical diagram of the specific vehicle.
- Failure to secure the sensor on the fuel tank body. For example, with a skew. As a rule, in such a situation, the smell of fuel spreads outwards, in particular, the smell of gasoline will be heard in the cabin.
- There are cases when the resistive board on which the slider moves simply falls off the fastening solder.
- Tubular fuel level sensors may have a broken signal wire. In this case, the arrow will constantly show an empty tank.
- Also, tubular sensors are characterized by a coating that can form on the guide post. This will naturally make it difficult (and even impossible) for the float to move. Plaque is usually formed as a result of using low-quality fuel (with a large amount of paraffin, gasoline instead of gasoline). In this case, the instrument needle will freeze in one position, and not necessarily in one of the extreme ones.
- For non-contact sensors, the magnetic sensor and/or its wiring may be damaged. Some of them have a special control and control board installed. The problem may be with her too. In this case, the sensor usually fails completely, that is, it does not indicate the fuel level at all.
Most often, problems arise with floats or resistive elements, which wear out over time and stop transmitting correct data. But note that when the fuel level is not displayed, it is not always the sensor that is to blame. Often the arrow does not work, and here the device on the panel, which, in fact, is a potentiometer, is to blame. Therefore, if the fuel sensor does not indicate the fuel correctly, then you need to remove it and check it with a multimeter and make a visual inspection.
By instruments
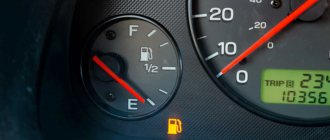
If the fuel indicator is working, the first solution is to navigate it. For example: the volume of the tank is 50 liters, 10 divisions are conventionally marked on the scale, which means that each “beats” 5 liters. When estimating the remaining fuel in this way, remember that the result will be approximate, and pay attention to the location of the car: the car must be strictly horizontal, otherwise the indicator will not correspond to reality.
More accurate readings can be obtained using a special probe. The gas tanks of some old cars were supplied with it from the factory, but by analogy you can do it yourself, having studied the topic well. The distance between the cutoffs depends on the size and shape of the tank; the length of the ruler must be at least one and a half meters, and the material from which it is made must not contain metal and not create sparks.
With sensor
If the dashboard does not support the test mode capabilities described above, the problem of monitoring the amount of gasoline in the car’s tank can be solved using a special wireless sensor installed directly in the gas tank.
A modern device runs on a battery with increased autonomy (up to five to seven years!) and is capable of storing data on changes in fuel level for an average of two months in the built-in memory. The fuel level can be read remotely at any time using a special device that recognizes a radio signal.
Types of fuel tanks and materials of manufacture
There is no single form and design of fuel storage tanks. To obtain the maximum volume of fuel tanks, their geometry is made complex - and different not only for individual brands, but also for each model. The containers differ in both material and equipment.
Main components of the gas tank
The list of equipment items differs for different vehicles. But most of them are universal and the same for all cars:
- Housing – steel, plastic or aluminum.
- The neck through which fuel is poured.
- A neck cover that may have a lock.
- An intake pipe, instead of which there may be a pump for pumping fuel.
- Sensor for monitoring fuel level.
- Tube and valve included in the ventilation system.
- Drain hole or pipe.
The standard set of equipment can be supplemented with other devices. Each model has its own list, which is described in the technical documentation for the vehicle. It is advisable for all car owners to study it in order to avoid mistakes when operating the car.
Design and principle of operation of the ventilation system
When considering the features of tanks of different cars, it is worth paying attention to the ventilation system, which solves several important problems:
- remove excess air from the tank during refueling;
- maintain the pressure at atmospheric pressure and avoid vacuum that could lead to tank deformation;
- maintain a safe temperature inside.
Most modern cars have a closed fuel tank ventilation system. The tanks do not have direct access to the atmosphere - a whole set of special devices are used to let air in. As the vacuum increases, the valve spring is pressed out. Air begins to enter inside until a pressure equal to atmospheric pressure is established inside.
Features of the design of fuel tanks in modern cars
Designers who design fuel tanks consider sealing first. No oil products should leak from the container and no evaporation should escape. Another important point is corrosion protection. You can avoid rust by using the following materials:
- high-quality steel, which is more often used on trucks;
- light alloys or aluminum, which can be found on passenger cars;
- polymers, thanks to which tanks of complex design are obtained.
Plastic tanks are considered the most convenient due to the complete absence of corrosion and lower weight. The disadvantage of plastic is its high permeability to gasoline and the likelihood of leaks. It can be compensated by using 2 layers of polymer.
Method No. 3. "Bulb"
This method is perfect for those for whom a full tank is a definite blow to the budget. In terms of accuracy, it is about the same as the two described above. In addition, to conduct this experiment you do not need to allocate separate time and money - it can be performed during your regular business and travel.
Algorithm:
- As soon as the indicator light with the image of a gas station lights up, we immediately reset the daily mileage.
- We go to the nearest gas station and refuel, as usual - as much money as we have for this matter.
- We record the filled liters (V).
- We go about our business as usual.
- As soon as the control lamp lights up again, we record the readings of the daily odometer (S).
- All the data for applying the formula is there.
It is worth noting that the accuracy of this method is higher, the closer the gas station is when your warning lamp lights up.