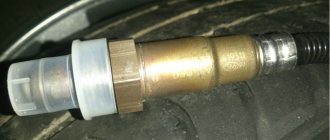
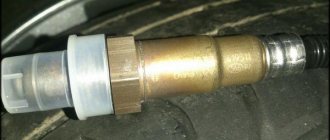
The Chevrolet Niva lambda probe, together with a sensor system, helps to properly regulate engine operation and use fuel extremely efficiently. This affects the amount of harmful emissions into the atmosphere.
On the Shnivy, the sensor is designed to transmit information to the computer regarding the amount of air coming out after combustion of the fuel. The information helps to adjust the composition of the fuel mixture and unlock the potential of the engine. It also significantly increases the life of the catalytic converter.
Where is it installed, types
This element is located in the exhaust manifold (the so-called “spider”), where the exhaust system pipes are connected. In some cases, the sensor is installed closer to the catalyst. But this arrangement does not affect the overall performance of the device. There are several types of oxygen sensors:
- Broadband type.
- With two-channel layout.
The latter were installed on old cars (before the 90s). Modern cars are equipped with a broadband lambda probe. Such a sensor is able to accurately detect deviations in the composition of exhaust gases and quickly balance this ratio by reducing or increasing oxygen in the mixture. A working sensor can reduce fuel consumption. Also, its work is aimed at maintaining optimal idle speed.
Operating principle of the oxygen sensor
The principle of operation of the oxygen sensor is quite simple. The lambda probe must compare the readings with some ideal results in order to understand how the percentage of oxygen in the mixture changes, so measurements are taken in two places - atmospheric air and combustion products are measured.
This approach allows the sensor to feel the difference if the fuel mixture ratio changes.
The ECU must receive an electrical impulse from the lambda probe. To do this, the sensor must be able to convert measurements into electrical signals. For measurements, special electrodes are used that can react with oxygen.
Lambda uses the principle of galvanic cells - changing the conditions of chemical reactions leads to a change in the voltage between the two electrodes. When the mixture is rich and the oxygen content is below the lower threshold, then the voltage rises. If the mixture is lean, the voltage will drop.
Next, the impulse that occurs at the stage of chemical reactions is sent to the ECU, where the parameters are compared with the fuel maps stored in the memory. As a result, the operation of the power system is adjusted.
Also interesting: Installing PTF Chevrolet Niva - Auto magazine MyDucato
The oxygen sensor operates on chemical reactions, but its design is relatively simple. The main element is a special tip made of ceramic materials. Zirconium dioxide and, less commonly, titanium dioxide are used as raw materials.
The tip is coated with platinum - it is this layer that reacts with oxygen. One side of this tip is in contact with the exhaust gases, the other side with the air in the atmosphere.
The lambda probe electrodes have one feature. So that the reaction is more efficient and the indicators are accurate, measurements of the oxygen content in the exhaust are carried out under certain temperatures.
In order for the tip to reach the performance characteristics and the required electrical conductivity, the temperature of the environment should be 300-400 degrees.
To ensure the required temperature regime, the lambda probe was initially installed in close proximity to the exhaust manifold. This ensured the desired temperature after warming up the internal combustion engine. The sensor did not start working immediately. Before the lambda warmed up enough and began to produce accurate parameters, the ECU used signals from other sensors. The optimal mixture was not prepared during the heating process.
Some oxygen sensor models are equipped with electric heaters. Thanks to them, the lambda can quickly reach operating temperature conditions. Heating uses energy from the vehicle's on-board network.
Why does the oxygen sensor (Kalina) fail?
Signs of a malfunction may vary. First of all, this concerns the quality of the combustible mixture itself. Various deposits can worsen the performance of the oxygen sensor. The element also malfunctions due to depressurization of the housing.
This often happens due to obsolescence of the element. Less often, the housing is damaged mechanically, since it is located in a fairly safe place. Another reason is improper power supply. The sensor contacts may move away, as a result of which information is received incorrectly by the control unit. The composition of the fuel-air mixture is disturbed (too lean or rich). Another cause of malfunctions is an incorrectly set advance angle. This applies to cars with a distributor ignition system. Interruptions can also occur due to problems with high-voltage wires, or due to spark plugs. The engine begins to stall at idle and operate incorrectly at high speeds.
Symptoms of a problem
Characteristic symptoms of lambda failure are factors.
- Cold and hot starts of the power plant become more difficult. The car starts the second or third time, and the starter has to be turned for a long time. This is a clear sign that the heater is faulty.
- Increased fuel consumption, the system constantly thinks that the mixture is too rich and adds gasoline to the injector.
- Acceleration is greatly reduced.
- Violation of the engine stroke. The electronic control unit incorrectly adjusts the adjustments, which affects the stability of the power plant.
- Shooting and popping noises are heard from the exhaust system. The problem is specific to lambdas 1 and 2.
How to identify the problem?
Let's look at possible signs of a malfunctioning oxygen sensor:
- Increased fuel consumption.
- Jerking when moving.
- Noticeable drop in power.
- Unstable engine operation at idle.
- Increased toxicity of exhaust gases.
Note that these symptoms do not always occur specifically because of the oxygen sensor.
Therefore, having identified one of the above symptoms, we proceed to a more detailed check of the device. We'll look at how to do this below.
Detailed diagnostics
How to check the lambda probe (oxygen sensor) with your own hands? You can do this in two ways:
- Visually.
- Using a multimeter.
Let's look at the first method first. So, first we remove the connector from the lambda probe. We examine all contacts. The wires must not be broken or damaged. If the contacts do not fit tightly against each other, this issue needs to be corrected. Next, we check the oxygen sensor itself. A Priora, the signs of a sensor malfunction may include the presence of soot, must be urgently repaired.
This is due to the combustion of a rich fuel mixture. Because of this, the device becomes dirty and cannot quickly respond to all changes. If there are shiny deposits (this is lead), the oxygen sensor is replaced. Lead damages both the probe itself and the catalyst. What are the signs of a bad oxygen sensor? The presence of lead indicates the use of excess fuel additives or low-quality motor oil.
Diagnostics with a multimeter
How to check a lambda probe (oxygen sensor) with a multimeter? To do this, we need to connect the signal wire from the oxygen probe connector to our measuring device. Next, we start the engine and keep the speed around 2.5 thousand. Let's release the gas pedal. We pull out the vacuum tube from the fuel regulator and look at the readings of the device.
If the voltage is less than 0.8 V (or absent at all), signs of a malfunction of the oxygen sensor have been confirmed. There is no point in repairing it. Due to the design features, the element can only be replaced. The cost of this element ranges from two to three thousand rubles for VAZ cars. How to change the oxygen sensor yourself, see below.
How to diagnose and replace
First, you should find the probe connector by placing the car over the inspection hole. You can simply disconnect the chip from the block with wires and unscrew the probe from its socket with a key, and then check the sensor with a multimeter.
Use a multimeter to set the resistance measurement and check the terminals of the heating element, usually 3 and 4. The resistance should vary between 12–45 Ohms. If it tends to infinity, then the heating element is faulty.
Also, there may be no power to the heating element. To check it, you need to disconnect the chips. Connect the multimeter to those connectors in the chip with the wiring harness that connect to the heater (usually 2 and 4). 4 - positive, 2 - negative probes and measure the voltage, after turning on the ignition. If there is no voltage, a wiring check is required.
A more accurate diagnosis of the voltage output signal is done with the vehicle running. From the back of the connector, into terminals 1 (signal+) and 2 (ground), you need to insert two thin metal tips, maybe paper clips, to connect to the multimeter probes. The positive probe goes to the signal, and the negative one to ground.
Select neutral speed, put the lever on the brake, jack up the front part of the Niva and place it on some kind of support. Turn on the ignition and use a multimeter to observe the voltage changes coming from the probe.
Until the sensor warms up, the motor operates without its participation (open cycle), and the readings on the device should correspond to 0.1–0.2 V. After 2–3 minutes, after the engine warms up, the readings should go up and run from 0.1 to 0.9 V. If the signal and then remains low, as at the beginning of warming up, or reaches its limit with deceleration (after 10 minutes or more), then the oxygen sensor requires replacement.
Replacement is carried out in the same sequence. You need to disconnect the old probe after the engine has cooled down, placing the car on an inspection hole. First, the chips, having first moved the latch, then the threaded connection of the sensor itself.
DIY replacement
First, disconnect the terminal on the battery. Next, disconnect the block from the sensor itself. Sometimes it is attached using clamps - we also unscrew them. After this, we pick up the “22” or “24” key (depending on the make of the car) and unscrew the probe. Please note that the sensor is part of the exhaust system and, accordingly, operates under extreme load conditions. It is very difficult to unscrew it the first time. Use universal lubricant VD-40. Try not to damage the threads and edges of the stuck sensor itself. As a last resort, you can use a hammer, screwdriver and gas wrench.
With light blows we move the element from side to side. You can pry it out with a screwdriver. If this does not help, use a drill to drill a hole in the probe in place of the nut. We insert a screwdriver inside and try to pull it back out. This should help. We screw a new one in place of the old element. Try to ensure that the part fits snugly against the surface of the exhaust manifold pipe (but do not overtighten the element).
Device diagram
Let's look at the probe diagram, which gives an idea of the placement of nodes. Knowledge of the design allows you to understand the locations of parts that are prone to failure.
Probe design example
- 1 - metal fitting intended for installing a probe, there are turnkey edges on the outer surface, a thread is located below;
- 2 - ceramic insulator;
- 3 — sealing element for inserting the wiring harness;
- 4 - signal wires;
- 5 - metal protective cap, equipped with ventilation vents, designed to protect the measuring element from damage;
- 6 — spring contact part;
- 7 - sensitive element made of ceramic;
- 8 - heating rod;
- 9 - ventilation duct;
- 10 - outer metal casing.
What is an oxygen concentration sensor used for?
In practice, many vehicle owners are not even aware of the existence of this element. Its purpose is to determine the oxygen concentration in the exhaust gases and subsequently transmit this information to the ECU. Based on this, according to the algorithms embedded in the system’s memory, the fuel-air mixture is corrected for its complete combustion in the cylinders of the power unit.
The location of the oxygen sensor is the exhaust manifold. On most models, the lambda is mounted directly in the area of the catalytic converter. Regardless of where the sensor is installed, the correctness of its readings and system performance will not be affected. There are two types of lambda probe:
Note that the second type is included in the design of older vehicle models that were produced before the 90s. All modern models have a broadband lambda, which accurately records all deviations to ensure the most correct mixture formation. At the same time, a properly functioning sensor of such a system can actually reduce fuel consumption and ensure optimal crankshaft speed of the power unit.
Electric snag
The emulator has a microprocessor that corrects the signal for the ECU. The latter “believes” that the sensor is working and passes the data without interpreting it as an error.
In fact, there is no longer a catalyst in the design; instead, a section of the exhaust pipe is welded in.
The cost of the emulator varies from 1,500 rubles, which is 85–90% of the price of a new recreation center. Unlike a standard controller, the emulator has an unlimited service life.
| Catalog article/marking | Price in rubles |
| BOSCH Euro III, up to car 0258005133 | From 1800 |
| After catalyst 0258045197 | From 1800 |
| Fion | From 1400 - 1500 |
| ZVT | From 1400 - 1500 |
| Krayd | From 1400 - 1500 |
| HW-QNT | From 1400 - 1500 |
| Metal spacer | 250-330 |
| Electronic emulator | From 1600 |
| *prices are as of May 2022 | |
Detailed problem definition
Common signs of a malfunctioning lambda probe include the following:
- increased fuel consumption;
- the occurrence of jerking while driving;
- a sharp decrease in the power of the power unit;
- unstable idle;
- the appearance of a sharp, toxic odor in the exhaust gases of a car.
It must be emphasized that the symptoms listed above are not always the result of a malfunction of the oxygen concentration sensor. If these symptoms are detected, the lambda probe must be thoroughly checked. Let's take a closer look at this process.
Causes and symptoms of problems
If the oxygen sensor fails, this affects the performance of the power plant. Failures are always accompanied by a decrease in the quality of the resulting fuel mixture.
Common reasons:
- mechanical damage appears, depressurization is possible due to improper operation or off-road driving;
- problems arise, power outages;
- thermal overload, overheating due to improper ignition;
- severe pollution due to the use of fuel that contains many additives that increase the octane number;
- air and exhaust gases may enter the system.
Typically, the probe fails gradually, which allows the problem to be identified in time.
Signs appear in sequence:
- Displayed as unstable inactive. The reason is that no signal is generated at a certain time. Fluctuations can be severe over a wide range.
- The quality of the air-fuel mixture decreases. This is accompanied by the appearance of jerks and unusual pops in the operation of the power unit. The dynamics are getting worse.
- The corresponding warning lamp lights up on the dashboard, which is a signal to the owner.
- If the situation worsens, the device stops working on an unheated engine.
- Power and responsiveness drop noticeably when you press the gas. Popping and jerking sounds appear more often. Engine overheating is possible.
- Fuel consumption increases, exhaust gases acquire a toxic odor.
In such a situation, it is necessary to replace the lambda probe, and signs of malfunction cannot be ignored. On new car models, emergency mode is activated, which makes further movement impossible. This eliminates the development of more serious engine problems and costly restoration.
Methods for diagnosing a lambda probe
You can test the sensor in one of the following ways:
- During a visual inspection
- Checking with a multimeter
Let's start with the first method. First, you need to disconnect the connector from the sensor and inspect the condition of the contacts; the integrity of the wires should not be compromised, and all connections should be held tightly. After this, we inspect the sensor itself. There should be no deposits or damage to the integrity of the structure.
Soot deposits can be cleaned; its formation is caused by the combustion of a too rich fuel mixture, as a result of which the lambda patency is impaired. This leads to the device beginning to function incorrectly. Lead deposits, which have a silvery-shiny color and are caused by the use of low-quality fuel and motor oil, are considered the most destructive for the sensor. There is no way to get rid of them; a complete replacement of the device is recommended.
The process of checking a lambda probe using a multimeter is not particularly difficult. To carry it out, you need to connect the signal wires of the sensor with the probes of the tester, then start the power unit and hold its speed at 2.5 thousand. Next, we drop the accelerator, pull out the choke and look at the multimeter scale.
A complete failure of the oxygen concentration sensor is indicated by the absence of voltage or its low value (less than 0.8V). Since the design features do not allow the lambda probe to fully restore functionality, a complete replacement of the worn-out element will be required.
How to replace it yourself?
As you can see, in most cases of lambda probe failure, repairing it makes no sense, so the best solution to the problem would be to replace the faulty element, especially since this process is not complicated.
Before replacement, it is necessary to turn off the power to the vehicle's on-board network, and then remove the block from the sensor (on some models it can be additionally secured with clamps). Since lambda is included in the design of the exhaust system, the element therefore constantly operates under high loads. It is not always possible to unscrew it the first time. This should be done carefully so as not to damage the threads in the exhaust manifold pipe.
After the failed element is removed from its seat, we clean the threads from dirt, install a new lambda probe and screw it in, being careful not to overtighten.
The importance of the oxygen concentration sensor in the exhaust system of a car cannot be overestimated, since its failure will provoke incorrect operation of the power unit, which is extremely detrimental to its elements. For this reason, you need to learn to identify its breakdowns in a timely and correct manner.
Regulator check
If you suspect a regulator malfunction, it is recommended to start by assessing its external condition. In most cases, if the sensor is faulty, it will be covered in a layer of dirt or grime. A normal appearance of the sensor usually indicates normal operation, but testing should be continued.
- The regulator must be disconnected from the unit.
- Then connect it to a voltmeter with a fairly high accuracy class.
Note. The connection diagram of the regulator to the voltmeter should be based on its pinout: the black wire from the sensor is responsible for the signal (goes to the controller), the white wires are responsible for heating, the gray wire is for grounding.
Checking the voltmeter readings is a diagnostic based on the dynamics of the vehicle's power plant. For example, if cruise mode is engaged (2500 rpm) with the vacuum tube removed, a normally operating regulator should output 0.9 V (a little more or less). If the sensor readings are below 0.3 V, the device is clearly faulty.
The control sensor may have a different mode. You can simulate forced air intake, which leans the air-fuel mixture. In this case, the regulator readings should be less than 0.2V.
Another test mode is associated with the intermediate position of the motor. In other words, if the engine speed is within 1500 rpm, the regulator should show a value of 0.5 V.
If the sensor is completely faulty, it should be disassembled and replaced. And here you need to adhere to some rules.
- It is better to change the regulator on a racing car, so to speak “hot”. This gives you a better chance of not breaking the threads.
- It is also advisable to slightly raise the connector of the new regulator to protect the device from dirt and moisture.
- And finally, experts recommend treating the sensor body with “graphite”, even with factory lubricant.
Almost all modern cars have an oxygen sensor. There are several ways to position the device. On some cars it is located next to the catalyst, on others it is in the exhaust manifold.
What to do if you find a faulty sensor on the road
If a sensor malfunction is detected on the road or you need to go somewhere urgently, but the problems with the sensor have not been resolved, what should you do? The solution is brilliant in its simplicity: you just need to turn off the probe. Of course, the flashing “control” will not go away until the engine stalls and the dynamics are, in principle, normal. But you can easily get to a car service station, even if without services.
It is necessary to install a sensor recommended by a specific vehicle manufacturer. By installing some kind of “sinister” device, even for reasons of economy, you can subject the engine to unbearable loads and problems. Undoubtedly, engine repair will cost much more than buying a high-quality oxygen sensor.
