Payment for goods and downloading of the book in electronic form (PDF format) is made on the website.
To do this, you need to find the book you are interested in and click on the “Buy” button. The price of the book is indicated on the button.
For convenience, the price on the website for residents of Russia, Belarus and Kazakhstan is presented in rubles.
For residents of Ukraine in hryvnias, and for all other countries - dollars.
After clicking on the “BUY” button, a payment window will open where you can select a payment system with which you can pay for the selected book using any bank card (Visa, MasterCard, MIR, etc.)
When you click on the “Pay by bank card” button, the Portmone payment system will open, which is the easiest way to make a payment.
In addition, the website offers four payment systems for payment:
- Yandex (payment from any bank cards, Yandex Money account, QIWI Wallet, terminals, etc.);
- Portmone (payment from any bank cards, Portmone account);
- PayPal (payment from any bank cards, PayPal account);
- WebMoney (payment from any bank cards, payment from WebMoney wallets).
Payment via Yandex Cashier
After selecting payment via Yandex, the Yandex Cashier payment system will launch, where you need to select a convenient payment method (bank card, QIWI, Yandex Money account, etc.)
After specifying payment details and confirming payment, payment for the goods will occur.
If you have a bank card in a currency other than the ruble, then the money will be debited from the card at the rate of the Central Bank of Russia at the time of the purchase.
This payment method is optimal for residents of Russia, Kazakhstan and Belarus.
Official website of the Yandex Kassa payment system https://kassa.yandex.ru
Basic data
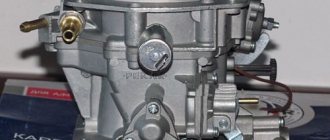
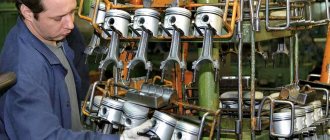
The VAZ 2110, 2112 oil pump is designed to uninterruptedly supply oil to the engine to lubricate its rubbing parts, which effectively extends their service life. On these cars, this product is connected to the crankshaft and directly receives energy from it for operation (rotation), which is traditional for all front-wheel drive VAZs. The product is located in the engine oil sump.
Signs of pump failure:
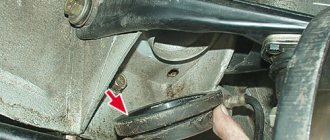
You need to know that the burning of a lamp with an image of an oil can, without confirmation, is not grounds for immediate replacement of the unit. First you need to make sure that the wiring of the oil pressure sensor is in good condition; if everything is in order with it, then you definitely need to check the sensor itself. To do this, it is dismantled and inspected - if there are no traces of lubricant on it (no circulation), the pump will need to be replaced; when the sensor is lubricated, the sensor should be replaced.
The most common pump failures include:
The manufacturer AvtoVAZ recommends changing the oil every 10 thousand km, but operating experience shows that it is better to reduce the mileage between changes. You need to buy oil only from reputable manufacturers, and you also need to be wary of counterfeits.
Payment via Portmone
After selecting payment through Portmone, the payment system will launch, where you need to select the payment method: bank card or Portmone account.
The price in the Portmone payment system is converted into dollars at the exchange rate of the Central Bank of the country where you are located.
If you have a bank card in a currency other than the dollar, then the money will be debited from the card at the rate of the Central Bank of your country at the time of the purchase.
After specifying payment details and confirming payment, payment for the goods will occur.
Official website of the Portmone payment system https://www.portmone.com
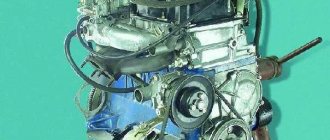
VAZ 2106 engine oil system
In a running engine, friction forces arise, to overcome which some of the engine power is spent. In addition, friction can cause overheating and wear of parts. Reducing the negative impact of friction forces and improving the performance of moving parts is achieved by:
The oil film replaces the friction of the mating surfaces of the parts with the friction between layers of lubricant. Other than this oil:
The VAZ 2106 uses a different lubrication system:
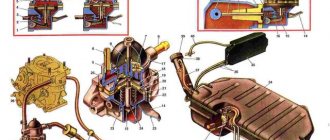
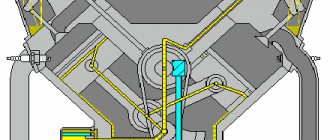
The photo of the engine of a VAZ 2106 car shows that under pressure from the gear oil pump, position 8, lubricant is obtained:
In addition, the lubrication system contains:
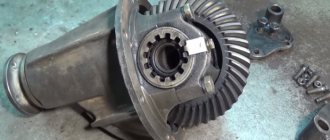
The oil pump of a VAZ 2106 car engine includes drive and driven gears. The second rotates freely on the axis, and the first is rigidly fixed to a shaft, which has a drive shaft gear at the other end, which meshes with a helical gear located on an additional shaft. The latter receives rotation from the engine crankshaft. A non-separable oil filter is used to clean the oil from contaminants. Its body contains:
Payment via PayPal
After selecting payment via PayPal, the PayPal payment system will launch, where you need to select the payment method: bank card or PayPal account.
If you already have a PayPal account, then you need to log into it and make a payment.
If you do not have a PayPal account and you want to pay using a bank card via PayPal, you need to click on the “Create an Account” button - shown with an arrow in the picture.
PayPal will then prompt you to select your country and provide your credit card information.
After specifying the information required to make the payment, you must click on the “Pay Now” button.
Official website of the PayPal payment system https://www.paypal.com
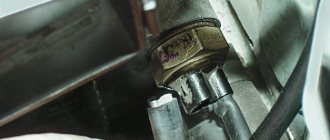
Checking the electrical oil pressure sensor
Checking the sensor with a multimeter
Electronic oil pressure sensors, used both on foreign and domestic cars, in particular on VAZ-2114 cars and other modern Ladas, are easy to check. Their design is similar to that of a rheostat, but they simply open the circuit at a certain pressure. Accordingly, its verification is even simpler. To do this you need:
- Set the multimeter to the “continuity” (break) mode of the electrical circuit.
- Ensure a tight connection between the air pump and the inlet (sensitive) hole where air is supplied. Here, similarly, it is necessary to ensure high-quality sealing, since the result of the experiment directly depends on this.
- Place one multimeter probe on the central output contact of the sensor, and the second on its body, “ground”.
- At the same time, use a pump to apply air pressure of about 1...1.5 atmospheres to the sensor. There is no need to blow hard so as not to damage the membrane. If the sensor is working properly, the electrical circuit will open almost immediately, under the mechanical action of the rod, which is in rigid connection with the bending sensitive membrane of the oil pressure sensor.
As is clear from the operating diagram of the sensor, if the circuit is open (detected with a multimeter), then the sensor is working. Otherwise, no. In rare cases, instead of the sensor, the problem why the oil light is on must be looked for in faulty (broken or damaged insulation) wiring.
You can also check the performance of the oil pressure sensor using another method. So, you need to remove the power wire from the sensor and short it to ground. If the sensor is working properly, the warning light on the dashboard should not light up. Otherwise the sensor is faulty.
Checking two sensors
On some modern machines, two pressure sensors of the same type (“new”) are installed. The first is designed for an absolute pressure value in the range of about 0.15...0.45 atmospheres, and is designed to open the warning lamp after starting the engine. Its verification is similar and follows the procedure described above. That is, the connection is the same. Its circuit should open when pressure is pumped into it in the specified range.
The second sensor is designed to monitor oil pressure while the engine is running. It is similar in type to the first, but its difference is to control the upper limit of the oil (in order to prevent it from increasing to a critical value). The upper value may vary and differs for specific car models. However, in most cases it is around 1.8 atmospheres. When this pressure level is reached or higher, the contact circuit should close and the engine oil pressure warning light should be activated on the instrument panel.
Checking the pressure sensor using a light bulb
To check the electric (new) oil pressure sensor, instead of a multimeter, you can use a light bulb designed to operate under 12 V DC voltage, as well as a power supply (battery) and a compressor (preferably with a pressure gauge). The verification algorithm is as follows:
- Two wires must be connected to the contacts of the light bulb.
- Connect one end of the wire going to the light bulb to the output contact of the pressure sensor.
- Connect the ground from the power supply (or minus from the battery) to the housing (ground) of the sensor.
- Connect the plus from the power supply or battery to the other wire on the light bulb.
- If the sensor is working properly, then after turning on the power supply (or simply when contact is made from the battery), the light should light up. Otherwise, the sensor can immediately be considered faulty.
- Next, to check, you need to apply a pressure of about 0.5 atmospheres to the sensitive element of the sensor using a compressor or pump. The pressure value can be different, and it depends on what pressure the sensor is designed for. Usually it is around the already mentioned 0.5 atmosphere.
- When the pressure increases to the specified value (critical for the sensor), the light should go out, since this will open the control electrical circuit in the sensor body. If this does not happen, then the sensor can also be considered unusable.
Instead of a compressor, you can easily get by with a regular car or even bicycle pump, which will easily produce the required half-atmosphere air pressure.
Payment via WebMoney
After selecting payment via WebMoney, the payment system will launch, where you need to select the payment method: bank card or WebMoney wallet.
If you already have a WebMoney wallet, then you need to log into it and make a payment.
If you do not have a WebMoney wallet and you want to pay in another way, you need to select any of the methods that WebMoney offers and make the payment
After specifying payment details and confirming payment, payment for the goods will occur.
Official website of the WebMoney payment system https://www.webmoney.ru/
Gas distribution mechanism
The gas distribution mechanism ensures that the engine cylinders are filled with a combustible mixture and exhaust gases are released in accordance with the cylinder operation order and valve timing adopted for the engine. The mechanism parts include: camshaft, valves and guide bushings, springs with fastening parts, valve drive levers.
The camshaft, which controls the opening and closing of the valves, is cast iron. The rubbing surfaces of the cams are bleached. This process consists of electric arc melting of surfaces, which results in the formation of a layer of so-called “white” cast iron, which has high hardness. The shaft rotates on five supports in a special housing 26 (see Fig. 3), and is kept from axial movements by a thrust flange placed in the groove of the front support journal of the shaft.
The valves (intake and exhaust) are located in the cylinder head obliquely in one row. The intake valve head has a larger diameter for better cylinder filling, and the operating chamfer of the exhaust valve, which operates at high temperatures in the aggressive environment of exhaust gases, has a heat-resistant alloy overlay. Springs 10 and 11 (Fig. 4) press the valve to the seat and do not allow it to come off the drive lever. The upper support plate 13 of the springs is held on the valve stem by two crackers 12, which when folded have the shape of a truncated cone.
Levers 15 transmit force from the camshaft cam to the valve. The lever rests on the spherical head of the adjusting bolt 17 with one end, and on the end of the valve with the other. The adjusting bolt is screwed into sleeve 21 and locked with locknut 18.
Downloading a book
After successfully completing the payment (by any method) and returning to the KrutilVertel store from the payment system website, you will be taken to the successful payment page:
On this page you need to indicate your e-mail, where access to download the book will be sent.
If you are already registered on our website, then simply follow the link to your personal account.
The book you purchased will be in your personal account, from where you can always download it.
Please note that after making the payment, you need to return back from the payment system website to the KrutilVertel website.
If for some reason you did not return back to the site and closed the payment system tab with a message about the successful completion of the payment, please let us know - we will send you a letter indicating access to download the book.
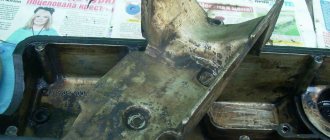
Oil filter
The filter is full-flow, non-separable, screwed onto the fitting of the cylinder block and connected by channels to the oil pump and the main oil line. To remove the filter, use device A.60312. When installing the filter, it is recommended to wrap it manually without a tool. A filter element made of special cardboard is installed in the steel filter housing. The filter has anti-drainage and bypass valves. The anti-drainage valve does not allow oil to drain from the system when the engine is stopped, the bypass valve allows oil to pass through when the filter element is clogged from the pump into the main oil line.
Problems when paying with bank cards
Sometimes difficulties may arise when paying with Visa/MasterCard bank cards. The most common of them:
- There is a restriction on the card for paying for online purchases
- A plastic card is not intended for making payments online.
- The plastic card is not activated for making payments online.
- There are not enough funds on the plastic card.
In order to solve these problems, you need to call or write to the technical support of the bank where you are served. Bank specialists will help you resolve them and make payments.
That's basically it. The entire process of paying for a book in PDF format on car repair on our website takes 1-2 minutes.
If you still have any questions, you can ask them using the feedback form, or write us an email at [email protected]
Engine crankcase ventilation
Rice. Scheme of crankcase ventilation of a VAZ car: 1 - tube; 2 - oil separator; 3 - cover; 4 — hoses; 5 - flame arrester; 6 — exhaust manifold; 7 - filter element; 8 — hose; 9 — throttle valve axis; 10 - spool; 11 — spool groove; 12 - calibrated hole.
The crankcase ventilation of the VAZ engine is forced, closed, preventing the release of crankcase gases into the atmosphere. It is carried out due to vacuum in the engine cylinders.
The crankcase ventilation system includes:
- hose 4;
- oil separator 2;
- exhaust manifold 6 located at the bottom of the air filter.
When the engine is running, blow-by gases are sucked into the exhaust manifold through an oil separator 2 with a cover 3, where the oil is separated and flows down tube 1. A flame arrester 5 is installed in the hose 4, which prevents the flame from breaking into the crankcase when “popping” into the carburetor.
From the exhaust manifold, gases can then pass in two ways:
- into the air filter, bypassing filter element 7, and through the carburetor into the engine cylinders with the combustible mixture;
- through hose 8 into the spool valve of the carburetor and then into the throttle space of the carburetor.
The spool device regulates the crankcase gas suction mode at different crankshaft speeds and consists of a spool 10 on the axis 9 of the throttle valve of the first chamber and a calibrated hole 12. The spool has a groove 11.
At a low crankshaft rotation speed (with the throttle valves closed), the vacuum at the inlet to the carburetor is insignificant, and the bulk of the gases are sucked through hose 8 through calibrated hole 12 into the rear throttle space of the carburetor. The calibrated orifice limits the amount of gases sucked in, and ventilation has little effect on the amount of vacuum behind the throttle valve.
With an increase in the crankshaft rotation speed when the throttle valve is opened, spool 10 rotates and opens an additional path for gases through groove 11. Gases are sucked out both through hose 8 and into the air filter. The total amount of gases sucked out increases.
At high crankshaft speeds (throttle valves are open), the bulk of gases are sucked into the air filter into the space behind the filter element.