SOME SIGNS OF ITS MALFUNCTION
The driver should be made to think about the occurrence of the following comments in the operation of the braking system:
- Liquid leakage from the tank;
- The brake pedal sinks when pressed;
- The appearance of air in the car brake system;
The manifestation of at least 1 of these signs should cause an immediate response from the driver to eliminate it.
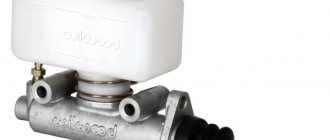
Restoring the performance of the GTZ is impossible without removing it, so it will have to be removed from the car.
STAGED REPLACEMENT OF THE MAIN BRAKE CYLINDER
You need to look at the whole process step by step. We will take into account all aspects and features. This must be taken especially seriously, because the braking system is our safety.
HOW TO REMOVE GTZ
When removing, you need to perform the following steps:
- First you need to disconnect the wiring from the brake fluid level sensor, which is located in the reservoir cap on the GTZ;
- The next step is to remove the cap from the tank and pump out the liquid from it. A huge-capacity honey syringe is perfect for this purpose;
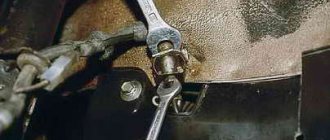
- Now you need to use a special wrench and unscrew the fittings of the tubes that are connected to the GTZ;
- Take these tubes to the side so that the replacement of the VAZ gas turbine engine occurs without interference;
- After which you can use a wrench set to “17” to unscrew the two nuts that secure the GTZ to the body of the vacuum booster;
Separating the GTZ from the vacuum
- The final step is to remove it from the vacuum booster.
- Wrenches for “10”, “13”, and “17”;
- A special wrench for unscrewing brake pipe fittings;
- Pliers;
- Rags;
- Metal brush;
- Liquid for topping up.
Before changing the main brake cylinder, you need to disassemble, inspect and troubleshoot the old cylinder. Maybe you can get his job back. It is possible to repair the head brake cylinder of a VAZ 2114 in this case, if only the rubber sealing collars are worn out, but wear has not been detected on the cylinder mirror. If it is present, repairs will be a worthless undertaking.
WHAT IS NEEDED TO REMOVE THE GTC FROM THE CAR
To perform such an operation, it is better to have an assistant and the necessary tools nearby:
You also need to ensure there is a place where, if necessary, you will have to lay out the parts of this disassembled product. Let's look at the question of how to replace the brake cylinder with your own hands. The matter is not very difficult and can be dealt with in about 30 minutes, in this case, unless unexpected incidents arise.
What brake hoses should I buy and what spare parts should I buy to replace the brake hoses?
Brake hoses have proven themselves well , they are of good quality and a little expensive. If you want to save a little, you can buy brake hoses produced by DAAZ , which are also of good quality.
You should also buy copper washers 1.5 mm thick, brake fluid, which is necessary for bleeding the brake system. I recommend buying brake fluid DOT 4 400 grams.
Algorithm for replacing the main brake cylinder on a VAZ 2114
Losing the brakes is a very unpleasant moment for any driver, especially if it happened while driving. This is a rare phenomenon on the road, but it does occur. 2114 is the culprit ; it must be emphasized that its failure is actually not unexpected. It all starts with insignificant “little things” and ends with failure. You also need to know that the VAZ 2113 and VAZ 2115 have a similar master brake cylinder.
Master brake cylinder
SELECTING A NEW CYLINDER AND ITS INSTALLATION
When purchasing, you should pay attention to the presence of plugs on all holes in the main brake cylinder. If they are missing, moisture may enter the internal part, as a result of which pockets of corrosion may appear. If the brake fluid reservoir is removed from an old product, it is better to purchase new bushings to install it in a new GTZ. There is a high possibility of their deformation when removing it.
After you have chosen the GTZ and purchased it, you can begin installing it. It starts with installing the tank.
A new product cannot be washed with gasoline or kerosene. You can use isopropyl alcohol or brake fluid.
Then they proceed like this:
- Place the cylinder in its place and secure it with 2 nuts to the vacuum booster housing;
- Place an empty container with a wide neck or a rag under the body of the installed product;
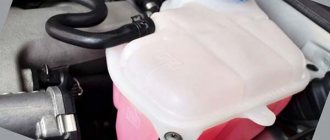
- Fill the reservoir with brake fluid to the upper max mark;
- The next step will be to check the performance of the cylinder. To carry out this action, you need an assistant who will “lightly” pump the brake pedal. The driver must close all four holes on the GTZ with his fingers and wait for the liquid to emerge from them. It should appear first in the two front holes, and then in the rear holes. The assistant keeps the pedal pressed, and the driver quickly connects the front, then the rear tubes and tightens them;
- Now you can put the brake pipes in place. This must be done slowly and with caution so as not to destroy the threads on the fittings or the cylinder body.
READ How to tighten the handbrake on a Nissan TIIDA
At this point, the work on replacing the gas turbine engine has been completed. There is one small detail left, this is bleeding the brakes of the VAZ 2114. This is a topic for a separate article, but for now good luck on the roads.
Auto repair school - Do-it-yourself car repair
Jun 21, 2022 VAZ 2108, VAZ 2109, VAZ 2110, VAZ 1117 Kalina, VAZ 2170 Priora by admin
And oops! Another article again about brake hoses! Only this time we will talk about replacing the front brake hose on VAZ-2108, VAZ-2109, VAZ-2110, VAZ-2115, VAZ-1117 Kalina, VAZ-2170 Priora . Even I was surprised why I hadn’t thought about the brake hoses of these cars until that moment. And I didn’t bother to write a few lines on this topic. Yes, I agree with you if you say that there is nothing difficult about replacing the front hoses. But, with an amendment. It will be easy only if you have already done this work more than once. And from your personal experience, you know about certain “surprises” and nuances that you may encounter during your work. But for a novice car enthusiast, everything will not seem so simple. A person who has decided, for the first time in his life, to replace the brake hoses on his own, will have the standard type of questions - Which manufacturer of the hoses should I buy?, Is a special tool required for this job?, In what order should the front brake hose be replaced?, And what Difficulties may arise during the work process? Of course, you don’t have to think for a long time, buy any hose that is in the store, remove the wheel and start doing something. True, this something turns into a lot of wasted time and effort, not counting the nerve cells and, possibly, broken certain parts. The only advantage after such work can be considered gaining bitter experience. And that’s all... You definitely won’t get pleasure from the work done. But this can be avoided.
If you have decided to independently replace the front brake hoses on VAZ-2108, VAZ-2109, VAZ-2110, VAZ-2115, VAZ-1117 Kalina, VAZ-2170 Priora, then first of all I recommend that you think about the tool which will be needed for this work. I list: open-end wrenches for 8, 14, 15, socket wrenches for 8 (will also be useful) and the main thing is the presence of special wrenches for brake pipes - a split and/or crimp wrench for 10 (it’s better not to start work without them) . Look at photo number 1. You will also need a small hammer, a metal brush, VD-40 fluid and a transparent bottle with a rubber tube for more efficient and accurate bleeding of the brakes.
I forgot something else... A! Assistant! He will help you not only bleed the system, but also empty a couple of bottles of beer in honor of the successful replacement of hoses)))
Spare parts. Here you will have a very large choice. to list all the companies that manufacture front brake hoses for VAZ-2108, VAZ-2109, VAZ-2110, VAZ-2115, VAZ-1117 Kalina, VAZ-2170 Priora . Yes, and this is not necessary. Since I advise you to make a choice from two possible options. The first one, brake hoses produced by Balakovo (BRTI). The quality and, as a rule, long service life of hoses from this manufacturer are above all praise. The only disadvantage of this option is the price. She, as they say, “bites.” And if finance sings romances, then we can remember the second option - brake hoses produced by Dimitrovgrad (DAAZ). The price is lower, the quality is pretty decent.
Along with the hoses, you should immediately buy copper washers . It’s even better to say, it’s not “should”, but it’s a must buy . I don’t see any point in saving money in this matter. There is one washer for each hose. The thickness of this copper sealing washer should be - 1.5 mm. Photo 2. Don't forget about the brake fluid. It will be needed to bleed the system after replacing the hoses. A 400 gram bottle of DOT-4 brake fluid is 100% sufficient.
We're done with the preparations. Let's get to the main point! To the description of replacing the front brake hose on cars VAZ-2108, VAZ-2109, VAZ-2110, VAZ-2115, VAZ-1117 Kalina, VAZ-2170 Priora :
1. First of all, after removing the wheel, I advise you to brush the metal fitting of the brake pipe and spray it with WD-40. After this, remove the protective cap and rubber ring from the bleeder fitting, again brush it and spray it with WD-40. Next, we try to unscrew the bleeder fitting; for this you can use a socket or socket wrench size 8 (photos 3, 4 and 5). Why does this need to be done in the first place? Will explain. The fact is that this unfortunate fitting for bleeding the front caliper of the VAZ-2108, VAZ-2109, VAZ-2110, VAZ-2115, VAZ-1117 Kalina, VAZ-2170 Priora cars tends to stick tightly . And when you try to unscrew it and bleed the system, it may simply break off. And this happens very often, otherwise I would not focus on this. In this case, it will not be possible to bleed the system. That is, if you start replacing the hose, and then remember about this fitting, then bleeding the brake system may become questionable. It will be difficult to solve the problem quickly. Since it is very difficult to unscrew and carefully drill out the fitting from the body of the aluminum caliper body. Not everyone can do this. And even then, the chances of success in this matter are 50 percent. The surest, fastest and safest way to solve the problem is to replace the entire front caliper brake cylinder . In general, this is what I'm getting at. Anticipating a problem with the fitting, we first pay attention to it. If it unscrews, good. And if it doesn’t and it breaks down, then it’s easier to go to the car market in a car with a broken fitting, but a working brake system (it’s very good if the market is nearby and you can walk to it, but not everyone is so lucky) to get a front caliper cylinder than after replacing the hose and, of course, with an airy system and an ineffective brake pedal, go the same way to the car market. I hope I explained it clearly))). Yes, you can try to “negotiate” with the bleeder fitting using a hammer! If you feel that the fitting is resting, give it a few gentle blows with a hammer, this may help and it will become more compliant (photo 6).
2. After the fitting, you can start working on the brake hose itself. We put a crimp wrench on the brake pipe fitting, hold the brake hose with a 15 wrench and tear the fitting out of place. If it moves with difficulty, tighten it, pour WD-40 and try to unscrew it again. When the tube fitting rotates freely, remove the crimp wrench and then unscrew it using a split or open-end wrench. To avoid loss of brake fluid, we plug the pipe with a rubber cap (photos 7 and 8).
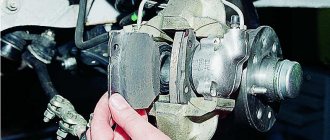
3. Remove the rubber hose ring from the front shock absorber strut holder (photo 9).
4. Using a split or open-end wrench 15 (in some cases 14), we try to unscrew the brake hose from the brake cylinder (photo 10). If you don’t want to unscrew, it doesn’t matter. We take wire cutters. Chick! Photo 11. And we finish the job with a spanner or socket wrench (with a high head) (photo 12).
All! The front brake hose has been removed. At the junction of the hose with the caliper, we carry out cleaning work (dirt, sand and oxidation do not contribute to a tight connection) and screw in the hose with a new sealing washer (photo 13). We tighten it, but without fanaticism. We connect the hose to the brake pipe, making sure that the hose does not get twisted. Don't forget to secure the brake hose to the strut holder. After this, you can start bleeding the system. We ask the assistant to press the brake pedal 3-4 times, at intervals of 1-2 seconds, and then hold it down. At this moment you release the bleeder fitting and liquid and air begin to come out. This is clearly visible in a transparent bottle (photo 14). Tighten the fitting. We repeat the procedure until the liquid begins to come out without air bubbles. Ready. All that remains is to check the tightness of all connections and the fluid level in the master brake cylinder reservoir.
Something like this... The work of replacing the front brake hose on VAZ-2108, VAZ-2109, VAZ-2110, VAZ-2115, VAZ-1117 Kalina, VAZ-2170 Priora cars has been completed. I hope I helped and explained everything clearly. If you have questions or just want to leave your feedback on this material, then do not hesitate to use the comment form))).
You may be interested in an article on replacing the front brake pads of VAZ 2108-2115, VAZ-1117 Kalina, VAZ-2170 Priora.
When using an article or photographs, an active direct hyperlink to the website www.avtorem.info is required!
Did you like the article? Share it on your page!
FAULTS
- The brake fluid leaves the reservoir;
- The rear drum is wet, fluid leakage is noticeable;
- The braking efficiency has disappeared, the pedal “takes” at the very end of the stroke, sometimes not from the first stroke.
- Natural wear and tear;
- The cuffs are corroded due to mixing different types of brake fluid;
- Poor quality of the part;
- The pistons were squeezed out due to severe wear of the pads.
It happens that the pistons inside the housing become jammed. If this happens with the pistons apart, the car begins to constantly slow down, and the drum overheats. You cannot drive with such a defect; the car must be urgently taken in for repairs.
There is one aspect that is worth focusing on. Often, when bleeding the brakes, mechanics break off the bleeder fitting on the cylinder when trying to unscrew them. Even WD-40 doesn't help. This happens due to the fact that over time, the “pumping” begins to boil in the ZTC body. Therefore, before bleeding the brakes, you should have new replacement parts in stock.
There is also a clever method that will help you avoid breaking off the fitting. Before unscrewing, you need to carefully (do not break the fitting with a hammer!), but painstakingly tap the housing around the bleeder fitting and try to move it out of place.
Then, without applying any special effort, we try to weaken the “pumping”. Doesn't work? Then we tap again. Most likely, patience will be rewarded, and the hassle of unscheduled cylinder replacement will not arise.
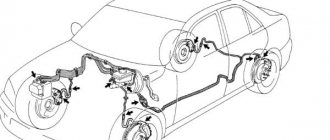
BRAKE SYSTEM
All modern cars have a hydraulic brake system, and discs or drums are used as braking parts. Discs are considered more effective in their own action, but the drums do not wear out longer. The brake system of the VAZ 2114 contains the following parts:
- Brake master cylinder;
- Front caliper (right and left, they are not interchangeable with each other);
- Rear service cylinder (one for each rear wheel);
- Vacuum booster;
- Tubes;
- Hoses;
- Disks (on the front wheels, identical to each other);
- Drums (on the rear wheels, interchangeable with each other).
From the interior, the system is controlled using a pedal, the free play is regulated by a rod.
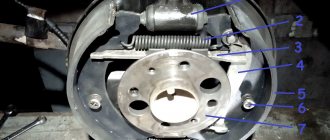
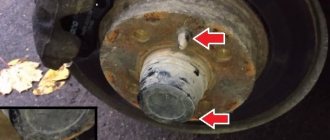
REAR BRAKE CYLINDER
The working rear brake cylinder on a VAZ is a device in which two pistons, under pressure created by a liquid, push the rear pads apart. The pads are pressed against the drums and braking occurs.
The rear brake cylinder for 2114 (ZTC) can be of different manufactures. In Russia there are quite a few companies specializing in the production of spare parts for cars. The parts produced by AvtoVAZ are unique; many spare parts for VAZ cars are created in Samara. But there are also products from other companies (including foreign ones):
- Ate, Germany;
- Samco, Italy;
- Lucas;
- Fenox;
- AP Lockheed;
- "Basalt";
- "Craft".
ZTC Kraft
Depends on the manufacturer and region of sale (as of 2105). There are no differences between the VAZ 2114 and VAZ 2115 models; the parts are completely interchangeable with each other.
On a one hundred percent assembled car, it is not visible where the rear brake cylinder is located; it is located inside the rear drum. But you can figure out where it is by looking at the brake pipe that goes to the cylinder.
REPLACEMENT
It is recommended to replace the rear brake cylinders immediately in pairs, even if only one of them is leaking. To replace, you will need the following tools:
- Auto jack;
- Wheel key;
- Wheel stops;
- Keys for 10 and 12;
- Hammer;
- A block of wood (or better yet, a drift made of brass or bronze);
- Brake bleeding wrench.
Replacing the rear brake cylinder on a VAZ 2114 occurs as follows (if there is no car lift):
- We loosen the bolts on the rear wheel, lift the car with a jack, and remove the wheel;
- We unscrew the two bolts on the drum (they also serve as guides for the wheel) with a 12mm wrench;
- We remove the drum. If it does not come off, tap it with a hammer through a drift or a block of wood. Fundamentally! You cannot put the car on the handbrake; the handbrake lever must be fully released;
- Removes the pads;
- Unscrew the brake pipe with a 10mm wrench;
- Unscrew the two cylinder mounting bolts (also a 10mm wrench).
READ 2022 Kia Sonet Subcompact SUV to hit dealerships ahead of India launch
That's it, rear brake cylinder 2114 has been removed. Another small aspect. When we disconnected the tube from it, liquid began to flow.
It’s better to plug the pipe with a piece of wood - less fluid will have to be filled, and it will be easier to bleed the brakes.
Installing the rear brake cylinder is done in reverse order.
That's all, we've figured out how to replace the rear brake cylinder. You should also remove air from the system by bleeding the brakes. After all the work performed, you should check the functionality of the new part. Check:
- Is there any fluid leakage after the replacement?
- Are the brake pads spread on the wheel where the gearbox has been changed?
The functionality of the new part can be checked before installing the wheel in place, but such a check must be done by two people. In general, you won’t be able to bleed the brakes alone. We check as follows:
- One of the participants sits behind the wheel, presses the brake pedal and keeps it pressed;
- The 2nd participant tries to spin the drum and looks for any liquid leaks.
If everything is in order, install the wheel in place. If the drum rotates or fluid leaks, the cylinder will have to be replaced.
There is still one point that masters do not always take into account. After pumping, we start the engine, press the brake pedal a couple of times, and only then check the effectiveness of the brakes while driving (making sure that the system is in full working order). There have been many cases when the brakes were inspected while accelerating in front of an obstacle. As a result, we ended up with a wrecked car. Replacing a rear brake cylinder is not a difficult task, but it is very important and requires care and vigilance.
The main stages of replacing brake pipes on a VAZ 2109, 2110
You can replace the mowing line pipeline in the direction from the head brake cylinder to each wheel according to the following scheme.
- Disconnect the battery terminals.
- Raise the car to a suitable height using a jack.
- Remove the car wheels.
- Using a “10” wrench, unscrew the nut securing the tube to the master cylinder and install a plug for dust and dirt in the supply hole.
- Carefully release the pipeline towards the wheels. Remove the protective plastic box and remove the line from the iron and plastic holders. Try to do this carefully so as not to destroy the clips.
Tip: When replacing a line, it is better to fill the system with the latest brake fluid.
Fundamentally: when installing a new highway, plug it at the inlet and outlet. Dry all connections to prevent dirt from entering the system. During the installation process, it is better to treat the surface of the copper or iron pipeline with an anti-corrosion coating.
Don't forget to change the connecting tube between the wheel calipers. To do this, use a brake wrench set to “10” so as not to strip the thread, unscrew the fittings and install a new tube. replaced after replacing the elastic hose on the wheel.
Necessary tools and spare parts
Replacing a faulty tube is possible with a minimum set of tools. Repairs to the “four” are often carried out by car owners, so having detailed replacement instructions won’t hurt. Carrying out work to replace a damaged tube is possible if you have the following tools:
- Keys for “10” and “15”;
- Wheelbrace wrench for wheel removal;
- Rags and containers for draining liquid.
The process of removing the old hose can be complicated by souring of the connection point. In this case, you should prepare WD-40 or a similar lubricant to treat the soured compounds. The VAZ 2114 brake hoses are quite durable, but if they are installed incorrectly, there is a risk of abrasion on the car body or wheel. When installing, you need to securely fasten the part in a special mount. In addition to replacement, during the diagnostic process of the system, you should check the condition of the discs, pads and the fluid itself.
Replacing the brake hose VAZ 2113, 2114, 2115
Prerequisites for leakage in the brake system With the engine running at idle speed and the gear shift lever in neutral, press and hold the brake pedal depressed with constant force. If the pedal begins to sink, this indicates a possible leak in the brake system. To prove this hunch, inspect the brake system. Check the fluid level in the head brake cylinder reservoir. A slight decrease in the fluid level in the head brake cylinder reservoir may be the result of enormous wear on the brake pads; a sharp decrease in the brake fluid level indicates the presence of leaks in the brake system. Negligence in the brake system can be both external and internal. When checking the brake system, small leaks may not be detected. If the fluid level in the head brake cylinder reservoir is normal, check the length of the vacuum booster rod. If the length is not adjusted, adjust or replace the stem. Check the hydraulic and parking brake adjustments.
When I braked and went to see what the reason was, at first there were a lot of thoughts in my head about where the brakes had gone. I opened the hood and looked at the brake fluid in the reservoir: the reservoir was practically full, maybe a few grams were missing. Next came a visual inspection. I started with the front wheels: I approached from the right side and looked - I saw that it was a little damp (I didn’t drive through puddles and it was dry outside). I touched it and cleaned it. Ultimately, it was immediately clear that the brake hose had ruptured.
READ Replacement Low Beam Lamp Opel Astra J
The place where it exploded
I stood there a little longer and a small puddle of brake fluid appeared.
CONSEQUENCES OF BRAKE FLUID LEAKAGE
It’s great that it’s not at a speed of 80-120 km/h. The consequences would have been very dire, although, earlier than that, I was driving at that speed.
I looked visually - there were no cracks or breaks anywhere. The hose is approximately 4.5 years old and has served its purpose for a long time.
NEW AND OLD HOSE, THERE IS NO SIGNIFICANT DIFFERENCE, NEW IS A LITTLE SHORT
I removed the hose and installed it in this order. I changed the front pads a bunch. When I installed the hose and installed new pads, I moved on to the GTZ. I removed the bolt and plug, screwed in the tube, and filled the brake fluid back in. And how do you think I bled the brake system alone? The answer is simple - unscrew the fitting on the caliper
and let it flow by gravity and substituted an empty container so that there wouldn’t be a big puddle of brake fluid.
One good thing is that the old brake pads wear out moderately, which means the cylinders are working perfectly.
After I pumped it up, I decided to check how it worked. The brakes are back to normal. The car still slows down until the hose is replaced. Now I drove for a whole day and didn’t even feel the change for the worse. In general, I'm pleased.
When is it necessary to replace pipes and other elements of the brake system?
Brake pipes are changed quite occasionally. The need for this arises only if the machine has been in use for a long time, in unfavorable conditions that promote the development of corrosion, or in the event of some mechanical damage.
The condition of these components can be assessed independently by looking under the car body, or by bringing your “iron horse” for inspection by specialists from the service center. According to the regulations, diagnostics of all components of the brake system should be carried out at least once a year, preferably at the end of the winter period. You can combine the inspection with the next oil change.
Replacement of brake pipes VAZ 2109 (Lada Samara)
Rubber hoses on all wheel cylinders must be replaced, regardless of their condition, every 70-100 thousand km. mileage Pipelines are replaced only when necessary.
To implement the work, the following tools will be useful to you:
- Jack;
- Phillips screwdrivers;
- Set of wrenches for: “10”, “14”, “17”;
- Clamping key to “10”;
- Clamping pliers;
What do you need to consider?
The design of the braking system and the principle of its operation are virtually the same for all car models. Accordingly, the method of its restoration is also similar for all brands of vehicles.
All pipeline repair work can be performed on a repair pit, overpass, or on a level area by lifting the machine with a jack.
Let us remind you how to check the condition of the brake system without leaving the garage.
- A situation arises when the engine is idling and the gear lever is in neutral. The driver must press the brake pedal and hold it in this position for several minutes. If the pedal fails very easily, then there is reason to suspect that there is a malfunction in the system. You need to think about how to replace brake hoses on a VAZ 2114, which specialist you should trust to solve an important issue.
- The contents of the master brake cylinder are checked regularly; if the fluid level drops, you need to sound the alarm and take the car to a service station using an emergency light. Even if there is a slight decrease in the level of contents in the tank, this condition can still be considered a sign of wear on the brake system components. This means that you need to decide how to replace brake hoses or pads on a VAZ 2114. If you notice the rapid disappearance of liquid from the barrel in a short period of time, this means that there is a leak, and it is strictly prohibited to drive such a machine. We remind you that depressurization of the system can be internal or external, and the first can only be recognized by the condition of the tank, while the second leaves its traces in the area of the wheel mechanisms.
Brake fluid VAZ 2114 - An important rule for a novice driver is to learn how to check the condition of the hydraulic and parking brakes. It wouldn't hurt to know how to regulate them. And the aerobatics for a newbie in the car industry is to know how to replace brake hoses on a VAZ 2114, especially since this car brand is a debut for many.
- It is imperative to inspect the condition of the wheels and “adjacent areas” before leaving. If you notice dampness on the surface being inspected, react immediately - check and figure out how to replace brake hoses on a VAZ 2114.
- Beginners should also study the control panel inside the car. Sensors there are always triggered if any of the important parts are worn out or suddenly fail. Always pay attention to the brake warning lights. So, for example, at the moment the ignition signal is given, the brake warning lamp should be on, and go out when the car is started and begins to move. Then everything is in order and you don’t have to think about how to replace the brake hoses on a VAZ 2114 this time.
The icon (!) “Brake system malfunction” is dimly lit
Replacing brake pipes - MegaSOS
Under the influence of harsh environmental conditions, brake pipes and hoses wear out and therefore from time to time need to be replaced. Timely replacement of these parts guarantees trouble-free operation of the machine and your safety. In this article we will answer the following questions:
- How often do you need to change brake lines and hoses?
- How to carry out repairs without the help of others?
Features of replacing brake hoses
When replacing brake pipes on a VAZ 2110, it is not superfluous to check the condition of the elastic hoses. If you see even minor cracks and mechanical damage on them, replace them. Also install new hoses if the service life of the old ones has already exceeded the required limit.
The elastic hose replacement scheme consists of the following steps:
Replacing the sorcerer, brake pipes, fittings on VAZ 2108-2115
- Thoroughly clean the cylinder with an iron brush, treating it with rust remover as necessary;
- Using a “14” wrench, unscrew the wheel caliper fitting;
- Plug the caliper hole to prevent dirt from getting into it;
- Using wrenches “17” and “10”, unscrew the fitting and disconnect the hose from the tube;
- Remove the elastic hose holder;
- Install the new hose in sequence from tube to caliper.
Replacing the parts of the brake system outlined above is not a very pleasant task. But, if you are going to replace the piping and hoses, be glad that you won't have to do it lately.
Sources:
https://autovaz-2114.ru/brake-system/osobennosti-zameny-zadnego-tormoznogo-cilindra-2114/ https://avtosaver.ru/tormoz/zamena-tormoznyx-trubok-vaz-2114-zamena-tormoznogo- shlanga-vaz-2113-2114-2115.html
How to check brake hoses?
When carrying out regular maintenance, it is worth checking the condition for abrasions, cuts and cracks. It is most convenient to do this with the wheel removed. Most often, the hoses on the front calipers “suffer”.
Visual inspection is an important component of diagnosing many components in a car, especially the brake system. The condition of discs, pads and tubes can be checked visually. The presence of smudges and cracks indicates the need to replace them. In general, the braking system is reliable, so even if one caliper fails, the car will still stop. But you should not rely on the remaining circuits and not service the problematic caliper with pipe. Replacement of VAZ 2114 brake hoses is required if the following symptoms are present:
- Cracks, abrasions and cuts are a clear signal to replace the part;
- Brake fluid leak. You can determine the location of the leak by drops on the pipes themselves;
- Brake failure or incomplete operation of the system is a sign of a malfunction in one of the circuits;
- The appearance of a brake malfunction lamp on the dashboard is an indicator of insufficient fluid level. Because leakage may be caused by damage to the tubes - checking their condition for cuts and abrasions is a mandatory procedure.
Another way to determine the location of a fluid leak is to inspect the asphalt under the car for puddles. If there are smudges, driving a car is strictly prohibited, because In addition to your own safety, you may put other road users at risk.