Although the last Ford Focus 2 rolled off the production line 6 years ago, this model continues to remain popular on the market. Naturally, all cars of this generation are already out of dealer warranty, so the question is “where to service the car?” always relevant for their owners.
Fortunately, the design of the car allows you to carry out many routine maintenance work yourself without any problems: for example, by replacing the air filter on a Ford Focus 2 yourself, the owner will spend only a few minutes.
How often should I replace it?
First, let’s decide which filter to talk about: cars in the first years of production used a compact flat filter, which, according to reviews from owners, did not prove to be the best, especially on 2.0-liter engines.
Although the manufacturer set the replacement interval at 15 thousand, even under average conditions, without getting carried away with driving on dirt roads, the owner could feel a noticeable deterioration in engine thrust even before the next maintenance.
Therefore, cars that rolled off the assembly line after May 2007 received an updated cylindrical filter with a much larger area (for the Russian assembly, the update affected primarily engines from 1.6, some cars with 1.4 engines continued to be equipped with old filters). The new filter is guaranteed to last the stated 15 thousand, exceptions are possible only with constant driving on primers.
SHABLON.indd
In this case, the arrows on the filter should be directed towards the car interior.
According to reviews from Focus II owners, the original filter (Visteon) makes the process somewhat simpler. The original filter is elastic, bends and twists easily, and after releasing it returns to its original shape. This allows you to keep your foot on the gas pedal.
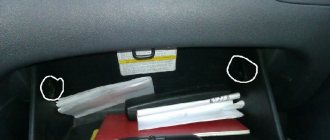
And if the pedal is still removed, do not be too lazy to replace the standard compressed nuts with those, for example, that are secured with a nylon belt - you will avoid the procedure for replacing the studs.
More information about the design, maintenance and repair of the Ford Focus II can be found in our Wikipedia (link)
Error in the text? Select it with your mouse! And press: Ctrl + Enter
Air filter selection
The air filter on pre-restyling cars had a factory part number 1232496. In fact, the Knecht/Mahle LX1572 filter was used on the assembly line, supplied directly in Ford OEM packaging, so this analogue can be considered absolute.
Also among non-original substitutes we can point to Bosch 1 457 433 323, MANN C 28 122, Champion U 793/606. Since the filter life is short due to the selected size, more frequent replacement of the Ford Focus 2 air filter with a non-original one is significantly more profitable than using the original.
After restyling, a filter with article number 1708877 began to be used (on cars of recent years, article number 1848220 can be selected by VIN). This filter was also produced for the Ford assembly line by the Mahle concern (their catalog number is LX1780/3), its other analogues are Bosch F 0264 001 36, MANN C 16134/1, Fram CA 10521. All these filters perfectly withstand 15 thousand runs, and only on very dusty roads they manage to significantly reduce their throughput.
Fuel consumption, engine power
Filtration device in a carburetor car
The air filter in a car affects the rate of fuel combustion inside the engine and, as a result, the engine power. Complete combustion of a combustible mixture is possible provided that it contains about 20 times more air than fuel. The car takes air from the environment, so the air flow contains dust, insect particles, plant spores, and so on. All these harmful impurities, once inside the engine, act as abrasive particles and lead to disruption of the power unit. The purpose of the filter device is to clean the incoming air from harmful impurities of dust and dirt. Passing through it, the air is purified, then mixed with fuel and leads to complete combustion of the fuel due to the presence of a large amount of oxygen in its volume, helping to reduce fuel consumption.
This device also affects the power of the motor due to the resistance created by the incoming air. The filter element can have a different design and, depending on the number of filtration layers, provide resistance to the flow of incoming air. As resistance increases, engine power decreases, as the amount of oxygen entering the engine decreases and the fuel does not burn completely. Replacing a worn-out filtration device with a new one will help reduce fuel consumption.
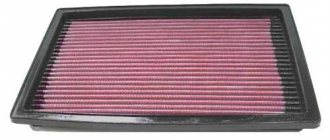
An increase in power on sports cars can be achieved by installing filter devices with zero resistance. Such filters consist of a minimum of layers treated with a special adhesive to trap small particles. “Nuleviki” do not create additional loads on the engine and allow you to achieve maximum engine power.
We recommend watching a video about the effect of a car air filter:
Ford Focus 2nd generation cars
The Ford Focus brand itself has been produced since 1998, and in 2004 the production of Ford Focus 2 started. Dorestayl is a model that was produced in 2004-2008, Focus was restyled in 2008, the car underwent changes:
- front bumper;
- optics;
- front wings;
- radiator grille.
The Ford Focus-2 car for Russia was equipped with various engines, both gasoline and diesel; in total, seven types of power units were installed on the Focus. Gasoline internal combustion engines are Duratec, with a chain drive of the gas distribution mechanism, and Zetec, with a timing belt drive, with a volume of 1400 to 2000 cm³. Also in the range of engines there is a Duratorq 1.8 liter diesel engine and a 2.5 liter turbocharged diesel engine produced by Volvo.
Assembly
After replacing the coarse filter and the pump itself, you should check the tightness of the wire chip. The glass itself should be securely in place. Next, the element is installed in the tank. Previously disconnected tubes are connected to it. And here the problem arises - how to close the lid? The lid was cut out independently, so we need to figure out how to seal it as tightly as possible. To do this, you can take a plate measuring 30x30 cm and drill holes in the corners with a drill.
View gallery
Next, we finally cut off the old cover and place the plate on the hole. We will need to drill a couple of holes in the body itself. Then a thread of the appropriate diameter is cut with a tap and the bolts are installed. To fasten the plate, it is enough to use an 8 or 10 mm bolt
When choosing the depth of the hole, it is important not to overdo it, otherwise you may drill through the tank itself. Moreover, this will happen unnoticed, because it is made of plastic, so choose the bolts as short as possible
Replacing the air filter Ford Focus 2
On second-generation Focus vehicles, the engine air filter (AF) is changed during maintenance; the cost of replacement is included in the general list of maintenance services. According to the regulations for replacing the filter element, many sources indicate different data; in general, it is recommended to change the VF on Ford cars through one service. If each maintenance is carried out every 20 thousand km, it turns out that the air filter needs to be updated once every 40 thousand km.
This replacement frequency is suitable for an environmentally friendly environment; perhaps the regulation is observed in Europe or America. In Russian conditions, the air filter becomes dirty much faster, so the Ford Focus 2 air filter should be replaced more often, after 20 thousand, and in conditions of heavy dust - after 15 thousand km.
Step-by-step instruction
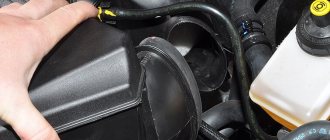
- Unscrew the 4 bolts on the cover.
- Pull up the cover. You need to make an effort - the lid fits tightly.
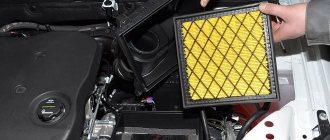
- Remove the old filter element.
- Wipe and/or vacuum the box.
- Install a new filter.
- Close the cover and tighten the bolts.
Checking and replacing the air filter element on 1.4 l R4 Duratec 16V engines; 1.6 l R4 Duratec 16V and 1.6 l R4 16V Duratec Ti-VCT
You will need: TORX T25 wrench, flat blade screwdriver.
1. Remove the air supply sleeve
2. Use a screwdriver to move the lock
3. and disconnect the wiring harness connector for the mass air flow and incoming air temperature sensor.
It is not necessary to remove the air supply hose and disconnect the pickup block; you can remove the air filter cover along with it. However, it is more convenient to perform the operation by removing the air supply sleeve and disconnecting the block of the transmitter wiring harness.
4. Remove six screws
5. Remove the air filter cover
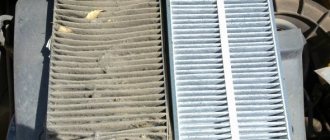
7. Inspect the filter element. Blow it out with compressed air. Replace the heavily contaminated filter element.
8. If necessary, remove dust and dirt from the air filter housing.
9. Install a new filter element into the housing.
The filter element has a rectangular shape that matches the shape of the air filter housing, so incorrect installation of the element is excluded.
10. Install the parts in the reverse order of removal.
You will need an "8" socket wrench.
1. Remove the mounting bolts.
2. . Remove the air filter cover.
3. . and remove the filter element from the filter housing.
4. Inspect the filter element. Blow it out with compressed air. Replace the heavily contaminated filter element.
5. If necessary, remove dust and dirt from the air filter housing.
6. Install the new filter element into the housing, securing the back of the filter element in the air filter housing holder.
7. Install the parts in the reverse order of removal.
Replacing the filter yourself
Maintenance at a car service center is not very cheap, so many car owners, in order to reduce costs, carry out maintenance themselves. It’s not difficult to replace the filter with your own hands; let’s look at how the engine filter element is changed on a pre-restyling Focus-2 car with a 1600 cm³ ZETEC engine. We carry out the work as follows:
- turn off the engine, open the hood;
- pull off the plug from the air flow sensor;
- unscrew the clamps of the injector pipe, disconnect the corrugation from the VF housing;
- unscrew the screws of the top cover of the VF housing, there are six of them in total, remove the cover;
- remove the filter element itself from the housing;
- if dirt and dust have accumulated in the lower part of the case, the plastic box should be removed in order to wash it;
- There is a sponge inside the lower housing at the bottom left; if it is dirty, it also needs to be changed;
- Having cleaned the body of dirt, install a sponge filter, secure the plastic box in its place;
- install a new filter element;
- fasten the top plastic cover with self-tapping screws;
- We put the pipe (corrugation) in place and connect the mass air flow sensor plug.
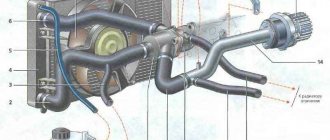
Power unit. Air and vapor.
Removal
All vehicles
1. Disconnect the upper clamp on the air filter exhaust pipe.
Excluding vehicles with diesel engines
2. Disconnect the electrical connector of the mass air flow (MAF) sensor.
Cars with diesel engines
3. Disconnect the electrical connector from the intake air temperature (IAT) sensor.
All cars
4. Disconnect the breather line.
5. Remove the air filter.
Compression check
After checking the compression, you can breathe a sigh of relief or worry, since the cost of the repair depends on the result.
Impaired compression often causes the presence of oil in the VF, and also causes a number of other problems.
Compression check
To work you will need:
- Compressometer;
- A rag in oil, which you will use to determine the compression stroke;
- Adapter for spark plug holes. It is used when checking the combustion chamber for leaks;
- Compressor.
Now let's start checking.
- Warm up the engine to operating temperature, then turn off the fuel supply.
- In the case of a carburetor, you need to remove the hose, clamp or squeeze it with something, or lower it into a container.
- If you have an injector, remove the fuel pump fuse, start the engine and let it run. As soon as the fuel in the fuel rail runs out, it will stall on its own.
- Disconnect the ignition system by removing the center wire from the distributor (on the carburetor). The crankshaft position sensor at the injector must be disconnected.
- Remove all debris from the spark plug wells so that it does not end up inside the cylinders. Unscrew the spark plugs.
- Insert the compression gauge fitting while an assistant starts the engine. The starter should rotate the engine until the pressure gauge needle stops in one position.
- By analogy, measurements are carried out on each cylinder, the results are recorded on paper.
- To calculate ideal compression, use the formula - 1.2 * Compression ratio.
See your owner's manual for the compression ratio of your engine. Please also note that measurements may have some error.
What you need to know about verification
- If the indicator is 12 atmospheres, this indicates that your engine is almost in perfect condition.
- When checking the compression on a cold engine, the compression readings will be significantly lower. Perform the test only on the engine at operating temperature.
- If the battery is partially discharged, the test data will also not be accurate.
- The increase in compression occurs due to the combustion of oil in the cylinders.
What the results say
We take the paper where you wrote down the data of the check, carried out according to all the rules, and study what is wrong with the motor.
- Indicators in the range of 0-4 atm indicate a high probability of burnout of the piston, head gasket or valve.
- Compression of 4-6 atmospheres indicates that the piston rings or the partition between them have broken.
- If you get about 8-10 atm in each cylinder, the cylinder-piston group is worn out. Major repairs will soon have to be carried out.
- 12-12.5 atm - these are the indicators that occur in a new, run-in power unit.
- If the car has serious mileage, and the check data shows numbers equal to or exceeding the norm, oil has probably entered the cylinders due to wear of the cylinder-piston group or valve liners.
Obviously, the presence of oil in the filter does not bode well. But the problem can still be prevented if measures are taken in time.
SCT
Country of origin: Germany (not confirmed)
Cost - 340 rubles
The plastic filter housing indicates the brand, model and production date, but it does not indicate where the filter was actually made. The product is packaged in a branded package with graphic images of products produced under this brand. On the packaging, in addition to detailed instructions on application, there is a QR code, by clicking on which you can find yourself in the catalog. Interchangeability is indicated only with the MANN-FILTER, Knecht and Filtron brands.