Bored with your car's interior? There is a simple way to update interior parts, which, if necessary, allows you to return everything to its original condition. Let's consider the process of pasting plastic elements with vinyl (film), and also learn about the most popular colors of this material.
Question to AVTOVAZ: Will paint be added to the dashboard or the structure of the plastic changed?
Answer: It is planned to use decorative inserts and cladding with original designs for the Exclusive LADA Vesta package.
Why vinyl film is better than painting
Do you know why car enthusiasts cover the interior with vinyl film rather than spray paint it? There are several reasons:
- the ability to choose complex colors in the form of texture (for example, carbon or wood);
- it’s easier to return parts to their original condition (it’s easier to remove film than paint);
- non-toxic (varnish and paint require a well-ventilated area);
- You can cover parts with film without removing them (this is much more difficult to do with paint).
You can buy inexpensive vinyl film on AliExpress.
Materials and tools for interior wrapping
The first stage is, as usual, preparation. Before you start, make sure you have everything you need:
- Vinyl film - even if you plan to cover just a couple of panels, buy film with a small margin
- Rubber spatula
- Squeegee with felt pad
- Blade (stationary or technical knife)
- Scissors
- Technical (construction) hair dryer
- Spray bottle with water
- Liquid soap or dishwashing detergent
- Degreaser - white spirit or similar
- Alcohol
- Lint-free soft cloths
How to cover the interior with vinyl with your own hands
The film covering process is universal, that is, the instructions are the same for all Lada models (Vesta, Granta, Kalina, Priora, Largus, Niva 4x4 and XRAY), as well as foreign-made cars. Features will only appear during the dismantling of interior parts.
Features of fitting parts:
- when working with uneven surfaces (curved, crooked), it is necessary to stretch the film by heating it with a hairdryer;
- film with textures (carbon, wood, etc.) cannot be stretched too much, the texture will not be even;
- Try to touch only the edge of the self-adhesive surface with your fingers.
Re-upholstery process:
- Degrease the front and back surfaces (the film will wrap);
- We apply the film to the part so that it has no tension and is pressed against the surface as much as possible without heating;
- We heat the film and stretch it in all directions. We try to delay as little as possible;
- When working with corners, we lay the film on the edge; it will be laid on the adjacent sides automatically;
- We cut off the excess film around the perimeter. There should be no film on the back of the corners;
- We fold the film to the back side of the part.
Video guide for wrapping parts with film:
An experienced craftsman is able to cover a part with film without removing it, that is, directly on the panel (dashboard).
Dry method
Dry carbon fiber pasting has its advantages:
- the film does not move during installation;
- adhesion to the paintwork of the car is higher than with the wet method;
- vinyl stretches less.
Instructions:
- Preparation for pasting using the dry method is not fundamentally different from the wet method. But after removing contaminants with a wet solution, you need to dry everything thoroughly and then treat the surface with White Spirit.
- The film is applied to the element and smoothed.
- Heat the film with a hairdryer over the entire area and gently smooth it again with a spatula.
- After careful smoothing and heating, excess carbon is cut off.
It is worth considering that 3D class carbon films are more durable than 2D and are more suitable for the dry method. High-quality films have special perforations, and these channels help to expel air evenly.
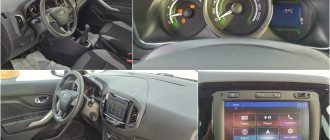
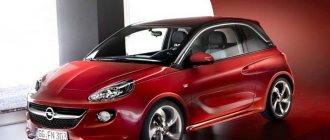
Interior finishing options for Lada cars
Options for tuning the interior with film can be seen in the photo (the work was done using Photoshop specifically for Lada.Online). For comparison, we post three images of modern cars: Lada Priora, Granta, Kalina, Vesta, XRAY, Largus and Niva 4x4:
- Staff salon;
- Wood effect film;
- Carbon film.
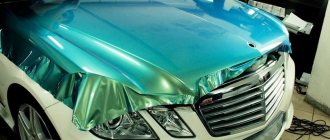
Purpose
Covering a car with this material has both practical and aesthetic meaning. From a functional point of view, gluing carbon film is beneficial in that it protects the car’s paintwork from the effects of external factors, such as precipitation, grains of sand and stones, ultraviolet rays, and chemically active substances. This is especially true for parts exposed to road particles, such as the hood. Externally, the coating in question quite reliably imitates carbon, as evidenced by photos and videos. Therefore, it is usually applied to those parts that are most often represented by carbon analogues, that is, the hood, mirrors, etc. The film can also be used to cover plastic in the interior. Moreover, this coating is much cheaper than the original material. You can learn about the various options for applying film both on body parts and in the interior from photos and videos. In addition, if the hood or other parts already have damage to the paintwork, they can be covered with film to hide the defects.
That is, carbon film has attractive aesthetic qualities and at the same time is strong enough to protect the car’s paintwork from various environmental factors. In addition, this material is suitable for application to various materials, such as metal or plastic, so it can be used both for coating body parts and for interior decoration.
Subject to compliance with operating rules, the service life of carbon film is up to 10 years.
The most popular colors of vinyl film
According to statistics of queries on the Internet, the most popular are:
- carbon film;
- wood effect film;
- matte film;
- gold (for the body);
- "chrome" film;
- mirror film;
- 3D texture.
Where can I buy
:
- in our online store (interior trim category)
- on AliExpress, armrests are in our selection of accessories.
How do you feel about this kind of interior tuning? What is the best way to finish the interior, with film or paint? Have you ever covered plastic elements with your own hands? What were the difficulties during this operation? Post your options for interior wallpaper and take part in the survey. Make sure that the interior of the car is harmonious and complete; pay attention to choosing seat covers that match the color.
Keywords: Lada Vesta torpedo | torpedo Lada Granta | torpedo Lada Kalina | torpedo Lada Priora | Torpedo Lada Largus | dashboard 4x4 | Lada Xray dashboard | air ducts Lada Vesta | air ducts for Lada Granta | air ducts Lada Kalina | air ducts Lada Priora | air ducts Lada Largus | air ducts 4x4 | air ducts lada xray | Lada Vesta doors | Lada Granta doors | Lada Kalina doors | Lada Priora doors | Lada Largus doors | doors 4x4 | doors lada xray | Torpedo Niva | Niva air ducts | Niva doors | universal article
0 0 0 0 0 0
Share on social networks:
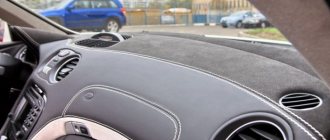
Selecting material for reupholstering the front panel of the machine
The torpedo is constantly in sight, which means its appearance and quality will be striking both to you and to other passengers. The selection of material for reupholstering the front panel should be approached responsibly. Most often, the following materials are used in the interior design of a car:
- leather (artificial and natural);
- Alcantara (another name is artificial suede);
- vinyl.
You should not select material via the Internet. Pictures and descriptions will not give you a complete picture of the product. Before making a purchase, stop by a specialized store and feel each of the materials offered. It is also worth writing down the manufacturer and name of the shade. After this, you can order goods from the online store with peace of mind.
Genuine Leather
Genuine leather is a good choice for upholstering the front panel. This is a durable material that is not afraid of temperature changes, getting wet and fire. In addition, its surface is resistant to mechanical damage. Of course, you shouldn’t deliberately scratch the skin with a nail, but white stripes won’t appear on it by themselves either. The leather can be easily cleaned of dirt by regularly wiping it with a damp cloth. You don’t have to worry about the panel fading in the sun—it’s not afraid of ultraviolet radiation. And there’s no point in talking about the appearance of genuine leather: it will fit perfectly into the interior of even the most expensive and pretentious car.
Genuine leather gives the car interior a sophisticated look
Eco leather
If you can’t afford genuine leather, use its modern substitute - eco-leather. This type of material is called environmental because it does not emit harmful substances during operation. It doesn't look at all like the cheap leatherette of the late 90s. This is a durable, moisture-resistant and vapor-proof material that can maintain its appearance for a long time. Do not be afraid that the eco-leather coating will crack in a short time. In terms of its performance qualities, the material is not inferior to genuine leather. In addition, eco-leather is suitable for drivers with allergies.
eco-leather has good performance characteristics, but is much cheaper than natural leather
Alcantara
Recently, Alcantara has become one of the most popular materials for interior upholstery, including the dashboard. This is a non-woven synthetic material that feels like suede. It combines a velvety soft surface with easy care and high wear resistance. Just like skin, it does not fade in the sun. High humidity and temperature changes also do not affect it negatively. Many drivers prefer to cover the entire interior with Alcantara to create an atmosphere of home comfort. Others use it to design individual elements to dilute the severity of the leather. In any case, Alcantara is perfect for covering a dashboard.
Alcantara is a synthetic fabric similar to suede
Vinyl
If you want to create an unusual interior design, consider using vinyl films. There is a rich variety of textures and colors on the market today. You can choose a calm black or gray color, or you can find an imitation python fabric in an acid green color. Chrome-plated films, as well as films with a carbon or metallic effect, are very popular. They are even easier to care for than leather. Vinyl films have, perhaps, only one drawback: they are easy to accidentally scratch. But the low price allows you to re-tighten the panel as often as you want.
Using vinyl film you can imitate various materials, including carbon fiber
In order to save money, some motorists do not purchase special automotive material, but a similar one intended for reupholstering furniture. At first glance, it seems that there is no difference between them. However, this is not true: furniture leather and other materials are designed for use at constant and comfortable indoor temperatures. The car heats up in the bright sun and cools down in the cold. Furniture materials will quickly crack under such conditions.
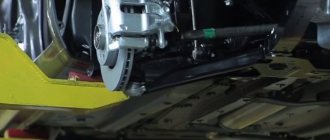
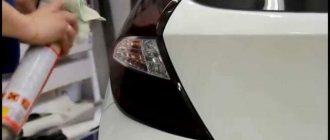
Application
In order to properly cover with carbon film, you need to follow the sequence of work. Do-it-yourself car wrapping with carbon film begins with preparation. It consists of cleaning the working surface and degreasing it. If there are uneven areas, you should prime them with a primer, since in this case the coating will adhere more tightly to the surface. The material must be cut into fragments for pasted body elements. They are correlated with the parts to determine cutting accuracy.
Next, the coating, without peeling off the base, is applied to the work surface and secured with masking tape. Then the base is removed, stretching the coating to prevent it from sticking. Then spray the surface with a soap solution, leaving no dry areas. After this, the material is applied to the surface and bubbles and liquid are removed from underneath it, smoothing it with squeegees: first with plastic, then with felt. Finally, the coating is heated with a hairdryer and smoothed again. Pasting rounded surfaces involves heating and smoothing the material throughout the entire work process. In any case, it is especially important to warm up critical areas of the film. Warming up allows you to more thoroughly attach the coating to the work surface, adjusting its shape. Heating efficiency is determined by temperature, so low-temperature household hair dryers are not suitable for this purpose. However, overheating is also unacceptable, as it leads to stretching of the material. Warming up is carried out gradually, treating each area. The whole process lasts 5 - 7 minutes. Finally, excess material is trimmed off with a utility knife. The free edges and joints should be treated with sealant to protect them from the mechanical influence of environmental factors. After the gluing is completed, the car is left for a day. During the week, washing can only be done using a non-contact method.
The wet method of film application is discussed above. It is widely used due to its simplicity. In addition to this technology, there is a dry method. Such work is more complex and takes more time, so usually experienced performers apply the film using this method. Application must be carried out at a temperature of at least 22°C in a dry and clean room. The main difference between the dry method and the wet method is that the material is applied to a dry work surface without using a soap solution. Otherwise, the technologies under consideration are similar, but the second is more effective.
You can cover the interior plastic with film yourself using the same methods as the hood and other body elements. The pre-glued parts are dismantled. Before you start covering the interior with carbon film, you should also watch the video.
0 0 votes
Article rating
Carbon removal
If you need to remove carbon fiber, use one of several methods:
- Carbon fiber can be removed from the hood of a car by heating it with a hairdryer. You should not allow the sticker to melt - it is important to remove the carbon fiber slowly, without damaging the car’s paint;
- You can remove the sticker by using appropriate chemicals that are applied to the sticker and dissolve the glue underneath;
- Carbon fiber can be removed from the body using a high pressure washer.
You should not remove the carbon fiber with sharp objects - this will most likely scratch the car's paint, but will not be able to remove the sticker.
Preparing for work
Before starting work, it is advisable to look on the Internet for examples of finishing car panels. After all, it is very important to adhere to norms and harmony. Often this procedure involves finishing only some elements of the interior. It is advisable to choose parts that can be easily dismantled and then reinstalled. When choosing, the shape of the element is no less important, and it is desirable that it does not have sharp corners or changes.
When everything is determined with the parts, they are carefully removed from their places. To do this, you need to use special tools for working with plastic. Experts do not recommend dismantling panel elements using screwdrivers and other metal objects, as this can severely damage the edges of the parts. And if the defect on the finished part is not very noticeable, then in the neighboring areas chips and scratches will significantly spoil the entire appearance.
The next stage of preparation will be to measure the required amount of film. This is quite simple to do - you need to take a roll of wallpaper, preferably 1.2 meters wide, and if there is none, then you can use two rolls of standard size.
The paper is laid out on a flat surface and fixed, after which the dismantled parts are placed on it. For each detail, space is left around within 2-3 centimeters. By laying out all the parts as close as possible, you can most accurately determine the required amount of film from the wallpaper. It is better to do this work slowly, since the film for finishing a car panel has a considerable cost. And this approach will help you save a lot and avoid unnecessary waste of expensive material.
Next, all parts are thoroughly cleaned of dirt and dust, dried and degreased. The latter can be done with ordinary alcohol. Under no circumstances should you use aggressive solvents for degreasing, as this can cause irreparable damage to the parts. This concludes the preparatory work.
This is interesting: Installing side glass yourself
Sequencing
When everything is ready for work, it is necessary to properly prepare the room for finishing the parts. What is important here is the absence of dust and normal temperature conditions. It would be a good idea to take care of the lighting, since if its quality is poor, you can create defects that will then greatly disappoint you when leaving the garage.
All work begins with cutting out the material, for which everything is done in the same way as with wallpaper. The film is laid face down on a previously prepared substrate made of clean material. Then all the prepared parts are laid out, taking into account the edge margin. Using a marker or a regular ballpoint pen, the contours of the material are determined for each laid out part.
It’s better to start with a part that has the simplest geometry, small dimensions and simple relief. A pre-marked film is cut out underneath it using scissors. After this, the protective coating is removed, under which there is a layer of adhesive. The part is carefully applied to the film and turned over to the front side.
Next, a construction hair dryer is used, with the help of which the attached film is carefully heated to the required elasticity. The heated material is carefully passed with a spatula or fingers until it evenly adheres to the part. At this stage, it is very important to prevent the formation of air bubbles under the film, and if necessary, air is squeezed out from the center of the part to its edges, similar to the process of tinting glass.
The protruding parts of the film will need to be carefully cut with scissors or a knife for more convenient folding. If it is not possible to bend the material along the edge, then after gluing the edge is carefully trimmed along the contour with a stationery knife. The remaining parts are folded to the back side and are additionally fixed there with glue.
The adhesive can be applied using the dot method, paying special attention to areas with turns and complex terrain. This will allow you to secure the film more securely and avoid peeling it off in the future.
All other prepared parts are glued in a similar manner. You need to go from simple to complex; this will allow you to practice a little and avoid mistakes when finishing elements with complex relief and geometry. When all the parts are ready, you can begin to install them in place, but you should avoid excessive pressure and the use of hard tools so as not to damage the applied film.
It would not be amiss to mention that a more impressive look for the finished parts of the car interior can be achieved by covering the applied film with a transparent varnish. This solution will give each element a deep shine and enhance the relief effect of the selected material.
Volkswagen Golf 1999 l. With. — styling
Kineshma
Volkswagen Golf, 2000
160 000 ₽
Surgut
Volkswagen Golf, 2002
200 000 ₽
Beloretsk
Volkswagen Golf, 2000
220 000 ₽
Novosibirsk
Volkswagen Golf, 1997
280 000 ₽
See more cars on Drome
Participate in the discussion can only registered users.
Login Register