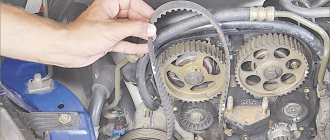
Valve lapping do it yourself - a simple procedure, provided that the car owner has previously had experience in performing repair work. To carry out lapping of valve seats, you will need a number of tools and materials, including lapping paste, a device for dismantling valves, a drill (screwdriver), kerosene, and a spring with a diameter extending into the hole of the valve seat. In terms of time, grinding in engine valves is a rather expensive procedure, since to perform it it is necessary to dismantle the cylinder head.
Why do you need to grind valves?
A little theory. The valves open and close the channels for supplying the fuel-air mixture and exhaust gases. The more reliably the valve closes the channel, the more complete gas exchange takes place in the engine. The engine operates normally and produces rated power.
The contact surface of the valve with the cylinder head is made in the form of an annular chamfer with an inclination angle of 30 to 60 degrees relative to the plane of connection of the cylinder head with the cylinder block. In the factory, these two surfaces are run-in individually for each contact pair. As a result, the valve, when closed, fits so tightly to the seating surface in the block head (seat) that it completely eliminates gas breakthrough.
valve chamfer
Over time, the seats in the block head and the working surfaces on the valves no longer fit tightly together. Shells, soot and oily deposits appear on them. Because of this, the valves do not provide complete isolation of the combustion chamber, and partial breakthrough of gases occurs. This reduces engine power and efficiency, increases fuel consumption and accelerates engine contamination and wear.
How to understand that valves need lapping
The initial check is carried out without dismantling the cylinder head. The following signs indirectly indicate an insufficient seal between the valves and the seats:
- reduction in engine power;
- uneven engine operation, excessive vibration and noise;
- low compression with large differences between cylinders;
- increased fuel consumption.
All these signs do not clearly indicate problems in the valve system. Similar phenomena are observed with general wear of the piston group . However, the above signs indicate at a minimum the need to check the timing belt and timing gear.
The next diagnostic stage takes place after dismantling the cylinder head. Before drying the valves, you can check them for leaks using any penetrating liquid (solvent, gasoline, acetone, etc.). We lay the block head on its side and pour liquid into the windows. If a greasy mark appears on the surface of the valves from the liquid passing between the seat and the valve, grinding is required. If liquid spills in a noticeable stream, there is a high probability that the valve has burned out. It will not be possible to grind a burnt valve. It will need to be replaced.
After drying, we inspect the chamfers on the valves and seats. The working chamfer should have a matte finish around its entire circumference. Moreover, the thickness of the chamfer with a tight fit does not matter much. The main thing is that it is continuous. This indicates how tightly the valve is closed.
If the chamfer on the valve and block is speckled with shells and carbon deposits, the valve needs to be ground in. This approach is usually practiced: even if one valve needs grinding in, the entire head is treated preventatively.
When is it time to think about grinding in?
To understand whether lapping is necessary, you can use different testing methods - with their help you can clarify the degree of depressurization of the valve system.
How to check the lapping:
- The cylinder head is being dismantled.
- The head is cleaned of soot, oily film and dirt.
- The BC head and bearings are checked. They must be without any deformation or mechanical damage.
- The camshaft bearings are checked. They should also be free from damage, burrs and metal deposits.
- To control the tightness of the valve system, it is necessary to install the cylinder head on a flat surface, pour a little kerosene or gasoline into the combustion chambers and leave for a while. If the kerosene level begins to decrease, it means there is a leak and the seal of the valve system is broken.
When a leak occurs (that is, depressurization), the motor operates unevenly, so it is necessary to carry out grinding.
We collect everything necessary for grinding in
Grinding valves at home does not require specific skills, specialized tools or large investments. Below is a list of necessary equipment and materials.
- Lapping paste. It is sold either in a one-component version, or in a more professional, two-component version (for rough and fine grinding). If you have no experience in this matter, choose the cheapest one-component paste.
- Any non-greasy solvent.
- Clean, lint-free rags.
- Lapping tool.
The grinding tool can be made from scrap materials. First, look at the valve plate. Some engines have a groove in it to simplify lapping. If there is a groove, we will grind it from the inside of the cylinder head. As a device for lapping, we are looking for any tool suitable for this groove (screwdriver, screwdriver bit, chisel, etc.). We insert a suitable tool into the groove and, with light pressure, we will rotate the valve in the seat with periodic changes in direction.
The easiest way to grind valves is using a drill or screwdriver. Insert a bit or drill into the chuck of the power tool, the diameter of which is as close as possible to the diameter of the valve stem. Next, we are looking for a small piece of hose (usually a regular hose from a fuel line is suitable) 7-10 cm long and two clamps that match the diameter. We place the hose on the drill (bit) and clamp it with a clamp with good force so that it is impossible to remove it manually. We will attach the second side of the hose to the valve stem in a similar way, using a clamp.
A hand lapping tool works on the same principle. It is necessary to bend a kind of rod with a handle from a steel rod (or a thick copper core) with a diameter comparable to the thickness of the valve stem. We secure the hose at the end of the rod with a clamp. Connect the second end of the hose to the valve stem.
Instead of a hose, you can use a piece of tubing made of soft material (for example, copper or aluminum). We rivet one end of the tube or clamp it with a clamp on a drill or rod, and at the other end we make several cuts along the axis. This will allow you to securely secure the tube to the rod with a clamp and quickly move the tool to another valve.
Important Tips
Having learned how much it costs to grind valves from professionals, car owners who do not have experience in car repairs try to perform this action themselves.
In order for everything to work out successfully the first time, it is recommended to pay attention to a number of tips:
- you should abandon the idea of removing all the rockers (cams on the valves) at once, since they will get mixed up, and each rocker should eventually fall into exactly its place;
- during the work process, you can use several abrasive pastes at once, you should start with fine and end with coarse;
- For a better fit, you can use machine oil.
If all the specified rules are followed, problems with valve grinding will definitely not arise.
How to properly lap valves
After drying, carefully inspect the valve for burnouts. There is no point in lapping a burnt valve; it is easier to replace it. We also check the axial runout of the rod in the bushing. If the valve is loose, then look at its rod. Visible wear on the rod is also unacceptable. If the rod is intact, but there is play, then the bushings will additionally need to be replaced. Grinding in valves with broken bushings does not make sense.
Before starting grinding, we clean the surfaces of the chamfers as much as possible from carbon deposits. After this, apply a small layer of lapping paste to the valve chamfer. We insert the valve into the bushing on the head of the block and connect the rod to our tool from the reverse side. We make a slight tension and begin to rotate the valve in the block head. There is no need to create a large clamping force : you can cut a chamfer in the seat that is too deep.
You cannot grind a chamfer in just one position. The valve must fit securely to the seat at any angle of rotation. The fact is that during timing operation, the valves constantly rotate in the seat. And if grinding is done without periodic turning, the caps will fit tightly and ensure tightness only in one position.
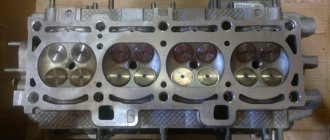
Valve lapping
valve grinding is a simple procedure, provided that the car owner has previously had experience in performing repair work. To carry out lapping of valve seats, you will need a number of tools and materials, including lapping paste, a device for dismantling valves, a drill (screwdriver), kerosene, and a spring with a diameter extending into the hole of the valve seat. In terms of time, grinding in engine valves is a rather expensive procedure, since to perform it it is necessary to dismantle the cylinder head.
What is lapping and why is it needed?
Valve lapping is a process that ensures that the intake and exhaust valves fit perfectly in the engine cylinders on their seats (seats). Typically, lapping is performed when replacing valves with new ones, or after performing a major engine overhaul. Ideally, lapped valves provide maximum tightness in the cylinder (combustion chamber). This, in turn, ensures a high level of compression, efficiency of the motor, its normal operation and technical characteristics.
In other words, if you do not grind in new valves, then part of the energy of the burnt gases will be irretrievably lost instead of providing the proper power to the engine. At the same time, fuel consumption will probably increase, and engine power will definitely decrease. Some modern cars are equipped with an automatic valve control system. It simply grinds off the valve, so there is no need for manual lapping.
Checking the quality of performed operations
You can check the quality of the work performed in several ways:
- kerosene;
- by air;
- pencil.
The most effective way to check is to use a vacuum tester, which simulates the processes taking place in a car engine. The gas that is passed through escapes through possible cracks.
It is better to check the cylinder head with a vacuum tester in a specialized service; purchasing a tester is quite expensive
A device is connected to both the intake and exhaust manifolds, resulting in a vacuum. If the valves are not properly ground in, the pressure gauge will record the minimum pressure level, since air passes through the gaps, which should not normally be the case.
Another way to check is to use kerosene. The cylinder head is positioned so that the combustion chamber is directed upward, and kerosene is poured on top. There is an opinion that kerosene should leak out overnight if the grinding is carried out incorrectly, but in reality this is not entirely true and the named method is not effective enough.
Checking the tightness of the cylinder head with kerosene is not the most reliable method of control
The uniformity of distribution of a special marking substance is another test option. Radial marks are drawn along the entire circumference of the valve seat, after which the part is inserted into place, pressed and scrolled. Then it is taken out and the formed pattern is examined. If the marks have been erased and the entire base of the seat has been painted evenly, then the valve can be put into operation. Otherwise, grinding is carried out again.
Grinding in valves is a necessary procedure to ensure the normal functioning of the car’s cylinder head. It is best to carry it out, despite the simplicity of the work and the availability of materials, with the help of specialists: this guarantees a long service life of not only the valves, but also the engine of the machine as a whole.
What is needed for grinding in
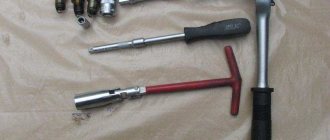
The grinding process is performed with the cylinder head removed. Therefore, in addition to tools for grinding valves, the car owner will also need a tool for dismantling the cylinder head. As a rule, these are ordinary locksmith keys, screwdrivers, and rags. However, it is also advisable to have a torque wrench, which will be needed at the stage of reassembling the head into place. The need for it arises because the fastening bolts holding the head in its seat must be tightened with a certain torque, which can only be ensured with the help of a torque wrench. Depending on which method of valve grinding is chosen - manual or mechanized (more on them a little later), the set of tools for the work will also differ.
To directly grind the valves, the car owner will need:
- Manual valve holder . Automotive stores or auto repair shops have ready-made such products for sale. If for some reason you do not want or cannot buy such a holder, then you can make it yourself. How to do it is described in the next section. The manual valve holder is used for manual lapping of valves.
- Valve grinding paste . In most cases, car owners buy ready-made compounds, since there are currently quite a lot of these products in car dealerships, including at different prices. As a last resort, you can make a similar composition yourself from abrasive shavings.
- Drill or screwdriver with reverse capability (for mechanized grinding). As a rule, grinding is performed in both directions of rotation, so the drill (screwdriver) must rotate in both directions. You can also use a hand drill, which itself can rotate in one direction or the other.
- Hose and spring . These devices are necessary to perform mechanized lapping. The spring should have low rigidity, and the diameter should be two to three millimeters larger than the diameter of the valve stem. The same applies to the hose, so that it can be placed flush on the rod. You can also use a small clamp to secure it. You also need some short metal rod with a diameter similar to the piston rod, so that it also fits the rubber hose closely.
- Kerosene . It is used as a cleaner and subsequently to check the quality of the grinding performed.
- "Sharoshka" . This is a special device designed to remove damaged metal in the valve seat. Such devices are sold ready-made in auto stores. Currently, in auto stores you can find this part for almost any engine (especially for common cars).
- Rags . Subsequently, you will need to use it to wipe the treated surfaces (including your hands) dry.
- Solvent . Needed for cleaning work surfaces.
- Scotch . It is a necessary component when performing one of the mechanized cleaning methods.
Valve grinding tool
If the car owner does not have the opportunity/desire to buy a factory device for grinding valves with his own hands (manually), a similar device can be made independently using improvised means. For this you will need:
- A metal tube with a cavity inside. Its length should be about 10...20 cm, and the diameter of the inner hole of the tube should be 2...3 mm larger than the diameter of the engine valve stem.
- An electric drill (or screwdriver) and a metal drill with a diameter of 8.5 mm.
- Contact or gas welding.
- Nut and bolt with a diameter of 8 mm.
The algorithm for manufacturing a device for grinding valves will be as follows:
- Using a drill, at a distance of about 7...10 mm from one of the edges, it is necessary to drill a hole of the above diameter.
- Using welding, you need to weld the nut exactly above the drilled hole. In this case, you need to work carefully so as not to damage the threads on the nut.
- Screw the bolt into the nut so that its edge reaches the inner surface of the tube wall opposite the hole.
- As a handle for the pipe, you can either bend the opposite piece of pipe at a right angle, or weld another piece of pipe or any other metal part of a similar shape (straight).
- Unscrew the bolt back, insert the valve stem into the tube, and use the bolt to tighten it tightly with a wrench.
Standard set of lapping tools
The most important tool is abrasive or diamond paste. It must be applied to the edge of the valve - the paste will create a sandpaper effect and allow you to quickly grind the plate to the seat.
According to the type of processing, the paste composition differs in the size of the abrasive elements - from coarse-grained to fine-grained. Coarse abrasive is used for initial grinding. Final grinding is carried out using a fine-grained paste - then the head of the component will be firmly installed in the seat.
Pastes also vary in price - from inexpensive ones for personal use to branded formulations for professional lapping. You can carry out independent processing with a composition of average cost. It is important to monitor the condition of the valves themselves and the correctness of the grinding process.
The next step is to choose the tool for the job. Lapping can be carried out by:
- Electric drills.
- Wooden device with suction cups.
- Pneumatic tool.
- A special pneumatic machine for tapping.
The electric drill for lapping is the most popular among amateur craftsmen because of its accessibility and versatility. Repair shops can use a special chamfer grinding machine.
Processing and restoring seats requires the use of special tools. This is a cutter for removing excavations - a device made in the shape of a valve seat. The cutter is put on the drill, since the drill is usually of medium size.
The tool is used if the valve heads are damaged due to burnout.
You will also need a desiccant to remove the “crackers” - the parts connecting the spring plates to the valve.
Valve lapping methods
There are actually two ways to grind valves - manual and mechanized. However, manual grinding is a labor-intensive and time-consuming process. Therefore, it is better to use the so-called mechanized method, using a drill or screwdriver. However, let's look at one and the other method in order.
Regardless of the chosen lapping method, first of all it is necessary to dismantle the valves from the cylinder head (it must also be previously dismantled). To remove the valves from the cylinder head guides, it is necessary to remove the valve springs. To do this, use a special device, and then remove the “crackers” from the spring plates.
Manual grinding method
To grind in car engine valves, you must follow the algorithm below:
- After dismantling the valve, it is necessary to thoroughly clean it from carbon deposits. To do this, it is better to use special cleaning agents, as well as an abrasive surface in order to thoroughly remove plaque, grease, and dirt from the surface.
- Apply a continuous thin layer of lapping paste to the valve chamfer (use coarse-grained paste first, and then fine-grained paste).
- If the homemade lapping device described above is used, it is necessary to insert the valve into its seat, turn the cylinder head over, and place the holder on the valve located in the valve sleeve and lubricated with lapping paste. Next, you need to tighten the bolt in order to secure the valve in the pipe as tightly as possible.
- Then you need to rotate the lapping device together with the valve alternately in both directions by half a turn (approximately ±25°). After one or two minutes, it is necessary to turn the valve 90° clockwise or counterclockwise and repeat the back-and-forth grinding movements. The valve must be ground in by periodically pressing it against the seat, and then releasing it, repeating the procedure cyclically.
- Manual grinding of the valves must be performed until a matte gray, even, uniform band appears on the chamfer . Its width is about 1.75...2.32 mm for the intake valves, and 1.44...1.54 mm for the exhaust valves. After grinding in, a matte gray band of the appropriate size should appear not only on the valve itself, but also on its seat.
- Another sign by which one can indirectly judge that the grinding-in can be completed is a change in the sound of the procedure. If at the beginning of rubbing it is purely “metallic” and loud, then towards the end the sound will be more muffled. That is, when it is not metal rubbing against metal, but metal rubbing against a matte surface. Typically the grinding process takes 5...10 minutes (depending on the specific situation and condition of the valve mechanism).
- Typically, grinding is performed using paste of different grain sizes. First, use a coarse-grained paste, and then use a fine-grained one. The algorithm for using them is the same. However, the second paste can be used only after the layer of the first paste has been well sanded and hardened.
- After lapping, it is necessary to thoroughly wipe the valve itself and its seat with a clean rag, and you can also rinse the surface of the valve in order to remove any remaining lapping paste from its surface.
- Check the quality of lapping by checking the concentricity of the valve disc and its seat. To do this, apply a thin layer of graphite with a pencil to the chamfer of the valve head. Next, the marked valve must be inserted into the guide sleeve, lightly pressed against the seat, and then turned. Based on the resulting traces of graphite, one can judge the concentricity of the location of the valve and its seat. If the grinding is good, then with one turn of the valve all the applied lines will be erased. If this does not happen, the grinding must be repeated until the specified condition is met. However, a complete check is performed using another method described below.
- Upon completion of valve lapping, all working surfaces of the parts are washed with kerosene to remove residual lapping paste and dirt. The valve stem and bushing are lubricated with engine oil. Next, the valves are installed in their seats in the cylinder head.
During the valve grinding process, it is necessary to get rid of the following types of defects:
- Carbon deposits on the chamfers that do not lead to deformation of the chamfer (valve).
- Carbon deposits on the chamfers leading to deformation. In particular, a stepped surface appeared on their conical surface, and the chamfer itself became round.
Please note that if in the first case the valve can simply be ground in, then in the second case it must be grooved. In some cases, grinding is performed in several stages. For example, rough grinding is carried out until all pits and scratches are removed from the surface of the workpiece. Often, paste with different levels of grain size is used for lapping. Coarse abrasive is intended for removing significant damage, and fine abrasive is for finishing. Accordingly, the finer the abrasive used, the better the quality of valve grinding is considered. Usually pastes have numbers. For example, 1 is finishing, 2 is roughing. It is undesirable for abrasive paste to get on other elements of the valve mechanism. If it gets there, wash it off with kerosene.
Grinding in valves with a drill
Grinding in valves using a drill is the best option to save time and effort. Its principle is similar to manual lapping. The algorithm for its implementation is as follows:
- Take a prepared metal rod and put a rubber hose of a suitable diameter on it. For better fastening, you can use a clamp of the appropriate diameter.
- Secure the mentioned metal rod with an attached rubber hose in the chuck of an electric drill (or screwdriver).
- Take the valve and put a spring on its stem, then install it in its seat.
- Having slightly pulled the valve out of the cylinder head, apply a small amount of lapping paste to its chamfer along the perimeter of its plate.
- Insert the valve stem into the rubber hose. If necessary, also use a clamp of the appropriate diameter for better fastening.
- At low speeds of the drill, start grinding the valve into its seat. In this case, you need to move it back and forth, which, in fact, is what the installed spring will help with. After a few seconds of rotation in one direction, you need to switch the drill to reverse and rotate it in the opposite direction.
- Carry out the procedure in the same way until a matte band appears on the valve body.
- Upon completion of grinding, thoroughly wipe the valve from any remaining paste, preferably using a solvent. Moreover, the paste must be removed not only from the valve chamfer, but also from its seat.
What lapping paste should I use?
At the dawn of the automotive industry, dust from diamond wheels mixed with engine oil was used to grind valves. Today, these mixtures are replaced by a variety of grinding pastes. They differ in the content of abrasive elements, fraction sizes and, accordingly, price.
The paste is selected depending on the degree of contamination, quality and grade of valve metal, year of manufacture and engine model. The grinding method – manual or mechanical – also matters.
An important factor in choosing a paste is the experience of the master . For example, a beginner using coarse paste can easily damage a valve or seat. Therefore, for novice craftsmen, it is recommended to use a fine-grained paste, while grinding in with this product will take more time.
Automotive stores sell coarse-grained paste called “Classic” or “Diamond” for initial lapping. For final grinding, FABO paste is used - a finishing anti-friction, non-abrasive treatment. This paste is sold in a set of two tubes, with large fractions and a grinding one.
There are also multifunctional pastes such as ABRO Grinding Paste GP-201. It can not only grind valves, but also clean rust from metal parts and even be used to sharpen cutting tools, such as planes. Its price is much lower than the special “FABO”, so, as they say, it will come in handy on the farm.
“PERMATEX” or “Done Deal” pastes are also used for polishing chrome parts, since they do not contain technical diamond, but silicon carbide.
Important! Before buying a paste, you need to carefully read its composition and range of applications.
If the repair finds the driver without paste, and it is impossible to postpone the grinding - the engine has already been disassembled, you can mix abrasive removed from ordinary, fine sandpaper with oil, and for final polishing use the paste of the State Optical Institute or better known as GOI paste.
How to check valve lapping
Upon completion of valve lapping, it is imperative to perform a quality check of the lapping. This can be done using one of two methods.
Method one
The method described below is the most common, but it will not always show the correct result with a 100% guarantee. It also cannot be used to check the quality of valve lapping on engines equipped with an EGR valve.
So, to perform the check, it is necessary to place the cylinder head on its side, so that the holes of the wells to which the manifolds are connected “look” up. Accordingly, the valves will be located in a horizontal plane, and their covers will be located vertically. Before checking that the valves have been ground in, it is necessary to dry the valve outlets using a compressor to ensure that possible fuel leakage from under them is visible (that is, so that the vertical wall is dry).
Next, you need to pour gasoline into vertically located wells (or even better, kerosene, since it has better fluidity). If the valves ensure tightness, then the poured kerosene will not leak out from under them. If fuel leaks out from under the valves, even in small quantities, it is necessary to perform additional grinding or other repair work (depending on the specific situation and diagnosis). The advantage of this method is that it is easy to perform.
However, this method also has its drawbacks. Thus, with its help it is impossible to check the quality of valve grinding when the engine is running under load (gas leakage under load). Also, it cannot be used for engines equipped with a USR valve, since their design implies the presence of corresponding valves in one or more cylinders, through which fuel will flow out. Therefore, it will not be possible to check the tightness using this method.
Method two
The second method of checking the quality of valve lapping is universal and the most reliable, since it allows you to check the passage of gases through the valves under load. To perform the corresponding check, it is necessary to position the cylinder head “upside down”, that is, in such a way that the valve outlets (holes) are on top and the manifold well holes are on the side. Next, you need to pour a small amount of fuel (in this case, it doesn’t matter what kind, and even its condition doesn’t matter) into the valve outlet cavity (a kind of plate).
Take an air compressor and use it to blow a stream of compressed air into the side well. Moreover, it is necessary to supply compressed air both to the opening of the intake manifold and to the opening of the exhaust manifold. If the valve grinding was done efficiently, then air bubbles will not come out from under them even under the load provided by the compressor. If there are air bubbles, it means there is no tightness. Accordingly, the grinding was performed poorly and rework is necessary. The method described in this section is extremely effective and versatile and can be used for any engine.
Conclusion
Grinding in valves is a simple procedure that most car owners, especially those with repair skills, can handle. The main thing is to have the appropriate tools and materials. You can make your own rubbing paste, or buy a ready-made one. However, the second option is preferable. To check the quality of the grinding performed, it is advisable to use an air compressor that checks gas leakage under load; this is a better approach.
Source