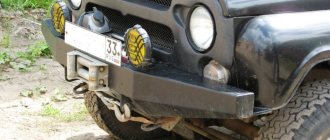
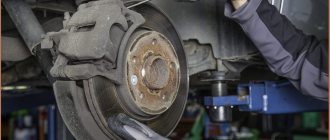
The car is subjected to serious overloads. Poor road surface conditions often lead to headlight damage. Broken asphalt pavement or its absence, and unmade roads are typical for our country. The body and other external elements quickly become covered with scratches and chips.
Manufacturers have invented ways to protect themselves. The optical system is located at the bottom of the body, exposed to impacts from stones, tree branches, grass, etc. Films on the headlights will protect the optics from damage. This coating has its own characteristics and performs several functions.
About the film
Protective film for headlights is often used as tinting. The best way for a car is factory tinting, which has a light transmittance of 95% or more. In industry it is applied by spraying. This allows for certification. Such minor tinting will not cause a fine. When applying film to headlights yourself, it is necessary to take into account the coefficient at which permissible standards will not be violated. Without fear, you can stick on a protective coating with the ability to transmit a light beam of at least 85%.
Characteristics of protective film for car headlights and taillights
The film is divided according to various criteria, for example, functionality, color, additional features.
Functionality:
- for toning;
- shockproof.
Colors:
- transparent, without color characteristics;
- colored, such as red, blue, yellow, etc.
Additional characteristics:
- chameleon;
- with gloss;
- with a matte surface;
- with a sticky layer - self-adhesive.
The film has such advantages as:
- ease of cleansing;
- practicality in operation;
- wear resistance;
- not picky when fastening.
Some people think that covering headlights with film is an expensive undertaking. Polishing or varnishing is, of course, much cheaper if we take into account a single application. However, such manipulations require periodic repetition, which is much more expensive.
Tinting optics with varnish
Let’s say right away, forget about all the cheap varnishes that are sold in a wide range in our car stores. When dried, they will give the exact opposite effect of the desired one. Instead of a shiny gloss, the lanterns will be dirty matte, which, you understand, will nullify all conversations about aesthetics. For a given purpose, you need to choose expensive professional materials, slightly darkening them with a special varnish. This gives the shine the necessary depth, emphasizing its richness. The final result is magnificent. Over time, the varnish can be polished and minor scratches that may have occurred during use can be removed. Let us separately make a reservation that tinting with varnish at home is extremely difficult. For these purposes, it is better to resort to the services of professionals who will carry out the necessary work in a special spray booth.
Advantages:
Low cost.
Flaws:
- It is better to remove the optics before tinting;
- Less light transmission;
- Uneven application, difficult to apply varnish evenly;
- It is impossible to remove varnish from optics without consequences.
How to choose a film?
The film protecting the headlights is selected based on a number of parameters:
- Thickness. This parameter directly affects the protection of glass optics. Sand chips, gravel stones and other abrasives will not cause harm, as well as excess moisture and chemicals.
- Transparency factor. This parameter directly depends on the first one. Before purchasing protective film for headlights, it is necessary to clarify the light transmittance of the vehicle's optics, which is provided by the manufacturer. This must be done to avoid getting fined.
- Stretch percentage. Determines the amount of material that will be consumed when pasting headlights.
Advantages and disadvantages
The obvious advantages include the following aspects:
- It is easy to apply the film yourself, so the cost savings are obvious.
- High-quality glass protection, scratches and chips will not appear.
- Damaged headlight glass may return to its original appearance after being covered with film.
- The light passes through evenly.
- The color of the film can be chosen to suit your taste. Then it will perform not only a protective function, but also please the eye.
- There are types of coatings that can be polished.
- Long-term use does not lead to wear or deterioration of color.
- The ability to create a perfectly smooth surface.
If we talk about shortcomings, there are only a few of them. Firstly, with the lights turned off, the car is practically invisible. Secondly, the cost of the source material makes you wonder whether this manipulation is necessary.
Booking efficiency
At the same time, the film itself is not something super durable. This is regular vinyl. However, due to the peculiarities of the structure of the film at the moment the stone hits the surface of the headlight, the impact energy at the point of contact is noticeably weakened. This effect is achieved by the fact that the film transmits a non-point blow to the glass surface at the point of contact between the stone and the film. And it distributes the impact energy to the maximum area. This leads to the fact that the impact on the headlight glass does not occur in a single point, but over the entire surface, which greatly reduces the risk of destruction of the headlight and the lamp in it. And if the headlight is destroyed, then the same film will prevent it from scattering into fragments and will hold everything in place. This will allow you to drive the car for a short time to buy and install a new one.
Do-it-yourself film covering of headlights
To do the pasting yourself, you need to have a certain set of tools:
- paper knife;
- rubber or plastic squeegee with felt (felt) coating;
- spray;
- solution: liquid soap with water;
- hair dryer, which is usually used by builders;
- degreaser (window cleaner or alcohol are excellent, you can use white spirit);
- clean and dry rags.
Before starting work on covering headlights with anti-gravel film, it is necessary to decide exactly how the process will take place. For example, will the entire surface of the optics be covered or will only the “eyelashes” on the headlights be treated? You can also select several color options for the film and create an application combination.
The working process
Taping a headlight with film is carried out in several stages:
- The working surface must be thoroughly washed and degreased.
- The places where the film will be pasted must be dry, for which the optics must be wiped with a clean rag.
- The material is applied to the headlight and the shape is outlined. It is necessary to leave an allowance around the edges of five to seven centimeters.
- A part is cut out of a common piece of film according to the prepared shape.
- The surface of the optics is generously wetted with soapy water.
- The prepared piece of film is applied to the headlight. Moving from the central part to the edges, the material is evenly smoothed using a squeegee. This manipulation should be done to get rid of air bubbles and excess solution.
- The pasted film is dried with a hairdryer while constantly smoothing with a squeegee.
- In order for the bends to stick evenly, the film must be heated with a hairdryer so that it becomes more elastic.
- Once the work is completed, the excess is trimmed off with a knife.
Instructions for gluing
By following all the rules, you can quickly and efficiently cover your car with auto vinyl.
General principles and rules
If vinyl is chosen for covering, it is better to cover the body completely rather than partially. This is due to the fact that it does not allow sunlight to pass through, and the color of the car will not completely fade. This will be very noticeable after removing the film.
Before the coating itself, it is necessary to carefully prepare the surface of the car. If there is rust somewhere, this place needs to be treated and puttied to prevent the spread of metal corrosion.
Conditions for pasting
Initially, you need to choose the place where the work will take place. This could be a garage with good lighting; the room temperature should be at least 20 degrees.
Cleanliness is the key to quality coating. The smallest speck of dust or particle caught under the film coating will ruin the entire appearance. The work will have to start again. Therefore, before starting work, wet the floor surface to prevent dust from flying.
Preparing a car for wrapping
Before sizing a car, it must be carefully prepared. The preparation stages include:
- If the surface contains some suspicious places (where the paintwork may come off), it is better to clean it immediately, since the film may be adjusted several times during the work.
- For convenient gluing in hard-to-reach places, it is better to disassemble the body in as much detail as possible.
- Wash and dry the surface very well.
- Treat the surface with a degreaser solution.
- When gluing, apply a primer in bend areas for better adhesion to the surface.
Pasting process
After preparing the car, you need to move on to preparing the material for wrapping. Make patterns in accordance with the places where the gluing will take place:
- apply vinyl around the perimeter to the surface;
- secure with paper tape;
- make appropriate marks, taking into account the reserve;
- cut out.
When pasting wet on a prepared surface:
- a soap solution is applied;
- the protective layer is removed from the film;
- The material is glued in the center and then slowly move to the edges, smoothing with a squeegee;
- if bubbles have formed, carefully remove them from the place of formation with a squeegee along with a soap solution and the bubbles will disappear;
- in the bend areas, heat the material with a hairdryer, and apply a primer to the edges, from the side of the adhesive base;
- if irregularities appear on the bend, heat it up a little more;
- After applying the film, the entire surface is heated for better adhesion and getting rid of some imperfections.
When pasting using the dry method, the application process is repeated, the difference is that the material is applied to a dry surface of the body. After application, the carbon coating is heated. Pass over the surface with a felt squeegee and wipe with a dry cloth or rag.
When applying, carefully ensure that the material does not stretch too much and bubbles do not form. If this happens, it is recommended to press the unfinished area with a wet rag and treat it with a hot stream of air. The vinyl should shrink a little, the imperfections will be hidden.
We recommend watching this video before starting work:
Adviсe
- When the work is finished, but the coating is not so perfect, for example, there are bubbles, you need to take a needle and carefully pierce them, squeezing out the air. Then use a squeegee to smooth the surface again.
- In order not to overpay for the material, you should contact stores that specialize in selling car accessories. Experienced sellers who know automotive optics can tell you what size cut to purchase.
- When squeezing out excess liquid from under the film, do not be afraid to apply force. Most types of films are equipped with a protective layer that must be removed upon completion of work.
- If the headlights have a convex shape, such as those on a Nissan Beetle, then aligning the film along the edges can be difficult. It must be thoroughly warmed and stretched.
- If you don’t have confidence in your own abilities, have never had to cover headlights with film, or simply don’t have the necessary equipment, then you should entrust the work to a specialist.
Many people ask why soapy water is needed. Experts give a simple answer: a soap solution prevents the film from sticking to the glass instantly and firmly, which allows it to be moved around the optics. The liquid is squeezed out from under the film from the center to the edges. If you change direction, you cannot avoid creases.
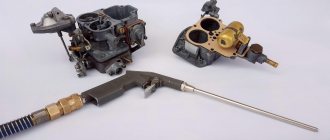
Making a homemade nozzle
In order to turn a Karcher mini washer into an effective sandblasting unit using a homemade nozzle, you will need the following structural elements:
- a nozzle through which a mixture of water and sand will be supplied to the treatment zone;
- trigger;
- reinforced hose that will be able to withstand high pressure;
- dispenser necessary to make the consumption of abrasive material more economical.
Nozzle diagram: 1 – thread; 2 – low pressure chamber; 3 – nozzle; 4 – fitting for sand supply; 5 – junction of two parts of the nozzle; 6 – smooth tapering transition
For the nozzle, if you intend to use your sandblaster regularly, it is best to purchase one that is made of ceramic. This type of attachment, which is constantly exposed to abrasive material, will last you much longer than its metal counterpart.
Homemade water sand blasting nozzle
Nozzle details: 1 – pistol; 2 – nozzle; 3 – nozzle holder; 4 – sandblasting nozzle
The efficiency of the sandblasting machine with a homemade nozzle, which you will equip your Karcher sink with, is greatly influenced by the quality of the nozzle. It’s worth starting to create such an element yourself only if you have the opportunity to drill an exact hole in a metal rod, the diameter of which is at least 15 mm. But if this is not possible, then it is better to purchase a factory nozzle, the quality of which will determine the operation of the entire device. The advisability of purchasing a serial nozzle also lies in the fact that some models of such products are already immediately equipped with triggers.
When choosing a hose, the length of which must be at least 2 meters, you should pay attention only to reinforced products. This is explained not only by the fact that such a hose will work under high pressure created by the compressor, but also by the fact that its internal walls will be constantly exposed to abrasive, which will quickly render the unreinforced product unusable
When starting to assemble and attach the nozzle to equip the Karcher washing machine, you should adhere to the following algorithm of actions:
- a ceramic or metal tip must be fixed to the nozzle of your homemade nozzle using a threaded connection;
- the dispenser, with which you will regulate the flow of the water-sand mixture coming under high pressure from the nozzle, should be attached to the metal or ceramic tip of the nozzle;
- the hose through which sand will be supplied from the hopper must be secured to the back of the nozzle, for which a fitting and a clamp of the appropriate diameter are used.
Scheme of operation and example of manufacturing a nozzle for collecting sand
When assembling and installing a nozzle for Karcher, you should take into account the fact that all elements of such a device will operate under high pressure created by the compressor of the device. That is why all formed connections must be ensured with maximum tightness and reliability. It is not difficult to fulfill this requirement if you make such connections using a special fum tape.
There is one more trick that will allow you to save abrasive material. It consists of the following: cleaning must be performed over a special container with a grid into which the waste mixture of water and sand will be collected. This mixture can be reused by lowering the end of a reinforced hose into it, which is connected to the nozzle of the device. There must be a grate on the top of this container; it is necessary in order to hold processing waste and prevent it from getting into the water-sand mixture.
Karcher sink with sandblasting nozzle in use