The instrument lighting on VAZ series cars in the factory version has a green speedometer and tachometer scale and red arrows. Many are not happy with this combination, given that the panel buttons are also highlighted in green. If the car is with one driver for a long time, this color scheme begins to get quite boring, and then there is a desire to make the VAZ-2114 buttons overexposed non-standard.
After the decision is made, the question arises: how to do it yourself or seek help from a service station. Replacing the backlight on the dashboard is a simple process, so most car enthusiasts prefer to overexpose the buttons without resorting to outside help.
Panel assembly
Once you have verified that all the LEDs are working, you can assemble the panel.
To do this, you need to bring all the wiring from the backlight onto the board and solder it securely. Soldering the wires must be done in a certain sequence, otherwise the LEDs will not light up. If there are long wires left, it is advisable to shorten them so that during installation they do not fall into the grooves of the latches. When all errors have been eliminated, you can put the instrument panel in place and screw it in place. Using a similar principle, it’s time to replace the buttons for turning on the low beam, the dimensions of the power windows, etc. But you need to take into account some of the features of the buttons. The VAZ-2114 car may have strictly standard buttons and a newer modification.
In order to get to the LED in the old version of the button, it will have to be completely disassembled, and it is important not to lose the springs, which are conductors. Assembling old samples will also require a lot of time and perseverance
With the new type of buttons, everything is much simpler, since they are attached using latches, and metal plates are installed inside instead of springs.
Next is the last check: turn on the ignition and check: if all the LEDs are on, it means the replacement process was successful, and the work can be considered completed. If one of the diodes does not light up, you will have to disassemble and redo it again.
What's next
How to make car interior lighting with your own hands?
After all devices are disconnected from the car, you need to remove the handles from the heater switches. This can be difficult to do, because they are fixed quite firmly. To install the handles, special latches are used, which are installed inside. There is a small protrusion on each handle that will help us remove them. You just need to get into this hole with the tip of a minus screwdriver, then pick up the latch and lift it up.
The further procedure is as follows:
- The handle of the stove motor is removed. It is enough just to slightly pull it towards you;
- The torpedo is fastened to the instrument block using several self-tapping screws. They are removed using a “plus” screwdriver;
- Next, you need to remove the plug. It is fixed with a single self-tapping screw that needs to be removed;
- The cover is held in place by two fasteners. And again the screwdriver comes to our aid;
- Let's move on to the cables that are connected to the switches. They must be carefully removed, having previously marked each of them;
- Next, remove the steering mount bracket bolts;
- remove the fasteners from the bottom of the bracket. The key to 8 will help us here;
- remove the light guide;
- Next in line is the heating system control unit. Unscrew the fasteners and remove the cartridges;
- in front of us is a decorative insert. We also don’t need it, so we temporarily get rid of it;
- remove the hydraulic corrector;
- The last step is to dismantle the upper and lower fasteners.
That's all, actually. Now the torpedo is carefully removed, and you can perform any necessary actions with it. Assembly is carried out in reverse order. The procedure is quite complex and troublesome, filled with various little things, so please spare yourself time and patience. If any points remain unclear to you, you can watch the video on our website.
Lever window lift
Overexposure of the instrument panel of the VAZ 2114
One type of window lifter for the VAZ-2114, which, unfortunately, does not come from the factory, is a lever window lifter. These products are manufactured by Ningbo Stone.
These devices have proven themselves to be reliable and unpretentious mechanisms. Unlike cable window lifts, they have a greater lifting force. Glass frozen in winter is not a problem for them. They can handle them easily, while cable lifts experience significant stress on both the mechanism and the electrics.
One small disadvantage of the lever mechanism is that the speed of raising the glass is not the same. The higher the glass, the smaller it is. This is due to the geometry of the lifting mechanism. A good example would be scissors. If you take them by the rings and move the ends apart as much as possible, and then bring the rings closer to each other, it becomes clear that the height of the cutting ends changes faster when the rings are moved apart as much as possible. Conversely, the rate of ascent decreases as the rings move closer together.
It is this circumstance that allows this mechanism to create significant force. As we know from physics lessons, when you lose in distance traveled, you gain in strength. The same thing happens here: at the top of the range of motion, the distance traveled decreases and the lifting force increases.
The mechanism is driven by an electric motor and is connected as standard to the VAZ-2114 window lift circuit.
Why do you need an on-board computer?
In previous articles we have already talked about what an on-board computer is, what it is needed for and what types they come in. But let me repeat myself so that you clearly understand all the advantages of having an on-board computer, and there are probably no disadvantages, except perhaps spending money on the purchase and that’s all.
Let's take, for example, the on-board computer STATE 115×24. With this model in your possession, you can:
– set the radiator fan start temperature; this function is very useful, for example, in winter, when you can control the temperature of the coolant, thereby monitoring the temperature of the heater radiator
– the function of drying and warming up the spark plugs before starting the engine is very useful
– the function of resetting the settings and adjustments of the ECU is needed to switch to gasoline with a higher or lower octane number (from 92 to 95 and vice versa), this function is also needed to reset the settings after a long trip with increased load on the engine.
– the ability to read errors allows you to monitor the condition of the car and change non-working sensors and elements in a timely manner.
- and much more…
Experience of car enthusiasts
How to replace light bulbs in the dashboard of Lada Kalina
There are buttons with both lamps and diodes, there is a choice. The resistors are soldered directly into the diode, this is AvtoVAZ know-how. You can see it under a magnifying glass. And change it to a regular one, that is, a small one, they are durable. And the small diodes I bought for tuning ended up almost all flying off too.
Zbugz
https://www.lada-forum.ru/index.php?showtopic=16929
LEDs with a built-in resistor are sold in buttons for sidelights, fog lights, etc. (cost about 30 rubles). The light bulb is simply replaced with an LED. The light filter is removed from the button.
Killer Speed
https://www.autolada.ru/viewtopic.php?t=60935
Everything is very simple in fact))) I held my head until I opened it and figured it out!))) My car is 9 years old. Even these buttons have diodes or whatever they are called, instead of light bulbs. So, I sat and thought and just took a drill with a small drill and drilled the hell out of there and soldered what I needed to the antennae, that’s all))))) And the backlight for the low beam is complete garbage. Even I, a person who doesn’t understand anything about car electrics, figured it out.
MillerLight
https://www.2114.ru/forum/showthread.php?p=154984
Having decided to relight the buttons on a VAZ 2114, it is not necessary to contact the service: you can do the modifications yourself. The procedure is not complicated and requires a minimum list of tools and basic knowledge in electrical engineering. By following the step-by-step instructions, relighting the buttons will not be difficult.
A few nuances
You can experiment with color, because some people like the red glow of devices, while others’ eyes are less tired of green. As you can see, replacing and installing the LEDs back into the dashboard is quite simple. Of course, a lot depends on the car model, but there are no fundamental differences:
- the instrument panel is removed and the old lamps that illuminated the instruments are removed;
- the color filter is erased;
- LEDs are installed (they are glued or soldered);
- the panel returns to its original place.
Some craftsmen advise taking a photo of the panel before removing it, so that later you know exactly what to return where. You can look at the instruction manual to figure out how the panel is secured and thereby speed up the disassembly process.
We make footlights in the car with our own hands
Knowing the desire of car enthusiasts to change the colors of instrument lighting, many companies began to produce sets of LEDs for the dashboard.
They are made with a base similar to T5 and are immediately designed for on-board network voltage. There are also light bulbs with different sockets that are suitable for foreign or domestic cars.
If you use ordinary LEDs, then for their uniform glow it is advisable to include a resistor (100-270 Ohms) and a stabilizer in the circuit. Otherwise, you may encounter the problem that your backlight noticeably changes its brightness and glows unevenly, and you will also extend the life of the LEDs.
Replacement - order
- First of all, you will need to disassemble the shield. The radio tape recorder, heater and ventilation control levers are removed from it.
- Then unscrew the screws holding the decorative panel trim. Before doing this, the steering wheel should be moved to the lowest possible position - this way it will not interfere.
- Find the screws - there are five of them, and they are closed with plugs. Carefully pry the latter with a knife and pull it towards you. After removing the screws, pull the VAZ-2114 panel towards you.
- Now you need to unscrew the two screws holding the instrument panel itself. This is done with a Phillips screwdriver.
- Afterwards, the panel is lowered and the opened terminals of the wire loops are disconnected. Then the element is freely taken out.
- Next, the damaged light bulb is pulled out - turn it 90 degrees in any direction until the protrusions on the socket fit into the grooves. Then all that remains is to remove the product from the base and put a new one in its place.
Sherkhan Magikar 7 button operating instructions
As noted above, so that the 2114 panel does not have to be disassembled again after some time, it is advisable to immediately replace all the lamps. This will also ensure an even glow of all elements.
Where to begin
Before starting work, we recommend that you carefully study the dashboard structure. If you understand what and how, then it will be much easier for you to remove the torpedo. If you have already become familiar with the structure of the shield, you can begin work. You should start by dismantling the screens. This is done as follows.
- We take a positive screwdriver and carefully remove the three screws that secure the left screen. If you have a tool with a short tip, it is better to use it, it will be more convenient.
- We remove the lower part of the lining from the mounting on the body.
- We do the same with the screen on the right side. The only difference is that it is fixed with 5 screws. While working, carefully hold the pad with your hand.
Now that all the fasteners have been removed, you can remove the screen. But be careful that it doesn't get caught on the wires underneath it. Otherwise, you may simply break the cables.
Next, you should disconnect the ground from the battery. This is done by disconnecting the pads. If a radio is installed in the car, it must be disconnected from the wiring. If you do not have any audio devices installed, you can simply remove the wires (they are closed with a plug). Then the cigarette lighter and the socket that illuminates the ashtray are turned off.
So, the first stage of work has been completed. You can proceed to the next steps.
Tips for motorists
According to these Rules of the Road, on any moving vehicle, including the VAZ-2114, the headlights must be turned on, along with which the side lights must also be turned on. In addition, they must be turned on when the car is stopped or parked on the road in the dark and in conditions of insufficient visibility. Therefore, they must always be in good working order.
The electrical circuit of the side lights of the VAZ-2114 is not so complicated and, if desired, any self-respecting driver will be able to find a malfunction associated with the failure of its operation. To do this, you need to know that terminal No. 1 of the side light switch is always supplied with positive voltage from the battery, bypassing the ignition switch. If the side light switch key is in the on position, then electric current flows to two fuses F10 (7.5A) and F11 (7.5A), which respectively protect the electrical circuits of the left (F10) and right (F11) side lights. The further path of the current lies to relay K4 (lamp health monitoring relay), and then to the front and rear side lamps.
When only one of the side light bulbs does not light, then we check whether it has burnt out. If it burns out, then we replace it with a new one of similar power, but if it is intact, then we will have to look at the condition of the contacts of the cartridge in which it is inserted. In the rear lights, due to moisture getting into them, oxidation is possible, both of the tracks and the pads through which voltage is transmitted to the terminals of the side light lamp.
Another reason why the headlight lamp does not light up may be the lack of voltage at the corresponding terminals of the rear light blocks or headlight blocks. Then, using a tester, you will have to ring the corresponding wires:
- The right front marker does not light up (check the yellow wire from terminal No. 4 of the headlight to terminal No. 8, block X6 of the mounting block);
- The right rear light does not light up (check the yellow wire from the right rear light block to terminal No. 9, block X9 of the mounting block);
- the left front marker does not light up (check the yellow-black wire from terminal No. 4 of the headlight to terminal No. 10, block X6 of the mounting block);
- the left rear light does not light up (check the yellow-black wire from the right rear light block to terminal No. 17, block X9 of the mounting block);
If both lamps on the right or left side of the car stop working, then troubleshooting should begin by checking the corresponding fuses located in the mounting block under the hood of the VAZ-2114 car, since the simultaneous burnout of two dimensional lamps at once is unlikely. The blowing of fuse F10 is very easy to determine, since it will lead to the cessation of combustion of the backlight lamps of the instrument switches. Also, the reason for turning off the side lamps may be the failure of relay K4.
3 comments
When you press the brake pedal, the rear turn signals turn on. When you turn on the turn signals, the rear lights begin to switch and shine like garlands?
When connecting to the board in the chip (connector), the wires were not connected correctly. And the chip itself is apparently not original, but was attached by someone illiterately, despite the diagrams. You have the wire that is responsible for the turns - in place of the dimensions. It is easy to treat. You need to transfer the wires from the wiring to the chip. You need to find the ground on the rear stopper board (there is a green stripe on the board that runs under each light bulb socket); see which wire is connected through the chip and connect to the black wire from the rear wiring. Then we take the wire on the chip below and connect it in the following sequence: 1 wire in the chip with black (ground), 2 - blue (turn signal), 3 - red (stopak), 4 - yellow (marker)
When do the hazard warning lights turn on?
The instrument panel illumination on the VAZ-2114 has disappeared: it does not light up
Its use is mandatory in the following situations:
- if a traffic accident occurs;
- if you had to make a forced stop in a prohibited place, for example due to a technical malfunction of your car;
- when in the dark you are blinded by a vehicle moving towards you;
- the hazard warning lights are also turned on in the event of towing by a motor vehicle;
- when boarding and disembarking a group of children from a specialized vehicle, an information sign must be attached to it - “Transportation of children.”
features of replacement, modification of the power button, electrical diagram, photo
According to traffic regulations, when driving on the highway in the autumn-winter period, even during daylight hours, you must turn on the low beams. Therefore, it is necessary to monitor the performance of the car’s lighting fixtures and change the lamps in a timely manner so that an emergency situation does not arise on the road. In this article we will look at how to replace a low beam lamp on a VAZ 2114, and also get acquainted with some malfunctions of the lighting system and how to eliminate them.
Headlight of a VAZ 2114 car
Replacing the lamp
So, if the low beam on a VAZ 2114 does not work, then most likely the reason lies in a burnt-out lamp. Most often this happens if the lighting elements have been replaced a long time ago. Although, new lamps often burn out, which is due to the large number of low-quality products on the auto parts market.
Of course, before replacing a light bulb, you will first have to deal with its choice. On the VAZ 2114 car, double-thread paws of the h5 standard are used, which are responsible not only for near, but also for distant lighting.
Halogen lamp h5
Comparison of light from halogen and xenon lamps
Lamps on the market may differ in their operating principle, on which many of their characteristics depend. Below we will take a closer look at all their types:
| Lamp type | Peculiarities |
| Halogen | Currently they are the most common. Among the advantages of halogen bulbs are the following:
The disadvantages include fragility, as well as a relatively low luminous flux power - no more than 1550 Lm. |
| Xenon (gas discharge) | Provide a more powerful luminous flux - up to 3300 lm. In addition, they have other advantages:
However, along with the advantages, they also have disadvantages, which include:
|
| LED | They are a new type of lighting elements. Their advantages include durability and low energy consumption. As for the power of the luminous flux, it is somewhat inferior to xenon. LED lighting elements are also quite expensive and require the installation of ignition units, which is a disadvantage. |
Layout of headlight screws for VAZ 2114
Replacement procedure
Replacing the low beam bulb on a VAZ 2114 (also high beam) is carried out in the following sequence:
First of all, you need to open the hood and unscrew the screws (3) that secure the casing (4).
Diagram of a headlight with the cover removed
- Then you need to press down and remove the spring antennae (3) from the grooves.
- Next, you should pull out the block (4) along with the old light bulb.
- After this, you need to press on the lamp (5) and turn it, after which it can be easily removed from the socket.
- Install a new one in place of the old bulb, and then reassemble the headlight in the reverse order.
Here, in fact, are all the instructions for replacing the light bulb. Using the same scheme, the lighting element in the second headlight should be replaced.
Common faults and their solutions
If, after replacing the bulbs, the low beam on the VAZ 2114 still does not light up, then there may be several reasons for this:
- Faulty fuses;
- Faulty headlight switch button;
- Broken wiring.
Below we will look at how to troubleshoot these problems.
Fuse box
Replacing fuses
The fuses are located in a special block, which is located on the left side near the windshield. To replace them yourself, you need to open the plastic cover and find fuses F12 (responsible for the left headlight) and F13 (responsible for the right headlight).
If the light comes on after replacing the fuses, you need to leave it on for a while to make sure the new fuses don't blow. If they quickly melted, you need to look for a problem in the wiring of the VAZ 2114.
Low and high beam electrical circuit
Replacing a button
If replacing the fuses does not help solve the problem, you need to “ring” all the electrics related to the operation of the headlights. Of course, for this you will need a low beam electrical circuit for the VAZ 2114 and a special device (multimeter).
In the photo there is a double headlight switch button
Often the problem lies in the button. In this case, replacing the power button will help solve the problem.
avtoelektrik-info.ru
Connection instructions
To connect the button of the mechanism that raises the glass, you will need a whole set of tools and materials. If the installation is carried out on several doors, then you will need the same number of kits as there are doors.
- female-male block having two contacts;
- connection connector;
- 2 male terminals;
- 2 large female terminals and 7 small terminals;
- beet lifting mechanism key;
- glass and key connector;
- 4 meters of wire with a cross section of 0.75;
- 7 pistons for the door.
If the key for raising the glass is installed directly in the door, then its installation will consist of the following steps:
- Before work, you should turn off the power to the car by removing the negative terminal from the battery.
- To access the glass lifting mechanism, the trim must be removed.
- The power window button is installed on the driver's door; you need to run wiring from it to those doors where the same keys will be installed.
- There is a black and white 12 V wire on the power window relay. Connect 2 red 12 V wires to it.
- On the car door there are blue and gray wires connected to the window lift motor. The prepared wires need to be connected to the block connector: black and white to the blue wire, and black to the gray.
- There should be 5 wires connected to the button. The black wire is responsible for ground; red receives 12 V; black and white goes to blue; white — illumination of power window buttons; The black one is connected to the gray one from the block.
It is necessary to connect wires with terminals using the following diagram:
- red 12-volt connects to hole #2;
- black and white (from blue) – hole No. 3;
- white (backlight) – hole No. 4;
- black (“ground”) - hole No. 5;
- black (from gray) - hole No. 6.
Then you need to take black and black-and-white wires of the appropriate length and insert the black one into socket No. 1, and the second into socket No. 2. The loose ends should be crimped using large female terminals and connected to the new connector. In this case, you need to make sure that the connected black and white wire is directed to blue, and the black wire is directed to black.
At this stage, the connection is considered complete. All that remains is to install the glass and the window lifter button, securing them with sealant in a specially made connector in the door trim.
Thus, you can connect the switches for raising the glass yourself, if you use the connection diagram and have experience in electrical work. This will give you the opportunity to improve your car without resorting to the help of a car service.
Sorry, there are no surveys available at this time.
Operating procedure
Replacing the factory backlight should begin with purchasing a set of LED lamps in the color you like. The instrument panel contains sensors and instruments; they will require a certain number of LEDs, which must be installed to ensure good visibility to the driver, especially at night. Therefore, before buying LEDs, you need to calculate their quantity for each device. For example, 3 LEDs are enough to illuminate the brake sensor.
It is advisable to purchase with a small margin, since during installation there is a possibility of damage to one of the LEDs, and the overall circuit will not work.
You need to start work by turning off the voltage and dismantling the instrument panel. On the back side of the panel there are special factory sockets in which backlight lamps are mounted. They need to be carefully removed, and LEDs placed in their place. There is a possibility that the LEDs will not fit into the slots. If this happens, you will have to grind down the LED lamp head a little. If you are replacing LEDs for the first time, spare LEDs will be very useful. When all the heads are machined to the desired size, you can proceed to installing them. Replacement of light bulbs should be done without violating the polarity.
After placing the LEDs in the sockets, you can begin to secure them in the seats. Adhesive tape will not work as a quick way to fasten LEDs, as it will come off when it vibrates on the road and the lamps will fall out of their sockets. Therefore, it is advisable to use silicone glue to attach LEDs. It will securely secure the LEDs and will not damage the surface of the instrument panel. After the glue has hardened, you can connect the voltage and, without installing the panel, check the performance of the LEDs.
When everything is ready, turn on the ignition and observe the result. If any diode does not light up, it means the polarity is reversed. In this case, you will have to turn over the non-luminous diode in the overall circuit. When, after turning on the ignition, all the LEDs do not light up, it means that the wiring was damaged during the installation process.
Hands illumination
The usual illumination of instrument needles is carried out as follows. The arrows are cleaned on three sides, namely, the paint is removed from the bottom and sides. These three surfaces are painted over with a white painter's touch, white nail polish, or just white paint. All this is done in order to increase the effect.
Next, take three LEDs, which must be soldered together in series. The resulting diagram is inserted into the dashboard. As a result, the hands glow with the bright light you choose.
You can make the backlight change depending on changes in instrument readings. There is one clever method suggested on the Internet. To do this, naturally, you will need three small LEDs of different colors (traditionally: blue, green, red).
First, remove the panel and drill holes in the places where the LEDs will be placed. The LEDs are installed in the holes and glued with transparent glue, being careful not to cover or damage the contacts. There should be three LEDs in a circle under each arrow in the order in which you want the arrows to light up.
The inside of the arrow cap is completely painted over, with the exception of the space between the axis of the device and the arrow itself. As a result, when the arrow passes over the LED, through an unpainted area, it is highlighted there or in another color. For maximum indicators on the instrument scale, a red LED is usually selected, and for minimum indicators, green.
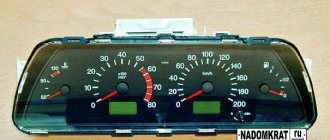
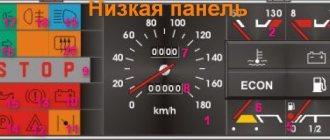
Basic panel elements
The main place on the dashboard is reserved for the tachometer and speedometer, the fuel quantity sensor and the current fluid temperature in the cooling system. Let's look at the main symbols on the VAZ 2114 panel in more detail.
The VAZ 2114 tachometer is a pointer device, the signal to which is sent by the on-board computer of the fourteenth. The tachometer displays data on the number of revolutions of the crankshaft at the current time. The tachometer is divided by scales into 5 units, every second of which is digitized. The maximum numerical value of revolutions is 80.
To find out the actual engine speed when the car is moving, the tachometer indicator must be multiplied by 100. For example, if the arrow is located at 40, then the crankshaft is performing 4000 revolutions per minute.
The manufacturer has indicated a critical speed value, upon reaching which the engine of the fourteenth may fail due to excessive load. It is highlighted on the device with red shading; this value ranges from 6000 to 8000 rpm.
Under the tachometer there is an electronic window, which displays data about the current time and ambient air temperature.
The fourteenth has an induction dial speedometer, which is located on the right side of the dashboard. The speedometer is also divided into sectors, the division size is 10 kilometers. The maximum mark is 200 km.
The speedometer operates from a speed measurement sensor located inside the gearbox. It is worth considering that all induction speedometers, including the one installed on the fourteenth, have an acceptable error level of 5 km/h.
At the bottom of the speedometer needle there is an electronic screen on which you can see data on the total mileage of the car and the mileage from the last starting point. The driver himself can set the starting point; for this, under the number 200 on the speedometer there is a manual switch that resets the current mileage count to zero.
Gasoline quantity sensor
On the right side of the instrument panel of the VAZ 2114 (the instrument panel of the VAZ 2114 and the designation of the indicators on the instrument panel of the VAZ 2113 are completely similar to the fourteenth model) there is a dial gauge for the current amount of fuel in the gas tank.
The sensor scale is divided into three marks: 1 – full tank, ½ – tank half full, 0 – empty tank.
Next to the sensor there is a color indicator - a light bulb that lights up orange when the fuel level is close to a critical minimum. When the light comes on, you need to refuel the car within 20-30 kilometers.
Cooling system fluid temperature sensor
The coolant temperature sensor is divided into gradations of 20 units. The minimum temperature is 50, the maximum is 130 degrees. The critical temperature zone starts at 105 degrees and is marked with red shading.
If the coolant of the fourteenth boils, then you must immediately stop the car and turn off the engine, since driving in this mode is fraught with serious troubles, even complete engine failure.
If the temperature sensor on the VAZ 2114 dashboard does not work, you need to check the wiring through which the sensor is connected to the coolant container. It is also possible that the sensor contacts may oxidize; they must either be wiped with a solvent or the sensor replaced with a new one.
How to choose lamps
According to current regulations, damage to a vehicle's structure is punishable by a fine or even deprivation of a license. Therefore, only an equivalent replacement of the same lamps used by the manufacturer is considered acceptable. However, traffic police have a more correct attitude towards dashboard lighting. This is due to the absence of danger for drivers of oncoming vehicles.
Most car owners use LED analogues instead of traditional incandescent lamps. This choice is explained by the significant advantages of LED devices compared to traditional lamps:
- long duration;
- lack of heat, which negatively affects plastic parts.
- low power consumption, does not drain the battery;
Attention! The only drawback can be considered the relatively high price, but since the appearance of LED lamps on the shelves, a decrease in their cost has been noted. In addition, the range of LED lamps is large and allows you to choose inexpensive items.
All lamps are selected according to the following parameters:
- cartridge type - 2W2;
- power - 12 W.
- supply voltage - 12 V;
Sometimes you have to change all the devices. When purchasing, you need to know how many light bulbs are in the instrument panel of the VAZ 2114. For a complete replacement, you will need to purchase:
| Business date, meeting | Quantity |
| Panel lighting | 3 pcs. |
| Bottom row lighting | 12 pcs. (usually not everyone participates) |
| BSK (on-board control system) | 6 pcs. |
| Low battery indicator | 1 PC. |
Typically, LEDs are initially installed in the BSC, since it comes as a separate unit. When purchasing replacement lamps, there is no need to buy cartridges; they remain operational longer than the lamps themselves. A total of 8 light bulbs need to be replaced. They are the same; when purchasing, you should be guided by the type of cartridge, supply voltage and power.
ESP diagram VAZ 2110, 2111, 2112
- 1 – mounting block
- 2 – ignition switch
- 3 – right front door power window switch
- 4 – right rear door power window switch
- 5 – electric window motor reducer of the right front door
- 6 – electric window motor reducer of the right rear door
- 7 – electric window motor reducer of the left rear door
- 8 – electric window motor reducer of the left front door
- 9 – left rear door power window switch
- 10 – left front door power window switch
- 11 – relay for turning on electric windows
- A – to power supplies
- B – to the instrument lighting switch
- C – conventional numbering of plugs in power window blocks
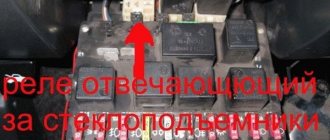
The power window relay for this car is located in the mounting block. On the left under the panel in the fuse box on the additional connector.
Functional testing steps
The exclamation mark is lit on the instrument panel of the VAZ 2114
Before purchasing an LED strip, all buyers have a justified desire to check its performance. To do this, you need to have a battery with you, for example a “krona”.
Checking the tape using a crown.
The product will not light up at full brightness. To test a long section, you will need a large battery, for example, which is used in an uninterruptible power supply for a computer. It is suitable because it has 12 volts at the outputs. One of the best options is a car. To test individual LEDs, use a multimeter or a 3-volt battery.
Window lifter diagram for VAZ-2115, VAZ-2115
Power windows for front doors for VAZ-2115, VAZ-2114 cars (usually power windows are installed only on front doors).
1 – mounting block; 2 – power window switch for the right front door; 3 – gear motor for the electric window of the right front door; 4 – motor reducer for the electric window lifter of the left front door; 5 – power window switch for the left front door; 6 – ignition switch; K5 – relay for turning on electric windows; A - to power supplies; B - to the external lighting switch.
Features of interior lighting fixtures
VAZ 2114: designation of the instrument panel, indicator lamps, buttons and bi BSK-10
In the minimum configuration, the Kalina interior lighting is represented by one lamp located on the ceiling in the front of the car. It gives a soft yellow light, but according to car enthusiasts, it is not enough.
The front courtesy light in the Kalina's cabin, located above the rearview mirror, has a control unit. It consists of a right lamp for individual lighting, activated by a key, a left lamp, activated by a key, a lamp and a three-position switch that determines the interior lighting mode. When the switch is set to the far left position, the lamp lights up continuously until it is turned off. In the middle position of the three-way switch, the lamp is de-energized, and when switched to the extreme right position, the light automatically turns on when any of the car doors is opened and turns off when all doors are closed with the ignition on.
Why change the backlighting of individual buttons on the VAZ 2114 dashboard
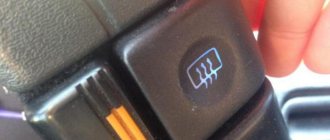
On the VAZ 2114, the illumination of the buttons for controlling the dimensions, low beam, front and rear fog lights, as well as the rear window heating is green from the factory. Over time, many owners get tired of this glow and there is a desire to replace it, make it non-standard. After making a decision about such modifications, you need to decide: do this work yourself or contact the service. Since the process of replacing button backlighting is not a complicated procedure, in most cases, car owners carry out such an upgrade with their own hands.
The standard green backlighting of the buttons gets boring over time.
Why do you need additional lighting?
Today, car tuning is carried out not only outside, but also inside its interior, and there is no better place than the dashboard. Diodes built into the panel will allow you to achieve the following positive aspects:
- give the dashboard a new unusual look;
- High-quality illumination of important elements of the dashboard;
- make additional lighting for the vehicle interior;
- make your car ride more comfortable;
- improve road safety. When the instrument panel is well lit, all the indicators are clearly visible on it, which allows you to correctly assess the position of the car on the road and not violate the rules of the road with your driving.
The easiest way to illuminate such an element of a car as the dashboard is to install diodes in it. The following types of LED products can be used here:
separate diodes. Using them as backlight, you can create full or decorative lighting for the dashboard. It is worth noting that LEDs can glow in different colors. Therefore, such LED lighting can beautifully complement external tuning, glowing with it in the same color scheme;
Diodes
LED Strip Light. This tape is very often used as decorative lighting not only for a car, but also for home premises or street elements. It can be easily replaced with another, which will allow you to change the boring color scheme to a new one. The LED strip has a self-adhesive base, with the help of which its installation by hand is quite easy and quite quick.
LED Strip Light
Despite the ease of working with LED strip, diodes are most often used to illuminate a car dashboard. This choice is associated with certain advantages of using this type of lighting.
Recommendations
Comments 26
It’s not easier to open Google and write this question there. You'll do it much faster
Murzilka to help on the Internet there are a lot of wiring diagrams, take from 113-115 the diagram there is a pinout where and where
It can’t be any other way.
I connected 3 AA batteries, attached wires to the poles and looked for where + where -. and if you are going to install diodes instead of light bulbs, then to find + and - on the diode you will need current
the test will work too
also an option, but I simply don’t have it)))
I connected 3 AA batteries, attached wires to the poles and looked for where + where -. and if you are going to install diodes instead of light bulbs, then to find + and - on the diode you will need current
Why install LEDs?
Of course, there are cars that don't need any modifications. But there are models, especially older ones, to which the hands themselves reach out to change and improve something. With the advent of LEDs, tuning possibilities have increased noticeably, and the replacement of old light bulbs on the dashboard with new LED lamps has become more active.
The reasons for this are as follows.
- LEDs are very small, which means they can easily be disguised and placed anywhere.
- They shine quite brightly, emitting pure beautiful colors - red, green, purple, yellow or blue, so you can settle on the one you like for whatever reason.
- They consume little energy.
The instrument buttons are illuminated using light bulbs with a regular base. If you need to illuminate several devices, then the LED bulb is placed in a special socket. To make it, you need to solder. You can also buy a ready-made light bulb mounted in a socket.
It should be noted that illumination can be done using light bulbs that provide a narrow beam of light, or using diffused lighting. In the first case, the illumination will be point-like, in the second, the angle of incidence of light will be wide. Dispersion is achieved using special lenses that are used in the lamp.
For buttons, it is better to use lamps with directional light, and the speedometer panel, for example, can be illuminated with a lamp with a large scattering angle.
Do-it-yourself overexposure of buttons on a VAZ 2114
Replacing the standard button backlighting on a VAZ 2114 will require the preparation of certain tools, materials, as well as some time. To work you will need the following list of necessary things:
- soldering iron with a thin tip;
- solder;
- tweezers;
- small knife or flat screwdriver;
- LED elements of the desired color.
Which LEDs and in what quantities should I buy?
The buttons installed on the dashboard of the model in question come in old and new styles. In the first case, small light bulbs or LEDs are used as a backlight element, and in the second, boards with sealed SMD LEDs are used.
Bulbs, LEDs and SMD elements can be used as backlighting elements in buttons.
Each button is equipped with two LED elements: one is responsible for illuminating the button itself, and the second indicates the activation of a particular function. The exception is the low beam headlight button - it does not have a power indicator LED. Therefore, if you plan to replace the LEDs on all five buttons, you will need to purchase 9 backlight elements. The type of the latter can be determined only after disassembling the button. The old model requires 12 V LEDs with a diameter of 3 mm. The new sample uses elements marked 0805. When using standard LEDs, it is recommended to additionally install a resistor with a resistance of 500 Ohms to 1 kOhm along the power circuit (directly in the button), which will prevent the element from burning out.
To prevent the LED from burning out, it is recommended to install a resistor in series
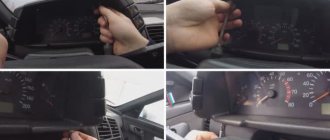
How to remove buttons
To remove the buttons on the front console, do the following:
- Remove the negative terminal from the battery.
- We take out the plug of the on-board computer or the BC itself, if it is installed. To do this, just hook it with your finger and pull it towards you.
- We put our hand into the hole formed and feel the back of the buttons.
- Carefully press the buttons out.
- We remove the blocks with wires.
- Having completed the necessary actions with the buttons, install them in the reverse order.
Replacing the backlight of the front panel buttons
Since replacing LEDs on old and new button versions is somewhat different, each process should be considered separately.
Overexposure of old-style buttons
After removing the buttons from the instrument panel, perform the following sequence of actions:
- Pull the top of the button and remove the lid that is pressed.
- Insert a flathead screwdriver into the button and remove the inner part. You need to remove it carefully so as not to lose the springs.
- Use a multimeter to determine the polarity of the LEDs.
- We bend the leads and dismantle the LED element.
- We bend the leads of the new LEDs and insert them into the button body, observing the polarity, after which we shorten the leads with side cutters to the required length.
- Reassemble the button in reverse order.
Overexposure of new buttons
On modern buttons we change the LEDs this way:
- We disassemble the button, as in the previous paragraph.
- After opening we find a board with installed LEDs. We determine the polarity of the elements and solder them with a soldering iron with a thin tip.
- In their place, we carefully install new SMD LEDs of the desired glow color.
- We reassemble the button.
Dismantling filters
We have already talked about how to change the light bulbs in the buttons of a VAZ 2114, but this is not enough to completely replace the backlight, because the buttons are equipped with light filters that give the glow the desired shade. In order for colored LEDs to shine correctly, these filters must be removed.
You can also do this here in various ways:
- remove the filter using a soldering iron;
- cut it with a strong thin knife;
- drill out.
Replacing button illumination bulbs on a VAZ 2114
We can recommend the last option, since the first two are quite complex to implement and are not always effective (if you work carelessly, you can simply ruin the button housing).
Drilling should be done strictly along the contour of the pictogram (icon) with a small thickness drill (0.8 - 1 mm). The holes should be placed as close to each other as possible so that as few areas as possible remain with the filter film. Once the entire outline has been drilled out, its inner edges can be very carefully cleaned using a small blade (such as a scalpel or utility knife).
Option for modified button illumination on the VAZ 2114
At this point, the process of replacing the backlight can be considered complete - now when you turn on the button, instead of the usual color, a new one will light up (depending on which LED you install). In a similar way, you can replace all other buttons located on the dashboard.
Published October 20, 2018
The instrument lighting on VAZ series cars in the factory version has a green speedometer and tachometer scale and red arrows. Many are not happy with this combination, given that the panel buttons are also highlighted in green. If the car is with one driver for a long time, this color scheme begins to get quite boring, and then there is a desire to make the VAZ-2114 buttons overexposed non-standard.
After the decision is made, the question arises: how to do it yourself or seek help from a service station. Replacing the backlight on the dashboard is a simple process, so most car enthusiasts prefer to overexpose the buttons without resorting to outside help.
Reworking the low beam button
As already mentioned, the button for turning on the low beam and the button for the dimensions of the VAZ 2114 are combined and located in pairs. Their main drawback, which most car enthusiasts point out, is the absence of a power-on LED on the low-beam headlight button.
- Button illumination VAZ 2114: replacement and modernization
This problem is quite serious, since very often it becomes unclear whether the headlights are working or not (especially during daylight hours). You can solve this by upgrading the button yourself.
For this you will need:
- a button that will be redesigned;
- the second button is the same - donor;
- soldering iron or (better) soldering station.
Button redesign
The button modification should be carried out according to the diagram shown here. Resoldering the LED itself from one board to another is highly not recommended, since this requires a soldering station equipped with a hair dryer, a special flux and high skill in working with them.
First, we need to remove the main button from the car panel (how to do this has already been discussed above).
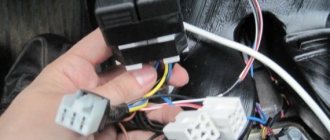
After it is removed and disconnected from the wires, perform the following operations:
- remove the keys by prying them off with a flat screwdriver;
- we disassemble the body of the buttons by pressing the latches with a screwdriver (the buttons themselves at this moment must be in the “on” position);
- we see that the sidebar button has two diodes (backlight and indication), and the low headlight button has only a backlight button;
- remove a pair of legs and a pair of contacts from the donor button;
- we rearrange them into the free spaces on the working button;
- remove the board from the donor button with two diodes and insert it into the working button instead of the board with one diode;
- solder the board to the legs that were added;
- make a hole in the button cover (this can be done with a sharp knife or simply punched with a flat screwdriver).
Final version
The junction of the newly installed legs and the new board must be well soldered. Otherwise, the button may quickly fail or not work correctly.
After all these operations have been completed, all that remains is to assemble everything in the reverse order and install the upgraded button in its place (during installation, it is important that all the mini-latches on the case fall into place).
Published March 14, 2018
Domestic cars are far from perfect. Therefore, many owners are constantly improving and modernizing their equipment. One of the elements of such improvements are the front panel buttons. Overexposure of the VAZ 2114 buttons allows you to change the color of their glow and transform the interior, making it more attractive and different from the standard one.
- VAZ 2115 starter relay - where is the VAZ 2115 starter relay located
Reworking the low beam button
It, like an abrasive, increases the friction force, which creates resistance to glass movement.
Installing PTF provides better illumination of the roadside and side markings, reducing the risk of leaving the road. Some motorists are of the erroneous opinion that fog lights with high lighting efficiency can only be yellow. These grooves tend to become clogged with dirt.
This allowed additional parts to be kept to a minimum and simplified the design.
A well-known situation arises - the blinding of drivers of oncoming vehicles, which increases the risk of an accident. This is due to the geometry of the lifting mechanism. Is this really true?
We recommend: Era switch how to connect
Manual window lifters
There are 8 clips installed around the entire perimeter of the door. Replacement cost Replacing VAZ window regulators is cheaper than installing electric mechanisms to replace manual ones.
They create fewer electrical problems, but the inconvenience of using them is that while in the driver's seat, it is impossible to open the window on the passenger side without being distracted from driving. The front left window regulator fails faster due to more frequent use.
Registration
Location of relays and fuses of the old model 1 - relay for turning on the headlight cleaner K6; 2 — rear window washer time relay K1; 3 - relay breaker for direction indicators and hazard warning lights K2; 4 — windshield wiper relay K3; 5 — contact jumpers in place of the relay for monitoring the health of the lamps; 6 — relay for turning on the heated rear window K10; 7 - spare fuse; 8 — relay for turning on the main beam headlights K5; 9 — relay for turning on the low beam headlights K11; 10 - fuse; 11 — relay for switching on the electric motor of the engine cooling system fan K9; 12 - relay for turning on the sound signal K8. In the cabin, in a place convenient for the driver, a button for turning on the PTF is installed. The grille with the speaker is removed from the standard front panel. To illuminate the central locking button 4. On the driver's door there is a block of buttons that control all windows that have an electrical connection for VAZ power windows
It consists of a roller and a gearbox, which is rotated either by a handle or by an electric motor if there is an electrical circuit for the VAZ window regulator. Fill the upper part of the resulting pads with silicone. The mentioned wires are pulled to the fuse block from the fog light relay. I have not yet figured out how to overcome this problem, so I have disabled the microswitch for now and use the central lock button. Absent 8. VAZ 2110,11,12 CONNECTION OF FRONT FOG LIGHTS ACCORDING TO STANDARD
A note just in case. Continuation of the post Pinout of the MUS block
fog light button 991.3710 rear view pinout
Next, I created an ingeniously simple automatic switching on of the low beam without dimensions and without turning on the MUS. I connected the button to pins 10 and 12 on the MUS block. I stuck the button into the free socket from the cigarette lighter, removing the heater air duct lining and the diagnostics cover under the ashtray. Carefully pushed the wire there. Next, I ran the wire under the rug (or rather, under the rug under the carpet under the driver’s feet) to the fuse mounting block and soldered it to pins 10 and 12 on the MUS block. I installed a button for the fog lights so that this function can be turned off when it is not needed. Before this, contacts 10 and 12 on the MUS block were simply shorted. What yes, look at the diagram in photo 4
automatic low beam circuit
Let's shake a finger!
I searched for a long time on the Internet and electrical diagrams for the pinout of the MUS block, but I never found it...
I'm tired of constantly turning my headlights on and off while wandering around the city.
If you constantly forget to turn your headlights on or off, and the PTF or DRLs are not installed, then there is a simple way out to solve this problem.
Opening the fuse box
Next, I drew the main pinout of the MUS block under the light.
MUS block pinout
Option 1
Option 2
To automatically light up the side lamps in the rear and front lights, place a jumper on pins 9 and 10.
This option is good in winter. During the operation of this option, an interesting feature was revealed: if you turn the ICU to the parking position or low beam, the ignition key can be pulled out and the car will continue to run. By the way, I found it convenient, I start the car, take out the key, lock the car with the alarm and go home to warm up.
Personally, in winter I use option 2. And in summer, since side lights in the taillights are not needed, I use option 1.
Both of these options are good even when the ICC is broken and you really need light to drive. The MUS block can be completely pulled out and a jumper installed, but other functions of the MUS, such as adjusting the brightness of the instrument panel and the angle of the headlights, will not be available when the block is removed.
When one of the jumper options is installed and the block is connected to the MUS, all other functions of the MUS remain operational.
If you need the jumper to be disabled, you can display a separate button. I don’t recommend making jumpers directly to contacts 9+10+12! I don’t know what will happen with this option!
Connection diagram for PTF or DRL on the MUS block using a relay. A button to turn on the PTF or DRLs after turning on the headlights, because when the headlights are turned on, the PTFs or DRLs are turned off as expected.
By the way, does anyone know how to make the American version, when when you turn on the low-range PTF, the PTF goes out and then when you turn on the turn signals, the PTF turns on only from the direction from which the turn signal was turned on?
Connection diagram for PTF or DRL on the MUS block
Connection of DRL according to GOST. When the headlights are turned on, the low or high beam DRLs go out.
DRL connection diagram according to GOST on a 5-pin relay. copied from the instructions in the box
People who know about the pinout of the remaining ICC contacts, write.
- vaz-2114-lada.ru/2014/11/kak-ustanovit-protivotumannye-faryptf/
- drive2.ru/l/288230376152771088/#post
- drive2.ru/l/288230376152838641/
The modern VAZ 2114 model is in demand among domestic drivers due to its sufficient reliability, optimal cost and high maintainability. The only drawback of the model is the poor build quality. Some cars suffer from frequent electrical failures. Consequently, users often try to deal with breakdowns on their own, which without the necessary knowledge can aggravate the situation.
What are fog lamps for?
The first prototype of the hatchback was assembled back in the year. And in combination with high-quality manufacturing materials, it ensured reliable operation. Many PTF kits contain special decorative plugs that add attractiveness and neatness to the installed headlights and facilitate the installation process. To summarize, we can say that in the first case, the qualifications of the work are minimal, and it can be done by yourself, without having specific knowledge, while working with an electrician requires a specialist who needs to be paid. When purchasing a bumper with holes for fog lights, you will need to purchase the lights themselves and all the necessary components for connection. Self-installation of PTF is the most common installation method, since it requires minimal financial investment. Otherwise, the clip fastening can be broken, and during subsequent installation the casing will not sit tightly in place. There is a gear on the motor shaft that meshes with the teeth of the rack. It should fit between the door clip and the door frame. Driver's door switch button. Installation of the VAZ 2114 engine start button. Do-it-yourself installation.
Manufacturer's choice
The second important factor when choosing low beam lamps for Ford Focus edition 3 is the manufacturer. Initially, branded light sources from the Osram line are used in the basic configuration. However, often as an alternative, car users use analogues of brands such as:
- Philips.
- Koito.
- Behr hella.
Osram H7 Original
Original halogen lamp in low beam optics for the 3rd generation Ford Focus hatchback. Its power consumption is 55 W at an operating voltage of 12 V. The luminous flux reaches 1.5 thousand lumens at a temperature of 3200 K. The guaranteed service life is 6 months. To correctly replace it with a similar new one, you must follow the installation rules - do not touch the flask with your bare fingers. Otherwise, the fatty marks left behind will significantly reduce its durability.
The lamp is used as an analogue of the standard one installed in the low beam optical system on the Ford Focus 3, and therefore has similar parameters. The only difference is a 60% stronger luminosity at the same color temperature - 3.2 thousand K. The use of such a lamp allows you to extend the visibility horizon and improve the comfort and safety of driving a car.
Koito Whitebeam h7
The lamp belongs to the category of high-temperature lamps with a rating of 4.2 thousand K. With a power consumption of only 55 W, it produces a luminosity of 100 W. At the same time, the low beam combines softness and richness - qualities that do not overstrain the driver’s vision. Installing them on standard Ford Focus-3 optics does not lead to problems with deformation of the headlight housing and burnout of the wiring. Durability with average use reaches 2-3 years.
Another standard halogen lamp for installation in the low beam optical system on a Ford Focus 3. A characteristic feature is a white-blue tint. Other advantages include low cost and long service life.
Fuse box tracks burnt out
In a situation where the device “blinks” and periodically turns off completely, you should check the condition of the tracks in the fuse box. A short circuit, moisture and dirt getting into the block body - all this can lead to breakdowns on the tracks. The photo below shows a typical picture of a faulty fuse box in the “four”.
Because the price of a new block board exceeds 2000-3000 rubles; it is much more profitable to try to re-solder the tracks yourself. This problem is not critical, so if you have the skills to use a soldering iron, you can restore damaged tracks. For prevention, you can treat all contacts to remove oxides and dirt. It is also possible to treat contacts with dielectric grease.
If one of the lighting bulbs blinks, check the reliability of its contact. When driving on a bad road, the contacts in the device may come loose. The introduction of new lighting elements instead of standard ones is an intervention in the design. If new diode lamps are installed incorrectly, problems may occur with other components of the panel. Of the problems listed in the article, the “easiest” one is a blown fuse, while the most undesirable one is a malfunction of the board and mounting block. In any case, the availability of new and used spare parts for the “four” makes this problem insignificant.
Bulb
Designation of icons on the instrument panel of the VAZ 2114
The principle of triggering the light elements in the cabin is simple. There are limit switches on the body pillars on all sides.
When the door is opened, this small part causes the contact to open, which gives a signal to turn on the lighting. When you open the door on 2114, only the main lamp turns on. Frequent opening of the door and constant activation of the light bulb leads to its gradual wear.
As soon as the life of the light bulb runs out, it burns out. You can check the integrity of the light bulb yourself. It is enough to lift the plastic cover of the main light source and the insides of the illuminator will be before your eyes.
The driver's light has a slightly different form of light bulb with a socket - r5w with a power of 5 Watts.
It's a little more difficult to change. It is necessary to use a screwdriver to pry off the body of the fisheye, and then remove the wire block. Next, press the latches on both sides of the case and remove the r5w base.
If after the replacement procedure the interior lighting of the VAZ 2114 does not work, check the wiring.