The timing belt is an important element in the gas distribution mechanism drive device. Although the manufacturer recommends checking the belt every 50 thousand km and replacing the timing belt every 100 thousand km, in reality it is advisable to halve these periods.
The reason is that when the valve teeth break or are cut off, they hit the pistons. As a result, expensive engine repairs have to be performed. In this article we will look at how to check the timing belt of a Priora, how long it takes to change the timing belt on this car, and also how to replace the timing belt on a Lada Priora.
Replacing rollers and timing belt: step-by-step steps
Initially, it should be noted that owners of a Lada Priora car with air conditioning will need to perform some steps to get to the timing mechanism. If you have a Priora with air conditioning, then initially you need:
- Using a wrench with a 15mm head, unscrew the generator tensioner pulley (not to be confused with the timing belt tensioner pulley). If the roller is humming, it is also recommended to replace it.
- After this, remove the alternator belt, which is also recommended to be replaced simultaneously with the timing belt drive.
- Now you will have access to the protective covers of the gas distribution mechanism.
Replacing the timing belt on a Priora 16 valves with your own hands is done by performing the following steps:
- Using a hexagon or T-30 bit in the shape of an asterisk, you need to unscrew 5 bolts securing the upper cover (plastic casing) and 2 bolts of the lower timing cover.
- The crankshaft sensor is disconnected by disconnecting the corresponding chip near the upper timing cover.
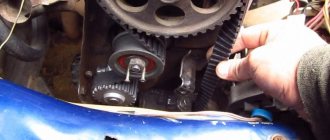
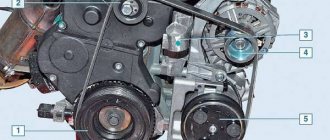
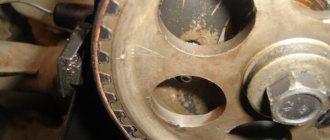
- Place a jack under the wheel on the passenger side, then lift the car and hang the wheel. This must be done in order to be able to align the marks of the camshaft pulleys. This procedure can also be performed by rotating the crankshaft pulley with a key to “17”. The photo below shows marks 1 on the mechanism body, as well as marks 2 on the camshaft pulleys. They must be combined by rotating the wheel with 5th gear engaged. If you do not plan to change the pump, then there is no need to loosen the camshaft pulleys after setting the marks.
Aligning the camshaft marks
After the marks are set, do not forget to put the gear shift lever in the neutral position. This is necessary so that the marks do not go astray. Checking the marks on the flywheel gear. There is a rubber plug at the top of the flywheel that should be removed using a screwdriver. Under the plug is the flywheel crown along with a mark that should coincide with the triangular mark on the left side.
Mark on the flywheel
If you plan to replace the pump, then at this stage you need to loosen the fastening of the 2 camshaft pulleys. The fastening is loosened in order to subsequently avoid bending of the valves when the timing belt is removed. In this case, the bolts are loosened, but not removed. To gain access to the crankshaft pulley, which is located at the very bottom, you need to remove the wheel or turn it all the way to the right. The 5 bolts securing the mudguard are unscrewed, which is necessary to gain access to the crankshaft pulley. To unscrew the crankshaft pulley mounting bolt, you need to ask an assistant to engage 5th gear and press the brake pedal. At this moment, use a wheel wrench or a ratchet with a 17-mm head to apply force to unscrew the bolt. To unscrew the crankshaft pulley mounting bolt, you must rotate the key counterclockwise.
Removing the crankshaft pulley
Behind the crankshaft pulley there is a thrust washer, which also needs to be removed.
Next, using a wrench with a “15” head, unscrew the bolts securing the rollers: tensioner and thrust.
Removing the tensioner and thrust rollers
After dismantling the rollers: tensioner and thrust, you can remove the timing belt.
Removing the timing belt
If you need to replace the pump, the internal protective casing is removed to do this. To do this, remove the camshaft pulleys, the fastenings of which were previously loosened. After this, the three bolts securing the generator tension roller holder are unscrewed. To remove the casing, you need to unscrew 6 more mounting bolts to “10”, two of which are located behind the camshaft pulleys. The photo below shows the location of the bolts that need to be unscrewed to remove the casing. This is only done when the pump needs to be replaced.
Location of the inner timing cover bolts
The inner casing is removed.
To remove the pump, you need to unscrew the 3 mounting bolts. To unscrew the bolts you will need a 5mm hexagon. Now the pump is removed, just don’t forget to drain the coolant first.
The removed elements should be installed in the reverse order of removal. Before installing the pump, you need to install the gasket, having previously lubricated it with a high-temperature resistant sealant. When tightening the pump mounting bolts, do not use much force to avoid stripping the threads. New rollers (tensioner and thrust) are installed. The tensioner roller is not tightened, as it will be used for adjustment. The camshaft pulleys are installed in place, and finally the crankshaft pulley. A new belt is put on. To do this, you must first put it on the crankshaft pulley, then on the pump, and finally on the camshaft pulleys.
We proceed to the procedure for adjusting the tension of the belt drive.
About the resource
Well, now we’ve come to the most interesting thing, namely the resource. You know, now I want to talk specifically about normal belts and tensioning equipment, about “PRIORS” will be a little lower.
Not all manufacturers strictly indicate how often to change the belt, but such information can still be found, even in the car’s operating books.
The average mileage recommended for replacement is 100,000 kilometers. On many foreign cars, this mileage can be much longer, about 150,000 kilometers.
Now the question may arise: what does it depend on? Guys, to be honest, the belt itself can run (as some manufacturers claim) about 200,000 km, but its service life is reduced due to tension and support rollers. They are often the culprits of the cliff!
The support roller is a kind of bearing on which the belt rests, often has a plastic housing.
The tension roller is almost the same plastic bearing, only it is located on a special mount that “tensions” the belt, that is, it keeps it in “tone” and prevents it from “sagging” and jumping onto a tooth.
Both videos must be of simply excellent quality, no, they simply must! With foreign cars this is almost always the case, these “support” and “tensioner” last a long time, and replacement is 100 - 150,000 km in advance.
As you may have guessed, not only the belt is changed, but also the tension and support rollers - THIS IS MANDATORY, REMEMBER THIS! As an indirect reason for a future replacement, there may be noise from the timing drive; when the rollers begin to “bend”, they begin to make noise.
How to wash power steering
Sometimes the tank, pump and steering rack are in such a state of disrepair after multiple missed oil changes that it becomes necessary to pre-flush the entire system when refueling. For this purpose, power steering flushing fluid is specially produced. You cannot wash this system from the inside with just anything; these mechanisms are made too precisely and require too much oil.
An example of a decent liquid would be any product from a well-known manufacturer, in particular, if it is the popular manufacturer of automotive detergents Winn's, then the canister will say “Power steering flush,” which means power steering cleaner.
For flushing, the same procedures are followed as for replacement, only first the old liquid is displaced by the cleaner, and only then it is squeezed out with fresh standard oil.
The quality of flushing will depend on the amount of cleaner passed through the power steering. For details of use, please refer to the specific product label.
How to replace the Priora timing belt
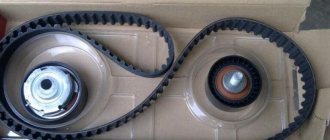
So, having selected a suitable timing belt for the Priora (regardless of the manufacturer, it is important to select a 16-valve Priora timing belt), you can begin the replacement procedure. The width of the belt should be 22 mm, the number of teeth is 137
After removing the timing cover, you must first align the timing belt itself. To do this, the crankshaft and camshafts are placed at TDC on the compression stroke of the first cylinder.
To rotate the crankshaft, use a 17mm wrench to turn the bolt securing the auxiliary drive pulley clockwise until the marks on the camshaft toothed pulleys align with the marks on the rear drive cover.
Also, to check the position of the crankshaft, you need to remove the plug from the rubber (it is located on top of the clutch housing). The mark on the flywheel should be opposite the slot in the upper cover of the clutch housing.
Then you need to fix the crankshaft. To do this, when unscrewing the bolt securing the drive pulley of the mounted units, you should invite an assistant to engage 5th gear and press the brake.
Now the pulley can be removed, and the washer is removed in parallel. To make it easier to put everything back together, the camshaft pulleys can be fixed in relation to each other before removing the belt. Pre-prepared wooden pegs are suitable for this.
Wooden wedges can be lightly driven between the teeth of the pulleys. Then use a 15mm wrench to loosen the bolt securing the timing belt tension roller. The roller will turn, the belt tension will be small, which will allow it to be removed from the camshafts. The belt can now be removed from the pump and crankshaft pulleys.
It is important to ensure that after removing the belt, the crankshaft and camshafts no longer rotate, as the pistons and valves may accidentally collide!
As for replacing the timing belt, first change the tension roller, then the support roller. The rollers are removed along with the bolt and thrust washers. At the same time, you need to check the condition of the pump
It is important that there are no leaks of antifreeze, the pump shaft should rotate easily, there should be no backlash, etc. If the pump is not working, it also needs to be replaced
By the way, before installing new timing belt rollers on the Priora, the threads of the mounting bolts should be coated with a special fixing sealant. Also, the support roller mounting bolt can be immediately tightened (torque 34–41 Nm), while the tension roller mounting bolt should not be fully tightened at this stage.
Next, you can proceed to installing the timing belt.
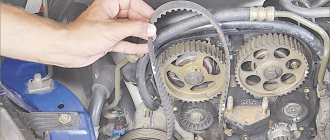
Before installing it, it is important to check that the camshaft timing marks match the marks on the rear drive cover. If the accessory drive pulley is removed, in this case it is easy to determine the position of the crankshaft (the marks on the crankshaft toothed pulley must coincide with the mark on the oil pump cover)
Now all that remains is to put the timing belt on the crankshaft pulley. The main thing is to tension both parts of the belt, placing the front part behind the support roller. At the same time, the rear part is put on the pump pulley and pulled behind the tension roller. Then you can put the belt on the camshaft pulleys. If the pulleys were previously secured, all stoppers must be removed. You can then adjust the timing belt tension as described above.
The final stage is the installation of the drive pulley for the mounted units. After this, turn the crankshaft by the pulley mounting bolt 2 turns clockwise. Next, you should check that the marks on the crankshaft and camshafts match exactly, and that the belt itself is tensioned properly.
If deviations are noticeable, the entire adjustment and/or installation process should be repeated. If the marks coincide, you can completely tighten the tension roller bolt (torque from 34 to 41 Nm), as well as the attachment drive pulley bolt (bolt tightening torque 105 or 110 Nm).
Features of the gas distribution mechanism drive
Replacing the timing belt of a Priora 16 valve was already different from the same operation on a top ten with a 2112 engine, and even more so from an 8-valve engine. First of all, when replacing a belt, one must take into account that the new valve drive belt on the Priora differed both in size and in tooth geometry, which made it not interchangeable even with a 10-valve 16-valve belt. Also different:
- drive pulleys;
- tension roller;
- intermediate roller;
- pump pulley.
In fact, some parts from 2112 are suitable for the drive mechanism, but the Priora engine already had a self-tensioning roller, the crankshaft pulley had a special groove to prevent the belt from jumping off, and the rollers, on the contrary, lost them. Actually, these are all the differences between the old engine and the new one. Kalina also had the same engine as the Priora, but its volume was reduced to 1400 cc.
How to replace the timing belt on a VAZ 2170-VAZ 2172?
Removal: 1) The first thing you need to do is prepare to remove the belt; preparation includes removing the minus terminal from the battery (How to remove it, read in point one “”) and installing the piston of the first and fourth cylinders to the TDC position (How to install, read the article: “Installing valve timing by marks”).
2) When all the preparatory work has been done, proceed to removing the belt itself; to do this, use a wrench or a 15-socket wrench to slightly loosen the tension on the tension roller (the roller mounting bolt is indicated by a red arrow, just do not confuse the tension roller with the support roller, so, by the way, the support one is to the right, and the tensioner is to the left and the tensioner is attached not in the very center but slightly to the side) and then turn it counterclockwise or clockwise (Whichever you like), so that the timing belt is loosened and is no longer strongly tensioned and thereby remove the belt from all the upper pulleys on which it is located (the upper pulleys include two camshaft pulleys, as well as the pump and also remove it from the tension roller).
3) Now you will need an assistant and a large thick flat screwdriver, in general everything is done as follows, in the engine compartment you look for the gearbox, and to be more precise, the clutch housing, and this housing has a small hole that is closed with a rubber plug, assistant let him pull out this plug and then insert a screwdriver into the teeth of the flywheel, thereby securing it from turning, at this time you completely unscrew the bolt that secures the crankshaft pulley and the generator pulley (the generator pulley is the one that is large, the crankshaft is the one that is small) and how Once the bolt is unscrewed, remove the generator pulley from the car and the washer located behind it.
Note! Also, don’t forget to remove the generator belt from the pulley, otherwise it will greatly interfere with removing the pulley. For information on how to remove it, read the article: “”!
4) And finally, at the very bottom, remove the belt (Indicated by the arrow) from the crankshaft pulley, but only remove it carefully, without turning the pulley, and in general, when the belt is completely removed, you do not need to turn any pulleys, otherwise if with force turn the camshaft pulleys, for example, provided that the first and fourth cylinders are set to the TDC position, then a meeting of the valves with the pistons may occur, due to which either the valves or the pistons (which is very unlikely) may be slightly deformed, so turn There is absolutely no need for any pulleys after removing the belt, but if you still twist them a little, then carefully return them to their place.
Installation: 1. When you install the new belt, clean all the pulleys and tension roller from dirt and after cleaning, degrease them with white spirit, or just go over them with white spirit right away and that’s it, and by the way, when installing the generator pulley, make sure that The pulley groove (Indicated by the red arrow) falls on the crankshaft pulley boss (Indicated by the blue arrow), otherwise you will not install the generator pulley.
2. After all the operations performed and most importantly after installing the new belt, adjust it, it is adjusted by the tension roller, namely, take a special key or a circlip puller (the puller is used in the photographs) and use it to clamp the outer disk of the tension roller (There are grooves will be, it will be necessary to insert a key or a puller into these grooves) and after which the roller is rotated counterclockwise (see photo 1), until the cutout on the outer disk with a rectangular protrusion on the inner sleeve of the tension roller coincides (see. photo 2), after matching with a wrench, the roller mounting bolt is tightened with a torque of 33.2-41.2 (3.40-4.20) and the operation of the roller and the belt tension are checked, the operation of the roller is checked as follows, you will need to start the car and if you hear noise from the tension roller, there is a possibility the fact that the roller (namely its bearing) has failed, if this is the case for you, then remove the roller from its place and check the operation of its bearing with your hands, to do this, turn the roller bearing and if it sticks, it has axial play will be present or traces of lubricant leakage from the bearing will be noticeable, then in this case replace the tension roller with a new one, it is replaced with the belt removed, just when removing the timing belt, you will not need to loosen the roller mounting bolt, but completely unscrew it and remove the tension roller from car (see photo 3), when installing a new roller, make sure that the roller disk with markings (see photo 4) is directed not inward, but outward.
Additional video: You can see in more detail how to replace the tension roller on a car in the video below:
Checking the condition of the belt
The inspection regulations for this unit require an inspection in a cold engine state. Remove the outer protective casing to allow visual contact with the surface of the gas distribution unit parts. Having gained access directly to the timing belt, rotating its drive, inspect both sides of the consumable in detail for the presence of any kind of defects (wear, broken teeth, protruding cord, rubber delamination, etc.). Tensioner rollers are subject to careful inspection; in the presence of mechanical damage and large play, they contribute to increased wear of the consumables. The presence of oil stains on the surface of a rubber technical part, which contribute to the destruction of its structure, is not allowed. If found, immediately remove from surface.
- https://m.etlib.ru/report/1812-zamena-grm-priora-16-klapanov
- https://autogrm.ru/vaz/grm-priora.html
- https://priorik.ru/lajfhak-reglament-zameny-remnya-grm-avtomobilya-priora-na-16-klapanov/
How to choose a belt for Priora?
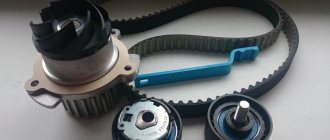
In order for the gas distribution mechanism to work reliably on the 16-valve Lada Priora 21126 engine with or without air conditioning, you must choose the right product. You can purchase a factory version; according to owners’ reviews, it is considered the best for VAZ cars. Below we will analyze the types of timing belts by size, markings and prices.
Timing belt size for Priora
For Lada Priora cars, the length and overall size of the strap depends on the number of teeth installed on it. You can accurately determine which timing belt is installed in your car by identifying the engine modification and reading the user's service manual. Or you can remove the old belt and measure its size to purchase a new one.
Straps that can be used in Prioras:
- with 111 teeth, the width of such products is 19 mm, installed on Prior engines from VAZ 2108;
- with 137 teeth, the width of such straps is 22 mm, they are mounted on engines 21126 and have article number 137-22 HNBR.
Company and prices
The brand of the company plays an important role. When deciding which timing belt for Priora 16 cl. It’s better to choose, most consumers prefer the originals.
Below is a list of timing belts for the VAZ Priora with their cost:
- The original strap is produced by AvtoVAZ, its average cost is about 1800 rubles.
- The product is from the manufacturer Gates, the cost varies around 1,500 rubles. If you want to buy a complete repair kit, it will cost the buyer approximately 3,500 rubles.
- Daiko, the cost of such a product is about 1,400 rubles.
- On average, a Kontitek belt will cost the buyer one thousand rubles.
- Products from the manufacturer Bosch have proven themselves to be positive. Their cost on average is about 1200 rubles.
- One of the most budget options is the Lynx strap; it will cost the buyer approximately 700 rubles.
The “techno-056” channel provided a video that describes all the differences between original Gates timing belts and fakes.
About engines
The car was produced from 2007 to 2022, it replaced the VAZ 2110. The first Priors were equipped with engines from the previous model with some modifications, they had an index of 21116. There were 8 valves in the cylinder head, the timing drive was with a toothed belt. Experts note that this engine has good environmental performance, reduced operating noise, and increased power. The engine is of in-line type, the power system uses an injector. As a disadvantage, a decrease in the engine life compared to the indicators declared by the manufacturer was noted.
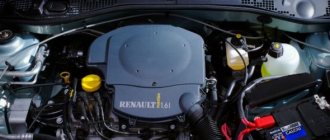
Engine 21126
After further modernization of the engine, version 21126 appeared, which is based on the previous cylinder block from the VAZ 21083, it received a twin-shaft cylinder head. The new Priora power unit with 16 valves has become a little more complex, but has received an increase in power and has become even more economical. The valve mechanism of this engine received a modified drive design; it was still belt driven. The length of the drive has become longer, so an automatic toothed belt tensioning system has been introduced. Somewhat later, the car was equipped with engines such as VAZ 21127, VAZ 21128, which were a modernized version of the VAZ 21126.
Are the valves bending?
Gasoline internal combustion engines of modern cars run on high-quality gasoline with an octane rating of 95 and higher. These types of fuel require a high compression ratio at the end of the piston stroke. Designers achieve this by reducing the combustion chamber in the cylinder head. This feature of the engine design carries the risk of damage to the valves, in some cases, pistons, and connecting rods in the engine. This can happen when the belt breaks or its teeth are cut off.
VAZ 21083 engines did not have such a problem since recesses for the valve heads were cast in the pistons. Therefore, their meeting with the pistons was not dangerous. On the engines of the new series, this was abandoned in order to increase efficiency, power, and other engine indicators. The designers believe that if the timing mechanism drive parts on the Priora are replaced in a timely manner, there will be no such problems. Every owner of a 16-valve Priora must remember that when the timing belt breaks, the valves are damaged. To the question of whether the valves on the 16 valve Priora are bent, the answer will only be in the affirmative, yes.
When to change: consequences of untimely change
It is recommended to replace the timing belt on a Priora after different periods of time. The manufacturer claims that it can withstand one hundred thousand mileage, but experience shows that a change may be needed much earlier.
The optimal period is every fifty thousand kilometers. Some argue that over such a short service life, rubber is simply not capable of failure. However, no one takes into account the conditions - roads, fuel quality, etc.
Also, during the operation of the mechanisms, it wears out, the rubber stretches, and therefore does not provide the correct tension of the timing belt, and slippage is possible. The teeth can wear off - because of this, traction with the gears is not ensured.
There is no exact time for a change that would suit all motorists. Some take good care of their vehicles, drive carefully, and use only high-quality fuel. Others use a more extreme type of driving, foreign liquids get on the rubber, etc.
In order not to lose your car during the repair period and not to spend a fortune on restoring the mechanics, write down or remember the date of the last timing belt change on the Priora. Next, regularly check the condition of the rubber; if worn, replace it with a new device.
Signs of possible failure
There are several characteristic signs that should alert the driver:
- When the engine is turned on, extraneous noise occurs. Sometimes drivers confuse a timing belt malfunction with a poorly functioning tension pulley.
- If the color of the exhaust gas has changed.
- The engine doesn't start well.
- An unusual vibration is felt.
Pay attention to these “symptoms”, even if the Priora’s mileage with a new timing belt has not yet reached 50 thousand km
It may fail earlier if foreign liquid gets onto the drive - oil, coolant, as well as dust or dirt.
It’s worse if it’s the coolant that gets onto the drive. Firstly, this means that the gasket that ensures the pump is sealed has failed, or there is a problem with the pump. Then the rubber is damaged and service life is reduced tenfold.
Even if the belt is new, but coolant or antifreeze gets on it, it will fail even after operating for 10 thousand miles. You will have to replace the Priora timing belt and figure out why foreign substances get on it.
How to check the serviceability of the belt yourself
If you suspect that it is time to replace the Priora timing belt, it would not hurt to check the serviceability of this rubber product. Visual diagnostics will allow you to check the serviceability and absence of scuffs on the Priora timing belt.
You should have a choice of one of the tools at hand, or two at once - a 5-point hex key, or a T-30 sprocket bit. If one doesn't work, try the second.
- Open and lift the hood.
- You will see the front panel covering the mechanism and timing belt.
- Take the key and unscrew the five bolts that hold the front panel, remove it.
- In front of you you will see a mechanism, including a tension roller.
- Place a jack on the passenger side and place the wheel in a suspended position. Engage fifth gear while it is working, look at the surface of the belt for damage, even small defects.
- If you notice cracks of any size, mechanical cuts, or threads sticking out, be sure to replace it by contacting a specialist or yourself.
- Check the pump. If any traces of coolant leakage from the pump are noticeable, then the rubber will also have to be changed, even if there is no mechanical damage.
- Check the tension roller. Auto mechanics advise changing it less often than tires. The average lifespan is approximately one hundred thousand kilometers. Change it every other time you change the belt.
- Measure the belt tension. To do this, press on the stretched rubber in the area between the gears of the two camshafts. You need to press with a force of about ten kilograms. Correct tension of the timing belt should not bend more than seven millimeters.
- Check that the rubber is not too loose. Make sure that the Priora timing marks match the original condition. The first, similar to a recess, is located on the outer race of the tension roller. The next one is located at the base of the roller. The maximum deviation is four millimeters; if the tension does not meet the standards, the product will have to be changed.
Found a discrepancy with the standards? Change the product. A belt set with rollers for the Priora 126 engine costs only five thousand rubles. This is a much smaller amount than the cost of a major repair if a component ruptures.
Signs of the need for internal combustion engine repair
The reasons why the operation of the engine is disrupted are arranged in a small list, starting with refusal to start and ending with floating idle speed (this problem was removed on the 127 “engine”). Not all breakdowns end in capital damage - sometimes it’s enough to add oil, sometimes it’s enough to adjust the ECU settings.
Compression reduction
A decrease in cylinder compression below 16 atmospheres is a bad sign. Such a high limit corresponds to a compression ratio of 11.
Knocks in the engine
Engine knocks can come from several points. These could be hydraulic compressors, timing belt rollers or pins. The knocking noise could also be caused by low oil level. The answer to the question will be given by a thorough detailed inspection of all parts of the unit and checking the oil level.
Blue smoke from the exhaust pipe
The blue smoke that comes from the exhaust pipe appears when oil enters the combustion chamber. It can leak either from the valves or from under the piston. The result is the same: the oil is eaten up and blue smoke pours out of the chimney. Once the leak is located, half the problem will already be solved.
Troit motor
Sometimes in the cold the engine may stall - don’t be alarmed by this, because it may simply be one of the spark plugs that fails. In this case, we advise you to simply restart the engine and it will stop running.
How much does it cost to overhaul a Priora engine - average price
Self-repair of a Priora engine with 16 valves costs an average of 16-20 thousand rubles. The cost depends on the severity of the breakdown and may be lower or higher than this average range. Repairing a Priora engine can be entrusted to the wrong hands, but then you will have to pay for the work - sometimes the cost of repairs reaches as much as 40 thousand rubles.
This is an unreasonably inflated figure, because, as practice shows, you can rebuild the engine on a Priora, working at a moderate pace, in just three days - and three days of work is definitely not worth that kind of money. Don’t be afraid of not being able to cope - your Lada is easy to repair, and using the advice and “tutorials”, you will conquer even such a task that is impossible at first glance.
Replacing the timing belt. VAZ, Priora
It is recommended to install a new timing belt if even small defects are detected, since a broken belt greatly increases the time and financial costs of repairing an internal combustion engine. In order to replace the belt, you must have the following tool:
— wrench 17 mm (socket)
— wrench 15 mm (open-end)
— key TORX.T30
- crosshead screwdriver
- key for rotating the roller (tensioner)
- a small pry bar or a large, durable screwdriver
Before you begin installing a new belt, you need to degrease all surfaces that come into contact with the belt. It is recommended to always replace the tension bearing together with the belt (as a rule, they can be purchased as a set).
Follow these steps:
Remove the negative cable from the battery by loosening the nut on the terminal. Remove the canister sensor and engine cover.
Unscrew the timing belt cover.
The two upper bolts are unscrewed with a TORX T30 wrench.
Using a 17 mm wrench, unscrew the tension roller bolt that tensions the drive belt.
Move the drive belt to the side.
Unscrew the 2 bolts of the lower part of the timing belt cover and remove it.
Using a 17 mm wrench, rotate the crankshaft and set the marks on the camshafts.
In order to unscrew the crankshaft pulley, you can use a pneumatic gun or get help. The assistant, while in the cabin, must engage 5th gear, press the brake and hold it. Next, you need to unscrew the crankshaft pulley using a lever.
Remove the pressure washer behind the crankshaft pulley.
It is necessary to set the marks on the crankshaft and then check the marks on the camshafts.
Using a 15 mm wrench, loosen the tension roller bolt and unscrew it.
Remove the timing belt.
Using a 15 mm wrench, unscrew the idler roller.
Install a new idler roller.
First, place the new belt on the crankshaft sprocket.
Then insert the belt through the idler pulley onto the camshaft.
Next, place the belt on the second camshaft. Make sure the marks are in place.
We put the belt on the pump and install a new tension roller.
Using the wrench to rotate the roller, cock the tensioner until the mark matches.
Having fixed this position, tighten the bolt.
Be sure to make sure that the labels on all elements match.
We put the pressure washer and crankshaft pulley in place. Tighten the nut with a pneumatic gun. Reassemble all other parts in the reverse order of disassembly.
Why are tags needed?
The gas distribution mechanism of the power unit 126 from the Lada Priora, as already mentioned, must work in a certain order. If this order is violated, starting problems begin, or the motor completely fails. Often the cause of engine failure is incorrectly positioned marks after changing the timing belt. Such mistakes are made by novice car enthusiasts and mechanics who have just graduated from college.
The manufacturer has created the necessary phases on the sixteen-valve 126 engine so that the valves open and close alternately. These actions are carried out through the movement of the cams of the switchgear. The phases must not be disrupted under any circumstances.
Attention! The belt must be replaced before it breaks and destroys the engine. Changing this part is done only by experienced mechanics and not by beginners “on the knee” in a garage environment.
A broken belt leads to sharp contact of the valves with the pistons, because there is a mismatch in the angular location of the crankshaft and camshafts. As a rule, the car is brought for major repairs to the service center on a tow truck in case of a broken belt.
Experienced mechanics carry out checking and adjusting the belt on a cold engine. And the timing drive notches can be found in the following places on the 16-valve Lada Priora engine:
The following tools are used to straighten notches:
To start changing the belt, you will need to read the instructions for the 126 engine and see where the marks are so as not to forget any.