For attaching windshield wiper blades
Currently, various types of fastenings are used.
This is usually due to the desire of manufacturers to make extra money on spare parts, although some mounting options are significantly smaller than others, which improves the aerodynamic resistance of the brushes and improves appearance. Until 1999, most automakers produced cars with standard windshield wiper mounts - a “hook”
. This type of fastening is currently the most common. In 1999, Ford equipped its Taurus with a new mount, and then almost all automakers began equipping their cars with various “tricky” mounts. Until recently, Japanese manufacturers refrained from such steps, although the first cases have already occurred - for example, Nissan Quashqai, Honda Civic and Mazda 3.
Car windshield wipers, commonly referred to as “windshield wipers,” are one of the consumable parts of all cars. They serve to remove water and dirt from the surface of the windshield, and sometimes also the rear window, that interfere with visibility. Since blades from different cars are not fundamentally different from each other, replacing windshield wipers is done the same way for all cars. Let's look at how to change them with your own hands.
Replacement
The process of replacing old windshield wiper blades with new ones does not cause serious problems
It is only important to carry out all actions carefully, not to break the plastic fastener included in the kit. The replacement process includes the following steps:
lift the wiper up, it is fixed in this position - perpendicular to the windshield;
Next, you need to take the brush body in your hand and squeeze it, then move it down - slight swaying will simplify the procedure;
then the brush is simply removed from the lever.
The installation process is performed in reverse. Many brush models are supplied with special adapters.
They must be used carefully. Plastic is usually fragile
If it is damaged, it will be impossible to install the brush in place. What will lead to the impossibility of using it?
When choosing a brush, it is important to focus on the brand. To date, Bosch, Champion and Denso have proven themselves well.
It is important to replace brushes in a timely manner, since road safety directly depends on this. Otherwise, precipitation falling on the windshield simply will not be removed in time
If the rear wiper of the Lada Kalina 2 does not clean well (the reason is the leash, not the brush)
07 April 2022 LadaOnline 39 286 Hatchback and station wagon cars are considered more practical, but sometimes they can have their own specific disadvantages. For example, on the new Kalina, the rear wiper does not press as hard as on the first generation models, which is why the wiper blade does not clean the rear window well, leaving uncleaned areas. Let's look at several ways to solve this problem.
Installation of wiper arms from Lada Kalina 1
The difference between the rear wiper arms is the length of the spring. On the new Kalina, the spring is short and is not able to press the blade firmly enough against the rear window. The design allows you to install on Kalina 2 a wiper arm from Kalina 1, catalog numbers:
- Rear windshield wiper arm Kalina station wagon - 1117-6313150;
- Rear wiper arm Kalina hatchback - 1119-6313150.
To change the leashes, first remove the old one by unscrewing the nut, and then install the new one, that’s it!
Modernization of wiper arms for Lada Kalina 2
It is not always possible to buy a wiper arm for the first Kalina; in this case, the design can be modified. It is necessary to remove the leash and tension spring. Then drill a new hole in the metal bar of the lever closer to the brush. We install the spring using a screwdriver, clinging it to the new hole. Now the tension will be stronger, which will allow the rear wiper to clean the glass better.
Result on video:
By the way, another way to solve the problem of poor cleaning of the rear window is to install a frameless wiper. Let us remind you that the front wiper blades can be installed in larger sizes.
Photo: logbook iosif-waitberg and c0de
Keywords: Lada Kalina windshield wipers | Lada Kalina accessories
1 0
Found an error? Select it and press Ctrl+Enter..
Similar materials
- What size of wipers (windshield wipers) is better to choose for Lada Priora
- Removing the rear light and replacing lamps Lada Kalina 2
- What size to choose for Lada Granta, Kalina 2 wipers
xn--80aal0a.xn--80asehdb
What to look for when choosing?
It is no secret that the level of visibility to the rear depends on the efficiency of the brush, which is especially important when maneuvering in cramped conditions and in bad weather. When choosing, you should lean toward high-quality branded products that will not subsequently emit an annoying squeak when rubbing against the glass and do not have to think about how to remove and replace the wiper. You should also inspect the integrity of the working element of the brush, which initially should not have cracks or breaks. An important role is played by the force with which the rear wiper is pressed to the surface of the glass, as well as the material from which the product is made.
The wipers stopped working: the most common reasons
Over time, every car owner is faced with the fact that the wipers suddenly stop functioning. Problems that arise reveal themselves either by a complete stop or by the appearance of extraneous sounds during operation (for example, creaking).
The mechanical part of the windshield wiper is usually very reliable. Therefore, usually wipers may not work for the following reasons:
- Excessive wear and tear on moving parts of the system or lack of lubrication in required areas. In order for the windshield wiper mechanism to work properly and not fail for unknown reasons, inspection and maintenance are required, albeit not too often.
- Improper use of wipers. As an example, in the winter season, before turning them on, you need to unfasten them from the glass (ideally, melt the ice on them). Failure to do this may result in fuse, motor, or drive rod failure during startup.
As a rule, the cause of windshield wiper failure is often a malfunction of the electrical part of the device:
- The hum of the motor is not heard, the wipers do not work (they do not move in any of the operating modes). In this case, the cause may be a malfunction of the following elements: wiring, connectors, switches or gear motor.
- The wipers work, but very slowly. Most likely, the reason is also in the gear motor. The drive mechanisms may have become oxidized and rusted. Usually they need to be cleaned and lubricated or checked for correct assembly of the mechanism.
- When the intermittent mode is on, the windshield wipers operate continuously. The reason is most likely a broken relay, which will have to be replaced since it is not repairable. If the wipers are working and the sound of the motor is heard, you can also diagnose a malfunction of the breaker relay.
- You can hear the engine running, but the wipers don't move. In this case, the reason is most likely a break in the rod or contact elements.
- The windshield wiper arm does not work. The cause of the malfunction may be oxidation or damage to the contact elements of the traction rod.
- The windshield wipers do not work correctly - they do not move to their original positions. The cause of the breakdown in this case may be improper installation, problems in the contact group of the gear motor, wear or shearing of the splines on the brush drives.
- The wipers do not work when the washer fluid is applied to the windows. The cause may be a broken steering column switch or defective wiring and electrical connections.
Reasons for mechanical windshield wiper failure include:
- Self-unscrewing (full or partial) of the nut connecting the crank to the gear axle. Such a defect is easy to determine when the wipers are on, since the gear motor is working, but the brushes do not move.
- The nut securing the wiper arm is loose or its thread has been stripped. The reason may be incorrect installation of the leash in the initial position. Avoiding this is quite simple - you need to tighten the nuts with the required torque, and before final tightening you need to put the windshield wipers in the desired position.
- The wipers do not clean the glass due to a poor fit. The simplest reason is wear of the brushes themselves. The brushes simply need to be replaced. The second most common reason is poor adherence of the brushes to the glass due to mechanical interference. An option to eliminate it is to clean the wiper of foreign objects that interfere with normal pressure. But if none are found, then it is necessary to inspect the wiper mechanism, disassemble it, find and replace parts with a lot of wear.
From the above it follows that the reason that the wipers do not work can be either a malfunction of the electric motor or wiring, or a failure of the mechanical component of the vehicle unit in question. The trapezoid, the mechanism for driving and moving the wipers, is very often prone to breakdowns. Read further in the article for what to do when your windshield wiper breaks or does not work.
Possible malfunctions and how to eliminate them?
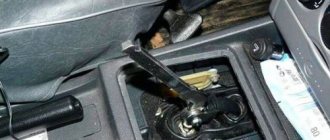
Intermittent operation of the rear wiper mechanism is a very common situation faced by owners of the Lada Kalina station wagon. The solution is simple - you need to replace the fuse. It is located in the mounting block, which in turn is located under the panel to the left of the steering column. Sometimes a replacement requires a relay, which can be found in the same mounting module.
When the rear windshield wiper completely refuses to function after activating the button, then diagnostics of the electric drive of the LADA Kalina station wagon will be needed. The wiring goes to the electric motor itself. Here you need to make sure that the contact at the ground terminal is reliable. In most cases, the problem is eliminated by simply cleaning the contacts from oxides. If such manipulations do not give the desired result, disassembling the mechanism and probably replacing the motor will be required. Sometimes the culprit for the lack of purifier functionality is the steering column switch.
Lada Kalina dashboard diagram
1,2,3,4 — blocks of the instrument panel wiring harness to the blocks of the rear wiring harness;
5,6 — blocks of the instrument panel wiring harness to the blocks of the front wiring harness; 7 — block of the instrument panel wiring harness to the block of the wiring harness 8 — block of the instrument panel wiring harness to the block of the front wiring harness; 9 — lighting control module; 10 — ignition switch; 11 — on-board computer mode switch; 12 — windshield wiper switch; 13 — sound signal switch; 14 — light signaling switch; 15 — instrument cluster; 16 — evaporator temperature sensor; 17 — interior air temperature sensor; 18 — air conditioner switch; 19 — controller of the automatic climate control system; 20 — heater damper gearmotor; 21 — rear window heating switch; 22 — alarm switch; 23 — brake signal switch; 24 — cigarette lighter; 25 — electric amplifier control unit; 26,27 — blocks of the instrument panel wiring harness to the radio; 28 — backlight lamp for the heater control panel; 29 — illuminator; 30 — mounting block: 31 — heater electric motor switch; 32 — heater electric motor; 33 — additional resistance of the heater electric motor; 34 — lampshade lighting of the glove box; 35 — glove box lighting switch; 36 — control unit of the APS-6 automobile anti-theft system; 37 — driver airbag module; 38 — passenger airbag module; 39.40 — blocks of the instrument panel wiring harness to the blocks of the ignition system wiring harness. KZ - additional starter relay; K4 - additional relay; K5 - relay-interrupter for direction indicators and hazard warning lights; K6 - windshield wiper relay; K7 - headlight high beam relay; K8 - sound signal relay; K9 - relay for turning on fog lights; K10 — relay for turning on the heated rear window; K11 — electric seat heating relay; K12 - air conditioning compressor clutch activation relay;
Instrument panel wiring harness - 11186-3724030-20.
When is it necessary to replace windshield wipers in Kalina?
Over time, owners of practical Lada Kalinas notice the appearance of brush marks on the surface of the windshield. Such “artifacts” create an obstacle to good visibility. In this situation, the indicated components will need to be replaced, and the trapezoid will likely need to be replaced
Many experienced owners advise purchasing frameless brushes, which, in their opinion, are able to “bravely” withstand temperature changes and can demonstrate a relatively longer service life of approximately 1.5 million cycles
Before replacing, you should understand the required size of the products. For Lada Kalina, you should purchase a driver's side brush with a length of 600 mm, and for the glass area opposite the passenger - 400 mm. For stern glass, the brush has a standard parameter of 360 mm. This wiper needs to be replaced much less frequently, since the intensity of its work is significantly lower compared to the front components.
What are the causes of breakdowns?
The most likely factor causing the wipers to stop is the blown working element in the fuse. Eliminating this malfunction involves performing the simplest action - replacing the fuse link. It is located in the corresponding mounting block, located on the left side of the steering column. It will be useful to stock up on a fuse diagram, which will help you easily find the insert we need.
When the purifiers stopped functioning intermittently, the control relay most likely became unusable. This component is also located in the previously designated block. When a relay fails, it is replaced with a new analogue. However, we note that according to numerous reviews from owners of domestic small cars, certain statistics have been formed indicating the small number of cases of breakdowns of this kind.
The most common cause is the destruction of bushings. They are made of plastic, so they do not boast a long service life, which reaches a maximum of three years. The process of destruction of elements is primarily influenced by the quality indicator of the material. Here, the only effective measure is replacement, and to carry it out you should acquire a repair kit, which is available at a specialized retailer. In this case, the trapezoid is replaced.
If the owner of a Lada Kalina discovers that the wiper drive is not working, this indicates that the unit’s motor has failed. In order to verify this fact, you will need to make sure that voltage is supplied to the motor contacts from the on-board network. This procedure is easily performed using a regular tester. If there is power, then we definitely change the motor.
How to remove the windshield wiper
First of all, we need to lift up the protective metal cap, under which there is a fastening nut.
After that, take a 10mm wrench and use it to unscrew the nut. Please note that there is a small washer under it to prevent it from being dropped. Moving the wiper a little, we pull it towards ourselves and it can be removed without much difficulty.
Advantages and weaknesses of wipers
Each type of brush has certain advantages, and at the same time, both product options are not without disadvantages. Frameless versions have great durability, because for their production manufacturers use high-quality rubber and weather-resistant plastic. Over time, although the rear brush wears out, this process is not intensive.
In operation, frameless brushes for the Lada Kalina station wagon do not emit unpleasant squeaks and do not greatly rub the surface of the rear window. Also, the products adequately withstand the onslaught of temperature changes.
Now the disadvantages. There is only one point here - it is overpriced.
In addition to the metal base, frame brushes have plastic structural components that are integrated into the frame itself. Cleaners are low-cost and widely distributed in the retail chain.
Among the disadvantages of frame options, one can highlight their small resource. After a couple of years of use, the working elements of such a brush become unusable and require inevitable replacement. A constant companion to the work of the wiper is an annoying squeak.
How to choose wipers?
When buying wipers, you need to not only consider the size of the wipers, but also decide what type you want to use. The market today offers consumers two types of devices.
Frame
According to experts, the use of frame options is more relevant if the windshield is strongly curved outward. The frame option is, in principle, less reliable, but its price is lower. According to experts, due to their design, frame devices will be able to clean the glass as much as possible. Frame-type devices are made of metal with plastic inserts; their service life is shorter, since the clamps and fasteners wear out quickly. Moreover, in severe frost the structure wears out even faster.
Frameless wiper Gabarit
Frameless
The use of frameless options is more relevant if the windshield is flatter. In the production of such brushes, plastic and rubber are used; the devices themselves have an arched shape. One of the main advantages of such wipers is resistance to frost, as well as relative noiselessness during operation. In addition, their service life is much longer, and if replacement is necessary, it is much easier to carry out.
It is necessary to take into account that frameless wipers fit more tightly to the glass, therefore, during operation there is a possibility of damage to it. Signs of abrasion, as well as defects and scratches may appear after several years. Before purchasing, it is advisable to make sure that the use of these brushes will not harm the car.
Possible causes of the malfunction and ways to eliminate them:
When the windshield wiper is on, the electric drive does not work:
Fuse blown:
- remove the cover located to the left of the driver, under the steering column, under it there is a mounting block;
- on the cover of the mounting block there is a diagram of the location of the relays and fuses of the car, we find the required fuse and change it if necessary;
Relay fault:
If the wipers on the Lada Kalina do not work intermittently, you need to change the relay located in the mounting block, next to the fuses.
Wiper motor malfunction:
- we check the ground terminal of the electric motor, screwed to the car body next to the rack;
- we clean it and the attachment point;
- install in place;
VAZ 1117 If this does not have a result, disconnect the connector for the electric drive of the windshield wiper, located under the windshield frame.
Using a tester or any other continuity test, we check whether power is coming to the connector. If power comes in, then it is necessary to change the wiper motor.
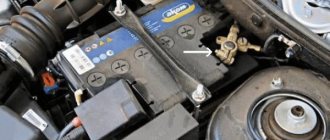
Disconnect the terminals from the battery. Remove the decorative caps from the leashes. Unscrew the nuts securing the leads and remove them. Remove the plastic grille under the windshield frame by unscrewing the bolts that secure it. Having unscrewed the trapezoid fastening (two bolts and one nut), remove the electric motor from the box and disconnect it from the trapezoid. We install a new one, repeating the procedure in reverse order.
If power does not come to the connector, the steering column switch must be replaced. Disconnect the battery terminals. Remove the plastic steering column cover. Disconnect the switch block and, pressing the latches on both sides, remove the steering column wiper switch. Install a new one by repeating the process in reverse order. Assembling the casing.
When turned on, the wipers on Kalina do not work, but the electric drive rotates
It is necessary to check the condition of the gearbox and wiper trapezoid.
Unscrew the plastic grill under the windshield frame. First remove the wiper arms and unscrew the nuts that secure them. We check whether the gearbox axis of the electric windshield wiper drive rotates.
If the axis rotates and the trapezoid is stationary, check the splined connection of the gearbox and trapezoid, and if necessary, tighten the fastening nut. If the connection is severely worn, it is necessary to replace this unit.
If your windshield wipers on your Lada Kalina do not work, this is not a reason to despair. As a rule, the cause is a minor malfunction. Such as a blown fuse or a loose nut on the spline connection between the gearbox and the windshield wiper drive, which can simply be tightened.
The windshield wiper electric drive system is quite reliable and does not require special maintenance. It is enough to follow basic operating rules. If during the winter period the wipers are frozen to the windshield, then before turning on the windshield wiper, it is necessary to free them from ice. And they will serve you without causing any problems.
Removing the windshield wiper mechanism completely is quite an easy job, for this we need 10 by 13 heads, a ratchet, a knob, a 10 and 13 ring spanner, you can also use an open-end wrench.
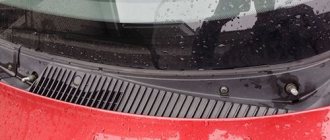
First of all, you need to get down to work on removing the wiper arms and plastic linings; detailed information on removing the plastic linings can be read here: Replacing the cabin filter on a Lada Kalina.
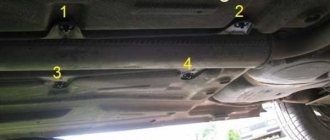
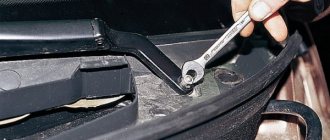
If you have sorted out the removal of the plastic covers, we proceed to the process of unscrewing the trapezoid mounting bolts. First, unscrew it on the left, as shown in the picture.
Then in the center.
After this, unscrew the nut on the right side; for this it is better to arm yourself with an open-end wrench.
Now there is nothing holding the trapeze, you need to slightly tilt it forward.
We take it out of the seat.
The final step when removing is to disconnect the power plug of the motor. To do this, you just need to bend the plug lock and remove the plug. First you need to disconnect it from the body; the plug is attached to a clip.
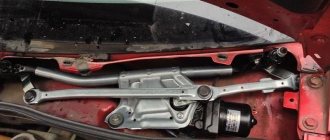
Removing and installing the windshield wiper motor on Lada Kalina
The motor is connected to the trapezoid by 3 bolts and one nut. So we unscrew the 3 bolts using a 10mm socket.
After this, unscrew the nut securing the trapezoid and the motor shaft.
You can remove the motor, since there are no more fasteners.
If there is a need, we replace the trapezoid or motor and assemble it in the reverse order.
Video “How to replace a trapezoid and a motor with your own hands?”
The procedure for replacing these devices of the windshield wiper system on Kalina is given below (author - channel In Sandro's garage).
Parts and consumables:
- Windshield wiper blades
- Rags
- Brush detergent
Note:
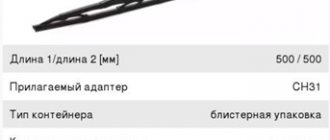
The brushes have different lengths. The length of the left (driver's) windshield wiper blade is 600 mm, the length of the right blade is 410 mm.
When do you need to change wipers?
Warning:
Be careful when removing the brushes: the lever under the action of the spring may suddenly drop onto the glass and break it.
1. If the brushes are dirty, they must be cleaned with a rag moistened with water or a special product. If they are sufficiently dirty or when they are covered with ice, they should be removed and cleaned. If the wear of the brushes is already clearly visible, as well as if they are damaged, they must be replaced with new ones. To do this, move the lever with the brush away from the windshield.
2. Press the brush locking tab and move the brush down from the lever hook so that the brush lock comes out of the hook.
3. Remove the brush from the lever.
4. If you need to replace the brush retainer, move it from the brush axis and remove it.
5. Similarly, remove the other windshield wiper blade.
6. Install the brushes in reverse order.
The article is missing:
Photos of parts and consumables
Do-it-yourself troubleshooting
To do this, you need to remove the trapezoid, which is located under the plastic decorative trim under the windshield. Windshield wiper repairs are carried out in the following order:
- unscrew and remove the windshield wiper blades along with the leads;
- unscrew and remove the plastic cover, for which you will need a TORX T20, or “star”;
- unscrew the trapezoid, which is attached to the car body with a nut and two bolts;
- disconnect the windshield wiper drive from the battery;
- remove the trapeze together with the drive.
If you do not remove the trapezoid, then when installing the bushings you can bend the hinges, which will lead to improper operation of the wipers. Therefore, it is better to remove the entire trapezoid and replace it not with weight, but with emphasis.
The destroyed bushing is immediately visible. It can be simply removed using wire cutters. To insert a new one, it and the locking ring must be steamed in hot water, otherwise it will not be possible to put it all on the hinge. Before putting on the locking ring, the bushing should be treated with lubricant (for example, lithol). All disassembly and assembly work takes a maximum of 40 minutes.
But if the central bushing “flies”, then most likely the entire windshield wiper mechanism will have to be replaced. Replacing a windshield wiper trapezoid is an even simpler task than the process of removing and installing new bushings. All work is carried out according to the algorithm described above.
Naturally, a complete replacement of the windshield wiper trapezoid will cost more than repairing the windshield wiper. But it will be more reliable. New ones are almost guaranteed to last longer than refurbished ones. Although some Lada owners claim that a rebuilt and repaired Kalina wiper trapezoid can easily last two years. Well, you should always base it on whether you are willing to spend time or money.
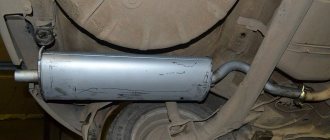
Removal and installation of gearbox Lada Kalina 1117 2004 - 2013
Tools:
- Open-end wrench 8 mm
- Open-end wrench 10 mm
- Open-end wrench 17 mm
- Open-end wrench 19 mm
- Straight box spanner 13 mm
- Straight box spanner 19 mm
- Driver for socket attachment
- Knob attachment 10 mm
- Knob attachment 13 mm
- Knob attachment 15 mm
- Knob attachment 17 mm
- Knob attachment 19 mm
- Knob attachment E-14
- Extension for socket bits
- Adjustable stops 2 pcs.
- Medium Phillips screwdriver
- Medium flat screwdriver
Parts and consumables:
- Wooden blocks 2 pcs.
- CV joint grease-4
- Studs M12x1.25 mm 2 pcs.
- Transmission oil
- Rags
- 3.5 liter capacity
- Funnel with hose attached
Note:
We carry out the work with an assistant on an inspection ditch or overpass.
1. Drain the oil from the gearbox as described here. Disconnect the wire terminal from the negative terminal of the battery. Remove the air filter as described here. Remove the starter as described here. We remove the clutch cable lead from the groove of the clutch release fork lever, following the instructions described here. Remove the left mudguard of the power unit, as described here. Disconnect the wire block from the reverse gear lock solenoid.
2. Disconnect the wiring block from the reverse light switch.
3. Disconnect the wire block from the speed sensor.
4. Using a 10mm wrench, unscrew the three bolts securing the lower clutch housing cover.
5. Remove the clutch housing cover.
6. Remove the right and left front wheel drives, as described here. Using a 13mm spanner, loosen the tightening of the nut of the coupling bolt of the clamp securing the control rod to the shank of the gear selector rod hinge. Then disconnect the transmission control rod.
7. Using a 19mm wrench, unscrew the nuts of the two bolts securing the clutch housing to the gearbox housing (which also secure the torque rod bracket), holding the bolts from turning with a head of the same size.
8. We remove the reaction rod with the bracket from the gearbox.
9. Disconnect the plastic throttle cable holder from the gearbox bracket.
10. Using a 13mm socket, unscrew the bolt securing the ignition coil bracket to the clutch housing.
11. Using a 19mm socket, unscrew the two upper bolts securing the gearbox to the cylinder block, which simultaneously secure the bracket with the holders of the throttle cable and wiring harness. The front bolt (in the direction of vehicle travel) is shorter than the rear bolt. We remove the bracket with the cable and wiring harness from the gearbox.
12. Remove the left front suspension brace as described here. We install adjustable stops through wooden blocks under the engine oil pan and gearbox housing.
13. Using a 19mm spanner, unscrew the nut of the lower rear mounting of the gearbox to the cylinder block.
14. Using a 19mm socket, unscrew the bolt of the lower front fastening of the gearbox to the cylinder block.
15. Using the “E-14” head, unscrew the two screws securing the front left support bracket of the power unit to the support.
16. Using a 15mm socket, unscrew the three nuts securing the bracket for the front left support of the power unit to the gearbox.
17. Remove the bracket.
18. Using a 19mm socket, unscrew the two outer bolts 1 securing the rear support bracket of the power unit to the gearbox, and using a 17mm socket, unscrew the middle bolt 2.
19. We move the gearbox away from the engine, removing the input shaft from the hub of the driven clutch disc.
20. When removing and installing the gearbox, do not rest the gearbox input shaft on the clutch diaphragm spring petals so as not to damage them. Before installing the gearbox, apply a thin layer of CV joint-4 lubricant to the splined end of the input shaft. To facilitate the operation of installing the gearbox, we screw two guide pins M12x1.25 mm (with sawn slots for a screwdriver) into the front lower threaded hole of the cylinder block and into the rear upper hole.
21. We insert the input shaft of the gearbox into the splines of the driven clutch disk and, orienting the gearbox so that the two guide pins fit into the corresponding holes in the clutch housing, and the standard pin of the clutch housing into the hole in the cylinder block, push the gearbox all the way into the engine cylinder block . Use a screwdriver to unscrew the guide pins from the holes in the cylinder block. We carry out further assembly operations in reverse order.
22. Fill the gearbox with oil as described here.
The article is missing:
- Photo of the instrument
- Photos of parts and consumables
- High-quality photos of repairs