Throwing out antifreeze from the expansion tank is one of the signs indicating the need to change the cooling system pipes on your VAZ 2109.
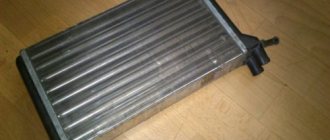
New tubes
A practical look at replacing pipes
When replacing pipes, the main thing is not to be afraid to do this work, then everything will certainly work out.
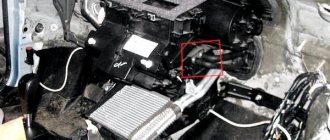
First of all, it is necessary to accurately represent the heater radiator and pipes, since in this case it will not be difficult to determine their location in the car interior. The stove radiator and pipe are located slightly to the right of the control panel, which resembles some kind of system of specialized levers. However, the console panel blocks free access to these functional elements of the car. There are two main methods for replacing old pipes with new ones:
- So, the essence of the first method is extremely simple: replacing the pipes is carried out based on the standard factory instructions of the car;
- this technique involves draining the coolant and removing the thick plastic dashboard;
- the second method, from a practical point of view, looks much easier to implement and will appeal to many motorists;
- In this article, all two methods will be considered equally; the choice of one of them falls directly on the shoulders of the motorist himself.
Application of the first (classical) technique
VAZ 21099 heater radiator
In order for the classical method to be fully and effectively implemented, it is first necessary to stock up on time and mentally prepare for the labor-intensive process, since the replacement of pipes is carried out in one moment.
List of tools that will be needed during the work
So:
- You must first prepare some kind of container, which will subsequently serve as a kind of reservoir for coolant;
- a standard set of screwdrivers, which is found in almost every car;
- a special head with a knob (in the future it will be necessary to unscrew the steering wheel with its help).
- first you need to release the battery from the terminals; to do this, they will need to be removed;
- Next, you will need to tighten the three bolts that hold the radiator grille;
- after removing the radiator grille, it will be necessary to remove the heating stove itself;
- then remove the air filter from the hood to free up a full viewing angle of the stove radiator pipes;
Algorithm for replacing logs using the classic (first) method
So:
- the junction of the pipes with the functional elements must be sealed with a sealing agent;
- then run a fluid test and if no signs of leakage are objectively detected, then the system can be restored (reassembled) to its original state.
The practical essence of the second (folk) method of replacing pipes
The essence of the second method of replacing pipes is to significantly save time and effort, since there is no need to drain the cooling liquid. Plus, there is no need to perform the complex procedure of dismantling the vehicle’s instrument panel. From a wide range of tools, you only need any empty container and a classic set of screwdrivers.
Scheme for replacing pipes using the “folk” method
So:
- as always, you must first release the battery by first removing its terminals;
- close the heating stove tap tightly;
- remove the radiator heater of the car, having previously unscrewed the required number of screws;
- then lay some extensive thin liquid-impermeable material on the floor of the car;
- drain the cooling liquid into a previously prepared container;
- then loosen the clamps, after which they will begin to be removed without difficulty;
- Next, the algorithm of actions is to carry out the assembly in the reverse order.
Both methods are well suited for replacing pipes with your own hands, however, it is imperative to consolidate theoretical information using photos and video materials. The instructions are easy to understand and easy to understand. The cost of replacing pipes yourself is very low, so the main thing is to stick to the right algorithm.
CONSEQUENCES
This seemingly simple situation, like a burst radiator hose, poses a serious threat to the engine. When coolant leaks, the engine temperature instantly rises, which is associated with loss of cooling of the cylinders, where the temperature reaches more than 2000 degrees Celsius.
The consequences of overheating may result in a major overhaul of the engine with the replacement of today's expensive parts
Therefore, the condition of the rubber of the cooling system must be given increased attention.
CAUSES
Car operating experience shows that 50% of drivers are indifferent to dripping or fogging of the cooling hoses, constantly adding fluid from the expansion tank. Danger can arise for several reasons. This could be fatigue wear, which is natural during many years of use, an untightened or faulty clamp, or a pinched clamp, which is actually even more dangerous.
A pinched clamp cuts the first layer of the hose, thereby compromising its integrity; when a sudden rupture occurs, only the rubber itself knows. A burst radiator pipe will make itself known by an increase in temperature on the instrument panel or by abundant steam escaping from under the hood of the car. In such a situation, it is definitely necessary to turn off the engine and do not start it until the malfunction is eliminated.
ADVICE FROM EXPERIENCED DRIVERS
In 90% of cases it bursts under the clamp; if you cut off the damaged area, it can still be put in place with a certain interference. As a last resort, you can remove the radiator mounts, thereby increasing the length of the pipe, and secure the radiator itself using any available means. For example, a useful tip is to not fully screw the bolt that fastened the radiator into place, and place a wire tie between it and the “ear” of the radiator, which will make it immobile.
If the radiator pipe has already been cut before, it will be clearly short when cut again. In this case, you can wrap a layer of rubber under the hose, put the damaged pipe back in place, and cover the rubber layer on top with a tin strip, say, from a beer or juice can.
Place a clamp on top, and even if after this there is partial digging, you will nevertheless be able to get to the house or the nearest workshop. If the pipe did not burst, but was torn out of place, then either the clamp was faulty or not tightened, or it was due to gases entering the cooling system. This is the most severe case and you will have to use the services of a tow truck, since most likely the head gasket has broken (provided that the expansion tank cap valve is in working order).
For new cars, the problem of a burst hose is not so pressing, since new hoses serve without problems for at least three years, and there is a reason to replace all pipes at once on cars with sufficient mileage. It is not always possible to find an original radiator pipe for replacement, but the range produced by the domestic auto industry is so large that you can choose a close analogue.
CAR OWNER REVIEW
I agree with the author of the article that you can always find a way out of the current situation, which is greatly facilitated by the advice of experienced motorists. People share their experiences, describe unusual situations that may be useful to other drivers on the road. I also wanted to share my experience, or rather, how I managed to get out of a similar situation, based on previously read articles on this topic.
On the way to the dacha, the radiator pipe burst. Remembering from what you read earlier that you can increase the length of a cut hose by cutting it in half and inserting a piece of tube of suitable diameter. There was a plastic tube in the machine, prepared for just the drilled well. They cut off the required piece from it (you can cut it with a simple knife), cut the broken end of the hose in half, cut the broken end, and inserted a piece of plastic tube.
Everything was clamped with clamps and assembled in place. The connection turned out to be strong and reliable. The old hose always rubbed against the valve cover, but the homemade one now doesn’t touch the cover at all, so is it necessary to replace it with a new one? Maybe this will be a new way out of the situation for some, and for others it will refresh something forgotten.
Good luck to you and see you soon on the pages of the RtiIvaz.ru blog!
You can also familiarize yourself with other materials on pipes:
Cars that most often have heat transfer problems
On some cars, the situation where the upper radiator hose is hot and the lower hose is cold is more common than others. Such models and their “childhood diseases” are collected in the table below.
| Brand, model | Cause of the problem | How can I fix it? |
| VAZ 2106, 2101 and other “Classics” | Low quality of original components, in particular the thermostats themselves, which jam. | Instead of the original VAZ thermostat valve, use parts from other companies: Metal Incar, Finwhale, Vernet. |
| The cold bottom of the radiator in a VAZ “Classic” with high mileage is a consequence of corrosion of parts and clogging of the radiator channels. | Flush the radiator using a special fluid or, if that doesn’t help, replace it. | |
| VAZ 2108-21099, 2113-2115, Kalina | A faulty expansion tank cap valve does not allow maintaining operating pressure in the cooling system, which disrupts coolant circulation and causes the heater to heat poorly. | Replace the expansion tank cap. |
| VAZ 2110 – 2112, Lada Priora | On the VAZ 2110-2112, the lower pipe is cold, and the heater blows cold due to the predisposition to the formation of traffic jams and disruption of coolant circulation. | Monitor the condition of the cooling circuit, remove plugs, especially when replacing antifreeze. As a radical solution, you can replace the thermostat with a “six-hole” one (art. 21082-1306010) or from Lada Granta (21900-1306010), adapting the circuit to it. |
| The upper pipe is heated, and the lower pipe is cold, due to exhaustion and lack of pump performance. | Install an improved pump, like the Luzar Turbo. | |
| Skoda Octavia | On the Skoda Octavia, the lower radiator pipe is cold, and the engine begins to overheat due to a faulty oil heat exchanger gasket. | Replace the oil heat exchanger gasket. |
| Daewoo lanos, Sens, ZAZ Chance | Cold lower pipe and radiator, a consequence of early opening or jamming of the thermostat. | Replace the thermostat with a better one that opens at 87 degrees. |
| Ford Focus | On a Ford Focus, the bottom of the radiator is cold and the top is hot, usually due to a stuck thermostat. | Replace the faulty thermostat. |
| Mazda 3 | On a Mazda 3, the lower pipe is cold, usually due to a faulty thermostat. | |
| Volkswagen Passat | With high mileage, the pump and thermostat fail. | Replace the pump or thermostat. |
| Suzuki Grand Vitara | Airing of the cooling system due to pressure failure. | Remove air pockets. Replace the expansion tank cap, which often becomes clogged or, on the contrary, does not hold pressure. |
Some features of the VAZ 2109 cooling system
- The VAZ 2109 CO is liquid, with a total volume of 7.8 liters, if you count it together with the stove. The type of system is closed, it is sealed. The operating pressure in the cooling system is maintained at about one atmosphere. Due to the increased pressure, the liquid in it boils at a higher temperature than at normal pressure. This significantly increases the service life of the CO itself, as well as the engine.
- Liquid circulation is carried out forcibly, that is, using a pump or pump. The CO “nine” is equipped with a centrifugal pump. Its body is made of aluminum. The pump mechanism operates from a timing belt drive. The rotation of the pump shaft is carried out on double-row ball bearings. Moreover, the role of the bearing cage is played by the pump roller; it does not have its own.
- The mechanism is filled with the appropriate lubricant (Litol) during manufacture. While it is functioning, it is not being maintained; such a possibility is not provided for by the design. If it breaks, it cannot be repaired, therefore, it is recommended to completely replace the pump if it breaks. In such systems, for greater reliability, they try to replace the pump when changing the timing belt.
- Since CO "nine" is liquid, this liquid needs to be replaced from time to time. The VAZ 2109 cooling system is undemanding in terms of antifreeze quality. However, the Antifreeze A 40 that was produced for such COs in the last century is no longer produced. What is produced under this brand, alas, does not comply with the GOST standards according to which this coolant was produced.
- Many auto mechanics do not recommend its use; from what is recommended by AvtoVAZ, it is quite possible to choose a replacement. As a last resort, purchase imported antifreeze with a composition that meets the requirements. But water cannot be used at all as antifreeze; it will leave a layer of scale on the walls of all pipelines of the system, and aluminum parts will undergo active corrosion.
- For coolant, working tO is +85O – +95OC. Additionally, at a temperature of about +99°C, the contacts in the fan relay close. The engine electric fan stops working when the relay sensor contacts open, this is +93°C. This means that, focusing only on the fact of turning the fan on and off, you can make a correct conclusion about the temperature in the system. Even with a failed (or missing) thermometer on the dashboard.
- The relay temperature sensor is installed in the cylinder head. There is a thermometer on the instrument panel that shows this temperature, signaling possible overheating. While the engine is running, liquid flows from the cooling jacket of the cylinder head and block to the radiator, where it picks up heat or to the thermostat.
- The cooling system of the VAZ 2109 has a small and large circulation circle, the separation occurs at the thermostat. Which is convenient, especially when you need to quickly warm up the engine at low air temperatures. The valve closes, liquid flows only through a small circuit. As the temperature rises, the thermostat valve allows coolant to flow into the large circle pipes.
- During engine operation, during combustion of the fuel mixture, temperatures reach 2,000°C and this happens intermittently. Poor performance of the cooling system not only leads to premature destruction of the cylinder-piston group due to thermal overload. The lubricant dries out and burns out, fuel costs increase with decreasing efficiency.
- Hypothermia leads to the accumulation of condensation, which washes away the lubricant (gasoline is a good solvent), enters the crankcase, mixes with the oil, diluting it. This is another reason to keep the CO in order, otherwise expensive engine repairs cannot be avoided.
- In addition to cooling the engine, CO heats the air in the radiator and cools the turbine (if there is a turbocharger), and also cools the oil and working fluid in the automatic transmission.
- For greater driving comfort, you should also do a little tuning of the system. You can increase the efficiency and reliability of operation by installing a pump that has an impeller with many blades. The fan is also desirable to be more powerful, six-bladed.
- It would be good if a manual fan start/stop system is installed, in addition to the relay, the sensor of which may fail. An additional fan on/off relay would also be useful; in city traffic jams, this will add peace of mind to the driver and reliability of the system.
System operation
The VAZ engine cooling system injector is required to maintain normal operating conditions inside the unit. When the motor and parts located next to it overheat, there is a risk of their partial destruction; cooling prevents this. Of course, the system does not guarantee a strong decrease in the temperature inside the unit, but its resource is quite enough to maintain the operation of the “nine”. The VAZ 2109 cooling system circuit works by distilling a special liquid through tubes placed between the car parts. As the liquid passes through hot areas, it partially reduces the temperature of the parts and heats up itself. The heated liquid is then cooled, after which the operating cycle is repeated. Now in more detail about the structure of the cooling system. It looks like this:
- pipes of the VAZ 2109 cooling system, connecting the cooling fluid (coolant) storage tank, engine and radiator;
- radiator - a device in which the coolant is cooled;
- liquid storage tank;
- pump - ensures the movement of coolant inside the system;
- a thermostat that divides the system into 2 separate circuits.
In addition, there are several small tubes that connect some parts to each other, operation sensors and various valves. Here's how it all works:
- Engine cooling begins when the temperature of the unit reaches 93ºС. A sensor inside the cylinder block measures the ambient temperature and gives a signal when the indicator reaches the limit values.
- The pump starts working, forcing the liquid to move along the lines. First, the liquid leaves the cylinder block jacket and, already heated, is directed to the radiator.
- Reaching the radiator, the coolant is distributed into several flows, filling the thin radiator tubes (thanks to this design, cooling occurs faster).
- The fan turns on, and air flows cool the coolant, after which it leaves the system through another channel and again goes to the cylinder block jacket.
- The cycle repeats.
- When warming up the engine, a small circuit is used, in which a thermostat is built-in, the principle is the same, but everything happens much faster.
The volume of the system tank is 7.8 liters; if repair of any cooling element is required, the tank is emptied. Regular maintenance and fluid replacement should be carried out regularly - every 3 months. It is recommended to use antifreeze or other brands of antifreeze as a coolant.
Modernization of the VAZ 2109 heater
Those who like to “tinker” with cars and experiment can carry out a small modernization of the crane in the old “old-fashioned” way. This will require a ball valve with an angled handle. The sequence of actions will be as follows:
- 1. Drain the coolant;
- 2. Unscrew the plug in the tap and pull out the valve. It won't be useful anymore.
- 3. A 3-kopeck USSR coin will be suitable as a new plug. It will need to be inserted into the “glass”;
- 4. Screw in the plug;
- 5. Under the hood, cut off the heater pipe and install a water tap;
- 6. Tighten the clamps on both sides;
- 7. Pour in antifreeze;
- 8. Check the system.
Every car enthusiast has the right to decide what suits him best. Experienced VAZ 2109 owners recommend a ceramic faucet for replacement. The complete set consists of the part itself, fasteners, and rubber seals. Situations of leakage or “sticking” do not occur after installation and during operation. It makes sense to purchase new pipes. It is likely that during use they have lost their elasticity and cracked. And this is one of the reasons for coolant leakage.
As you know, the level in the coolant expansion tank is constantly decreasing. Therefore, you have to top it up all the time. Every motorist must know that it is necessary to check the tightness of the cooling system. This check is carried out after every 15,000 km. If flaws are found in the hoses, the cooling pipes of the VAZ-2109 are replaced. It is worth noting that replacing the VAZ 2109 pipes can be easily done on your own.
What can cause the lower radiator hose to be cold and the upper hose to be hot?
Coolant circulation diagram: Click to enlarge.
Whether the lower radiator hose should be cold depends on the path of antifreeze.
After starting the engine, it first circulates in a small circle, bypassing the radiator, and after reaching a temperature of about 85 ° C , at which the thermostat partially opens, it goes to a large one.
In most models, coolant enters the radiator through the upper pipe, after which it is pumped down and returns through the lower pipe to the engine cooling jacket.
In those models where the thermostat blocks the flow of antifreeze from the radiator (for example, VAZ 2109), the lower pipe may be cold while the upper pipe is hot and before the engine warms up. If both channels or the radiator inlet are blocked (as on the Lada Granta), when the upper pipe warms up, both the radiator and the lower outlet should quickly warm up.
With a working cooling system, the bottom of the car radiator is cold and the top is hot only at the moment when the thermostat has already opened slightly, but the antifreeze has not yet reached the lower pipe. When the air temperature is low and the interior heater is on in winter, it takes longer for the coolant to warm up. In this case, the thermostat opens 10 minutes or more after the start of movement. At low air temperatures, it often happens that a car’s radiator is hot on top and warm on the bottom, since antifreeze quickly cools down as it passes through it.
Diesel engines warm up much slower than gasoline engines. Some cars with a diesel engine in winter can only fully use the large circle when driving at high speed (over 100 km/h) and during long periods of “taffy” in traffic jams.
You need to figure out why the lower radiator hose is not heating up and solve the problem in the following situations:
- the upper pipe is hot, and the lower one remains cold even after high-speed driving in warm weather;
- the radiator warms up only at the top, remaining cold at the bottom;
- coolant temperature readings on the dashboard go into the “red zone” ( more than 100–110 degrees );
- Antifreeze is boiling in the expansion tank.
The main reasons why the upper radiator pipe heats up and the lower one is cold:
Why does an air lock appear in the cooling system: video
- Thermostat is stuck in the closed or half-closed position.
- cooling pump is worn out and cannot create the required pressure.
- radiator channels with deposits.
- An air lock has formed in the cooling system.
Cooling system malfunctions are not always reflected in sensor readings. The coolant temperature sensor (coolant temperature sensor) may not be in contact with the overheated liquid and show a normal temperature. For the same reason, the radiator fan may not turn on in a timely manner.
Computer diagnostics only help identify problems with an electronically controlled thermostat. A problem with a mechanical valve is indirectly indicated by the non-corresponding readings of the DTOZ located on the block, in the cylinder head or in the area of the thermostat.
You cannot operate the car if the car is heating up and the lower radiator pipe is cold! This is fraught with a breakthrough of the gasket between the head and the block, failure and damage to the cooling system pipes, misalignment of the cylinder head, scuffing and wedge of the engine CPG due to overheating!
"Folk" way
Folk craftsmen - these are brave and very desperate craftsmen - offer a much less labor-intensive method. The bottom line is that replacing the stove pipes (and the stove itself) is done without draining the coolant and without dismantling the instrument panel. The tools you will need are a set of screwdrivers, rags and a container (small) to drain the liquid from the pipes. In this case, replacing the heater radiator pipes is carried out according to the following scheme:
- Removing the terminals from the battery
- Close the heater tap
- We remove the right front seat (to make it easier to do the work)
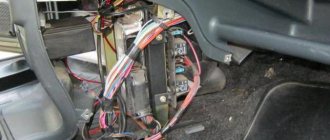
- We unscrew the two screws securing the dashboard on the right side, and one screw located in the glove compartment, then, pulling the dashboard towards you, we place a wooden block
- Now there is a gap on the side of the passenger seat and you can get to the pipes and to the heater radiator itself
- Lay a rag on the floor of the cabin and prepare a container to collect the coolant
- Which will spill from the radiator and pipes
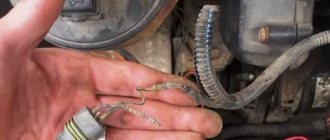
- We loosen the clamps of the pipes (photo above) and carefully, one by one, remove them from the radiator, replacing the container. 200 - 300 grams of coolant will drain into it
- Replace the pipes with new ones, and change the clamps, just in case.
- If necessary, unscrew the three bolts that secure the radiator to the stove and pull it down to the right
- We install the pipes and the new radiator in the reverse order.
Here are both methods, choose the one that suits you, and also watch a video on this topic.
Fast and high-quality replacement of the VAZ-2109 heater radiator
Owners of VAZ Samara family know firsthand that one of the most vulnerable parts of the cooling system is the heater radiator. It very often fails, or rather, leaks. And the metal from which the radiator is made seems fine, and the heat exchange is good, but that’s all it leaks. Fortunately, the prices for this spare part are applicable, which allows for replacement as needed. Yes, and here everything is not so smooth. The fact is that replacing the VAZ-2109 heater radiator requires disassembling and removing the control panel. At least, this is what is indicated in the user manual for this car. We will tell you how to quickly replace the heater radiator of a VAZ-2109 without disassembling the dashboard.
Replacing the heater radiator on a VAZ-2109: instructions
We will bypass the method of replacing the heater, which involves dismantling the control panel. Although it is considered correct and is even written in the manual, it can take up a lot of not only your time, but also your nerves. Let's dwell on the folk method, invented and repeatedly used in our garages.
See:
The first step is to remove the front passenger seat, as it will interfere with our process. Next, turn off the heater valve and begin unscrewing the screws securing the control panel to the body on the right side. Don't forget to remove the glove compartment. Then unscrew the screws securing the panel on the right to the floor.
Check that all screws are unscrewed. To do this, try lifting the panel and pulling it towards you. If something interferes with this, it means that something is not unscrewed somewhere. If the panel moves, place any object (a block, a log, a bottle) between it and the body that would hold it in a raised state.
Replacing the VAZ-2109 heater begins with disconnecting the hoses from the pipes. To do this, just use a screwdriver to loosen the clamps and pull the hoses towards you. Be prepared for coolant to start leaking from the radiator. A clean rag should always be at hand. After this, you can dismantle the radiator itself. We unscrew the three screws on its cover, securing it to the body. The radiator can now be removed from the heater housing. The new part is installed in the reverse order.
But that is not all. Replacing the heater radiator yourself without removing the VAZ- 2109 should end with a thorough check of the tightness of the connections. When the radiator is installed, do not rush to screw the panel. Pour coolant into the system, remembering to tighten the drain plug, start the engine and warm it up. Having moved into the cabin, inspect the connections of the hoses and pipes, as well as the heater valve. If there are no leaks, you can assemble the panel.
Replacing pipes
And when it comes time to change the heater radiator pipes on your VAZ 2109 - don’t be afraid to do the replacement yourself
First of all, it is important to know where the stove radiator and its pipes are located. So, the heater radiator is located on the right heater casing (that is, to the right of the panel of heater control levers), direct access is blocked by the dashboard console
The price of the pipes themselves is a pittance, but for replacement at a service station they will demand a tidy sum, why? Now you will see for yourself. There are two ways to replace pipes (the methods are also suitable for replacing a stove radiator):
- The first - (the so-called classic) is carried out in accordance with the instructions (manual) for the operation, maintenance and repair of the VAZ2109.
- It involves removing the dashboard and draining the fluid from the engine cooling system.
- The second is simpler (folk), does not require complex manipulations
- In our article we will consider both methods so that you can choose the most convenient one for you.
Inflates cooling system hoses
I changed the cap, checked the thermostat, poured it into the tank, and sucked it out as it cooled. It seems that the air in the cooling system should be removed on its own. What could be the problem? The pipe is hot, the temperature remains in the middle of the scale.
- Coolant fan does not turn on, Toyota Rav 4 – 9 answers
- Why does the Toyota Rav 4 eject antifreeze from the radiator cap? – 3 answers
- The coolant arrow does not show the temperature correctly - 1 answer
When it’s hot, that is, on a warm engine (CAREFULLY with a large piece of rag, open the lid, gradually bleeding air from the system), then put it on and it will inflate already in a warm engine. Can you imagine what happens when a car moves along the highway, at revs?
On Japanese ones, the air came out once or twice, if everything is in order, the air in the system simply has no place to come from.
It inflates for everyone, some more, some less. The temperature rises, and accordingly the pressure in the system also increases. Have you tried warming up the car to the opening temperature of the thermostat, when the lower pipe becomes hot?
As it cools, the air does not escape, but rather enters the expander, because the valve in the lid is bidirectional. In one case, it is triggered when the pressure in the system increases (during overheating). In another case, the valve allows air into the system when the coolant cools, so that a vacuum is not created in the system and the hoses are not flattened.
Thus, on a cold engine, the system must have atmospheric pressure, no more, no less. And if you have an air lock somewhere in the system, then it can remain there for a long time if it is not helped.
Hi all! Maybe someone came across this? The upper cooling pipe constantly inflates like a balloon, I’m afraid it might burst at one point... No matter how you turn the engine in place (P, N), bubbles do not go into the expansion barrel. Maybe someone had it?
Malfunctions in the system
In a domestic car VAZ-2109, you can independently identify problems in the cooling system.
For example, system overheating occurs if:
- lack of coolant - check, add if necessary;
- the pump belt is torn or worn - replace it;
- the radiator is clogged with dirt - flush or replace;
- The fan may be broken.
There are also a number of other malfunctions:
- Coolant leak. Hoses may be damaged or parts may crack. If fluid is lost, the system is overfilled.
- Corrosion can occur if the water is contaminated or the antifreeze solution is not formulated correctly.
- Air locks (warm up the engine properly, then let the car sit, remove the hose and start the engine again - this will help expel the air).
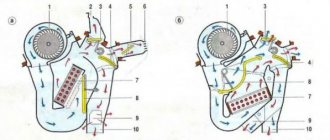
Heater diagram
The heater is mounted in the cabin under the dashboard using nuts on bolts that are welded to the air supply box. The air heated in the heater through channels (air ducts) enters the interior of the cabin. The air ducts are located at the bottom of the dashboard and have sealing gaskets.
If you plan to carry out repair and maintenance work, or replace failed components yourself, you definitely need to study the design of the stove and become familiar with the location of the components.
Based on the diagram below, we will introduce you to the design of the VAZ 2109 stove.
Scheme
| Item number | What is this |
| 1. | Bracket for fixing stove casings |
| 2. | Heater control damper |
| 3. | Left heater casing |
| 4. | Flap rod for heating the foot area |
| 5. | Radiator gasket |
| 6. | Radiator |
| 7. | Gasket sealing stove |
| 8. | Electric stove motor |
| 9. | Heater fan shrouds |
| 10. | Fan impeller |
| 11. | Heating damper |
| 12. | Air duct for heated windshield |
| 13. | Side nozzle duct |
| 14. | Side nozzle |
| 15. | Center nozzle flap |
| 16. | Pusher (blades); |
| 17. | Blade axis |
| 18. | The blade itself |
| 19. | Center nozzle closing lever |
| 20. | Heated windshield damper rod |
| 21. | Lever for changing air flow directions |
| 22. | Air heating control knob |
| 23. | Windshield air handle |
| 24. | Leg air handle |
| 25. | Bracket for control levers |
| 26. | Rod sheath fixation bracket |
| 27. | Stove valve control rod |
| 28. | Stove control damper rod |
| 29. | Heated footwell flap |
| 30. | Air control lever axis |
| 31. | Screw clamp |
| 32. | Stove valve |
| 33. | Heater valve body |
| 34. | Valve lever |
| 35. | Hoses connecting the faucet to the heater radiator |
| 36. | Internal ventilation duct |
| 37. | Heated windows for rear footwells |
| 38. | Stove tap |
| 39. | Window for heating the driver's foot area |
| 40. | |
| 41. | Inner cavity of the central pillar |
| 42. | Exhaust ventilation duct |
| 43. | B-pillar trim |
| 44. | Hood deflector lining |
| 45. | Rubber valve |
| 46. | Deflector housing |
| 47. | Exhaust ventilation deflector |
| I | Heater |
| II | Stove operation diagrams |
| III | Stove tap |
| IV | Interior exhaust ventilation |
Having become acquainted with the components of the VAZ 2109 stove, let's find out in more detail how everything is arranged and functions here.
Device location
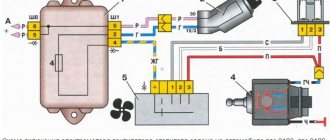
Engine cooling system VAZ-21083
1 – expansion tank; 2 – expansion tank plug; 3 – steam removal hose; 4 – hose from the expansion tank to the thermostat; 5 – radiator supply hose; 6 – radiator outlet hose; 7 – left radiator tank; 8 – aluminum radiator tubes; 9 – sensor for turning on the electric fan; 10 – right radiator tank; 11 – drain plug; 12 – radiator core; 13 – electric fan casing; 14 – electric fan impeller; 15 – electric motor; 16 – pump gear pulley; 17 – pump impeller; 18 – camshaft drive toothed belt; 19 – heater radiator outlet pipe; 20 – pump supply pipe; 21 – tap; 22 – heater radiator; 23 – hose for draining fluid from the heating of the inlet pipe to the carburetor heating block; 24 – carburetor heating block; 25 – exhaust pipe; 26 – heater supply pipe; 27 – hose for draining fluid from the heating of the inlet pipe and the carburetor heating unit; 28 – coolant temperature indicator sensor; 29 – thermostat.
What causes damage to the body of the “nine”
There is an opinion that Soviet cars are equipped with an “indestructible” body. It is impossible to say this one hundred percent, but it is also wrong to refute such a statement. Indeed, the body of the VAZ 2109, the diagram of which is presented in the article, is made to perfection, but over time, any quality will come to an end.
VAZ 2109 body geometry
Almost all car bodies older than 5-7 years need repair. And there is nothing surprising about this. The living conditions of recent years, the huge amount of harmful substances, the general deterioration of the environment - all this cannot have a positive effect. Difficult, almost extreme, modern operating conditions also cause a lot of harm.
As a result, the state of the metal surface becomes deplorable, the internal combustion engine and parts are sent for disassembly, and instead of a worn-out but close-to-the-heart car, a new car takes its place. All this can be avoided if you know the features of the body layout, understand the intricacies and carry out preventive maintenance in a timely manner.
Main causes of malfunction
There can be several reasons for such problems, but the most common are:
- Worn or damaged pipes.
- Incorrect connection of pipes.
- Broken stove tap.
- Radiator failure.
The first of these reasons - wear of pipes - can occur for natural reasons during operation, since the chemicals contained in coolants have a corrosive effect, which is complemented by the influence of high temperature.
In addition, the hoses of the VAZ 2114 stove can be easily damaged by over-tightening the clamps on them. When such damage occurs, fluid leaks from the system.
In total, VAZ 2114 cars have 4 pipes. Two of them are located under the hood and two in the cabin.
Their damage, which led to a coolant leak, can be judged by the following indirect signs:
- there is a constant drop in the liquid level;
- a specific smell appeared in the cabin;
- A puddle of coolant forms under the car or in the passenger compartment while parked.
If at least one of these signs is observed, then urgent diagnostics of the pipes should be carried out and their replacement.
Replacement
Set of pipes for the VAZ 2109 cooling system
If at least one of the pipes is in doubt, the entire cooling system set must be replaced.
Dismantling
Begin:
- First of all, you need to open the cap from the expansion tank. This must be done so that the cooling system has access to air.
- Open the interior heating valve, turn the lever to the right until it stops.
- Remove the crankcase protection, first unscrew the fastening bolts.
- Clean the area near the radiator drain plug and cylinder block well so that dirty residues do not get into the drained antifreeze.
- First place the prepared container under the radiator drain plug.
- Open it and wait for everything to drain.
- Do the same work under the cylinder block.
- Wait for the antifreeze to drain completely, then tighten both plugs - on the radiator and the block.
Replacing cooling on a VAZ 2109
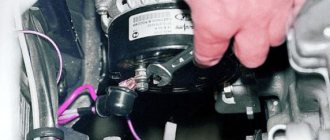
- Unscrew the clamps securing the antifreeze supply and return pipes from the heating tap. It is located in the partition between the engine compartment and the passenger compartment.
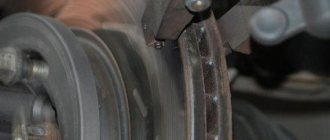
- Remove the rubber pipes if they are difficult to turn a little in different directions. Since they will be replaced, then you need to cut them lengthwise with a sharp knife. During operation, hot antifreeze causes the pipes to stick to the metal fittings. Therefore, it can be difficult to remove them, even with great effort.
- Using a flathead screwdriver, remove the valve from the engine compartment.
- Use pliers to disconnect the holder from the heating tap drive rod.
- The tap needs to be cleaned and the inside needs to be blown out with a pump.
- Consistently remove all other pipes from the engine and radiator.
Examination
If there is no inspection hole in the garage, then the car must be placed on an overpass. In bad weather conditions, it is still better to drive it into the garage. Raise it higher with a jack and place reliable supports under each part of the machine.
Note: Never leave your vehicle on a jack for long periods of time.
To work you will need:
- tool set;
- a lamp with a protective cap - in case of a fall or impact, the lamp will not break, and the fragments will not cause injury;
- antifreeze for topping up.
Let's get started:
- First you need to disconnect the negative terminal from the battery.
- Lay a sheet of plywood or thick cardboard on the floor.
- It is necessary to start the inspection from the engine compartment and first make sure that the temperature of the cooling radiator and the engine has reached the ambient temperature.
- Check the connections of the pipes on the outlet and inlet fittings of the radiator.
- The connections to the thermostat at the expansion tank are also carefully checked.
Note: check with the palm of your hand, running at the bottom of the connections. You need to determine whether liquid is accumulating.
Let's continue:
- Tighten the clamps, but do not tighten them too much, as you can damage the pipe itself if you overtighten the clamp.
- Then lie down on the prepared cardboard at the bottom of the car under the engine and check the pipe, as well as the suitable pipe of the water pump.
Note. Don’t forget to check the pipes that go to the interior heating system.
- Then continue checking under the hood.
- Rubber tubes suitable for the carburetor are carefully checked.
- Don’t forget to check the tightness of the radiator drain plug and coolant temperature sensor.
- After completing the inspection, make sure that all inspected connections are tight.
- Make a conclusion about the condition of the pipes.