How to connect speakers in two-piece systems
Approximately 80% of car enthusiasts who install component sound systems are limited to installing additional tweeters. For some, this is not enough, since achieving the highest sound quality is impossible without “drawing” the lower frequencies of the sound spectrum to the point of the limits of human hearing.
Obstacles to the propagation of vibrations of the lowest frequencies degrade the quality slightly. Therefore, huge subwoofers operating in the lower sound band are placed in the trunk or on the rear parcel shelf.
A component car audio system can contain from 2 (including tweeter) speakers per channel to 4, 6 or more
Thus, a component car audio system can contain from 2 (including tweeter) speakers per channel to 4, 6 or more. Practical implementation depends on the aesthetic requirements of the car owner, his desire to spend money and time to achieve them.
Scheme of channel-by-channel connection of speaker components
All components of the audio system are connected to each other by wires. Weak tweeters can be connected with almost any wire. Subwoofers are a completely different matter. With a power of 100 W, the speaker will require a current of about 8 A. To avoid mistakes, it is best to use a specialized speaker cable with a wire cross-section of at least 2.5 square meters. mm.
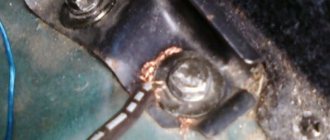
To connect the wires to each other and to the speakers, depending on the design features, use standard connectors, terminals or twisting with mandatory soldering
Wires for connecting speakers are laid in inaccessible places, covered under removable casings as far as possible from other wiring harnesses. The sound lines are inserted into the doors through standard rubber accordion covers.
By following the recommendations outlined above, any owner will be able to equip their car with good sound. How many speakers will be used and where exactly they will be installed depends on the design features of the car and the desires of its owner. And the secret of success lies in the availability of the necessary components and accuracy when performing work.
Car audio systems rarely use only one full-range speaker. This scheme is used only in exceptional cases, since one loudspeaker gives a satisfactory sound picture, where there are mainly mid frequencies, and the low and high ranges are weak and inexpressive. Component acoustics with two or more acoustic emitters require a crossover.
Typically this is a passive filter using capacitors and inductors that suppresses a certain frequency band. The tweeter limiter attenuates or nearly attenuates all frequencies below 2500 Hz and allows high-frequency content to pass through. The filter, designed to connect the low-frequency head, cuts off frequencies above 150-200 Hz. Thus, the range of reproduced frequencies is divided into two bands designed to work with a specific speaker.
What is a crossover
Crossovers are specialized devices in sound systems that create the necessary frequency ranges while the speakers are operating. In simpler terms, these are several filters for sound.
Externally, it is a housing with dimensions of approximately 12x6x4 centimeters, and inside this housing contains filters that are responsible for transmitting sound signals depending on their frequency. According to their main function, crossovers are divided into:
- High frequency (adjustable to frequencies from 80 to 100 Hz);
- Low-frequency (adjustable to frequencies from 2-5 kHz).
Connecting to an audio system
After the location of the tweeter has been determined, you need to make a small hole in the casing under it for the wires. Wires from tweeters and other speakers connected to the audio system should also be hidden under the interior plastic. To do this, you will have to carefully disassemble it, test the car audio, and then reassemble the interior trim in reverse order. The tools needed for this work are: figured and flat-head screwdrivers (and best of all, special plastic spatulas for removing interior trim), side cutters, wires, heat shrink or electrical tape (if you have a soldering iron, then it won’t hurt to use it), double-sided tape and a flashlight.
The radio emits sound waves in the range from 5 Hz to 25,000 kHz. Tweeters have little inertia and are able to perceive sound from 2,000 Hz. Low-frequency waves are destructive for them, and when they enter the “ether,” they significantly spoil the sound. Therefore, connecting the high-frequency speakers directly to the radio would be a big mistake.
In order to filter out low-frequency waves, you can route the tweeter wires through a crossover. It comes complete with component acoustics, or can be purchased separately.
Connection instructions
A passive crossover for car audio is connected as follows:
- Speakers are purchased and installed.
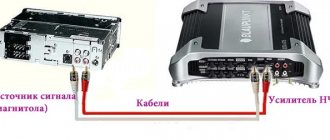
- The output wires for the speakers from the radio are connected to the input terminals of the device.
- The speakers are connected using speaker cables to the corresponding terminals of the device, which may be designated Wf (for a full-range speaker), Sw (for a subwoofer), Mw (for a midwoofer) and Tw (for a tweeter).
To simplify setup and connection, car amplifiers with a built-in crossover are selected. The subwoofer, midwoofers and tweeters are connected to the corresponding outputs of the audio device. The switches select the characteristics most suitable for the selected speakers.
Purpose
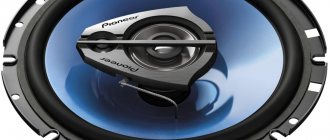
The main purpose of installing tweeters is to reproduce high frequencies. They are small speakers that are installed in the front and rear of the car (or in one of them), depending on the audio system. For maximum effect, they are used as part of multi-component audio systems, but can be found in retail sales (for example, from Pioneer). The advantages of the speakers include ease of installation - every car owner can connect the tweeters correctly.
Speakers for better sound
When installed in speaker systems, motorists install tweeters through a crossover - this is a device that provides operating ranges for the speakers. It separates frequencies when working with a multi-component audio system. This allows you to get the maximum effect from the system and ensure high-quality sound quality in the car.
Connecting tweeters to the crossover is quite simple, and to do this, you only need to read the audio system instructions. But there are times when you need to connect the tweeters in your car directly to the radio.
Connecting tweeters to the radio
It is possible to connect tweeters to speakers that are already installed. To do this, you will need a 1st order filter (capacitor). The capacity will depend on the installed speakers and is selected individually in each specific case.
Connection rules
Installation and connection
To complete the installation and install the speakers, you need to do the following (installation in doors is taken as an example):
- After removing the door trim, a hole of the appropriate diameter is made in the place where the column will be installed.
- Next you need to lay the wires. If there are no holes for them, you need to make them yourself using a drill. It is necessary to prevent contact of the cable with metal parts of the car (for this you need to use corrugation or spacer rings). In most cases, the wires are laid parallel to the standard wiring - this avoids problems in the future and achieves maximum safety. It is necessary to lay the wires in the doors so that when the door is opened and closed, the cable rotates and does not bend. After wiring the wires, you need to check with a multimeter for short circuits (measure the resistance, which should be 3-4 ohms).
- The speaker is attached to the casing using double-sided tape.
- After completing all the steps described above, you need to correctly connect the speakers to the system. It must be remembered that different connection methods are possible, but it is recommended to connect the speakers to a crossover or frequency filter in order to achieve the best sound. Another recommended method is to connect through an amplifier. You will need to run wires from it to the tweeters. The connection must be made only according to the connection diagrams (depending on the method) and not deviate from them.
- It is necessary to check the operation of the equipment and configure it. If everything is done correctly, the devices will work normally.
- Reinstall the disassembled parts and secure them.
Attention: during installation it is necessary to mark the wires so as not to get tangled in them, properly insulate all contacts and take the cable with a small margin!
Bottom line: installing tweeters in a car is not difficult and any car owner can do it. But if you don’t have the relevant experience, and you don’t have enough time to study the installation yourself, or you have doubts about success, it’s better to turn to specialists or a car service center.
“>
Choosing the right speakers and radio
First of all, specialized audio equipment is intended for installation in the car interior. Manufacturers of car speakers take into account not only sound quality, but also difficult operating conditions: vibration, dust, temperature changes, etc.
Is it possible to install household or variety speakers in a car?
Computer and concert speakers are designed for more gentle conditions. They most likely won't last long in a car.
In addition, computer speakers usually require not only a sound source, but also a separate power supply, without which they will not work, while car speakers are connected only to the output of an amplifier or radio.
As a rule, it is advisable to buy speakers where it is possible to evaluate the sound quality. Appearance does not play a special role, since in the car's interior the speakers are usually covered with a decorative mesh or grille.
Choosing suitable speakers for a car consists of determining the basic requirements for them and comparing the technical characteristics of several models of the same price category
Installation of component acoustics - location recommendations
When building a car speaker system, the sound stage is usually oriented towards the front of the car. Component acoustics can create a high-quality sound stage, so it is recommended to install them as front speakers (in the front of the car). That is, if the car owner places some emphasis on sound quality, then it is worth proceeding from these considerations. You can either leave the rear speakers alone or change them to coaxial ones, which will act as a “backup” for the front ones.
Many car owners are interested in the possibility of installing component acoustics in the rear of the car. Here the car owner starts from thinking - why not create a high-quality sound stage for the rear passengers? But within the space of a car interior, it is almost impossible to create two high-quality scenes (for front and rear passengers) so that they do not interfere with each other. This also “suffers” from some automakers who want to “surprise” the buyer with a large number of speakers in the cabin. As a result, the rear scene spoils the front one, and it turns out, as in the well-known saying about “two birds with one stone.” Therefore, here we can answer simply - not recommended.
But when choosing a set of component acoustics, the car owner often asks another question - why install a 2-component system if you can install a 3-component one? More spaced speakers, each of which plays its own frequency range - better sound? In theory, yes. In practice, almost always - no. But the point here is that 3-component acoustics are VERY demanding in terms of installation location and configuration. And this is very expensive (production of podiums, processor system). But even if all recommendations are followed, the final option may not always suit the car owner. Even in our practice, we have often encountered cases where car owners assembled processor systems (costing hundreds of thousands of rubles) based on 3-component acoustics, but later changed them to 2-component ones. But, of course, you can experiment.
How to install crossovers for speakers
To avoid problems with how to connect a crossover for speakers, you need to follow the installation rules. Do not lay power and speaker cables together. This may cause low-frequency interference in the speakers. The same effect is caused by crossing cables. The band limiter is not a device whose operation requires any intervention, so the blocks can be placed in any convenient location. The main thing is that no dust, dirt gets in there and there is no elevated temperature. The blocks do not have a sealed housing, so negative external factors can lead to disruption of internal soldering and failure of the speaker system. It is advisable to tin the ends of the copper cable with a thin layer of solder before clamping it with a screw. This will reduce copper oxidation and the formation of an oxide film. Broken contact between the speaker and the amplifier is especially dangerous. Lack of load leads to breakdown of the output transistors.
Some crossover modifications consist of two first-order filters in series. Such models have a signal attenuation switch on the front side. When connecting a first order filter, the attenuation of unnecessary frequency band is 6 dB per octave. The crossover design allows you to connect a second link and get an attenuation of 12 dB. When connecting a crossover to speakers, it is desirable that the filter controls be accessible.
An important component in any high-quality vehicle audio system is the crossover, so you need to be able to not only choose it correctly, but also know how to connect crossovers to speakers. Without this knowledge, the sound of music in a vehicle will be far from ideal, which for many amounts to ruined trips.
How to configure
In order to get the highest quality sound, you need to select the required cutoff frequency. If you use a three-way active crossover (the best option for most acoustic systems), you need to identify two cutoff frequency levels. The first shows the boundary between frequencies such as medium and low, and the second does the same, but for high and medium frequencies.
An important point: every vehicle owner must correctly determine the frequency characteristics of the speakers used before connecting the crossover to the speakers. There is no need to go to these frequencies, since in this case the crossovers will refuse to work normally at them. Ultimately, this will only lead to deterioration in sound and quality. This will also cause a reduction in the life of the equipment and the entire acoustic system in the vehicle.
Connecting speakers via crossover
The cross-section of the conductor is very important when driving speakers through a band-pass filter. It directly depends on the power of the speaker system and the resistance of the dynamic head. If we omit all the calculations, it turns out that for a speaker with a power of 100 watts and a resistance of 4 Ohms, you need a cable with a minimum cross-section of 2.0 mm2. The lower the acoustic resistance, the greater the current will flow in the circuit. When connecting loudspeakers, it is recommended to take a 20% margin over the cable cross-section.
Connecting the crossover to the speakers should only be done with real copper wire. Particularly dangerous when connecting elements of a sound system is the use of cheap cables from some Chinese manufacturers. Instead of copper, they use copper alloy or copper-plated steel. Both are strictly contraindicated in car acoustics. In addition to poor sound quality, there will be uncontrolled heating of the connecting wires, which can lead to dangerous consequences.
Installation
Features of how to connect crossovers to speakers include the following:
- Crossovers, as devices that help create the necessary frequencies and sounds on speakers, are connected to the entire audio system;
- All devices, regardless of the type of operation, have symbols located on stickers. Here, on the stickers located on the back, there are diagrams for connecting the active wires;
- After this, the cover is removed, since under it there are indications of the operation and working elements of the device in the general acoustic system of the vehicle;
- The next step is choosing a suitable installation location.
How to connect speakers to a car radio
Before you begin installing and connecting the speakers, you need to decide on the location of their installation. Depending on the vehicle, there may be space provided for the speakers from the factory. It is recommended to mount the front speakers on the edges of the dashboard or in the doors. Both options are good, but the second is the most popular, since the dynamic heads can be secured more reliably. In addition, an acoustic podium can be built into the door body. The diameter of the columns must be measured, after which the dimensions are transferred to the doors, for example, with a sharp knife. It is advisable to use patterns to transfer dimensions.
As for the second pair of speakers, they are located in the rear of the cabin. Basically, the rear shelf or doors are used for these purposes. In any case, installation requires some modifications. The standard shelf of the car is a decorative element and to install the speakers you will need to remove it and install speakers with podiums. Only in this case can you count on high-quality sound and the absence of squeaks, rattles, etc.
Wire selection
To connect speakers, it is recommended to use speaker wires with a cross-section of 1.5–4 mm². Despite the fact that compared to a radio and speakers they are low in cost, their quality should not be neglected. First of all, you need to know and take into account that the wires that come with the speaker system are unsuitable for normal operation of the speakers: they have a cross-section of 0.25–0.5 mm². Such wiring will be sufficient only for connecting low-power dynamic heads (up to 15–20 W). The thing is that the RF signal in the wire spreads across its surface. Using wires of small cross-section, not only the quality, but also the volume of the sound deteriorates.
Speaker wires should be selected with a cross-section of 1.5–4 mm², which depends on the signal strength. You should not use the wires that come with the speakers due to their small cross-section, which will negatively affect the sound quality
It is also necessary to take into account the fact that the speaker wires are marked, can have either two or four pairs, be plain or with a black stripe. The connection of a single-color conductor is made with a wide contact of the speaker, with a black marking - with a narrow one. If the acoustics have low power (up to 20 W), then the minus for the side and rear speakers can be used. For higher power systems, “+” and “-” must be supplied to each speaker separately, while the negative wire cannot be connected to the car body. Otherwise, the sound will be distorted. The main materials used for making acoustic wire cores are copper and aluminum. It is preferable to use copper, since it oxidizes less on connections, but it is also more expensive compared to aluminum. There are also more expensive wires - silver.
Preparatory work: how to remove the trim
Before carrying out work, turn off the ignition and disconnect the negative cable from the battery. Then do this:
- Often there is no speaker panel, and the speakers are hidden behind a non-removable mesh (grid) of the door trim.
In this case, remove the door handles that interfere with dismantling. If there are fastenings with self-tapping screws, remove the protective plugs and unscrew the screws. Then remove the trim. Slowly rocking, remove the panel, releasing one fastener after another. - If the standard speakers are covered with a separate decorative panel, carefully pick it up in the least visible place and pull it, roughly identifying the attachment points.
Slowly rocking, remove the panel, releasing one fastener after another. Remove door handles and other body parts that interfere with dismantling - If fastening with plastic clips, hook the trim in a less visible place, being careful not to leave scratches on the surface. Remove it, releasing the latches sequentially around the perimeter of the door.
What kind of speakers are there?
Today, almost every car has a radio with speakers located in the front and rear and capable of pleasing the owner with decent sound. The market offers a variety of speaker systems that can satisfy the needs of even the most demanding music lovers. One simple option is to purchase a radio complete with speakers. A more difficult way is to correctly select and install acoustics that will match a specific car.
To get truly high-quality sound, you need to find out what types of dynamic heads exist. They are conventionally divided into:
- broadband;
- coaxial;
- component.
Wideband speakers reproduce the entire spectrum of sound frequencies that human hearing can perceive. It is precisely this kind of acoustics that, in most cases, is equipped with cars from the factory today. If you are a lover of good sound, then preference should be given to coaxial dynamic drivers. The set consists of several columns, the installation of which is carried out along one axis. The entire frequency spectrum, divided into low-frequency (LF), mid-frequency (MF) and high-frequency (HF), is reproduced by separate speakers. By dividing and expanding the frequency range, the sound quality can be improved. For lovers of high-quality music with powerful bass, you should consider a component system, which is usually used as front speakers. In addition to different types of acoustic systems, speakers are divided by standard sizes, the choice of which depends on the installation location and the goals pursued.
Acoustic systems are divided into broadband, coaxial and component. You need to give preference to one or another speaker depending on your goals.
What are tweeters used for?
Car audio systems often use tweeters or tweeters. Their main purpose is to reproduce high-frequency sounds. You can purchase the elements either separately or as a set with a multi-component system. In appearance, such devices are small speakers that can improve the sound in a car, making it even louder and more voluminous. They are usually installed at the back or front, which depends on the speaker system circuit used.
Tweeters in a car are designed to reproduce high-frequency sounds, and they are installed in the side pillars of the windshield, doors, and dashboard
Installation of component acoustics - characteristics
Component acoustics have a number of characteristics and features that you will have to pay attention to before purchasing. For example, the diameter of any system under consideration. This diameter always relates to the largest speaker, that is, the mid/bass speaker, which is installed in the car door. Here, manufacturers, for the most part, focus on the size of the standard seats of most cars, so the largest range is presented in relation to the following sizes: 10 cm, 13 cm, 16 cm and 15 cm (4, 5.25, 6.3 and 6.5 inches, respectively). It is in these sizes that the main range of component car audio is presented, although there is some variation in both directions. In this case, it is not at all necessary that the car owner should choose replacement speakers that correspond to the seat of the standard acoustics of his car, but this will be discussed later. It is also worth noting that in component acoustics the midbass almost always has a round shape.
When choosing acoustics, you should take into account such an indicator as sensitivity. The sensitivity of an acoustic is essentially the ratio of the sound pressure of the acoustic to the supplied electrical power. Sensitivity is a technical concept that reflects the efficiency of the speaker. Sensitivity is expressed in the fact that with the same power input, a speaker with greater sensitivity will create greater sound pressure, that is, it will be louder. Sensitivity depends on many parameters, such as: weight, size and material of the diffuser, method of winding the coil, etc.
The question of the power of component acoustics interests many car owners. Manufacturers do not write on the packaging of their products the emitted power, but the power that the speaker coil can withstand, that is, the supplied electrical power. It is impossible to judge the emitted power from these data, so it is always necessary to look for the rated power in the characteristics. It is the latter that you should count on during installation. The main range of component acoustics is designed for power in the range of 60-120 W. The choice within this range will depend on many individual factors.
How to get rid of whistling in speakers
The whistling sound in the speakers is annoying; to get rid of this problem you need to understand the reasons and eliminate them.
What can provoke:
1. Radio tape recorder (head unit, also known as GU).
1.1. Get the radio 1.2. If it’s a Pioneer, try using a thin wire to connect the body of the control unit and the outer “skirt” of the RCA connector. If the background disappears, take the unit to a service center (change the blown fuse for the linear outputs). And don’t “plug” the interconnects anymore when the GU/amplifier is turned on. By the way, this is also possible with a short-term short circuit of the amplifier outputs. 1.3. Check the reliability of the connection of the DIN connector (and in general all connectors of the control unit). 1.4. Try turning off the antenna. 1.5. Route the plus and minus wires directly to the control unit from the battery using any suitable wire. 1.6. It makes noise and crackles when you increase or decrease the volume, maybe from a bad power contact (both positive and ground).
2. Amplifier(s).
2.1. Try changing the location of the amplifier (it is best to take it outside the cabin). For example, an amplifier in the trunk can pick up background noise from the fuel pump/its wiring. Moving it to the other side of the trunk will help remove the background. 2.2. Try turning the gain to zero - does the background remain? Is it getting quieter or not? 2.3. Is the amplifier body in contact with the body mass? You can’t do that, redo it. 2.4. Disconnect the GU-REMOTE wire from the amplifier and instead connect “+12V” with any suitable wire. 2.5 Screen of interblocks (tails): 2.5.1 If there is one tail in the interblock (such a thin vein), it must be shorted to the ground of the PG (not the amplifier!). 2.5.2 Pin the tails of the screen (not the ground!) coming from the interconnect cables into the minuses of all amplifiers. 2.6. If the RCA connector of the amplifier is slightly wobbly, there may be a bad contact; it is necessary to solder the connectors from inside the amplifier.
3. Interconnect cables.
3.1. First of all, re-route other interblocks by air, preferably outside the car. 3.2. If it is not possible, disconnect them from the control unit and the amplifier and check for a break/poor contact/short circuit with the body. Then change position, listen to the background and shift.
4. Crossovers. 4.1. Try moving the crossovers to a different location (it’s better to move them and listen to changes in the background).
5. Speakers and speaker wires. 5.1. Test each wire for a short to body ground.
6. Add. equipment. 6.1. The interference comes from xenon, parking sensors and other extras. equipment.
7. Power supply to the system as a whole.
7.1. All lands must be brought to one point, otherwise there will be an earth loop. Throw the mass of the PG to the mass of amplifiers. 7.2. Eliminate contact with EVERYONE! components (without exception!) of a system with a car body, that is, with MASS. 7.3. Tighten the terminals on the battery.7.4. Try temporarily replacing the battery. 7.5. Try temporarily replacing the spark plugs and high-voltage wires.
Basik also said very well on this topic at one time (Warning: the video contains profanity!):
We hope that these tips will help you eliminate squeaking noise in your speakers and you can enjoy high-quality sound in your car.
Information prepared by the automotive news agency "Avtoline"
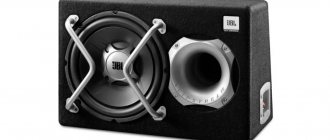
Speakers for component acoustics
The professional term “component acoustics” means speakers with broadband, high-frequency emitters assembled in one housing. The name, which characterizes the differences between coaxial and component speakers, has also taken root in the trade designations of diffusers.
component acoustics in the car
Replacing low-quality standard speakers is the first step in acoustic tuning. Without changing the factory car radio, you can use inexpensive coaxial speakers (they have a high-frequency diffuser built into the broadband) or two-component acoustics.
Based on the sound quality when selecting a signal from the standard car radio of budget models, only a specialist can distinguish between coaxial and component speakers. But even relatively inexpensive component speakers in cars last much longer than coaxial speakers.
2-component acoustics (which is correctly called “two-way”) combines two diffusers in one housing, allowing you to reproduce both high and mid frequencies. For background listening to music, a two-component system is sufficient, but it does not meet the high requirements for the quality of overtone transmission.
A complete set of two-component acoustics includes:
- two tweeters (professionals often call tweeters “tweeters”);
- two midbass (bass/midrange speaker with a range of 50 Hz - 3.5 kHz);
- two passive two-way crossovers.
Most inexpensive stock radios are not equipped with built-in crossovers, which must be purchased separately. A device combining an inductor and a capacitor is necessary to accurately separate the frequency spectrum.
To this set, 3-component acoustics add two midrange and mid-range speakers for reproducing the mid-range (frequencies 150 Hz - 1 KHz). To complete three-component acoustics, you will also need to replace two-way crossovers with three-way ones.
Both dynamic sound wave reproduction systems are designed for frontal placement (in the front of the cabin). They can be installed in door panels (in place of standard speakers), above the dashboard, on the side pillars of the windshield.
When creating a three-lane front for the third pair (midranges), you need to think about the installation location. In addition, midrange models without a phase-equalizing tip will require the manufacture of a bulk body. Most often, the third pair of speakers is installed on the central tunnel of the cabin. It makes no sense to install midranges near the rear window; this will worsen the sound volume.
Active and passive
Another classification is passive and active. The main difference between these two types is the components from which they are composed.
Active ones consist of components that require constant operation of power sources. These are, for example, microcontrollers, amplifiers and other elements.
As for passive ones, they are created from elements that do not require power, for example, coils, as well as capacitors and resistors.
Another difference is that active ones can only be mounted in front of the amplifier, while passive ones have more choice - they can be mounted in front of the speaker itself.
Differences between active and passive crossovers
Let's start the comparison with a passive crossover. It is known from practice that the passive crossover is the most common and most often found type on the market. Based on the name, you can understand that passive ones do not require additional power. Accordingly, it is easier and faster for the vehicle owner to install the equipment in his car. But, unfortunately, speed does not always guarantee quality.
They are rarely found as separate equipment, but any car amplifier contains an active filter as an integral part. Due to the passive principle of the circuit, the system needs to take part of the energy from the filter to ensure its operation. In this case, reactive elements tend to change the phase shift. Of course, this is not the most serious drawback, but the owner will not be able to fine-tune the frequencies.
Active crossovers allow you to get rid of this disadvantage. The fact is that, although they are much more complicated than passive ones, the audio stream in them is filtered much better. Thanks to the presence of not only coils and capacitors, but also additional semiconductor elements, the developers were able to significantly reduce the size of the device.
They are rarely found as separate equipment, but any car amplifier contains an active filter as an integral part.
Advantages and disadvantages
Active crossovers
Pros:
- Convenience during operation;
- The switches are output directly to the housing.
Minuses:
- Too expensive;
- The need for active crossovers in amplifiers for channels;
- The presence of distortions in the work that arise due to the operation of the elements of these devices.
Passive crossovers
Pros:
- Dividing signals into systems with several bands, and this requires only two amplification channels;
- Low cost.
Minuses:
- Impossibility of configuration without direct intervention in the entire electricity supply circuit;
- Select according to the acoustic system bands used;
- Configuration, selection and installation are processes that require professional knowledge and experience.
Instructions on how to connect tweeters to a car step by step
Every motorist wants his car to be comfortable and convenient. One of the comfort elements that makes it more pleasant to be in a car is music. Therefore, car owners are trying in every possible way to improve the audio system and install a variety of additional equipment. One of the elements that helps improve sound is speakers and a high-quality audio system. Among the variety of systems, there are speakers called tweeters or tweeters, which are installed in addition to acoustics or separately. But not every car owner knows how to install speakers correctly and where to connect this equipment.
Designations of modifications
Among the designations that crossover modifications for vehicles have are the following:
- Input, or entrance. It is to this place that the output of the active amplifier is connected, so it is important not to make a mistake with the polarity here.
- Woofer, or low frequency emitter. A speaker with mid and low frequencies is connected to this place. Separation stripes are indicated in the technical documentation.
- Twitter, or tweeter. A high-frequency speaker is connected to this location.
These are the main points and rules regarding how to connect crossovers to speakers and to the entire sound system of the vehicle.
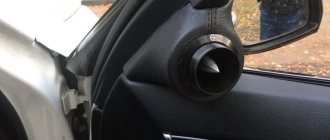
In what places is it recommended to install tweeters?
Manufacturers recommend many places to place tweeters, most commonly at ear level. In other words, aim them as high as possible at the listener. But not everyone agrees with this opinion. This installation is not always convenient. It depends on the specific circumstances. And the number of installation options is quite large.
- Corners of mirrors. During the trip they will not cause additional discomfort. Moreover, they will fit beautifully into the interior of the vehicle;
- Dashboard. Installation can even be done using double-sided tape;
- Podiums. There are two options here. The first is to install the tweeters in a standard podium (which comes with the tweeter), the second is to make the podium yourself. The latter case is more complicated, but it guarantees a better result.
Where is the best place to point tweeters?
When designing car audio, you can choose one of two options:
- each tweeter is directed at the listener. That is, the right tweeter is directed at the driver, the left one is also aimed at him;
- Diagonal installation. In other words, the tweeter on the right is routed to the left seat, while the speaker on the left is routed to the right.
The choice of one option or another depends on the individual preferences of the owner. To begin with, you can point the HF speakers towards yourself, and then try the diagonal method. After testing, the owner himself will decide whether to choose the first method or give preference to the second.
Installation of component acoustics - assortment
The choice of component acoustics is huge, and the car owner is unlikely to have problems finding the necessary set in the required price category. The cost of component kits varies very widely - from one thousand to several hundred thousand rubles. Of course, kits in the highest price categories are of interest to a very limited number of car owners - those who want to build a truly high-quality and individual acoustic system, and are ready to spend serious money. More often, the buyer's choice is focused on low and medium price categories, in which the main assortment is presented.
In any specialized online store, a visitor can see offers from dozens of manufacturers, including many well-known and not so well-known. Well-known brands in this area are DLS, Focal, Hertz, JBL, Kicx, Morel and some others. Some manufacturers produce speakers exclusively, while others specialize in the entire range of car audio equipment. The range of some brands contains only budget sets, while others try to cover the maximum number of price ranges. Manufacturers such as Focal, Audison, Morel have high-quality kits in their lines that may be of interest to true car audio fans.
The cost of a specific kit depends on many parameters - brand awareness, technical characteristics, quality of materials (from which the components are made), acoustic class. In addition, each brand has its own individual sound characteristics, which is very important when building a high-quality acoustic system in accordance with the preferences of the car owner. That is why it is advisable to seek the help of specialists from specialized installation centers who will not only select the required equipment, but also carry out its high-quality installation.