About the oil seal
The oil seal is one of the most common and long-invented sealing devices for moving mechanisms. This part is widely used due to its simple design.
It should be noted that the oil seals used in VAZ cars have a direction and need to be installed only in the designated direction of shaft rotation.
Device
The oil seal is made of special rubber, which does not lose its properties when in contact with oil. This kind of rubber is called oil-resistant .
Structurally, the oil seal is similar to a ring; inside the oil seal there is a so-called “box”. Which, under the influence of oil pressure, is pressed against the working part of the shaft and creates a tight seal.
The oil seal also has a spring that presses its working part against the shaft ensuring tightness.
Cylinder head repair
We mark all hydraulic compensators with numbers using an ordinary clerical touch and put them away. An ordinary magnet will help you pull them out. We dry out the valves and remove the oil seals (valve seals), the valves into scrap metal, the oil seals into the trash. We clean all channels. We take the head for grinding, just in case. After washing it again with kerosene after sanding and blowing it with air, we begin to assemble it.
We arrange the freshly purchased valves in the sequence in which they will stand in the cylinder head and begin to grind in one by one. Lubricate the valve stem with clean oil and apply lapping paste to the edge.
We insert the valve into place and put a valve grinding tool on the valve stem. The stores sell a device for manual lapping, but since this is the twenty-first century, we are mechanizing the process. We take the old valve and cut off the rod from it, select a rubber tube for it of such a diameter that it fits tightly. The rod is in a reversible drill, one end of the tube is on it, the other is on the valve being ground in. At low speeds we begin to grind the valve, constantly change the direction of rotation and periodically press it to the seat or weaken the force. On average, the valve takes about twenty seconds. We take it out and wipe it. The valve is considered ground in if a uniform gray strip of at least 1.5 mm wide appears on the chamfer.
Dimensions of the oil seal distributed by VAZ
The dimensions of the oil seal installed on the camshaft of VAZ cars are the same only for front-wheel drive Lada cars. It should also be noted that the dimensions of the oil seal do not differ depending on the type of engine, that is, if the engine has 16 valves, then the oil seals for each camshaft will be the same.
Oil seal size: 28*42*7
Consequences of oil getting into spark plug wells
When oil appears in the spark plug wells, soot will appear on the spark plugs, high-voltage wires will break through, and the engine will constantly stall or may not start.
Structurally, it so happened that only 16-valve engines with a volume of 1.6 liters are equipped with spark plug wells. For the 1.5 engine, guide tubes are installed - glasses that are missing on the older brother. This can be determined very simply:
- We unscrew the candle.
- Visually inspect the nest.
- If the surface is smooth, then glasses are installed, and if there are slits, then spark plug wells are installed.
Where is
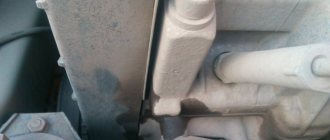
The oil seal is located under the timing belt boot, behind the camshaft gear.
The oil seal must be replaced if engine oil leaks through it. This leak can lead to oil getting onto the timing belt, which is strictly prohibited. Oil can damage the belt and lead to its breakage, which on 16-valve engines can lead to valve bending.
We change the camshaft oil seal on a 16 valve VAZ-2112 with our own hands
The element of the camshaft that is very often subjected to constant loads and most often fails is the oil seal, or as it is also called the cuff. On a VAZ-2112, you can replace the oil seal with your own hands, since no special skills are required for this.
The video describes the replacement of oil seals on a 124 engine when replacing the timing belt.
Replacing the oil seal
The replacement process is simple, but quite long. To carry out the work, it is necessary to remove the timing belt and camshaft gears, and in models with a 16-valve engine, it is necessary to remove the timing rollers and the rear part of the timing boot cover.
Required tool:
- Open-end wrench for 10, 15 and 17mm;
- Screwdriver;
- Mandrel to fit the oil seal;
- Hammer;
Step-by-step replacement instructions
- The first thing you need to do is remove the timing belt. How to do this can be studied in detail in our article “Replacing the Timing Belt”. It is first recommended to loosen the camshaft pulley mounting bolt with a 17mm wrench, since this will be much more difficult to do after removing the belt.
- Remove the timing belt and unscrew the camshaft pulley. Be careful not to lose the key.
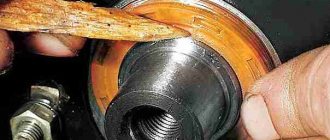
- Then pry up the old oil seal with a screwdriver and remove it.
- We wipe the seat and shaft from debris.
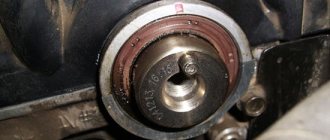
- We install a new oil seal, lubricating the shaft with clean engine oil. This will ensure easier sliding and movement of the oil seal along the shaft.
As a mandrel, you can use the head from the tool kit; you need to select the head in such a way that part of it rests against the metal part of the oil seal, but not against the working part.
- Using a hammer, lightly install the oil seal into its place.
- The replacement is completed, we carry out the assembly process in reverse order.
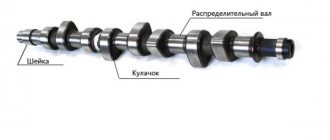
Removing and replacing the camshaft of the VAZ-2110, VAZ-2111 engine
Removing the camshaft of VAZ-2110, -2111 engines
Removing the valve cover of the cylinder head
On the VAZ-2111 engine, use a 10" wrench to unscrew the two nuts securing the ground wires to the studs of the cylinder head plug and remove the wires from the studs. Using a 10" wrench, unscrew two nuts and one bolt securing the plug. Remove the plug... ...and its O-ring.
On the VAZ-2110 engine, remove the housing of the auxiliary units. Remove the camshaft toothed pulley. Unscrew the top nut securing the rear timing belt cover
Using a 13″ wrench, evenly in several steps (until the pressure of the valve springs is removed), unscrew the ten nuts securing the camshaft bearing housings. Remove the front... ...and rear camshaft bearing housings from the studs. Moving the rear timing belt cover slightly away from the cylinder head, remove the camshaft. Remove the camshaft oil seal.
We install the camshaft in the following sequence.
We clean the mating surfaces of the cylinder head and bearing housings from old sealant and oil.
Lubricate the bearing journals and camshaft cams with engine oil. We place the shaft in the cylinder head supports so that the cams of the first cylinder are directed upwards. On the surfaces of the cylinder heads mating with the bearing housings in the area of the outer supports, apply a thin layer of silicone sealant. We install the bearing housings and tighten the nuts securing them in two steps. Pre-tighten the nuts in the sequence shown in the figure until the surfaces of the bearing housings touch the cylinder head. In this case, it is necessary to ensure that the installed housing bushings fit freely into their sockets. Finally tighten the nuts to a torque of 21.6 N•m (2.2 kgf.m) in the same sequence. After tightening the nuts, carefully remove any remaining sealant squeezed out of the gaps. Check the clearances in the valve mechanism. We press in the new camshaft oil seal. We carry out further assembly in the reverse order of disassembly.
Step-by-step work order
Before you begin, make sure that the car is on a level surface, the handbrake is on, and the negative cable on the battery is removed.
Removing the seals
- First of all, open the hood and remove all the plastic elements.
This applies to protecting the timing belt and engine lining. If the bolts are not corroded, they will unscrew easily - The next step is to remove the timing belt. How to properly carry out such work is written in detail in this article. Next, remove the camshaft pulleys by unscrewing the bolts that secure them.
Next, a dilemma may arise about whether to carry out the replacement without removing the cylinder head and dismantling the cylinder head. If you chose the second option, then the procedure for removing the cylinder head is written in great detail in this article.
If the first option is still closer to you, then we perform the following procedure:
- Since the oil seals on the engine are located directly behind the camshaft pulleys, there is no escape from dismantling them.
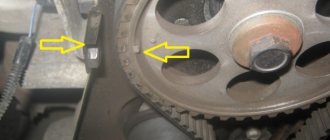
- Next, you need to arm yourself with a special puller, but if you don’t have one, then a regular flat-blade screwdriver will do.
- Using a screwdriver, slowly remove the special key from the groove on the shaft.
The location of the key is indicated by the arrow
Please note that the key must be put in a safe place so as not to lose it.
- Then, we carefully remove the oil seal, first from one side and then from the other.
Be careful not to damage the shaft itself
Installing camshaft seals
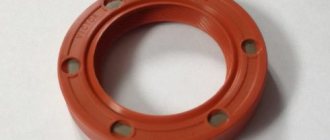
Before you begin installing new cuffs, check its condition by inspecting its working edge, which should not have any defects; it should be smooth without visible damage to the rubber. This also applies to the oil seal spring; it must be intact and there must be no signs of stretching or other visible damage.
The edge under the number is 1. and the spring under the number is 2.
Installation procedure
- Before installing the oil seal on the camshaft, lubricate its lip with engine oil.
The edge is oiled - Then fix it on the shaft towards the cylinder head and, by pushing, guide it as close to the body as possible.
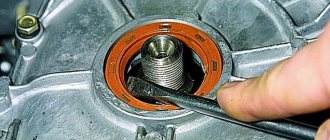
When the oil seal is on, it will easily pass through the body - To finally fix the oil seal in its place, you may need a hammer and a special shape suitable for the diameter of the oil seal. If this shape is not available, then a regular large-diameter socket from the tool kit will do.
- Press the cuff completely into place by gently tapping it.
It is necessary to knock until it aligns exactly with the body at the same distance. Please note that it is impossible to press in all the way, as it may block the flow of oil and the oil seal connection will become leaky. Tapping should not be strong, but frequent - When all the work is completed, reinstall the previously removed keys, pulleys and timing belt onto the two camshafts.
When installing the belt, follow all rules and requirements for aligning all marks.
What does the cuff affect?
To assess the full significance of the role of the camshaft oil seal, let's try to work backwards. Let's take a closer look at what can happen if the oil seal fails and stops reliably performing its tasks.
- The minimum harm that a faulty cuff can cause is oiliness of the entire engine compartment.
- Oil consumption will increase significantly; you will have to add lubricant regularly. The corresponding warning light will constantly remind you of this and will soon become annoying.
- If the oil level drops, valve knocking will begin, which will soon fail. It's only a matter of time.
- Non-metallic elements of the engine compartment that are filled with oil will soon collapse, become deformed, and cease to perform their tasks efficiently.
- If oil gets on the contacts, it will cause problems with starting the engine.
- The camshaft position sensor will begin to generate errors. This will entail an increase in fuel consumption, since the ECU will not be able to regulate the supply of fuel to each cylinder; the load will be the same everywhere.
Functionality check
Before you start replacing the cuff, if you find traces of oil on the engine, you need to carry out several checks:
- It is likely that the system responsible for ventilating the oil sump is clogged;
- The hoses in the system may become pinched, causing a malfunction.
If checking these elements shows that everything is in order, you will have to replace the oil seal.
We advise you to pay attention to several important points
- Start the engine and listen for rattling valves or a loose camshaft making noise. A regular stethoscope will help you here, which will provide more accurate listening. It is likely that you will need to replace the cuffs and camshaft, or its components that are responsible for the knocking.
- In some situations, knocking can be eliminated by simply replacing the timing belt.
- Check the engine at idle speed. If the engine operation is unstable, or it is difficult to start the engine, check the condition of the camshaft position sensor. Sometimes replacing this element returns the motor to its previous operating efficiency.
Why is it necessary to replace on time?
On the left is the new seal, and on the right is the old one
It will be no secret to anyone that timely replacement of the camshaft oil seal will not harm the engine in any way, but will only increase its performance characteristics. The time period for replacing it is not determined in any way and depends only on the mileage and driving style. Since frequent and intensive use of the engine leads to rapid wear of all these parts.
Timely replacement of the oil seal will prevent oil leakage from the engine, which is its main task.
However, if this moment was missed and a leak did occur, this will be accompanied by very unpleasant facts:
- Oil consumption will increase.
- The engine will be constantly dirty , since dust from the road will constantly stick to the oil that spills onto the engine.
- Also, oil that leaks from the engine will negatively affect the general condition of various electrical contacts and elements. First of all, this applies to electrical power supply blocks, where contact may be deteriorated.
conclusions
As you can see for yourself, there is nothing complicated about replacing the camshaft oil seal on a VAZ-2112. This work is not primitive, but does not require any special skills. You just need to carefully read this and all the supporting articles and then the repair will not become something unusual for you. After all, by doing such work yourself, you not only save your budget, but also significantly increase your experience in repairing your own car.
–> VAZ Masters / Engine / Camshaft
Camshaft oil seal VAZ
We change the camshaft oil seal on a 16 valve VAZ-2112 with our own hands
The element of the camshaft that is very often subjected to constant loads and most often fails is the oil seal, or as it is also called the cuff. On a VAZ-2112, you can replace the oil seal with your own hands, since no special skills are required for this.
The video describes the replacement of oil seals on a 124 engine when replacing the timing belt.
Possible consequences
Leakage of lubricant through the oil seal is not dangerous only for the time being:
- Don’t forget about the dangers to the engine of oil leakage from the lubrication system: firstly, increased wear due to the parts running dry, and secondly, oil consumption for topping up, the price of which is also a pretty penny
- The timing belt can jump over a pulley tooth and even several teeth at once, all due to oil getting on the belt teeth caused by leaking camshaft oil seal, which causes an oil film to form on the timing belt
- If lubricant gets in (lubricant is a chemical), the belt begins to spread and can break under load at full speed of the car, you can imagine the consequences
- Therefore, if even minor oil stains are detected on the timing belt casing, it is necessary to immediately determine the cause of the stain.
A little about what an oil seal is in general:
- An oil seal is a rubber-metal cuff that serves to seal the rotating parts of units and prevents liquids (lubricants) from leaking out of them
- The name “oil seal” comes from ancient cars, where felt lubricated with lard (fat) was used instead of a cuff.
- The cuff has a special edge, which, when rotated, creates a turbulence that prevents lubricant from leaking out of the unit
- It is important not to confuse the direction of rotation (there are left and right cuffs), otherwise the new perfectly installed cuff will leak
Nuances
When installing the bearing housing and cylinder head, do not apply sealant that contains silicone. This is due to the fact that the motor heats up, and accordingly the sealant heats up, which releases vapors that can get into the cylinders and further through the system. You should use a sealant whose instructions or packaging indicate that it is safe for the oxygen sensor. When applying sealant to cavities, you should not apply a lot of it, because when tightening the bolts, it can get inside and this will lead to clogging of the oil channels, and therefore there will be no lubrication. The lack of lubricant will lead to increased wear of parts that will quickly fail.
Replacing the cuff
Replacing camshaft seals on a VAZ 2112 begins with standard procedures:
- It is necessary to stop the car with the handbrake, engage first gear and put “shoes” under the wheels
- Then we de-energize the electrical circuits of the car by removing the terminals from the battery
We still have to get to the cuffs themselves, so we remove all the interfering components and parts in order:
- The drive belt of the electric generator is in the way, so we loosen the tightening of the lower and upper nuts securing it
- Then, to loosen the drive belt, we bring the generator closer to the cylinder block, to do this we turn its adjusting bolt counterclockwise, as in the photo below
The adjusting bolt for tensioning the drive belt allows you to move the electric generator closer or further from the motor, while releasing or tightening the drive belt.
Adjusting bolt for tensioning the drive belt
So:
- We use the “10” socket with a ratchet to unscrew the six bolts that secure the front cover of the timing case and remove it
Unscrew the mounting bolts of the timing casing and remove the casing
- Then you need to remove the right wheel, as well as the plastic shield from the engine compartment
- Take Head “17” with a knob and turn the crankshaft in the direction of the clock hand
- In this case, we place the head on the bolt that secures the electric generator drive pulley.
- Rotate until the marks on the camshaft toothed pulleys coincide with the marks on the rear timing belt cover.
- In this case, the engine flywheel mark should be opposite the slot in the clutch housing cover
- We insert a screwdriver between the flywheel teeth, through the hole in the clutch housing, to secure it from turning.
- Then you can safely unscrew the bolt that secures the generator drive pulley, and remove the pulley
- Now, using the “17” key, you need to loosen the nut of the timing belt tensioner roller
- We turn the roller and loosen the belt tension, then remove its rear branch from the exhaust camshaft pulley, then from the belt tension roller and the coolant pump pulley
Remove the timing belt after loosening the tension roller
- Then carefully remove the belt from the crankshaft and exhaust camshaft pulleys, as well as the support roller.
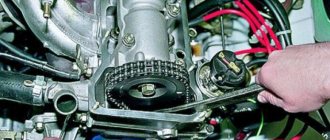
- We take a spanner “17” and unscrew the bolt that secures the camshaft pulley so that the camshaft does not rotate and the marks do not go astray, insert a screwdriver into the pulley hole and thus hold it
We unscrew the “17” key, the bolt that secures the pulley, and use a screwdriver to hold the camshaft from turning
- You can remove the toothed pulley from the camshaft and at the same time pull out the key, if it sticks out, if the key is recessed, it will not interfere with removing the oil seal, then you can leave it in place
- We pull the oil seal out of the seat using curved pliers or a screwdriver
Pull out the oil seal using a screwdriver
Installing the oil seal
All that remains is to insert the new oil seal into place; for this you also need instructions:
- Before installation, it is necessary to lubricate the working surface of the cuff; use engine oil for lubrication.
- Then we press the cuff into the seat
- Pressing should be done carefully so as not to “lift up” and damage the rubber of the oil seal rim
- To perform pressing, it is better to use a hammer with a plastic or rubber head.
- He will also use a mandrel or a piece of pipe of the required diameter.
Press the cuff into place with a hammer and mandrel
- In this case, the edges of the oil seal must be flush with the edges of its seat
- We do the same with the second camshaft oil seal, if necessary.
- Replacement of camshaft seals on a VAZ 2112 was completed successfully
- Then we install the pulleys, timing belt, generator drive pulley, timing case and generator drive belt
- The tension of all drive belts should be adjusted.
Add a commentAdd a comment We recommend reading VAZ 2109: replacing the camshaft oil seal without problemsVAZ 2110 camshaft play - solution to the problemReplacing the VAZ 2110 camshaft oil seal using an independent methodReplacing the VAZ 2110 camshaft and all about it
Replacing the camshaft oil seal on the VAZ-2109 and other front-wheel drive vehicles of the VAZ line is a simple, but necessary manipulation that allows you to extend the life of the power unit.
Ignoring cuff malfunctions leads to loss of oil, small solid particles entering the engine and, accordingly, increased wear of the internal mechanisms of the engine.
Content
Rear SC
The procedure for replacing the rear motor assembly is noticeably more complicated than the front one, so not everyone will decide to carry out such work on their own. We recommend that you consult first and watch training videos.
To replace the rear AC, you will have to spend a little more time and effort. The work is not easy, but with the right approach, a positive result can still be achieved.
Rear SC
- Disconnect the negative terminal from the battery. This will completely de-energize the car and avoid unpleasant situations.
- Remove the flywheel.
- Remove the rear protective cover from the engine crankcase.
- Next, we disconnect the fastening bolts from the oil seal retainer, after which it can be removed together with the seal outward.
- Be sure to arm yourself with a core or mandrel. Using these tools, you can press the crankshaft rear oil seal out of its seat - the race. The element itself is clamped in a vice, after which the problematic component is exposed to the tool.
- The holder is probably covered with dust and dirt. Be sure to delete it.
- Now carefully examine the condition of the surface. Even if there is even minor damage to the retainer, it will have to be replaced along with the oil seal itself.
- Now select a suitable mandrel so that its size matches the parameters of the new oil seal. Insert the spare part into its place. In this case, it is important that the working edge of the new oil seal is directed with the working edge inside the retainer, that is, the holder.
- Be sure to change the seal on the retainer. This is done regardless of the condition of the seal on the old crankshaft oil seal.
- Lubricate the crankshaft lips and flange with regular engine oil. This will make it easier to return the holder to its seat.
- To make it more comfortable for you, use a wooden stick to support the lip on the oil seal.
- Now all that remains is to perform the reassembly procedure, following the specified sequence of dismantling work.
The basis for successful replacement of front and rear joints is patience, attentiveness and perseverance. If you rush, rush, nothing good will come of it, and you will have to go to a service station and pay a lot of money.
When is it necessary to replace the oil seal?
The camshaft seals are replaced if oil leaks are detected in the pulley area.
In addition, the element is replaced if there is obvious mechanical damage. The procedure is not urgent, so a machine with a faulty cuff can be operated with some caution for a long period.
The exception is when the loss of oil through a destroyed element is sufficiently large or the destruction of the part is so massive that it allows dust to penetrate into the power unit.
When is it time to change?
The car crankshaft has two oil seals: front and rear. They are dense elastic rings in a hard cage.
Their purpose is to prevent dust and dirt from entering the crankcase and to prevent oil leakage. The service life of the sealing rings is 150 thousand kilometers. But consumables may wear out sooner. The reason for this may be:
- poor quality product;
- work under increased loads;
- overheat;
- untimely replacement of oil and filter;
- use of oils that do not meet the recommended ones.
You can diagnose the replacement of oil seals by the oil stains that appear on the engine and gearbox. An oil leak can cause the timing belt to break, causing damage to the valves. In this case, it may be necessary not only to replace the valves, but also to overhaul the engine.
List of tools
To replace the camshaft oil seal on VAZ-2110 and 2112 16 valves, a minimum set of tools is required. These include:
- key to “10”;
- key to "17";
- Slotted screwdriver;
- Mandrel for pressing;
- A small amount of motor oil.
A pit or lift is not required for manipulation. The unit is fully accessible from the engine compartment. On VAZ-2110 cars there are 8 valves and on 16 valve units the oil seal is located under the camshaft pulley, on the right side in the direction of movement of the car.
How to change the crankshaft oil seal on a Priora
We replace the front crankshaft oil seal when traces of an oil leak appear on the wall of the engine crankcase pan, under the generator drive pulley.
Remove the timing belt (see “Replacing the timing belt”). After removing the belt, do not turn the crankshaft and camshafts so as not to disrupt the engine valve timing.
Use a screwdriver to pry off the toothed pulley.
. and remove it from the crankshaft toe.
Use a screwdriver to pry off the oil seal (do not damage the crankshaft journal). . and remove it from the oil pump cover. Apply a thin layer of engine oil to the working edge of the new oil seal...
...and press in the oil seal using a tool head or a piece of pipe of a suitable size. We carry out assembly in reverse order. In this case, it is imperative to replace the timing belt.
There are many reasons why oil seals of various shafts, axes, cylinders, pushers, valves and other rotating and rubbing mechanisms become unusable and can no longer serve for their intended purpose - to hold liquids and gases under pressure in a certain volume.
Replacing the front crankshaft oil seal.
If you find traces of oil leakage through the crankshaft oil seals, first check to see if the crankcase ventilation system is clogged and if its hoses are pinched, and if necessary, repair the faults. If the oil leak does not stop, replace the seals. A sign that the front crankshaft oil seal needs to be replaced is oil leaking through its lip. In this case, oil is sprayed out by the rotating crankshaft pulley, as a result of which the entire front part of the engine and the timing belt become oily; You will need: all the tools necessary to remove the timing belt, as well as a straight-blade screwdriver (two), and a hammer.
Replacing the rear crankshaft oil seal.
The cause of oily clutch discs may be a leak in the gearbox input shaft oil seal or the crankshaft rear oil seal. Engine and transmission oils differ in smell. With a certain skill, you can use it to determine which of the seals is defective. There is another way to determine the type of oil. Drop the oil into a thin layer of water poured into a container. Transmission oil will spread over the entire surface of the water in the form of a rainbow film, and motor oil will remain in the form of a drop, similar to a grain of lentil; You will need: a screwdriver with a straight blade, a mandrel.
How to change valve stem seals on a 16-valve Priora
Well, Priora began to “eat” engine oil. The exhaust has darkened, and streaks have appeared in the air duct from the mass air flow sensor to the throttle valve assembly. The unit itself is also in a sad state from being oiled. But the compression in the cylinders is fine. Replacing valves for Lada Priora 16 valves. The car does not lose power. What's the matter? And the fact is that, most likely, the oil seals on the valves have worn out. How to change valve stem seals without removing the head for 16 replacement valves. How to remove the head on a Lada Priora 16 valves. Replacing valves, cylinder head on Lada Priora 16. Or as they are called - valve seals. But there are 16 of them on Priora and they need replacing.
Replacement procedure
Replacing the camshaft oil seal on a VAZ-2114 8-valve car and other vehicles equipped with a similar engine is practically no different from that on the 16-valve power units of the 2112 model. However, there are still some differences.
”alt=””>
Performing manipulations on 8-valve engines
The replacement procedure begins with fixing the car in a stationary state using the parking brake and “heels” under the wheels. The gear lever must be in neutral. After this, using a 10mm wrench, the timing cover is removed.
The camshaft and crankshaft pulleys should be installed in the TDC position. To do this, the mark on the camshaft sprocket is aligned with the installation lug located on the rear cover of the timing drive. After the gas distribution mechanism has been brought to the required position, it is fixed using a screwdriver inserted into the teeth of the flywheel.
Using a 17 key, loosen the tension roller bolt and remove the belt from the upper sprocket. After this, the camshaft pulley is secured from turning and the bolt securing it to the end of the shaft is removed. The star itself is removed. When dismantling the sprocket, care should be taken, since under it there is a small semicircular key, which is very often lost during the disassembly of the timing drive.
After the above-described manipulations, the camshaft oil seal is removed using a screwdriver. The new part is lubricated with engine oil and pressed into place using a special mandrel. If you don't have one, you can use a socket head of a suitable size. Assembly of the mechanism is carried out in reverse order.
Performing manipulations on 16-valve engines
Replacement of VAZ-2112 camshaft oil seals is carried out in a manner similar to that described above. In this case, the exhaust camshaft sprocket is first dismantled, then the intake camshaft. The amount of work increases slightly due to the greater number of mounting points for the timing cover.
In addition, special care should be taken when reassembling the mechanism and setting marks. On 1.5 liter 2112 engines, incorrect installation of timing marks often leads to damage to the valve mechanism and CPG.
”alt=””>
Front SC
We recommend starting with the front one, since this oil seal is the easiest to replace. Even a car owner without much experience can handle it. Once you learn how to change it, you will most likely be able to replace the rear crankshaft oil seal yourself. But it is better to act according to the circumstances.
Retrieving an element
The steps for replacing the front oil seal are as follows:
- Remove the protective cover located on the timing belt;
- Remove your engine protection. You will have to get under the bottom and unscrew the corresponding fasteners;
- Set the piston of the first cylinder to top dead center on the compression stroke;
- Slightly loosen the timing belt tension, after which it can be easily removed;
- Remove the front right wheel;
- Remove the generator drive belt, and also do not forget to remove the pulley;
- Now we dismantle the fasteners of the crankshaft pulley and take it out. Here you will need to first remove the key;
Front SC
- Be sure to drain the engine oil from the system. To do this, prepare an appropriate container in advance. If you plan to refill the oil, be sure to keep the container clean and dry;
- Remove the oil pump. It is on this that the desired crankshaft oil seal is located;
- To remove the SC, you will need a flathead screwdriver;
- At the same time, check the condition of the oil filter. Replace it if necessary;
- Having dismantled the old front crankshaft oil seal, you can now install a new one in its place;
- Installation of the SC is carried out with a 27 mm nozzle or head;
- Assembly of the unit is carried out exactly in the reverse order.
Since replacing the AC requires serious dismantling work, it is not superfluous to simultaneously check the condition of other units, replace the oil, filter or other parts.
Evaluation of results
The effectiveness of replacing camshaft seals is assessed after the mechanism is fully assembled and sea trials are carried out. In the area of the replaced part, even when the engine is running at high speeds, there should be no oil leaks or signs of sweating. If such phenomena occur, it means that the element was pressed incorrectly or had manufacturing defects.
Alfa Romeo” alt=””>Rover” alt=””>ZAZ Sens” alt=””>Kia Spectra” alt=””>Sources used:
- https://enginehack.ru/zamena-salnika-raspredelitelnogo-vala-vaz/
- https://carfrance.ru/kak-zamenit-salnik-raspredvala-na-vaz-2112-svoimi-rukami/
- https://masteravaza.ru/dvigatel/raspredelitelnyj-val/vaz-2112-zamena-salnikov-raspredvalov-1128
- https://znanieavto.ru/dvs/zamena-salnika-raspredvala.html