Instructions
You can replace the oil seals on a VAZ yourself. To do this, you should find a place where the operation will be performed; it is better to use an inspection hole or overpass.
Required Tools
To perform the procedure you need to prepare:
- set of sockets and keys;
- screwdrivers with bits;
- container for draining the working fluid;
- new cuffs;
- sealant.
Stages
The procedure for replacing the front crankshaft seal consists of the following steps:
- The negative terminal of the battery is disconnected to de-energize the car.
- We remove the timing belt and engine protection.
- Then you should loosen the timing belt tension and remove it. In this case, you need to ensure that the marks match.
- Next, unscrew and dismantle the right front wheel.
- Now remove the generator drive belt.
- Then you need to unscrew the mounting bolt and remove the crankshaft pulley.
- Drain the oil from the engine.
- We dismantle the oil pump on which the front oil seal is installed.
- We replace the front cuff with a new one, lubricating it on the outside with sealant and on the inside with machine oil.
- Assembly is carried out in reverse order.
Replacing the back cuff is a little more complicated and involves the following steps:
- First of all, the negative terminal from the battery is disconnected.
- Then you need to remove the clutch basket.
- Next, the flywheel is dismantled.
- Remove the clutch housing protective cover.
- Unscrew the bolts securing the rear oil seal holder and remove it together with the seal.
- Having secured the clamp in a vice, remove the seal.
- We inspect the cuff retainer. If defects are found, the part must be replaced.
- Using a suitable mandrel, insert the new cuff into the holder with the working edge inside the retainer.
- We change the holder gasket and put it in place, having previously lubricated the crankshaft edge and flange with engine oil.
- When mounting the holder, you need to carefully tuck the working edge of the seal ring onto the shaft flange using a wooden stick.
- Next we carry out the reverse assembly.
After replacing the shaft seals on a VAZ, you should check after a while for oil leaks.
How to change the front and rear crankshaft oil seals of a VAZ 2110
What you will need to replace:
- ring wrenches or a set of sockets “10”, “13”, “19”;
- pliers;
- screwdriver;
- container for draining lubricant;
- new o-rings.
When replacing a crankshaft oil seal, it is better to purchase a kit right away, fortunately, they are not expensive - a large oil seal from the VAZ manufacturer with article number 21080100516000 costs about 150 rubles, and a small oil seal with article number 21081005034 costs about 60 rubles. You can also purchase a set of oil seals from ESPRA, catalog number E07418, costing 420 rubles.
The price is indicated for spring 2022 in Moscow and the region.
Replacing the front crankshaft oil seal of a VAZ 2110
- Drain the engine oil into a container with a volume of at least 4 liters.
- Remove the front timing cover.
- Remove the right wheel. Turn the crankshaft clockwise by the pulley mounting bolt until the marks on the toothed pulleys align.
- We fix the crankshaft from turning.
- Unscrew the bolt securing the generator drive pulley and remove the generator drive pulley.
- Turn the tension roller to a position in which the belt will be loosened as much as possible. Remove the timing belt.
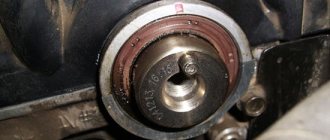
- Use two screwdrivers to pry up the crankshaft toothed pulley and remove it from the crankshaft toe.
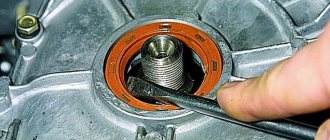
- Use a screwdriver to pry up the oil seal and remove it from the oil pump cover.
- Lubricate the working edge of the new oil seal with engine oil and press it in.
Replacing the rear crankshaft oil seal of a VAZ 2110
The rear crankshaft oil seal is pressed into the oil seal cover. To carry out the replacement, it will be necessary to remove additional parts and mechanisms, and as a result, highly qualified performer, therefore, to replace the rear oil seal, it is recommended to contact a service station. But, if you decide to replace the rear oil seal of a VAZ 2110, the following instructions will help you:
- Drain the oil from the engine and gearbox.
- We remove the wheel.
- We remove the CV joint from the hole in the ball joint of the bearing.
- We take out the drive shaft with the CV joint.
- Disconnect the gearshift drive rod.
- We unscrew the gearbox mounting bolts and remove the gearbox from the engine. We remove the gearbox.
- We unscrew the six bolts securing the clutch housing to the flywheel and remove it.
- Unscrew the six bolts securing the flywheel to the crankshaft and remove it.
- Use a screwdriver to pry up the oil seal and remove it from the holder.
What parts to choose for replacement
It is better to immediately change the boot along with the oil seal.
Before you begin repair work, you need to purchase the necessary parts for replacement.
As for the oil seal, Balakovo products are very popular. You need an oil seal with article number 2110–1701043 and 21100-1701043-00 .
Manufacturers offer two options for oil seals - simple and reinforced.
In addition, it is recommended to immediately purchase a cardan boot, as there is a high probability that it is also worn out. Even if this is not the case, it may break during the repair process. Therefore, it is better to spend a small amount on anther than to bother with disassembly again.
Recently, reinforced oil seals have appeared on sale, which are called that way. If you believe the assurances of sellers, their service life is significantly higher than that of standard products.
Reasons for failure and number of gearbox seals
Among the most common reasons:
- The service period has expired.
- Factory defect.
- Structural features of the car.
Many drivers assume that replacing one oil seal can eliminate the problem, which is not entirely correct. There are three cuffs that are installed in the car. Consequently, it is necessary to carry out three operations:
- Replacing the VAZ 2110 gearbox seals located on the front wheel drives.
- Replacing the VAZ 2110 gearbox seal located on the input shaft.
- Replacing the gear selector rod cuff.
It would seem that such a simple mechanism as a box, but it has three different oil seals that need to be replaced. After replacing the seals, the car starts to work much better. This affects the quality of gear shifting, and subsequently the handling of the car.
Gearbox device
General view of the gearbox
Before proceeding directly to the process of replacing the oil seal, it is necessary to consider the structure of one of the main elements of the car - the gearbox. So, what parts does the unit consist of:
Gearbox: 1 – clutch release bearing; 2 – guide sleeve; 3 – input shaft; 4 – roller bearing of the secondary shaft; 5 – secondary shaft; 6 – retaining ring; 7 – satellite axis; 8 – speedometer drive drive gear; 9 – transport plug; 10 – wheel drive oil seal; 11 – tapered roller bearing of the differential; 12 – axle gear; 13 – satellite; 14 – differential box; 15 – clutch housing; 16 – driven gear of the main gear; 17 – drain plug; 18 – adjusting ring; 19 – driven gear of the 1st gear of the secondary shaft; 20 – synchronizer for 1st and 2nd gears; 21 – driven gear of the second gear of the secondary shaft; 22 – retaining ring; 23 – persistent half ring; 24 – driven gear of the third gear of the secondary shaft; 25 – synchronizer for 3rd and 4th gears; 26 – driven gear of the fourth gear of the secondary shaft; 27 – needle bearing of the secondary shaft gears; 28 – ball bearing of the secondary shaft; 29 – thrust plate; 30 – driven gear V of the secondary shaft transmission; 31 – 5th gear synchronizer assembly; 32 – nut; 33 – thrust washer; 34 – drive gear V of the input shaft; 35 – rear cover of the gearbox housing; 36 – ball bearing of the input shaft; 37 – gearbox housing; 38 – roller bearing of the input shaft; 39 – breather; 40 – input shaft oil seal
Work order
- First of all, we disconnect the negative terminal, as a result of which we de-energize the VAZ-2110. After this procedure, it is necessary to remove the protection of the timing belt and the car engine.
- We loosen the tense timing belt, and then simply remove it, making sure that the marks match.
- We remove the right wheel in front of the VAZ. After completing the manipulations with the wheel, the generator drive belt is also removed, after which you must unscrew the bolt securing the crankshaft pulley.
- The engine oil is drained and the oil pump, to which the front oil seal is attached, is dismantled. We replace the cuff and carefully coat it with sealant.
- The cuff on the inside is generously coated with oil, then remove the seal and take out the front cuff of the car. We collect all this in the reverse order of the above steps.
Replacing the rear cuff will be much more difficult. The procedure for carrying out repair actions is as follows:
- We remove the negative terminal from the battery, after which it is necessary to remove the clutch basket. After these procedures, we proceed to dismantling the flywheel, and then to removing the crankcase casing.
- The rear oil seal holder is removed by unscrewing the tightened bolts securing it. We unscrew the bolts that secure the flywheel.
- While holding the latch, you need to pull out the seal. To do this, you can use a vice and inspect the fixing part of the cuff. If there are any defects in it, this part is also replaced, and then the working edge of the new cuff is placed inside the retainer and the gasket is replaced.
- The edge of the crankshaft together with the flange is generously coated with oil. We install the holder, very carefully tucking the working edge of the sealing ring onto the flange. Reassembly after repair is carried out in the reverse order. After making repairs, you need to check from time to time to see if engine oil is leaking.
Changing crankshaft seals on a VAZ-2110 8-valve engine with your own hands
Any oil leak from car components is a serious cause for concern. Having discovered oil stains under the car, you need to immediately find out the cause of their occurrence. Most often, oil leaks occur in the VAZ-2110 due to poor-quality or worn-out crankcase housing gasket or oil filter. These problems are not serious and can be fixed quite easily.
But if oil stains are found under the hood, everything can be much more serious. As a rule, this indicates failure of the crankshaft seals. Replacing these parts is a more complex process than replacing pan gaskets or housings.
Signs of a leaking oil seal
If a puddle of oil forms under the car, this is a clinical case. The cause of the malfunction is clearly visible to the naked eye. The seal of the inner CV joint does not leak so clearly. Oil droplets may appear after sitting in the garage, especially in winter, when the tires become tanned. Don't be lazy to regularly look under the bottom. When the oil seal is “snotty”, there will be a dirty oil stain around the junction of the CV joint with the box.
Lubricant leaks, splashing onto the muffler, give off an unpleasant burnt smell. This is also an indirect sign of a leaky seal. In general, make it a rule to inspect all places of potential oil leakage at every maintenance or transition to the summer (winter) operating season.
How to determine the wear of oil seals on a VAZ-2110
An oil leak from under the clutch housing cover can be seen if you drive the car into an inspection hole.
The oil seal itself is a product made of a combined material. In this case, it is rubber and metal. The purpose of the oil seal is to provide a tight seal between the rotating parts of the car. In another way, the oil seal is called the shaft cuff.
Before changing oil seals, you need to check the following engine parts and systems:
- Check the oil supply system for blockages.
- Oil filter.
- Hoses for their integrity.
- Crankcase ventilation system.
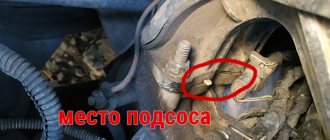
Cuff edges
When you see these drips, suspicion falls on the front crankshaft oil seal.
You can verify this by removing the timing cover.
If all these systems are in working order, and oil leaks on the engine do not disappear, it means that the seals have most likely become unusable. The most characteristic sign that indicates the deterioration of the seals is traces of oil smudges on the edges of the cuff.
Since the crankshaft pulley rotates at high speed, oil gets onto the entire front part of the engine, and the accessory belt also becomes oily. Such a belt will have to be changed, since its contact with oil is unacceptable. In addition, there is another sign indicating wear of the rear oil seal. These are traces of oil on the joints of the clutch housing and cylinder block.
How to properly drain oil from a box
There may be some inconvenience with the oil draining process. Indeed, it is necessary to have some experience here.
- To supply oil to the gearbox, you need to find the cap. It is made of rubber. It must be unscrewed and thoroughly wiped with a dry cloth to remove dust, dirt and oil residues. The same action should be done with the drain hole.
- The oil drain plug is unscrewed. Place a container under the car to allow any remaining oil to drain into it.
- The dipstick is removed, which indicates the amount of oil.
- We change the oil. New oil is poured to the mark indicated on the dipstick.
- The dipstick must be cleaned of any remaining oil with a dry cloth.
- After new oil enters the gearbox, you need to check its level again. To do this, the probe is placed in place. If the level readings do not correspond to the mark, you must add the required amount.
Note: in earlier car models, there is no oil indicator. The hole is located on the right side of the gearbox housing. Oil must be filled to the bottom edge of the hole.
Some materials are available in specialized literature. Videos and photos of the replacement process can be easily found on the Internet. Replacing oil seals is not expensive. If necessary, if you can’t do it yourself, this work must be entrusted to professionals. They can be found at your nearest service station. But if you do everything as required by the instructions, no problems should arise. And why overpay, especially since the price for services of this kind is not cheap.
Necessary tool
In order to change the seals, you need to prepare the following set of tools:
- A set of keys or sockets. Among them there must be keys for 10, 13 and 19.
- Several screwdrivers.
- Pliers.
- Prepare a special container for draining the oil. It can be made from a plastic canister, which is cut into two parts. Cut-up five-liter water bottles will also work.
- New seals.
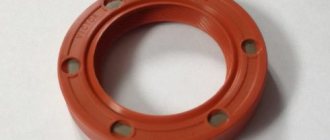
Front crankshaft oil seal.
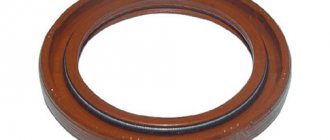
Rear crankshaft oil seal.
Articles
As for new oil seals, it is better to change the front and rear at once. They are also called big and small.
- The most popular parts are from AvtoVAZ, with article numbers 21080100516000 and 21081005034.
- A better quality seal kit is from ESPRA, with catalog number E07418. A foreign manufacturer costs twice as much.
A set of branded ESPRA oil seals.
Replacement algorithm
In order to replace a part, you need to perform the following sequence of actions:
- First of all, you need to drain the oil from the engine. To do this, you will need an empty container of at least four liters.
- Next, remove the front timing belt cover.
Unscrew the two bolts on the sides of the cover.
Unscrew one bolt in the center of the cover.
Remove the timing cover.
- You need to raise the right front part of the car using a jack and remove the front wheel.
Jack up the front and remove the wheel.
- The camshaft must be turned clockwise by the bolt. You need to align the marks on the pulleys.
Align the mark on the pulley with the installation tab on the cover.
- The crankshaft must be fixed.
You can fix the crankshaft with a screwdriver...
...or lock the camshaft pulley.
- The generator drive pulley is removed.
First, under the hood, loosen the tension of the generator belt, then through the wheel arch, using a 17-mm spanner, unscrew the bolt and remove the pulley.
- Next you need to remove the timing belt. To do this, the tension roller must be turned so that the belt is in its loosest position.
Loosen the roller and remove the timing belt.
- The toothed pulley is removed. For this, two screwdrivers are used.
Usually the pulley can be easily removed.
But you may need a puller.
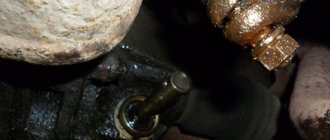
Only after this can the old oil seal be removed. For this you also need to use a screwdriver.
Under the pulley we see oil and an old oil seal.
We take out the worn oil seal and clean the surfaces.
Before installing a new oil seal, you need to lubricate its edge with machine oil. Only after this is it pressed in.
If the toothed pulley is completely rusted and there is no puller at hand, watch a video on how to remove the gear using the third method:
Rear oil seal
In addition, to replace it you will need to remove additional components and parts. If the VAZ-2110 car owner has already had to change various oil seals, then he will definitely cope with this task. An inexperienced car enthusiast can ask a friend who has had to do similar work for help.
The procedure goes as follows:
- You need to drain the oil from the gearbox.
Using a 17 key, unscrew the plug and drain the oil into a container; when finished, put the plug back in place.
- The wheel is removed. It is for this reason that it is recommended to change two oil seals at once in order to avoid unnecessary disassembly procedures.
- The CV joint is brought out.
To remove the drive, you need to unscrew the bolts securing the ball joint.
- The drive shaft is taken out along with the CV joint.
We push out the hinge using a mounting spatula.
- The gearbox is removed. Before doing this, you need to disconnect the drive rod.
We unscrew the jet rod.
Remove the clutch housing cover.
We unscrew the bolts securing the box.
Together we move the gearbox to the side.
- Now you need to remove the flywheel.
Before removing the flywheel, put marks.
- Having removed the flywheel, we see the oil seal.
View of the seal.
- The old oil seal is removed using a screwdriver.
We clean the seat from dirt and install a new oil seal.
Next you need to lubricate with oil and install a new crankshaft oil seal. Assembly occurs in reverse order.
It happens that the old oil seal cannot be pulled out with a screwdriver, then self-tapping screws will come to the rescue. More details are shown in the video:
Replacing the cuff
Replacing gearbox seals on a VAZ 2110
In order to replace the front wheel drive seal, you must be able to do the job correctly. When it is not possible to replace it yourself, you need to contact special workshops. The local specialists will do this work in a matter of hours, or maybe even less.
Removing the drive seal
So, to replace the front wheel drive seals, you need to do the following:
Note: When replacing seals, there is no need to remove and disassemble the entire gearbox. The oil seals for the right and left drives are not interchangeable.
- The first step is to drain the oil from the gearbox.
- Once the oil is in the container, remove the drive.
- After opening access to the oil seal, it is necessary to carefully remove the damaged or worn-out oil seal with a sharp tool, taking the utmost care.
Installing a new cuff
The oil seal removal process is completed. But, it is necessary to install a new part in place of the damaged one. To perform these actions, several simple rules are used:
- The oil seal surface is lubricated with special transmission oil.
- To install a new oil seal, it is necessary to apply a used cuff to its surface (from the inside).
- By lightly tapping the used oil seal with a hammer, we place the second new one in its original place.
- We assemble the mechanism.
The oil seal installation work has been completed. Assembly steps must be performed in exactly the opposite order. The left drive oil seal is replaced using the same technology as for the right one.
Input shaft cuff and its replacement
The input shaft seal may need to be replaced. The job won't seem too difficult if you do specific steps in a specific order:
- The gearbox is removed.
- The crankcase has several clutch parts. They must be carefully removed.
- The oil seal is pierced with a special tool. The center punch is ideal. The work should be carried out very carefully, since damage to the input shaft of the gearbox is unacceptable.
- Using thin-nose pliers, the old oil seal is removed and a new one is installed in its place.
How to change the oil seal on a VAZ 2110
- The working surface of the new oil seal must be lubricated with transmission oil.
- The old seal is installed on the outer surface of the new seal and, with careful blows of a hammer, the new seal is installed in place of the old one.
Mechanism rod oil seal and its replacement
During vehicle maintenance, it may be necessary to replace the gear selector rod cuff. To install this part, it is necessary to disassemble the gearbox housing. To complete this work you need to do a few simple steps:
- Using a tool (socket wrench) with the number “17”, unscrew the bolt securing the power unit support bracket.
- To remove the two nuts securing the rear cover of the gearbox housing, you must use a 17 mm spanner.
- The bracket is removed.
Note. The word “removed” means careful removal of the part and careful storage until the mechanism is assembled.
- There are several parts on the gearbox that relate to the clutch release drive. They need to be removed.
- The speed sensor mounted on the gearbox is disconnected and separated from the device.
- There is a rubber plug in the crankcase that must be removed.
- Using a tool, a 10 mm wrench, unscrew the nut securing the speed sensor drive.
- Next, you need to carefully remove the drive.
Note: many mechanics recommend turning out the crankcase mounting stud. It must be moved as much as possible towards the engine cylinders. There are two nuts on it, which, when rotated, allow this operation to be performed.
- For the next job you must use a key with the number “13”. Use it to remove the four nuts that secure the rear crankcase cover.
- To separate the lid, lightly tap it. The tapping continues until the lid is released.
Note: for this work it is better to use a hammer with a rubber on the heel or a regular hammer, but tap through a wooden block.
- The mechanism cover is removed.
- Without any turns or changes, third gear is engaged.
- Using a key with the number “10”, unscrew the fifth gear fork bolt.
- It is necessary to install fifth gear.
- The bent sides of the primary and secondary shaft fastening nuts must be carefully pressed out.
When and why do you need to change crankshaft oil seals?
Today this part is a very important part of the car. This is due to the fact that even with a slight displacement an oil leak will appear.
According to experts, it is worth replacing the oil seal at least once every three years. Although, this period of time is conditional, since in some situations it may be necessary to perform unscheduled repairs. For example, in case of engine overheating.
It is worth starting unscheduled repairs only if there are certain signs indicating the need for such work. In this case, an oil leak may be an alarm.
During any repair, the master must have a certain set of tools and materials on hand. When replacing oil seals, you do not need to use specific equipment. It is enough just to choose the appropriate size seals. Do not forget that these parts in a car, presented on the domestic automobile market, can be single-edged, as well as with or without anthers. Replacing oil seals should only be done with similar models.
Many modern car owners believe that only a qualified specialist working in a car workshop can change oil seals. This is a misconception, since today there are a huge number of manuals and recommendations posted on the Internet, thanks to which the work process is simplified.
Selection of CV joints and oil seals for the Chevrolet Lacetti
The choice of new front suspension elements for the Chevrolet Lacetti is quite large, taking into account the analogues suitable for the entire line of GM golf-class cars. The Lacetti received many chassis elements from Opel, and until 2003 the brand itself bore the name Nubira and produced cars and components mainly for the American market.
When selecting, take into account the type of engine, year of manufacture of the car, type of gearbox. Any part can be selected by VIN, which encodes information about the parameters of spare parts.
The best components are original ones, made in Korea; Chinese analogues can be three times cheaper, but the quality of materials, according to reviews from owners, always remains much worse. According to statistics, the mileage life of Chinese analogues is half that of the original ones.
It will be useful: Automatic transmission control unit: purpose and device
Why is it necessary to change on time?
Naturally, timely repair of parts that have become unusable will extend the life of both the engine and the VAZ-2110 vehicle itself. The time after which it is necessary to change the oil seal directly depends on how old or new the car is, on the driving style of the car owner and operating conditions.
If you change them in a timely manner, this will help reduce the cost of car repairs, because such measures eliminate engine oil leaks, which negatively affect the operation of the engine.
If you do not change it in time, the VAZ-2110 car will “eat” more motor oil, and the engine itself will begin to collect dirt and dust, which cannot but affect the stability of its operation. Engine oil leaks negatively affect car parts that are not made of metal, and the contact in the terminals will become much worse, which, in turn, will affect how the car starts.
The main reasons for device failure
The main factor indicating that crankshaft oil seals on VAZ 2110 models require increased attention is the numerous oil flows in the engine system, which arise under the influence of a number of reasons, including:
- Aging of the unit and its natural, physical wear;
- Problems with the installation of the device or its incorrect installation, which entails the occurrence of cracks on the working plane of the cuff;
- Various mechanical damages;
- Use of low-quality rubber.
The following set will be useful for work:
- Set of car keys;
- Screwdrivers with various attachments;
- Key for tensioning the timing belt;
- Graphite lubricant or antifreeze;
- Waste container;
- Canister with motor oil;
- Heat-resistant sealant.
Changing the front oil seal with your own hands
It is worth immediately noting that replacing the front crankshaft oil seal is not particularly difficult and is quite within the capabilities of even a novice car owner. It should be performed in this order:
- Remove the protective cover from the timing belt and dismantle the engine protection;
- We set the piston in the first cylinder to TDC on the compression stroke;
- Slightly loosen the timing belt, then remove it;
- We remove the front right wheel, after lifting the car with a jack;
- We dismantle the generator drive belt and pulley;
- Unscrew the fastening from the crankshaft pulley and remove it. Here you should first remove the key;
- Drain the engine oil from the system;
- We remove the oil pump, on which the device we need is located;
- We remove the old part using a screwdriver and put a new one in its place, using a nozzle or head on “27” for this;
- We reassemble the previously dismantled units in the reverse order.
Replacing the front-wheel drive oil seal on VAZ-2108, VAZ-2109, VAZ-2110, VAZ-2115 cars
Is the front wheel drive seal leaking?
Thoughts like: How expensive is it to replace an oil seal? Is it possible to replace the oil seal with your own hands? And how difficult is it to replace it? Yes!? Then you have come to the right place... I can say for sure that it is not difficult, and you can easily carry out the work yourself. Of course, only if you have the desire, the necessary tools and precise instructions for correctly replacing the front wheel drive oil seal on VAZ-2108, VAZ-2109, VAZ-2110, VAZ-2115 from the Auto Repair School website! ))) Well, as they say, from words to deeds! Let's move on to the description of the main thing - a list of tools, purchasing spare parts and the process of replacing the drive oil seal with photographs. It will be useful. Replacing a Volvo XC90 automatic transmission with your own hands Tools: 17mm wrench, 30mm socket wrench with a long knob, pry bar, screwdriver, oil drain container, a hammer and a mandrel for carefully pressing the oil seal. You can also use an old oil seal to mount the drive seal. But this is not very convenient. It’s easier, after all, to buy an oil seal and select a piece of pipe of a suitable diameter for it.
Spare parts: when purchasing a drive oil seal, you must know exactly which side you need it for. Since the oil seals of the left and right drives differ in the direction of the oil drainage notches. There are three main differences from each other. First, the direction of the arrows on the inside of the seals. On the right oil seal, the arrow indicates movement to the left, and on the left, to the right. The second difference is the numbers at the end of the catalog number. The number on the right oil seal ends in an even number (4), on the left oil seal - in an odd number (5). And the third, exactly applies to Balakovo-made oil seals, is the color of the oil seal itself. Right black, left brown (photos 1 and 2).
Let's move on to the description of the process of replacing the front wheel drive oil seal on VAZ-2108, VAZ-2109, VAZ-2110, VAZ-2115:
We drive the car into a pit or overpass and drain the oil from the gearbox. You don't have to drain everything. It will be enough to drain about one liter. Loosen the wheel bolts and unscrew the front hub bearing nut (photo 3).
We jack up the car and unscrew the two bolts securing the lower ball joint to the steering knuckle (photo 4). Having installed the pry bar between the body and the anti-roll bar, push the lower arm down. And pull out the end of the drive from the hub.
We unscrew the bolts securing the lower ball joint from the steering knuckle of the VAZ-2109. After that, we climb under the car and, using a pry bar or mounting blade, leaning on the boss on the gearbox housing, push the drive out of the gearbox (photo 5). At this moment, if you forgot to drain the oil from the box, the fun will begin))).
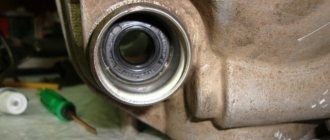
Using the same pry bar or screwdriver, we pull out the oil seal from the gearbox (photo 6).
AND …. We can press in a new oil seal (photo 7). We do not press the oil seal all the way, namely as shown in photo 8.
How to correctly install the front wheel drive oil seal on a VAZ-2110 car. We carry out the assembly in the reverse order. Don't forget to fill the gearbox with oil!
If you find an error, please select a piece of text and press Ctrl+Enter.
Diagnosis of the problem
- Signs indicating the need to replace the gearbox seal are, first of all, oil traces left on the asphalt after the car has been parked.
- Before changing the oil seal, you should first make sure that this is the problem.
- Because oil leakage is often caused by a poorly screwed oil filter.
- Failure to identify an oil leak problem in a timely manner can have serious consequences.
- If you do not detect an oil leak from the gearbox in a timely manner, it will leak out completely, and then instead of the oil seal, the price of which is 50-100 rubles, you will have to repair the gearbox (see Repairing the VAZ 2109 gearbox - we do it right), and the price will increase significantly.
- To prevent this, it is necessary to periodically check the oil level in the engine and gearbox.
- Insufficient oil level in the gearbox can be manifested by a characteristic crunching sound that occurs when changing gears.
Replacing the gearbox rod seal of a VAZ 2109
- An awl like a crochet hook or something similar.
- Keys for 10 and 13.
- The awl is ordinary.
- Plastic cork from a mineral water bottle.
Replacement is carried out on an inspection pit or a lift. If there is nothing else, you can use a cheap alternative in the form of two spare tires laid flat. We take two stronger boards and drive onto this improvised elevation. Naturally, the work will have to be done lying down.
Attention: After driving onto a pit or overpass for repairs, secure the car for your own safety using the handbrake and additional wheel chocks.
Replacing the oil seal in a VAZ 2109 gearbox is carried out in the following sequence:
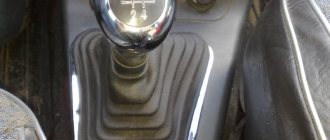
- We get to the rod that changes gears; it is covered on top with a rubber boot.
- If it leaks oil, then it is very easy to find it by looking at the oil stain (see photo below).
Gear shift rod
- We bend the wide part of this boot to get to the cardan located underneath it, which is attached to the rod.
- To gain access to the oil seal, it is necessary to disconnect the cardan from the shift lever and from the rod.
- For this we use the key 13.
- We unscrew the nut completely, this will help loosen the connection of the lever with the cardan.
- We take the lever out of the cardan, thus engaging 1st or 3rd gear.
- We use a 10mm wrench to disconnect the cardan from the rod; to do this, we move the lever to the side.
- We dismantle the cardan.
Disconnect the cardan from the rod
- Next, we remove the rubber boot, now we see the reason for the repair - it is the gearbox rod oil seal.
- It is located in a special recess - this is the place where the rod enters the box.
- Removing this oil seal without using a special tool is impossible, so we take a special awl and get to work.
- You can use a self-tapping screw as an option, the principle is very simple - you need to screw the self-tapping screw into the oil seal and “uncork” it like a corkscrew.
- When you have removed the old one, you can start replacing it.
- It is first necessary to thoroughly clean the seat from sand, oil, and other contaminants.
- Now you can press the new oil seal into the seat.
Replacing the VAZ 2109 gearbox seal is easier using a plastic bottle cap:
- This is done this way: cut out the inside of the plug and install a new oil seal through it.
- You can do without a traffic jam, this is a matter for the owner.
- We assemble the lever in the reverse order of disassembly.
- When the oil seal was replaced or any work was done related to fastening the gearshift lever and cardan, the rocker located in the car interior shifted greatly, which makes it impossible, in some cases, to change gears.
- Here the whole problem is hidden in the 13 screw, which connects the cardan itself and the lever that switches the speeds.
- Not everyone knows that it (screw 13) is not only fastening, but also adjusting.
- Therefore, upon completion of the work, be sure to check what position your lever is in and adjust its position, if necessary.
- Only now can you safely collect your tools and wash your hands.
- After assembly, be sure to check the oil level; if the level is low, you need to top it up, after which we can check the operation.
- Drive a couple of laps and make sure that the oil is not leaking anywhere else.
- That's all, I hope our instructions were useful to you. As you yourself have seen, replacing this oil seal is not difficult, and there is no point in overpaying for service stations.
Stories from our readers
“Fucking basin. "
Hi all! My name is Mikhail, now I’ll tell you a story about how I managed to exchange my two-wheeler for a 2010 Camry. It all started with the fact that I began to be wildly irritated by the breakdowns of the two-wheeler, it seemed like nothing serious was broken, but damn it, there were so many little things that really started to irritate me. This is where the idea arose that it was time to change the car to a foreign car. The choice fell on the melting Camry of the tenth years.
Yes, I had matured morally, but financially I just couldn’t handle it. I’ll say right away that I am against loans and taking a car, especially not a new one, on credit is unreasonable. My salary is 24k a month, so collecting 600-700 thousand is almost impossible for me. I started looking for different ways to make money on the Internet. You can’t imagine how many scams there are, what I haven’t tried: sports betting, network marketing, and even the volcano casino, where I successfully lost about 10 thousand ((The only direction in which it seemed to me that I could make money was currency trading on the stock exchange, they call it Forex. But when I started delving into it, I realized that it was very difficult for me. I continued to dig further and came across binary options. The essence is the same as in Forex, but it’s much easier to understand. I started reading forums, studying trading strategies. I tried it on a demo account, then opened a real account. To be honest, I didn’t manage to start earning money right away, until I understood all the mechanics of options, I lost about 3,000 rubles, but as it turned out, it was a precious experience. Now I earn 5-7 thousand rubles a day. I managed to get the car buy after half a year, but in my opinion this is a good result, and it’s not about the car, my life has changed, I naturally quit my job, I have more free time for myself and my family. You’ll laugh, but I work directly on the phone)) If If you want to change your life like me, then here’s what I advise you to do right now: 1. Register on the site 2. Practice on a Demo account (it’s free). 3. As soon as you get something on the Demo account, top up your REAL ACCOUNT and go to REAL MONEY! I also advise you to download the application to your phone, it’s much more convenient to work from your phone. Download here.
Algorithm for replacing the front and rear oil seals
- Decide on the location of the repair work: a service station or do it yourself in a garage;
- If it’s a car service, then everything is clear, there are no problems, the main thing is that you pay the money. But if at home, then we drive the machine into the inspection hole for ease of changing and draining the oil;
- We wait until the engine cools down, otherwise you can get burned from the temperature of the engine;
- Disconnect the battery terminal;
- We remove the air filter so that it does not interfere with operations;
- Using a cape on “10” we dismantle the oil pump. You must be careful as lubricant leaks are possible;
- Now you should remove the oil seal from the oil pump cavity. We pry it evenly along the contour with a thin screwdriver until it comes completely out of the grooves;
- Wipe the oil pump housing with a clean and dry rag. We carry out visual diagnostics to check for mechanical damage and cracks. If everything is normal, then we prepare to install a new oil seal, otherwise we eliminate the defects;
- We also diagnose the new oil seal for any defects;
- Using a special cone-shaped nozzle, which can be purchased at any auto store, push the bushing into the oil pump socket until it stops. The main thing is that the walls protrude evenly in relation to the edge;
- Install the pump in reverse order. Don’t forget to lubricate the body with sealant to give strength and tightness.
If everything is clear with the front unit, then with the rear it is a little more complicated
- We carry out the procedure similar to points 1-4;
- Disconnect the gearbox;
- Using a “10” cap, unscrew the bolts securing the flywheel to the engine;
- At the same time, remove the clutch shield from the bushings;
- Unscrew the eight bolts - holders;
- We dismantle the holder
of the oil seal we need; - Now you should carefully press our bushing out of the holder. The work is painstaking, but it must be done;
- After removal, inspect the holder and check for defects, wipe with a clean cloth;
- Using a cone-shaped nozzle with a diameter of only 9.9 cm, press the sleeve into the holder;
- The edge should be directed inward, otherwise oil will leak;
- The gasket on the holder must be intact, otherwise, be sure to replace it and place the new one on the sealant;
- The lip of the oil seal is lubricated with lightly clean engine oil;
- with a similar liquid
; - Carefully and slowly place the holder on the shaft flange; tapping can only be done using a wooden board. Metal is strictly prohibited;
- Screw in the mounting bolts;
- Install the clutch shield in the reverse order;
- We test the car.
As you can see, replacing the crankshaft oil seal on a VAZ 2110 is not a labor-intensive process, and special experience is not necessary. It is enough to act in accordance with the instructions and there will be no problems. What to do if one day you notice that a small puddle of oil appears under the car. There are two main reasons for oil leakage from the engine: either the oil pan gasket is broken, or there is a problem with the rear or front oil seals.
If the problem is in the gasket, then it is very easy to install. You need to crawl under the car and look at the pan. If it is wet where it connects to the engine, then the problem is in the sump. If you still determine that the problem is in the oil seal, then see the instructions below. Of course, you can go to a service station, but it will be expensive. Therefore, I advise you to replace the VAZ 2110 crankshaft oil seal with your own hands.