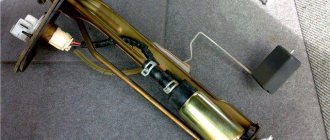
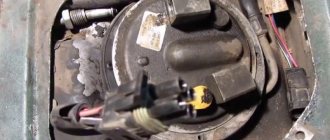
Today, I disassembled the fuel pump and removed the old chip and gasket.
The chip was also
cracked
, and the gasket was already like
a rag
.
After about 30 minutes of my torment, I finally installed another Chip and Gasket.
I also installed
Gayke
, which I made at work.
(I think if this continues to leak through the Chip, I’ll probably buy a complete fuel pump right away)
In the meantime, they are collecting money for a complete overhaul of the Engine + transition to a 1.6 8-valve.
One of the most important tasks in the fuel system of a car is performed by the fuel pump or, as it is called, the fuel pump. It is he who supplies fuel through the fuel system and a lot depends on him. On injection VAZs, an electric fuel pump is installed, located in the tank. We will tell you in detail how to replace the fuel pump on a VAZ 2110-2112 in this article.
Causes: fuse, relay, connector
The pump power circuit includes many elements: closed relay contacts 5, fuse 3 (15 A), “+” wire, “pump-to-ground” wire. The most “difficult” defect is a short circuit of the “+” wire to ground. By the way, the cord itself is laid on metal, so such a defect cannot be ruled out.
Mounting block for dashboard
Both the relay and the fuse are located in a block located under the dashboard on the right. A fuse can blow in two cases:
- The “+” cord makes contact with ground;
- The motor resistance decreases due to overheating.
The first defect may be “floating”, and then it will be difficult to identify. But before calling an electrician, try checking everything else:
- Relay 5 should click twice: when the ignition is turned on and after 1.5 s. If this does not happen, replace the relay;
- Check fuse 3. If it is blown, you need to look for the cause.
Consider the situation: the relay is working, but the fuse is blown. Then we do this: disconnect the pump connector, install a new fuse and measure the voltage at the terminals. Details are below.
Connectors under the hatch, disconnecting them
You need to remove the hatch under the rear seat: two screws are unscrewed with a Phillips screwdriver. Next you need to disconnect the connector on the module, and then move on to the block under the dashboard.
First, turn off the fuel pump!
Replace the fuse. Let's move on to the fuel pump: connect the probe (zero cord) to any of the mounting studs. Voltage should appear on the “gray” wire when the ignition is turned on. And also check the potential difference between the “gray” and “black” wires - it should be equal to 12 volts, and also at the moment the ignition is turned on. Wiring:
- The two outer cords are the FLS sensor;
- “Black” – minus power supply;
- "Grey" is a plus.
The "black wire" sometimes loses contact with ground. At the last step, we checked exactly this version.
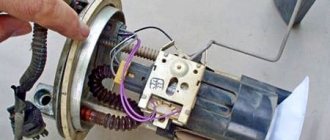
There are reviews from owners that say: the fuel pump on a VAZ-2112 does not work if the electric motor is working properly and there is voltage in the connector. This happens when the contacts of the internal terminal block oxidize (see photo).
Internal connector - yellow
Getting to the connector on the motor is not easy - you need to remove the fuel pump module by unscrewing 8 nuts around the perimeter.
Diagnosing the fuel pump
Safety precautions
Before unscrewing the nuts, you need to disconnect the two hoses. But first try starting the engine. The power supply to the fuel pump is not connected.
Please note - the power is turned off here!
Everything is ready for dismantling if:
- External connector is disabled;
- It is impossible to start the engine, although the on-board network is not de-energized;
- It is better if the tank is filled less than 50%!
You need to unscrew two fittings from the module cover (top photo). Then use a socket wrench to unscrew the nuts from the studs and remove the retaining ring.
There is very little left to the internal connector
Having gained access to the internal connector, you need to clean its contacts. Assembly is carried out in reverse order. Good luck!
Oxidation of the terminals of the internal connector is a typical disease of the VAZ-2112 fuel pump, and only one of the contacts does not work. The “+” terminal is more often oxidized.
How to replace a device
Before replacing a burnt-out pump, it is recommended to drain the fuel from the containers through the drainage holes in the bottom of the tanks, closed with screw caps. Then the passenger seat is removed, the guides are screwed to the body with 17 mm hex head bolts.
The guides are equipped with decorative plastic covers that will need to be removed to provide access to the seat attachment points. Additionally, the plastic decorative element of the threshold, which presses the carpet on the floor, is removed.
Then you need to follow these steps:
- Carefully disconnect the electrical cable connector for the seat and backrest heating (if your vehicle has such an option).
- Carefully remove the passenger seat from the passenger compartment or place it on the rear sofa. Pull back the carpet sheet and there is a rectangular hatch on the metal body floor panel, secured with 2 Phillips head screws.
- Unscrew the screws and pry out the hatch with a plastic spatula. In the niche you will see a fuel module with three tubes and a power cable. Remove accumulated dirt from the surface of the tank and fuel cartridge with a dry brush with stiff bristles.
- Disconnect the fuel lines, having previously prepared a container for draining gasoline and a rag, which is placed under the tubes before starting removal. Disconnect the pump motor electrical connector. It is recommended to secure the pipes and wiring harness to the seat mounting bolts, as the elements may slide under the bottom of the vehicle.
- Using a 10 mm socket wrench, remove the 8 nuts holding the fuel cartridge into the cavity of the fuel reservoir. Since there have been cases of turning of the mounting pins, it is recommended to first clean the threads from dirt and rust with a special liquid (for example, WD-40). The nuts are loosened by 0.5-1 turns crosswise, which avoids uneven load and distortion.
- Then we remove the fuel module from the cavity of the tank. Since the level sensor float is located on the side of the housing, it is necessary to tilt the assembly to the sides, ensuring that the float is removed from the mounting hole.
- Drain the remaining gasoline from the plastic casing into a previously prepared tank; the hole in the tank is temporarily closed with a suitable rag. Then you need to dry the product from gasoline residues in the open air, and then proceed to replace the pump.
Advantages of injection models
The main function of the pump is to supply fuel to the combustion chamber. It must meet certain requirements. The main criterion is pressure.
The pumps for injection and carburetor engines are different. Thanks to the engine with direct fuel injection, there is no need for preliminary preparation of the combustible mixture. As you know, the carburetor is the weak link. Difficult adjustments, clogged jets, difficult starting in cold weather create inconvenience for owners of classic VAZ brands.
Tens and VAZ-2112 internal combustion engines have significant advantages. Let us note the advantages of injection units:
- support for environmental standards;
- direct injection into the combustion chamber;
- fuel economy;
- system reliability;
- increased engine power;
- starting a cold unit without warming up;
- dispensing a portion of the mixture;
- The fuel module is controlled electronically.
Unfortunately, the injector has a number of disadvantages. Maintenance and repairs have to be carried out at a service station. It also requires qualified personnel and a computer to determine the malfunction of electronic components. Let us point out other disadvantages:
- design complexity;
- high requirements for the octane number of gasoline;
- complex diagnostics and repairs;
- expensive spare parts and equipment.
The most common causes of failure of an electrical part of a car:
- mechanical damage to electrical wiring (open circuit, short circuit, wear of terminals, etc.);
- failure of sensors and components due to moisture ingress and corrosion processes;
- malfunction of control units and control units;
- failure of lighting equipment, fuses, relays;
- malfunctions of electronic components;
- problems with the starter, generator, corrosion of battery terminals.
The UAZ Patriot model range includes cars with engines made according to Euro 2 (before 2007), Euro 3 (produced from 2007 to 2022) and Euro 4 (after 2013) standards. The UAZ Patriot electrical circuit diagram for each modification has its own characteristics associated with the design of the engine control system, the use of various electronic units and other equipment. Thus, cars produced before 2012 were equipped with Slovenian relay and fuse mounting blocks. They have a non-separable design, and theoretically cannot be repaired if they have an internal fault (melted conductors, broken contacts, etc.). In practice, such problems can also be solved, but only by experienced craftsmen and using original methods. Since 2012, Patriot cars have been equipped with a dismountable mounting block of relays and fuses (similar to VAZ), which significantly simplifies the process of repairing this unit. Turbodiesel engines of UAZ Patriot vehicles, which began to be installed on production vehicles in 2012, comply with the Euro 4 standard. Meeting high environmental requirements required the complication of circuit design solutions for electrical equipment of vehicles. The additional equipment of the vehicles includes a “winter package”, which includes the following electrical equipment:
- electric heated windshield;
- additional electric interior heater;
- heated rear seats;
- high capacity battery.
To carry out prompt and high-quality repairs of the vehicle’s electrical equipment, it is necessary to carefully study the electrical circuit diagram corresponding to the year of manufacture of the vehicle.
How do fuel pump breakdowns manifest themselves?
We will not consider a broken relay or a blown fuse as a serious reason. Sometimes the relay itself is enough to be removed and inserted into place, and the system will work; the contacts are simply oxidized, and the fuse needs to be tested with a tester and, if necessary, replaced with a similar one.
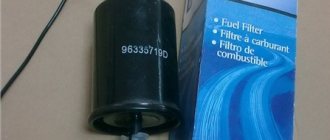
A much less pleasant situation is when the coarse filter, which is located in the fuel module along with the pump, becomes clogged. The symptoms of a breakdown are floating, so it’s quite difficult to immediately understand what needs to be done. The first signs of a clogged coarse filter:
- reduction in engine power;
- lack of traction at high speeds;
- Unstable engine operation at low and idle speeds;
- Difficulty starting the engine.
Signs of a fuel pump malfunction
Using these signs, you can determine that the fuel pump is not pumping.
- The most common sign of a faulty fuel pump is that the car drives intermittently. While driving, the car begins to sharply slow down and then accelerate. Uniform movement of the vehicle is ensured by a continuous supply of fuel.
- The second most common symptom is floating engine speed at idle. This way you can determine if the fuel pump is faulty before you start driving.
- The engine starts with difficulty or does not start at all. Quite often this happens because the fuel pump has completely failed. The symptom is not the most common, since the reason that the engine does not start may lie in a variety of malfunctions.
- The car's dynamics deteriorate. When you press the gas pedal all the way to the floor, the car jerks or does not respond at all to moving the pedal. In this case, the fault may lie not in the pedal, but in the fuel pump.
We recommend: Which is better, electric corrector or hydrocorrector for headlights on a VAZ 2110: pros and cons
Do not forget that all the signs listed above are not one hundred percent. Such malfunctions can be caused by failure of various other engine parts. The engine speed may well fluctuate due to a malfunction of the mass air flow sensor or throttle position sensor.
Such malfunctions most often occur due to low quality fuel or uncleaned injectors.
Instructions for replacing the fuel pump mesh on a VAZ 2110
One of the car maintenance operations is replacing the VAZ 2110 fuel pump grid. The procedure is quite simple; you only need knowledge of the procedure for performing the work and a minimum set of several tools. Therefore, it is usually performed by car enthusiasts themselves, without the involvement of service station specialists.
Purpose and principle of operation of the fuel pump
The fuel pump is designed to pump fuel from one point to another. In a car, the role of the first point is played by a fuel reservoir - the tank, and the second - by the engine, where the pumping takes place. This process occurs at a certain pressure, which is maintained by the pump reducer, which is a very important point.
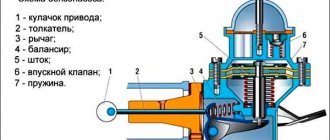
Fuel pump diagram
Fuel pumps are divided into 2 types according to the type of drive: electric and mechanical. Inside the first there is an electric motor with a mini-pump, which operates from the mains and uninterruptedly pumps fuel into the engine. The second type is becoming increasingly rare, as it is installed on carburetor cars, and operates due to the reciprocating movement of the lever.
Fuel pump diagram
Electrical diagram of UAZ Patriot until 2007
The electrical circuit diagram is shown in Fig. 1
The conductors of the electrical circuit connections are made of stranded copper wire, enclosed in polyvinyl chloride (PVC) insulation with one- or two-color markings in accordance with the electrical circuit. Groups of conductors are combined into electrical bundles. A common cause of electrical wiring failure is the shorting of wires inside the harness due to a short circuit. In this case, it is necessary to “gut” the entire harness to make sure that there are no internal melts or short circuits along its entire length. In the event of a breakdown in the electrical connections between the nodes of the electrical circuit, the connections from a specific actuator to the node control unit should be “ringed” in accordance with the diagram shown. The designation of the circuit elements is shown in Fig. 2
Causes of malfunctioning fuel pump
Fuel pumps are different. It all depends on the specific brand of car and the characteristics of the pump itself.
Knowing the causes of problems in the vehicle’s fuel system is a necessary condition for its successful repair. Problems may arise for the following reasons:
- Wiring problems: Wires have become dirty, rusted, or melted. As a result, the electric voltage decreases and fuel pumping becomes more difficult.
- Debris and dust getting into the gas tank. Rust in the tank. As a result, the fuel becomes unclean and causes problems. Poor quality fuel also pollutes the gas tank.
- Filter dirty. Fuel pressure decreases and the functions of the device are weakened.
- Driving with an empty tank. This leads to a decrease in pressure and overheating. It dries out and becomes damaged.
To effectively treat a living organism, it is important to know not only the symptoms, but also the causes of the disease. It’s the same with the operation of car systems: you need to find out the causes of problems in the operation of the fuel pump
The gasoline pump is one of the key elements of the automobile fuel complex. It is responsible for transferring fuel under pressure to the injectors (when the car uses a system in which fuel is injected) or to the carburetor. Like other parts of the car, the pump may stop working properly.
The device can be mechanical or electrical. It all depends on its functional characteristics and structure.
How to check functionality
This is easy to do at home. First you need to remove the pump and place it in a vice. Then connect a hose to each branch pipe. One hose must be directed into an empty container, and the other into a container with gasoline. The mechanism must be pumped by hand. If the fuel moves from hose to hose, then you can be happy. This means everything is fine. If this does not happen, then most likely the part needs to be replaced.
Knowledge of the operation of all vehicle systems and experience in troubleshooting them will help save money and provide invaluable assistance in the event of a breakdown far from populated areas.
Tips and tricks
In the case when the gas tank is heavily contaminated, cleaning or replacing the fuel pump mesh will only be a temporary measure, and the rate of subsequent contamination of the mesh will not greatly depend on the quality of the fuel being filled. In such a situation, it is necessary to remove and wash not only the mesh, but also the gas tank.
To keep the fuel pump screen clean, try not to lower the fuel level in the gas tank below ½ unless necessary. Dirt and deposits that clog the mesh are usually located at the very bottom and are the last to be drawn in by the gas pump.
The causes of whistling and increased noise during operation of the fuel pump are overheating of the pump. How to diagnose and fix the problem yourself. Tips and tricks.
Why does the fuel pump grid need to be changed? How to remove the fuel pump yourself to replace the filter. Features of reassembly after replacing the fuel pump mesh.
How to determine why the fuel pump does not pump or works poorly. Fuel rail pressure, pump diagnostics. Wiring, relays, fuel pump fuses.
Why and when you need to flush the engine power system. How to flush the engine fuel system yourself: gasoline and diesel engines.
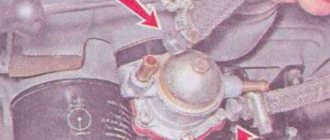
How to change a fuel pump. Location of the fuel pump, releasing pressure in the system, unscrewing the fuel lines, removing the pump, reassembling.
Mechanical and electric fuel pump, design and principle of operation of the device, types of pumps and main malfunctions, operating features
How to check and replace the fuel pump relay
If the electric fuel pump does not show signs of life when the ignition is turned on, this does not mean that it has burned out. The cause of the breakdown may also be the “relay”. The simplest method of checking the fuel pump relay is by ear - it should click when the ignition is turned on. If you don’t hear a click, then most likely the relay is faulty.
However, everything is not so simple - the breakdown can be “tricky”, for example, the car does not start the first time. The cause of the breakdown may be burnt relay contacts.
In this case, checking the functionality of the pump is very simple:
- Remove the protective cover that hides the fuse and relay block.
- Unscrew the fastenings of the block and remove it; it will remain attached to the wires.
- Pull the relay out of the block and place a jumper between 2 opposite contacts, so we will supply power directly to the fuel pump.
- If the electric motor of the fuel pump begins to make noise with this connection, it means that most likely the fuel pump itself is working, and the fault lies in the relay. In this case, replace the relay.
Malfunctions of the electric fuel pump 2110
If the pump stops working, there may be several reasons for the malfunction:
- electrical wiring is damaged;
- fuse burned out;
- the relay stopped working;
- BN motor burned out;
- The engine control unit has failed.
When a driver in a car with a VAZ 2110-12 injection engine turns on the ignition, the electric motor starts working - a characteristic buzzing sound is heard. If no sounds are noted, it means that the BN is not pumping fuel.
The easiest way is to check the electric fuel pump fuse, which is located almost in the same place as the relay, located to the left of the RB.
If the fuse is blown, it must be replaced. It often happens that when replacing a fuse, it immediately blows. The main reasons for the malfunction of this phenomenon:
- the fuel pump itself “shorts”;
- There is a short circuit in the electrical wiring.
Another characteristic malfunction of the electric fuel pump is that fuel is pumped, but the operation is accompanied by loud noise. A noisy fuel pump is a sure sign that this device will not “live” for long and will soon fail.
When should you check your fuel pump?
It is necessary to check all potentially faulty components one by one, and the fuel pump first.
Problems when starting and running the engine are not always associated with the fuel pump. Sometimes the signs of a fuel pump breakdown are the same as those of a faulty fuel pressure regulator , injectors or jets, spark plugs and high-voltage wiring. Even experienced specialists who know by heart all the signs of a “dying” pump cannot unambiguously determine the type and cause of the breakdown the first time, and it is necessary to check all potentially faulty components one by one. In this case, the fuel pump is usually checked first. In this case, there are two types of malfunction - the fuel pump does not work at all or does not produce the required pressure. In the first case, the malfunction can be recognized by ear, since it should start when the ignition is turned on. In the second case, you need to know how to check the pressure of the fuel pump. Here you need to use a special pressure gauge. We list the main symptoms of a fuel pump malfunction:
- the engine does not start;
- the engine is unstable;
- the engine lacks traction during sharp acceleration;
- The engine lacks traction at low speeds.
We recommend: Replacing front and rear brake pads on Lada Kalina
Connector block for fuel pump 2110 new. (thick)
Leave your review of the product: Connector block for fuel pump 2110 new. (thick)
Delivery to regions
- Delivery of goods is paid upon receipt of the goods in your city.
- Delivery to the transport company is FREE
- The timing, cost and method of delivery by region depend on the weight, dimensions and cost of the ordered product.
Attention: Orders are processed every day, seven days a week, from 09-00 to 21-00 inclusive
Order of shipment to regions of the Russian Federation.
- Place an order through the website or by phone.
- You pay the bill through the bank, after the money arrives in our bank account (usually 1-3 days after payment for the goods), when paying through electronic money systems (funds are credited within a day), we deliver the goods to the transport company.
You can make a preliminary calculation of the cost and delivery time of the goods you have chosen to your city by choosing one of the companies recommended by us.
Russian PostPhone: 8-800-2005-888 Website: https://www.russianpost.ru Coverage: delivery is possible to any location in Russia Opening hours: Mon-Fri from 10 to 19, Sat from 11 to 16, Sun - closed Calculate delivery cost Track the cargo
Business linesPhoneSite: https://www.dellin.ruCoverage: 500 cities in RussiaOpening hours: Mon-Fri from 10 to 19, Sat from 11 to 16, Sun - closedCalculate delivery costTrack the cargo
Attention - This delivery method is ordered from a consultant! Phone Website: https://www.emspost.ru Coverage: delivery is possible to any location in Russia Opening hours: Mon-Fri from 10 to 19, Sat from 11 to 16, Sun - closed Calculate delivery cost Track the cargo
PECTphoneSite: https://www.pecom.ru Opening hours: Mon-Fri from 8 to 20 Sat from 10 to 16, Sun - closed Calculate delivery cost Track cargo
SDEKTelephoneSite: https://www.edostavka.ru/Opening hours: Mon-Fri from 8:30 to 19, Sat from 10 to 16, Sun - closedCalculate delivery costTrack cargo
Hermes. You can pick up your parcel yourself at one of the Hermes delivery points in 196 cities of Russia. Hermes points are located within walking distance from the metro and public transport stops. Website: www.hermesrussia.ru Opening hours: Mon-Fri from 9-00 to 19, Sat from 10 to 16, Sun - closed
If you cannot decide on the choice of transport company or do not know which transport companies deliver goods to your city, we will be happy to advise you.
If you cooperate with a transport company not represented in this list, then write to us and we will deliver your cargo to any transport center within the city of Tolyatti.
The order is shipped from 2 to 5 rubles. days, depending on the availability of the ordered goods.
If everything has been checked, but the fuel pump does not work - article numbers
In general, the pump article number for VAZ-2112 engines looks like this: 21102-1139009-XX. Instead of the letters XX there are numbers, for example 02 or 03. They indicate the manufacturer. So, modules from different factories are not interchangeable! The resistance of the FLS resistor is different in them. However, when replacing the FLS sensor, you can borrow it from the “old” module. That's what they usually do.
Until April 2002, article numbers of the type 2112-1139009 were used.
Almost every module available for purchase contains a built-in pressure regulator. There are also exceptions - KSZC-A243, for example. The meaning is as follows:
- All internal combustion engines with a volume of 1.5 liters are equipped with a ramp with an “external” regulator (2112-1160010);
- The 21124 or 21114 motor requires a built-in regulator.
In conjunction with 1.5 liter engines, you can use any module – both with and without a built-in regulator.
Designations of analogues
- 21102-062213.0XX – instead of the letters XX there will be a plant designation (07, 13, etc.);
- KSZC-A233 or A243 – KSZC brand. No pressure regulator .
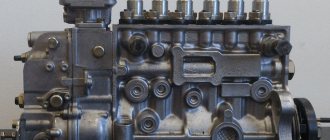
Mechanical fuel pump "tens" VAZ
The VAZ 2110 (Lada-110) car has been produced at AvtoVAZ since 1995, and the first engines on this model came with carburetors. Eight-valve VAZ 2110 engines with a power of 72 hp. With. were set to “tens” until 2000, and the fuel pumps on these internal combustion engines, accordingly, were mechanical.
The 2110 mechanical fuel pump consists of parts:
- metal case (two halves);
- top cover;
- pusher with diaphragm;
- two valves;
- return spring.
Gasoline is pumped from the fuel tank by oscillating the diaphragm and opening and closing valves. The diaphragm with a pusher is driven by the camshaft eccentric; on the lower BN housing there is a manual pumping lever for gasoline.
Master node of the system
The VAZ-2110 fuel pump is equipped with an electric drive. Its body is lowered into the fuel tank. Gasoline is both a pumpable fuel and a coolant. It should be remembered that traveling with an empty tank is fraught with overheating of the VAZ-2110 injector fuel pump.
This electrical device is an independent unit. Accordingly, its operation does not depend on the state of other mechanisms. A necessary condition for rotating the VAZ-2110 fuel pump rotor is maintaining normal voltage on the on-board network.
The voltage comes through the ignition switch. When the key is moved to position 1, the circuit is closed to turn on the drive. The VAZ fuel pump fills the fuel rail. The engine is ready to start.
If symptoms of poor fuel system performance occur, the pump should be checked. We list the signs that make it possible to replace the VAZ-2110 fuel pump:
- the car is malfunctioning;
- accelerates poorly;
- twitches while driving;
- won't start at all
- gasoline does not flow to the ramp.
First of all, a hearing test is performed. After turning the ignition key to position No. 1, there should be a noise under the rear seat. The sound lasts for a couple of seconds. This means that the pump has pumped up the required pressure.
Fuel pump pinout
The pinout of the VAZ 2114 fuel pump chip includes contacts for power supply to the electric motor, a fuel level meter contact, and a critical residue alarm contact. Thus, the pump block chip includes four contacts:
- Remaining indicator:
- Weight;
- Pump power;
- Fuel level.
The power connector located on the block has a pin part - “male”, respectively, the mating part is “female”. It should be borne in mind that the pump unit is not connected to the on-board network directly, but through an adapter harness, one of the terminals of which is connected to the block and the other to the on-board network.
The following wire colors are used in this harness:
- Black and white – mass;
- Gray – supply voltage;
- Pink – level indicator;
- Blue and red – reserve balance.
Features of the injection power system
The tasks of fuel pumps in carburetor and injection engines are somewhat different. If for a carburetor engine it is important to simply supply gasoline to the carburetor, then for an injection system this is not enough. The fuel pump must not only pump fuel from the tank to the ramp, but also create a certain pressure, without which the engine simply will not start.
Access to the fuel pump in injection cars is also complicated by the fact that in cars of recent years of production it is mounted together with a fuel receiver and a coarse filter directly in the gas tank. This complicates the diagnosis, repair and maintenance of the entire fuel module, but simplifies the design of the pump, since the gasoline itself lubricates and cools it. But this is precisely what often leads to unit breakdowns.
How to check the operation of the fuel pump?
First, you should check the fuse. To do this, check the instructions for its location. Next, you should check the voltage at the pump. Before doing this, be sure to check if everything is in order with the battery. The voltage at the fuel pump terminal must be checked using a multimeter or tester. The instruction manual always indicates the required voltage.
Using a tester, check the voltage supply to the fuse. Often this is where the electrical circuit breaks.
If the search does not yield results, then the voltage should be checked on the contacts themselves. All contacts must be in place and connected to ground. A broken contact or its oxidation leads to failure of the fuel pump system. If no broken contacts are detected, but the voltage drops by more than 1 volt, then the problem is in the wiring or oxidation of the contacts. There should be no short circuit in the wiring.
If, after checking the voltage, contacts and fuse, you do not find any problems, then the problem lies in the fuel pump itself. In this case, the fuel pump will most likely require replacement. In practice, it most often turns out that replacement is a last resort. First, you should try to restore and test the fuel pump again.
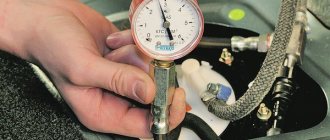
Before you check the fuel pump, you need to remember that, as mentioned above, pressure is the most important characteristic of the fuel pump, so it is worth measuring its level.
How to check the pressure in the fuel rail?
You will need a pressure gauge that measures pressure in the range from 7 to 10 atmospheres. If you choose a pressure gauge with a large margin, you risk getting less accurate measurement results. Specialized stores sell a kit for measuring pressure, but you can also design your own device.
If you want to assemble the device yourself, you will also need a hose with an internal diameter of 9 millimeters. You will also need plumbing tow, with which you can seal the connection between the pressure gauge and the tube. All parts are connected and tightened using a clamp. You will also need a car spool. Next you need to perform a series of actions:
- Place the car on a level surface that is prevented from rolling, turn off the ignition and open the hood.
- Check that the injection nozzles have access to the fuel rail.
- Find the fuel pressure plug and remove it. Then you should unscrew the nipple using the spool.
- Prepare an empty container (a regular bucket will do) and a clean rag. This is necessary to collect residual fuel, which under pressure can splash out in different directions. Therefore, take care of the safety of your skin (especially your face and eyes).
- Connect the device to the fitting and begin checking the mechanism.
We recommend: Replacing the front engine mount of a VAZ 2114
Checking the pressure in the fuel rail should occur in four operating modes of the power unit:
- when the ignition is on;
- at idle engine speed;
- code the fuel pressure regulator tube is reset;
- when the drain tube is compressed.
Fuel rail pressure measurement results
The results may vary slightly for different car models, but in general they should be as follows:
- when the ignition is turned on, the pressure must be at least 3 atmospheres,
- at idle engine speed - at least 2.5 atmospheres,
- when the pressure regulator tube is reset - at least 3.3 atmospheres,
- when squeezing the drain tube - at least 7 atmospheres.
Fuel rail pressure fluctuates slightly during preparation. When you press the pedal, it suddenly takes on a value of 3 atmospheres; when you release the pedal, it drops to 2.5 atmospheres. When fuel enters the fuel system, turn off the ignition and begin observing the pressure gauge. The pressure in this case should drop to 0.7 bar and remain unchanged.
If the pressure drops to zero, there may be a problem with the fuel pressure regulator. In this case, the regulator must be replaced immediately. The cause could also be the fuel pump check valve.
It is necessary to observe the behavior of the pressure gauge even at 3,000 engine speeds. A drop in pressure will indicate a faulty fuel pump. Sometimes the fuel pump cannot reach the required pressure for a long time. In this case, the problem lies in a clogged fuel filter, which needs to be replaced, or in a dirty fuel pump mesh (read more about where the fuel filter is located).
If the above methods do not reveal a malfunction of the fuel pump, you will have to diagnose other units (DPZD, IAC, mass air flow sensor, compression in the engine and some other indicators and parts).
Why is it needed?
There is a coarse filter that comes first from the gas tank. After all, first the lid where the fuel tank is located is opened, a gun is inserted there, the magic button is pressed and the fuel flows. Yes, it takes a lot of your money along the way, but what can you do? The location of the tank can be on the left or right, but this does not play a special role. Coarse cleaning, which is a mesh that traps large particles of debris.
This is followed by a fine filter. This is exactly what we will talk about. This element is called a fuel filter. With its help, small particles are retained. But even they can penetrate your diesel engine or gasoline injector.
Dust, dirt, debris, rust elements. All this can penetrate the system, causing a clogged pipe, tube, valve, fuel hose, or fuel pump components. Nothing good will come of this if timely replacement is not made.
To understand how to replace the filter, which element to choose and how to choose an analogue for the device you are going to change, you need to have at least a basic understanding of such an important component of the car.
I suggest starting with varieties.
Kinds
Modern fuel filters installed on Ford Focus, Nissan Almera, Hyundai Solaris, Nexia, Mazda, Opel, BMW e60, Renault Logan and Megane, Kia Rio and many others have at least two degrees of purification.
- First degree. This is a rough cleansing that allows you to get rid of large contaminants. Not to be confused with a regular mesh in the tank, which is not available everywhere.
- Second degree. Fine cleaning. This is the main task that falls on the shoulders of the filter.
And here you probably have the main question - where is the filter device located? I don't know. No, I can answer, but if you tell me specifically what make of your car or what year of manufacture. After all, on the same Chevrolet Niva, different Opel, Toyota, Mazda models, on the Volkswagen Passat B3, as well as on the domestic VAZ 2114, 2112 and 2110, the location may differ.
However, they are always located somewhere between the engine and the gas tank, since the filter's job is to prevent contaminants from entering the engine while the fuel moves from the tank to the engine. What's in the gas tank itself? That's right, a coarse cleaning device. This is an additional filter element so that any unscrupulous gas stations do not spoil your car.
Now let’s talk about the types of filters themselves. What element will be on the car? It depends on the type of engine. There are three of them, as you know. Except for electric motors. Well, there is no need for a fuel filter, as you understand.
Therefore, there are three types of filters:
- carburetor;
- diesel;
- injection.
Location
So you bought yourself a brand new sedan and you think it’s time to change the filter for this engine. Want to choose the best? Well then, take a closer look at Cummins devices. Mann, Hertz. They have proven themselves well, and they cost quite a bit.
You probably know whether your engine is diesel, injection or carburetor
This is important to understand the location of the fine filter, that is, our today's hero
- Carburetor. In these engines, the TF (fuel filter) is placed in front of the carburetor itself, and is often in a transparent housing to control contamination. These are the most basic devices, because the carburetor is the least demanding on the quality of fuel.
- Injector. It uses nozzles and therefore requires high-quality filtration. And the fuel is supplied under high pressure. Therefore, the filters are enclosed in durable metal housings. The TF has to be regularly maintained, cleaned and monitored for its condition. They are placed mainly under the bottom of the car to make it easier to dismantle and replace.
- Diesel. A diesel engine also needs high-quality purified fuel, since the system is quite sensitive. Diesel fuel has a higher moisture content than gasoline. The TF is designed to filter debris and remove accumulated moisture. A separator is provided for this purpose. The location is quite simple - between the engine and the pump that pumps fuel.
Any fuel system must include a TF. They are replaced assembled, that is, there is no point in removing the filter elements themselves (usually special paper), leaving plastic or metal. Be sure to look at the number and article number of the filter that is installed on your machine, and check the operating manual from the factory. This is the only source of truthful information regarding the maintenance of your particular vehicle in this configuration and with this type of engine.
Possible causes of fuel pump malfunction
Mechanical fuel pump disassembled
A mechanical fuel pump may fail for the following reasons:
- If the integrity of the diaphragm is damaged.
- After dirt accumulates under the valves.
- When the filter is clogged.
- When the spring loses its elasticity.
- If the seal of the housing is broken.
- Due to natural wear and tear of parts during operation.
The electric fuel pump of a modern car is quite reliable. Malfunctions in it arise only due to the influence of certain factors, among which the most common are the following:
Burnt contacts inside the fuel pump
1. Faulty wiring in the form of dirty, rusty, melted or damaged wires in the fuel complex interferes with the operation of the device and also limits the required current parameters, making it difficult to pump fuel.
2. Debris and foreign impurities in the fuel tank in the form of rust, dirt, water, mechanical particles that penetrate the fuel pump and cause its breakdown.
Clogged fuel pump filter
3. A clogged fuel filter with debris from the tank contributes to a sharp decrease in the pressure created by the pump and a deterioration in its operating parameters.
Melted fuel pump turbine
4. Driving a car for a long time with a small amount of fuel, during which the pump is not immersed, experiences significant overheating, quickly consumes internal lubricant and fails.
5. Natural wear of the rubbing parts of the pump.
Wiring harness for fuel level sensor VAZ 2110, 2112, 2170 Priora fuel pump
Dear customers, in order to avoid errors when sending the fuel level sensor harness 21101-3827010РХ, in the “Comment” line, indicate for which engine power system 21114, 21124 or 11183i, 11194i, your car model, year of manufacture.
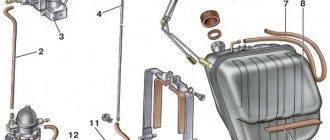
Electric fuel pump assembly – is an electric fuel pump module with a fuel level indicator sensor assembly. Designed to supply fuel from the gas tank to the engine injectors, as well as determine the fuel level and signal its minimum level in the gas tank with an electronic engine control system (ECM)
1- built-in fuel pressure regulator; 2- fittings for installing fuel lines with quick-release tips; 3- electrical connector; 4 – fuel level indicator sensor.
The VAZ 21126 Lada Priora electric fuel pump assembly is of a submersible type, installed in the gas tank located under the bottom of the car body, in the area of the rear seat behind the service hatch, by opening which you can find it.
The submersible fuel pump is lubricated and cooled by fuel.
The fuel level sensor 21101 - 3827010 as part of the fuel system is used to determine the fuel level and is installed directly in the fuel tank. The fuel level sensor is used in conjunction with the fuel level indicator, which in turn is located on the dashboard. The fuel level indicator sensor is based on the operating principle of changing the voltage (pulse height, frequency) at the sensor output when the fuel level in the tank changes.
The fuel level sensor wiring harness 21101-3827010РХ is intended for connection to the common wiring block, as well as to the FLS wiring block from the fuel pump in cars of the VAZ 2110-2112, VAZ 2113-2115, VAZ 2170 family.
Structurally, the fuel supply sensor is nothing more than a rheostat with nichrome resistance. The movement of the movable adjustable contact is carried out through a float lever, the console of which is equipped with an additional contact point. This additional contact, being in a specific position, closes the control circuit, thereby indicating the need to use the fuel volume of the reserve group, which includes a volume from 4 to 6.5 liters. gasoline.
The fuel level sensor is a device of low reliability. Sometimes it becomes necessary to buy a fuel sensor, because after a certain period of operation, the indicators of this device begin to “jump”, that is, produce incorrect parameters. This is due to the fact that the main disadvantage of such a device is the thinning of the track of the contact group under the influence of the friction force of the runner.
In some cases, you can repair the device by slightly bending the so-called. “rocker arm” (bending) of the runner, thereby placing its working contact surface slightly above the wear area of the contact track. If wear exceeds permissible standards, the FLS fuel sensor must be replaced with a new product.
If the fuel tank is half full and the VAZ fuel consumption sensor shows a zero tank fill value, the following measures must be taken:
– test the technical conditions of the contact group on the rear of the instrument panel and, if necessary, tighten the electrical wiring fasteners;
– check the smooth movement of the float spoke, focusing on eliminating unauthorized stops in intermediate positions.
Due to low-quality gasoline and additives, the internal electrical mechanisms in the electric gasoline pump are corroded. When working dry, the brushes overheat and wear out. With proper operation, the service life of the fuel pump is very long.
Connectors DUT 21101-3827010РХ with assembled wiring are highly resistant to adverse environmental influences (high humidity, saline solutions, oil, gasoline and their fumes, aggressive detergents). Connectors with Cargen wires use wires with copper cores with a cross-section from 0.5 mm to 6 mm.
The wiring harness for the fuel level sensor 21101-3827010РХ, fuel pump in cars of the VAZ 2110-2112, VAZ 2113-2115, VAZ 2170 family satisfies the needs of consumers and complies with the requirements of GOST R51814.1-2004 (ISO/TU 16949:2002).
Replacing the wiring harness of the FLS 21101-3827010РХ, located in the electric fuel pump module, connecting the common wiring block, as well as the fuel pump FLS wiring block in cars of the VAZ 2110-2112, VAZ 2113-2115, VAZ 2170 family, can be done independently, without contacting specialized services service.
When replacing a VAZ fuel sensor, it is dismantled along with the electric fuel pump for supplying fuel.
Problems with the operation of the vacuum type device
The vacuum pump may malfunction. This can happen for several reasons:
| Problems | Causes | Solution |
| Insufficient vacuum | Insufficient oil level | Add oil to the required level |
| The oil has become dirty | Dirty engine. The higher the alkali content in the oil, the faster the engine cleans and the oil turns black. | Replace the oil with clean oil. If the alkali content is high, replacement is required after 5,000 kilometers. |
| The oil fill hole is clogged | Small particles on the surface of the lid | Clean the inlet and rinse the filter |
| The integrity of the hoses is compromised | Wear, mechanical damage, hose connection failure | Check hoses and their connections |
| Insufficient pump power | Loss of voltage from the generator to the pump due to unsuccessful implementation of standard wiring, insufficient device size | Replace the wiring or purchase a new part of the required power |
| Oil started leaking | The integrity of the oil container is damaged | Replace container |
| The cover of the hole for draining the oil does not fit well or the rubber ring has become unusable | The thread of the cover is torn off, the ring is worn out | Replace the cover and replace the gasket |
| Oil splashes | Permissible oil level exceeded | Drain some of the oil to the desired level |
| The pressure at the air evacuation fitting has been exceeded | Insufficient pump power | Install a more powerful pump |
| The pump is hard to start | The temperature has become too low | The device must be turned on and off several times in a row or the oil must be heated |
| Breakdowns in the electrical part of the pump | Voltage surges, short circuit | Check and eliminate breakdowns |
| Garbage has accumulated inside | Dirt in the gas tank | Examine the contents and remove the blockage, clean the gas tank |