The serviceability of the brake system and the condition of the brake pads directly affect the quality of the car's braking, so you should not drive a car with faulty brakes. This is the main rule that everyone should know. But in order to promptly change system elements, you need to know how to determine brake pad wear. These parts are subject to heavy loads during vehicle operation and need to be replaced on time, and not only after a complete failure of the braking system.
Brake pad manufacturers recommend replacement every 10-15 thousand kilometers, but the range may vary depending on certain factors. Therefore, it is so important to carry out a preventive inspection of system elements in order to identify possible malfunctions. More details about ways to check brake pad wear will be discussed in this article.
Why do they wear out?
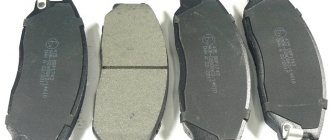
For the record, the brake pad design includes a frame and a lining made of friction material . When in contact with the disc, it gradually wears out, which is why this process is an area of increased attention. The rate of wear is influenced by various factors, from the chemical composition of the material and the quality of parts, and ending with operating conditions.
Causes of brake pad wear
Let's look at the main reasons for brake pad wear:
- car weight;
- quality of materials used in production;
- climatic conditions;
- driving type (if you drive quietly, the linings will last much longer);
- vehicle load;
- faulty brake cylinders.
Causes of squeaking brake pads
Important! Despite the resources specified by the manufacturer, improper use of the vehicle or exposure to the above factors can significantly affect the service life of the linings.
Wear of the front wheel pair brake pads
How are drum brakes different from disc brakes?
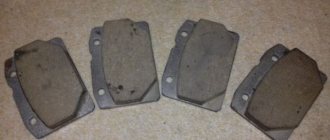
One of the disadvantages of drum mechanisms compared to disk ones is the lack of a self-cleaning effect. Wear products from the brake pads remain inside the drum and leave characteristic marks on the working surfaces of the friction elements.
Editorial Kalina is often used to participate in various competitions. That is, the conditions of its operation can be called difficult. However, to our surprise, the wear on the original pads turned out to be small - about 30%. Probably the reason is that the car has a relatively small mass, and its dynamic performance is not outstanding.
Alas, wear products have significantly damaged the working surfaces of the linings and drums. This can't be fixed. The next time you replace the pads, you will also have to update the drums, otherwise they will immediately damage the new pads. However, there is nothing criminal in the further operation of the car in this form. The reduction in rear brake performance is not noticeable even when driving on a race track. In general, drums, like discs, can survive two sets of friction linings.
There is a misleading belief that brake pads need to be changed at some single set period of time, and then the car will function “problem-free” and brake perfectly. But pad wear depends on many factors, in particular, weather and road conditions, individual driving style, etc.
Characteristic signs
Experts identify several main signs by which the degree of wear can be determined. Let's consider each of them separately.
Signs of Brake Pad Wear
The appearance of knocking or other sounds
When the life of the lining ends, it begins to wear unevenly, which is why various cracks or chips may appear on the surface of the friction layer. Worn brake pads make pounding and noise when they come into contact with the disc.
Knocking noise when braking
Increased braking distance
Experienced drivers may notice that when the pads are used for a long time, the braking distance may increase, and the brake pedal must be pressed harder to stop the car.
Increased braking distance
Replacing front brake pads
- We secure the car with the handbrake and place barriers under the wheels. All you need are keys No. 13 and 17, as well as a screwdriver.
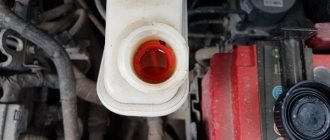
- We dismantle the wheel and check the brake fluid level at the same time. It should be between the MIN and MAX marks on the tank body.
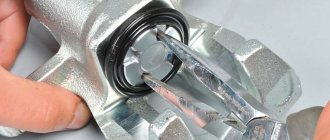
- We press on the piston and pull the caliper until it stops.
- Use a wrench No. 13 to remove the lower bolt, and use a wrench No. 17 to hold the guide pin at this moment. We lift the body and take out the pads. We remove dirt, if any.
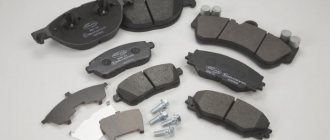
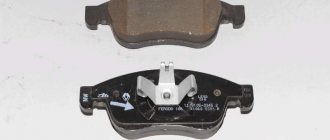
- We install new products, the springs are installed parallel to the top of the pads. We move the bracket body down and fasten the bolt in place, after which we bend the tendril of the lock washer.
- Install the wheel. Next, you need to press the brake several times to check the piston.
Worn brake pad
Diagnostic features
The main method for determining the condition of the linings has been and will always be the driver. Only he will be able to notice even minor deviations in the operation of the braking system, since he is accustomed to his car. Uneven wear of the linings leads to the fact that the wheels begin to brake with different efficiency.
How to determine brake pad wear
A block subjected to higher mechanical loads will be covered with a large number of chips and cracks. As a result, it makes a lot of noise when braking. Hence the knocking in the wheels. The signs of wear are all clear; now all that remains is to learn how to diagnose the linings in the field.
Brake pad diagnostics
Car brake system repair
To be confident in your car, you need to regularly check the condition of all its brake parts. Uneven pad wear is common. This is due to the design features of the car. The car is always heavier at the front, because there is a heavy power unit there. Accordingly, wear occurs faster on the front axle. Also, unevenness is often observed on the sides. Due to a broken brake cylinder, one of the pads may get stuck, and therefore the performance will be uneven. That is why it is recommended to regularly monitor the condition of the entire brake system and it is not at all necessary to contact the services of a service center every time. Discs and pads can be seen even without removing the wheels if the casting has large holes.
When to change brake discs and pads
Replacing brake pads on a car can be done in a number of cases:
When their natural wear occurs, the linings wear down to a critical thickness. If a reduction in disc thickness of less than 10% is considered dangerous, then the linings can wear up to 50%. You need to remember about the unevenness, and not wait for the moment when they rub bare metal on the discs or rear brake drums.
Damage to parts after careless driving on a sandy road. Large particles that enter will certainly cause serious damage in the form of deep scratches. This is a dangerous condition, so you need to change the pads and grind the discs.
Replacing discs and pads
Replacing brakes is, in principle, the same on all cars, but there are differences between different types of structures. There are two options: with brake discs on both axles and discs only at the front, and drums installed at the rear. Repair of the brake system in this case is carried out according to the following plan:
- First you need to loosen the wheel bolts with a wheel wrench because it will be inconvenient for the canopy to do this job.
- Then you need to raise the car to the safest possible height so that repair work can be carried out. If you have one jack, it is convenient to do this one wheel at a time.
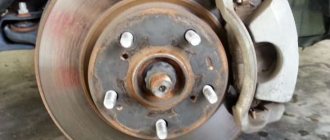
- Next, the wheel is removed and access to the brake mechanism is opened. At the front there are discs and brake calipers. To remove the discs, you must first move the caliper to the side by unscrewing it from the mounting on the reverse side.
- The disc is attached to the front wheel hub with 4 or more stud screws, depending on the design of a particular car.
- It is possible that the disc will have to be knocked off the hub groove because it has not been removed for a long time and has become welded with corrosion. To tap, use a wooden tip. They do the same with drums, because they are made of cast iron or aluminum - fairly soft metals. The planting site is first treated with WD-40 to dissolve the rust.
Changing brake pads is no more difficult than the previously described procedure. You don't need to unscrew the caliper to do this. It is enough to remove the guide from its installation location without losing the spring. Then remove the old pads. At the same time, it is worth checking the condition of the brake cylinders and their boots. Often they tear and various contaminants get under the rubber, which leads to damage to the surface of the working cylinder. You can wash off the dirt with the same WD-40, but then be sure to lubricate and develop it, because they are most likely stuck. To do this, press the piston into the cylinder and, by gently pressing the brake pedal and holding it, push it back out. A jammed cylinder is easily recognized. The wheel on one side slows down later than the other and there is uneven wear on the linings.
Replacing the rear brake pads is also easy, even if there are drums there. The design of the brake mechanism looks different. The pads are secured in the center with cotter pins and are spring-loaded, since they are in a floating state and independently level their position. There is also a manual braking mechanism and other parts. It is important to assemble everything exactly as it was installed. Don't forget to check the functionality of the rear brake cylinders. This can and should be done with the pads installed. Place a pry bar against the metal boot and press down on the pads. Then press the brake pedal, it should move in evenly on both sides. It should not be wet under the cylinder, the anthers should be intact.
How to properly break in new brakes
After replacing a worn disc or brake pads, they need to be run in. This is an important procedure because new parts are not centered and the wheels will brake unevenly. Any brake replacement after repairs have been performed needs to be inspected.
A reliable braking system is the key to safety when driving a car, so the break-in stage should be taken with full responsibility. As investigations into various accidents show, in some cases the car skids precisely after replacing the brake pads.
Running in involves the grinding process. Pads and discs, like clothing, must fit perfectly to each other to ensure effective braking across the entire surface, and not just one edge. Loose pads can also cause skidding. If your car has had a comprehensive brake replacement with the installation of new pads or discs, be sure to wipe them down. Incorrect or lack of running-in will certainly lead to the following troubles:
- When braking, you will feel a vibration in the steering wheel. It will be pulled from side to side because the wheels will brake separately.
- Some time after repairing your brakes, you will notice uneven wear on the pads. This is also a very dangerous condition that leads to problems. It is not difficult to determine this fact. The discs will definitely show signs of uneven fit of the linings.
- New pads and discs, while they are grinding in, have low braking efficiency. Therefore, immediately after installing these parts, you should not go for a technical inspection. Measurements on the bench will definitely show insufficient braking.
The running-in procedure involves a cyclic increase in speed to 60-65 km/h and a slow decrease to 10 km/h. Over the next 300 km you need to adhere to this mode and avoid sudden braking.
How to determine the degree of wear
If you have a special sensor, it is very easy to determine the degree of wear - when the friction lining is erased, a light on the dashboard lights up. This means that further use of the pads is undesirable, so they need to be replaced. But practice shows that such sensors do not always work correctly, and not all cars are equipped with them. In such cases, the driver can only rely on himself. There are two ways to determine the degree of brake lining wear: with wheel removal or without removal . Let's consider each of the methods separately.
How to check brake pad wear
With wheel removal
Periodically checking brake pads for wear is an important part of car maintenance. Below are step-by-step instructions for checking the condition of the linings while removing the wheel.
Checking the pads by removing the wheel
Table. Checking the condition of the brake pads.
| Steps, photo | Description of actions |
| Step one | Jack up your car on the side where the wheel will be removed. Before doing this, put the car on the parking brake. |
| Step two | Unscrew the mounting bolts and remove the wheel. You need to twist them counterclockwise. |
| Step three | Inspect the brake caliper and find a special hole in it through which the pads can be seen. |
| Step four | Using a caliper, measure the thickness of the brake pads (see photo). |
| Step five | If the thickness of the brake linings is less than the permissible standard, replace them. Then put the wheel in place. |
Note! People living in large cities have to change pads more often than people living in rural areas. The same can be said about other parts of the braking system.
Without removing the wheel
With alloy wheels, lining diagnostics are simplified. In this case, you won't even need to remove the wheels. Below are step-by-step instructions for this process.
Checking the brake pads without removing the wheel
Step 1: Prepare a caliper to measure the thickness of the pad. In our case, we use an electronic caliper - it is more accurate. You may also need a marker and a plastic straw to mark on. Although many motorists do without it.
Prepare the caliper for work
Some people use a straw to measure.
Step 2: Pull out the depth gauge (the inside of the caliper). It will be used to carry out further measurements.
Use a depth gauge
Step 3. Inspect the brake caliper - there is an inspection window in the caliper body through which you can measure the thickness of the pad.
Locate the inspection window in the brake caliper
Step 4. Insert the depth gauge into the viewing window until it stops, as shown in the photo.
Insert the caliper into the viewing window
Step 5: Gently press the caliper against the outside surface of the brake pad.
Press the caliper onto the block
Step 6: Pull out the caliper and look at the measurement results. If the thickness of the brake lining is less than 5 mm, then the elements need to be replaced.
Review your measurements
Important! The dimensions of the inspection hole do not always allow one to study the condition of the pad, which makes it impossible to take measurements without removing the wheel. In this case, the wheel must be removed.
Proper Pad and Disc Inspection Process
Before checking, review the table of permissible dimensions of brake parts. When the data matches, start making replacements. The process is divided into the following stages:
- We place the vehicle on a jack and remove the front wheel.
- We clean the disk from settled dust.
- Using a caliper we determine the thickness of the disc. The permissible wear parameter is 10.8 mm.
- In the inspection window we determine the thickness of both pads; you can take a caliper.
- Use a screwdriver to see how the pads move. When they move tightly, it means they have compressed the disc. If the wear is uneven, a new cylinder and caliper must be installed.
- To get to the rear ones, remove the wheel and drum.
- We measure their thickness and the size of the drum surface. The diameter should not exceed 201.5 mm.
Brake pads
Parts need to be replaced if:
- linings in oil;
- products thinner than 1.5 mm;
- the linings are not tightly connected to the base;
- Discs need to be replaced if there are scratches or deformation.
Tips and tricks
To prevent premature brake pad wear, you need to follow a few simple rules.
How to extend the life of brake pads
- Do not press the brake pedal unless necessary . Many motorists accelerate on short sections of the road, knowing that after 20-30 meters they will have to slow down. This significantly reduces the life of brake discs and pads.
- Choose quality spare parts. You don’t have to spend a lot of money on the original, but you shouldn’t skimp on the braking system either. Experts recommend buying discs and pads from the same manufacturer.
- Carry out regular checks of the condition of the pads and other system elements . You don’t have to do this yourself - you can ask service station employees for help.
- When choosing pads, give preference to parts with a wear indicator. They cost a little more than regular brake pads, but having an indicator will greatly facilitate the maintenance process.
When you installed new pads
The brake system is an important component of the car. It is responsible for the safety of the driver and passengers, so maintenance and care must be correct. By following all of the above recommendations, you will not only learn how to determine brake pad wear, but also ensure reliable operation of the entire system.
Signs of brake disc wear
The brake disc is a cylindrical part that fits onto the hub. It has a groove on both sides, which serves as a working surface. It can be single or double with ventilation, that is, there is a void between the working surfaces, and the disks themselves are perforated around the entire circumference. When rotating, air penetrates inside and cools them, since the metal becomes very hot during friction.
Disk wear can be determined by a number of signs:
- When driving, vibration is felt when you press the brake pedal, and it gradually intensifies with further wear.
- When you press the brake pedal, a cyclic beating is felt, this indicates deformation of the part, which is an emergency condition. May cause disc destruction during movement.
- When braking, a distinct metallic squeak is felt, which may change as wear increases.
In the initial state, the disk has a certain thickness. Wear is considered critical if its thickness has decreased by 30% or more.
Limit value of residual thickness
Obviously, the intensity and duration of the impact of the listed circumstances on the service life of the braking system differs for each specific car - one driver drives carefully, another constantly loads the car, a third uses only high-quality original spare parts. From a technical point of view, it is incorrect to say that it is time to replace the brake pads if a certain period of time has passed (for example, 1 year) or a certain mileage has been reached. The mileage resource, expressed in km, is an average value and can be used for guidance only. The following values are usually given: for disc brakes installed on both front and rear axles, it is 10–20 thousand km; for drum wheels, used mainly on the rear wheels – 100–150 thousand km.
In reality, the need for replacement occurs only when the maximum remaining thickness of the lining is reached. The manufacturer usually indicates this value on the product packaging, and the manufacturer - in the maintenance and repair manual. For most modern passenger cars, it fluctuates in the range of 1–2 mm for the brake mechanisms of both front and rear wheels.
Factors affecting pad wear
Let's look at the factors that influence how often your brake pads will need to be replaced. There are few of them, but they directly affect indicators such as how long it will take for this to happen, and how many kilometers the car will travel before the corresponding indicator on the instrument panel works. Here are some of them:
- Travel mode. When the car moves in the city, it is often necessary to stop at short intervals, which contributes to rapid wear of the bars.
- Driving style. A non-aggressive driving style puts less stress on the brake mechanism and increases the interval after which the pads will need to be changed.
- The nature of the machine loading. When the trunk is constantly loaded, the load on the front brake trims is reduced, and accordingly, they will need to be changed less often.
Disadvantages of electronic alarms
Like any signaling devices, wear monitoring sensors have certain disadvantages:
- The wires they are equipped with are quite thin and often fray and break.
- Unprotected wire connectors from moisture and dirt often leads to oxidation of the contacts or their shorting.
In rainy weather, moisture falling on the friction layer can change its resistance, which will lead to false operation of the indicator.
The only advantage of electronic sensors (based on the disadvantages described above) is that even if the wire breaks, they will still signal the wear of the linings. In this case, they will work as mechanical alarms; when the sensor rod begins to press closely against the disk, a characteristic squeaking sound will appear.
For most modern cars, wear indicators are sold separately from the brake bars.
Thus, manufacturers have made sure that it is possible to replace a worn or faulty part (unfortunately, this does not apply to overlays with integrated alarms). But, despite this, experts still advise replacing old sensors along with installing new brake strips. Since it is possible that they will not work correctly.
We recommend watching:
- Brake light is on
- Brake fluid light is on
- How to loosen the handbrake on a grant
- The exclamation mark is lit on the dashboard of the VAZ
- Brake light repeater VAZ 2114
- Rear brake system VAZ 2110
Causes of Brake Wear
According to modern rules for monitoring the technical condition of vehicles, disc brake pads must be changed once every 10,000 kilometers. But this figure cannot be a single standard for everyone, since the wear of consumables greatly depends on driving style.
If you brake smoothly and not often (the mileage is mainly on the highway), then you can change the pads after 20,000 kilometers. On the contrary, if you brake frequently and sharply (aggressive driving style in the city), then the pads may wear off after 5,000 kilometers.
An important factor is the quality characteristics of the pads themselves. Some manufacturers openly save on raw materials. The same manufacturer may have several models of pads - more expensive and cheaper, softer and harder.
Everyone is different, so it is important to check your brake wear from time to time.
Regular trips to service stations for service
The most important point that will save the brake system from various problems is high-quality maintenance of the machine. Changing oils and other fluids is a must, so you'll still need to do regular servicing. Instead of simply replacing consumables, order high-quality diagnostics of the main vehicle systems from the service. This will help you complete a high-quality restoration and carry out reliable work on your car, which will ensure another year of normal operation without any special difficulties or problems. Therefore, in most cases, it is better to use regular trips to a service station to carry out the following work on the brake system:
- determining the quality and level of brake fluid, if necessary, replacing or supplementing this material;
- studying the condition of the pads, diagnosing each wheel separately to determine the need to replace brake parts;
- inspecting the discs, looking for chips and scratches that can affect the quality of braking and the reliability of the entire system;
- periodic replacement of pads and inspection of brake mechanisms, testing on stands and in the workshop;
- replacing parts that create certain problems or suspicions in the operation of the brake mechanisms;
- repairing brake discs or replacing them simultaneously to achieve high operating efficiency.
The higher the quality of service, the greater the chances of a quality outcome. Most likely, you will get quite reliable brake performance, and you simply won’t have to look at the pads yourself and try to determine their wear if you do it this way. Our technicians will check, test and fully diagnose all systems that may fail. The information obtained is used to carry out repair work and achieve ideal operation of the braking system. The only thing the car owner can do is pay money for the necessary repairs and diagnostic work. But you should remember that these costs will definitely pay for themselves, offering you high travel safety.
How to check the condition of the pads without removing the wheels
The car's brake system should always work properly and not have any problems. One of the most worn elements is the pads.
The process of their operation is based on constant friction, which makes the pads a short-lived part.
The duration of their operation is affected by:
- driver's driving style. With frequent sharp braking, as well as with sharp accelerations, wear increases several times;
- the material from which they are composed. Depending on the manufacturer, the thickness of the product and the quality of production may vary;
Note! Cheap pads not only have a short lifespan, but can also damage brake discs, cylinders, and calipers. And the breakdown of these parts threatens with more serious waste. You cannot save on this spare part; it is advisable to buy original ones, which are recommended by the manufacturer of a particular car.
- type of car. On larger vehicles that weigh more, the pads will wear out faster.
- sudden temperature changes. In unstable weather conditions, especially in winter, when the thermometer changes from minus to plus within a few hours, reactions in the system lead to metal deformation, and this affects the wear of all car parts, including pads.
- malfunctions in other elements of the braking system. The condition of the pads will indicate any system problem. For example, if a cylinder or caliper malfunctions.
Wear check
Any car owner can do the initial inspection; you don’t even need to remove the wheels.
To check the condition of the brake linings, you need to pay attention to the following points:
- Sound is the first obvious sign. Appears during any braking, similar to an unpleasant squeak.
- All modern cars are equipped with a wear sensor. It is very simple to determine such a malfunction using this function - you just need to notice the reading of the indicator lamp. As a rule, it lights up red. Note. This method doesn't always work. There have been cases when the pads have already worn out, but according to the readings of the device everything is in order. Therefore, you should not be guided only by them.
- Increased braking distance. If you discover that the car does not immediately respond to commands, and the brake distance becomes longer, you need to take immediate action.
- It is worth taking a closer look at the wheel rims; if there are metal shavings on them , this may indicate wear of both the pads and the rim.
- By measuring the thickness of the outer pad. This can be done without removing the wheel, however, if the wheel hole allows you to see it. To do this, you will need a ruler, placing it end-to-end on the brake disc to measure the remaining thickness. According to the recommendations of professionals, it should be at least 4-5mm.
In all these cases, the operation of the car becomes unsafe. It is important to replace worn parts yourself as soon as possible or contact a qualified auto mechanic.
Replacement dates and signs
Based on the model of the brake mechanism and the friction material of the bars, manufacturers indicate how many thousands of kilometers the pads can last. Manufacturers also recommend when it is necessary to change the strips, focusing on the remaining minimum permissible friction layer.
All this is described in the instructions for the car, but there are average standards, the value of which ranges from 20 to 30 thousand km, for the front slats in disc brakes. And for drum and disc type rear brake pads, this mileage interval in km must be multiplied by two.
The weight of the machine also plays a big role in the wear rate. The above figures are relevant for small passenger cars weighing up to 1300 kg. If we consider large sedans weighing about 1600 kg, then the wear of the bars will occur one and a half times faster. For cars with a curb weight of 1800 kg or more, the pads will need to be replaced after they have covered a distance half as much as a small passenger car can travel.
If the car was bought used, there is often no way to find out when the pads were last changed and what their mileage was. Some signs will help you understand that it’s time to replace them:
- The pad wear warning light on the instrument panel came on. Some brake pads have an electronic or mechanical indicator that signals when the friction material has worn down to the minimum limit and it is time to replace them.
- There was a sound when the car stopped. This sound occurs at a certain percentage of wear of the friction material, when it is worn down to metal.
- When stopping suddenly, a sound is heard and a beating is felt in the area of the wheels. The reason for this is uneven wear of the pads or cracks and chips that may occur on the disc or friction layer. In this case, even the indicator, if present, may not work. Uneven wear of the friction layer is dangerous because after a certain number of kilometers you will have to change not only the strips, but also the wheel disk or drum.