The model of the Volga Automobile Plant VAZ 2110, produced from the second half of the 1990s to the end of the 2000s, gained wide popularity among motorists. The updated design and aerodynamic properties allowed it to quickly win the hearts of its fans.
During the production process, several engine options were installed on the car in order to improve dynamic characteristics. But no matter how good the car is, the time comes when it is necessary to overhaul the engine. The average cost of its implementation in Russia is from 12,000 to 20,000 rubles .
Is it worth doing an engine overhaul?
The engine for 2101-2107 was developed by the Italians in the 50s of the last century. Since then, the design has not changed, only in 2007 the 2107 model was equipped with an injector. The engine is very simple, and if you have a repair book, as well as a set of tools, you can successfully carry out high-quality engine repairs. The cost of capital, even under ideal repair conditions, is inexpensive.
Regarding the service life: according to the manufacturer’s statement, the engine runs for 120,000 km, after which the block is bored to the repair size, and so on 2 more times, after which the block can be thrown away. Subject to high-quality spare parts, proper troubleshooting, the use of high-quality lubricants, and professional assembly, our engine can travel 150-200 thousand, from replacement to oil change and some consumables.
Lubricating parts
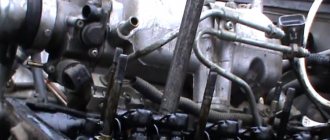
Combined engine lubrication device for the VAZ-2109 (2110). Oil is supplied to the main and connecting rod bearings, as well as to the camshaft supports under pressure; the cylinders, pistons, pins and rings, camshaft cams and pushers are lubricated by splashing; all other associated parts are lubricated by gravity.
A gear-type oil pump with a bypass valve is installed at the front of the block. The oil receiver is mounted using bolts on the cover of the second main bearing and the pump housing. The oil filter is non-separable and has bypass and anti-drainage valves. The design of the lubrication system and other engine systems is discussed in detail in separate articles.
Crankcase ventilation is forced, gases are removed through the oil separator.
Repair tool
We will need:
- universal set of sockets and keys;
- screwdrivers;
- torque wrench;
- piston ring clamp;
- crane for dismantling and mounting the motor;
- hammer.
From technical fluids and lubricants:
- motor oil 10w40 or 5w40 4 liters and 1 liter jar ($30);
- green or blue antifreeze 10 liters ($18);
- copper paste 1 tube ($5);
- Victor Reinz sealant ($5).
Version of the module on the 8-valve VAZ-2110
Ignition module 2111-3705010 (Stary Oskol).
Ignition module 2112-3705010 for a one and a half liter engine. The top ten was equipped with two 8-valve engines of different sizes - 1.5 (2111) and 1.6 liters (21114). The ignition modules for these engines are different.
- The one and a half liter engine has a module with article number 2112-3705010,
- and the 1600 cc engine is equipped with module 2111-3705010.
A module for a 1.5 liter engine costs about 1500-2100, and the second one is 500 rubles cheaper.
Module structure
The module consists of two ignition coils and two high-voltage switch switches.
Inside the module there is a board with radio components and ignition coils filled with compound.
The coil generates a high voltage pulse, and it is a simple transformer with two windings, primary (induction voltage about 500 V) and secondary (induction voltage at least 20 kV). All this is assembled in a single housing, on which there is a connector for signal wires (from the engine control unit) and four terminals for high-voltage wires.
Schematic diagram of the module.
The module operates on the principle of an idle spark - it distributes sparks in pairs to cylinders 1-4 and 2-3 according to impulses transmitted from the ECU.
Services
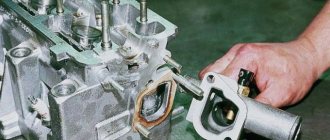
For high-quality repairs, we will need to send the cylinder head and the block itself for grinding. To make the plane even, to ensure a smooth surface and stable operation of the engine, remove 1 mm from the surface of the block, and 2 mm from the surface of the cylinder head. In total, 3 mm will be removed, thereby increasing the compression ratio to 10:1. The engine initially does not have a piston return to TDC of 1.95 mm, and the thickness of the gasket is approximately 1 mm, so you can safely sharpen the block and cylinder head.
The cylinder head must be pressed for pressure testing, checking for the formation of cracks in the channels. If they are not there, then the craftsmen install new valve guides, install valves with seals and grind them in. In total, such work will cost about 50 euros, depending on the region. If desired, you can lighten the flywheel by 1.5 kg by removing the metal around it.
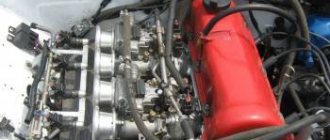
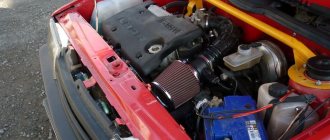
Features of the 2111 (1.5i) engine power system
Location of elements of the 2111 (1.5i) engine power supply system in the engine compartment:
1 - receiver; 2 — vacuum supply hose to the fuel pressure regulator; 3 — throttle assembly; 4 - fuel rail; 5 — fuel pressure regulator; 6 — air supply hose to the throttle valve; 7 - adsorber; 8 — air filter; 9, 10 and 11 — hoses of the crankcase ventilation system; 12 — throttle valve drive cable; 13 — diagnostic fitting
Read more: Resistances for 12V LED
combined with the fuel level indicator sensor into a single unit - fuel module
(often called an electric fuel pump). The pressure pump delivers fuel from the tank through the fuel filter to the fuel rail.
Engine Fuel Module 2111 (1.5i):
1 — fuel level indicator sensor; 2 — connecting block; 3 — inlet pipe; 4 - outlet (discharge) pipe; 5 — module cover; 6 — module cover guide; 7 - electric fuel pump in a plastic casing; 8 - intake chamber
Fuel rail for engine 2111 (1.5i) complete with injectors:
1 — diagnostic fitting; 2 - fuel rail; 3 — fuel supply tube to the fuel rail; 4 — fuel pressure regulator; 5 — tube for draining (draining) fuel into the tank; 6, 7, 8 and 9 - injectors
Fuel pressure control
installed on the fuel rail. Excess fuel is returned to the tank through the fuel return line.
Engine power supply system diagram 2111 (1.5i):
1 - nozzle; 2 - fuel rail; 3 — diagnostic fitting; 4 - adsorber; 5 - check valve; 6 — throttle assembly; 7 - gravity valve; 8 — safety (two-way) valve; 9 - separator; 10 - filler pipe; 11 — fuel filter; 12 — fuel drain line; 13 — fuel line hose connecting the outlet pipe of the fuel module to the fuel filter; 14 — fuel module; 15 — fuel tank; 16 — fuel line connecting the fuel filter to the fuel rail; 17 - fuel pressure regulator
What spare parts are needed
- repair size pistons with rings (70ue);
- connecting rod and main bearings (15ue);
- camshaft 21213 (for the best “low-end” 35ue);
- split gear (in order to correctly set the 20ue marks) and a new chain (12ue);
- valves, guides and seals (20ue);
- valve springs (15ue), the purchase of which is often neglected;
- rocker depending on condition;
- cylinder head bolts (3ue);
- automatic chain tensioner (11ue);
- set of gaskets and seals (10ue);
- oil pump assembly (30ue);
- gear tensioner shoe (25ue);
- thermostat, pump and cooling pipes (20ue);
- BSZ (45ue) to provide a powerful spark, respectively + new wires with spark plugs (15ue);
- carburetor repair kit (4ue);
- filter (oil, fuel, air (5ue);
In total, work with parts and liquids, on average, will cost 470, provided high-quality spare parts are used, which will ultimately give a well-functioning engine with a long service life, as well as a power of about 85 hp.
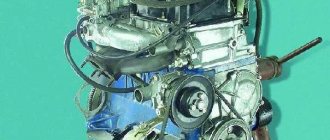
VAZ 2114 engine repair
During the operation of the internal combustion engine on a car, various failures and malfunctions may occur, which can be eliminated by self-repair or with the involvement of specialists. The need for a major overhaul of the power propulsion system, with its proper operation, arises when the mileage reaches 150,000 km. In this case, a VAZ 2114 engine overhaul is needed.
- Before you begin disassembling the engine, you need to drain the oil and coolant, and then wash the entire unit. Be sure to remove all attachments so as not to damage them during reassembly.
- Disconnect all pipes through which gasoline is supplied.
- Remove all systems and components related to the air supply, remove the air supply and exhaust hoses and pipes.
- Remove the cooling system pipes and crankcase breather. Don't forget to disconnect the throttle pipe.
- Remove the receiver, as well as the pipeline mounting bracket and the fuel rail, remove the injectors with regulators.
- Remove the wires with the ignition module and knock sensor. Unscrew the spark plugs. After this, unscrew all sensors.
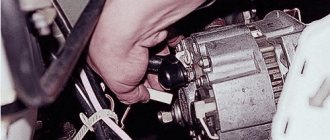
- Remove the generator by first removing the tension belt. With the generator, remove all brackets and strips necessary for its installation and adjustment.
- Block the flywheel and remove the generator pulley.
- Remove the camshaft drive with the cover, tension mechanism and pulley.
- Unscrew the pump, remove the exhaust manifold and thermostat.
- Disconnect the oil filter and oil sump, then remove the oil pump.
- In order to remove the piston group, you need to unscrew the nuts from the connecting rod bolts and remove the cover.
- Since the flywheel is blocked, you need to unscrew its fastenings with the flange and remove the flywheel disk.
- Remove the caps from the main bearings along with the lower bearings.
- Carefully pull out the crankshaft. It must be handled very carefully to prevent damage and scratches.
- Remove the upper liners and thrust half-rings.
When overhauling an internal combustion engine, it is necessary to carefully inspect each unit, component or part. If mechanical damage is detected, the spare part must be replaced. All gaskets, washers and non-metallic parts also need to be replaced.
The VAZ 2114 injector engine is a series of engines that were installed on the Lada 2114 vehicle. Like many Lada models, the 2114 model received several power unit options over all years of production. So, the technical characteristics of each of them were different. Let's consider the design of the 2114 engine, as well as issues of maintenance, tuning and repair.
Repair process
To begin with, we remove the engine from the beam and begin to disassemble it, simultaneously carrying out troubleshooting of the parts. We send the head and bare block for milling and assembly of the cylinder head. When the parts arrive, we begin assembling the block.
Before installing pistons and connecting rods, they need to be weighed. The difference in weight, in tolerances, should not exceed 3 grams. If the difference is normal, use a piston ring clamp and gently tap with a hammer to press the pistons into the block. After this, we attach the connecting rods to the crankshaft using the journals. During installation of the pistons, the cylinders should be lubricated with oil, as well as the places under the liners. This is required so that in a short period, when the pressure in the system is insufficient, there is no increased friction of parts. We need copper grease to lubricate the connecting rod cap bolts!
Next, we install the oil pump, and pour a little oil into the oil receiver, after which we place the pan on the gasket and sealant.
What is this?
Engine overhaul refers to the work of a master aimed at returning the engine to a state as close as possible to its original state. In this case, most of the nodes are changed or restored. This type of repair is resorted to when there is a lot of wear on the parts of the unit.
The list of work may include grinding the crankshaft journal and camshaft, installing new pistons and springs, and honing the cylinders. If too many engine components are faulty, then it is more advisable to completely replace it.
The following signs indicate that it is time to overhaul the engine on the VAZ-2114:
- The appearance of red, black or dark gray carbon deposits on the spark plugs.
- Increased oil consumption.
- The occurrence of knocking in the engine.
- Increased fuel consumption.
- The appearance of smoky exhaust.
- Bad traction.
- Engine overheating.
- At idle, the engine runs unevenly.
- Reduced power.
Major repairs proceed approximately according to this scheme:
- Preparing the engine for dismantling (disconnecting wires, hoses, gearbox).
- Removing the engine.
- Removal and inspection of the cylinder head.
- Disassembling the unit for diagnostics and cleaning.
- Block boring. Grinding the crankshaft. Application of hone to the cylinder walls.
- Weight distribution of connecting rods, pistons.
- Block assembly.
- Restoring the head (replacing caps and guides, straightening seats).
- Assembling the engine and installing it in the engine compartment.
- Connection.
- Functionality check.
Block head
We complete the finished head with a camshaft and a split gear. We set the camshaft to the overlap and tighten the star nuts well so that the camshaft phases do not “walk”. The camshaft bed is also well lubricated with oil. After installing the cylinder head gasket, we seat the head and use a torque wrench to properly tighten the head. After installation, we adjust the initial valve clearance. This procedure should be repeated on a warm engine. Now you can install attachments and place the motor on the beam. Before mounting the manifold to the cylinder head, check the evenness of their plane and place it on the sealant. Lubricate the manifold mounting studs with copper grease.
After installing the engine, we put the ignition kit in its place, and set everything to 1 mark, where the piston of the first cylinder is at TDC. We connect everything necessary and fill in the liquids. It is important that before screwing in the oil filter, it must be filled with oil.
Next, we start the engine, first of all we expel the air from the cooling system, and top it up if necessary. Then, with the engine warm, we check the oil level and adjust the valves.
After 1000 km, it is recommended to change the oil and re-press the head and check the connections. Run-in, as a rule, provided that the rings are of high quality, occurs at the first start. A full break-in will require no more than 1000 km. At this stage, the motor shows maximum power and torque. 85 horsepower can be achieved with high-quality repairs. If there is a need to increase power, then you can install a camshaft with a wider phase, a direct-flow exhaust system and a carburetor with increased capacity. As a result, you are guaranteed an honest 100 “horses” and a good resource. Do not forget that the compression ratio of the engine is increased, so fill only with 95-grade gasoline, which will allow you to use all the engine power and achieve minimal fuel consumption.
Technical characteristics of the VAZ 2114 engine model 2111
- ICE type - in-line;
- four cylinders, two valves per cylinder;
- cylinder diameter - 82 mm;
- compression ratio - 9.8;
- ICE volume - 1.5 liters;
- engine power - 78 hp. With.;
- maximum torque - 116 Nm at 3000 rpm;
- average fuel consumption in mixed mode is 7.3 liters per 100 km;
- ICE weight - 127 kg;
- the service life of the power propulsion system is 150 thousand kilometers, during practical operation the service life reaches 250 thousand kilometers;
- real engine tuning is possible in various ways and without loss of service life the power can be increased to 120 hp. s., there is the potential to increase the power of the internal combustion engine to 180 hp. pp., but with a significant loss of power plant life.
Approximate price
On average, a major overhaul of a VAZ-2114 engine costs from 22,000 rubles.
Engine repair cost broken down:
- Dismantling – 500 rubles .
- Installation – 600 rubles .
- Replacing oil scraper caps - 2000-4000 rubles .
- Pulling the engine sump - about 490 rubles .
- Crankshaft grinding - from 900 rubles .
- Replacing the crankshaft bearing - about 330 rubles .
- Honing and boring on a standard block - from 1000 rubles .
- Replacing the valve cover - 420-620 rubles .
- Replacement of the engine mount - from 540 rubles .
Overhaul of VAZ internal combustion engines and diagnostics in the Eastern Administrative District of Moscow
In order for the VAZ 2101-2107 engine to remain in working condition, it is necessary not only to fill in high-quality oil and fuel, but also to monitor the general condition of the engine in order to avoid unstable operation and premature engine wear. Regularly undergo computer diagnostics of the internal combustion engine of the VAZ 2101-2107 Classic since 1980 in order to prevent expensive overhaul and restoration of the VAZ 2101-2107 engine in advance.
Complete price list for VAZ internal combustion engine repairs
All work on diagnostics and repair of the VAZ 2101-2107 engine is carried out using modern equipment, in accordance with the requirements of the automaker.
In what cases is it necessary and how much does it cost to overhaul a VAZ 2101-2107 Classic engine since 1980 in Moscow
Overhaul of a VAZ internal combustion engine is a process that requires a lot of experience and takes a lot of time. The very essence of overhauling VAZ engines is to bring and restore the engine to its factory perfect condition. If it is difficult to find a new or contract engine for replacement, or its price exceeds the cost of overhauling the VAZ internal combustion engine, then our service’s experienced mechanics have experience working with overhauls of VAZ 2101-2107. Overhaul may be necessary only after a thorough computer diagnostic of the VAZ engine, which will cost only 500 or 1000 rubles.
What's better? Should I replace the internal combustion engine of a VAZ 2101-2107 Classic since 1980 or carry out an engine overhaul?
Replacing a VAZ engine is a less labor-intensive process than a major overhaul, but it will require re-registration of the car with the traffic police, provision of a certificate-invoice and, in some cases, approval of the replacement of the internal combustion engine by NAMI, which can also cost a tidy sum. Of course, in particularly difficult cases, it is easier to replace the VAZ 2101-2107 engine in Moscow. After replacing the engine of a VAZ 2101-2107 Classic since 1980, we provide a guarantee for high-quality repairs, because We use only original and compatible spare parts. We will also help you select a contract VAZ engine and install it on a VAZ 2101-2107 Classic from 1980 with a guarantee.
Car maintenance after major repairs
After overhauling the engine with your own hands, the car must be operated carefully. During the break-in, the basic rules must be followed; the ride must be calm. During this period, frequent oil changes are required: every 500 km. When the mileage reaches 2000 km, the oil is changed unscheduled for the last time. Next, it needs to be changed like in any car after 10-15 thousand.
After overhauling the engine yourself, with proper operation, the car will delight the owner for many years. The main thing is to change consumables on time and use high-quality, proven products.
You can see how the overhaul of a VAZ engine takes place in the video.
Source
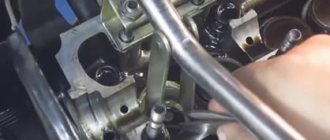
Cleaning valve channels
To remove any valve, you will need to remove the camshaft. All screws on the bearing housing must be unscrewed evenly and tightened with a force of 10 N*m. The hydraulic compensator can be removed with a magnet, and then the valve is desiccated by compressing the spring with a puller (see photo).
How to remove the valve
There may be carbon deposits in the valve channels. It is cleared:
- Flat screwdriver;
- Sanding felt.
Grinding is carried out as follows: a rubber pipe is placed on the valve, a paste with diamond chips is applied (one drop), then the valve is pressed into the channel and scrolled. It will also be possible to change the valve stem seals (2112-1007026). You can’t do this without a special puller.
Cap puller
On any car, including the VAZ-2112, cylinder head repair comes down to cleaning and checking, as well as correcting geometry defects. In the latter case we are talking about milling. The presence of cracks and chips is a reason for replacement, not repair.
A small photo report
A burnt valve is immediately visible.
One valve burned out in cylinder 2
Carbon deposits were found in each valve channel.
Carbon layer in the cylinder head channels
Repair: cleaning all channels, replacing the valve with lapping. Direct repair of the VAZ 2112 cylinder head will require several operations that require some special equipment. Of course, this is not possible at home, and car enthusiasts simply replace worn parts. Next, we will consider the process of repairing the block head, as well as some of the nuances associated with this work.