Adjusting the VAZ 2109 clutch
Tightening the VAZ 2114 clutch This operation is carried out in cases where there are shocks or friction when the clutch is engaged, slight slipping of the clutch when the clutch is pressed for a long time, the clutch “drives”.
To adjust the clutch, do the following:
- Place the gearshift lever in the “neutral” position.
- We dismantle the clutch housing.
- We dismantle the bearing. Repair operations should be carried out smoothly and calmly, because the bearing may be defective.
- Rotate the adjusting fastener until the pedal movement is completely adjusted.
- We test the clutch for oil leaks, otherwise the clutch mechanism may slip. To eliminate this problem, it is necessary to treat the coupling with a degreasing compound.
How to adjust the clutch cable
To properly tighten the cable, it is necessary to carry out this procedure.
- Drive the car onto a level surface and put the handbrake on.
- For safety's sake, disconnect the terminals from the battery.
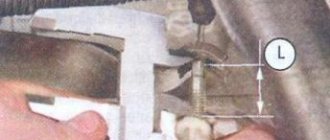
- In the cabin, near the corresponding pedal, place a ruler parallel to its movement. Ideally, the lever pad should be within 13 cm. An error of up to 5 mm is allowed. In case of large deviation, adjustment is required.
The hood opens. There is an air filter near the battery. You can remove it by releasing the air duct clamp (with a screwdriver or a No. 8 socket). Under the dismantled can you need to find the clutch cable itself. The part is located near the gearbox housing. There is a tensioner lock on it (it looks like several nuts threaded onto the casing and pressing the mounting plate on both sides). Use wrench No. 17 to loosen the locknuts. If necessary, you can treat the mount with WD-40 or its equivalent. Then, using a 13mm horn, loosen the thrust nuts (1 and 2). Next, the tension of the shirt is adjusted. Nuts No. 1, 2 rotate counterclockwise. Thus, the pedal settles closer to the floor; to raise the lever, you need to do the opposite. After calibration, the mechanism is assembled in the reverse order. Next, you need to press the corresponding pedal 5-6 times all the way and repeat the procedure with the ruler. If there is no position failure, everything is fine.
Examination
Nuts with which the clutch is adjusted Having achieved the parameters established by the manufacturer of the VAZ 2114 car, after tightening the lock nut, you need to make sure that you have adjusted the clutch correctly.
To do this, you need to press the pedal to the floor 2-3 times and measure its travel again. If there are changes in its progress, the adjustment procedure must be repeated again. Usually the clutch begins to “grab” approximately in the middle of the stroke. After completing the adjustment, it is necessary to perform one last check:
- park the car on a level area,
- tighten the parking brake lever,
- start the engine and engage the gear,
- Next, you need to try to move, without pressing the clutch.
If everything is set correctly, the VAZ 2114 engine will stall. If the result is different, this means that everything needs to be adjusted again, that is, all the work needs to be done again, according to the instructions.
Loading …
Features of setting up the new clutch drive
To check the correct installation of the mechanism, measure the distance between the end of the damper and the clutch fork (or cable tip). In the first case, the length (distance to the fork) should be from 86 to 91 millimeters, in the second (to the tip) - from 60 to 65 millimeters. The distances shown are valid for most vehicles. But in some cases they can have other meanings. Then you will have to adjust the mechanism using the tension nut manually (according to the diagram given earlier).
Then a final check of the clutch cable's functionality is performed. To do this, press the pedal 2-3 times, measure again and make sure the resulting distance corresponds to the recommended values. If there is no match, we set up the mechanism again. When the required values are achieved, be sure to tighten the locknut. Now you can safely hit the road!
All signs of clutch failure.
Attention, all options are listed in descending order of their likelihood from the most likely to the rarest. This is the most honest fault
It occurs when the clutch drive is damaged.
This is the most honest fault. It occurs when the clutch drive is damaged.
— the clutch cable is torn/the hydraulic drive is damaged (repaired by replacement and adjustment).
— the clutch fork has worn out and is put on the hinge (repaired by replacement or welding and adjustment).
The smell of burnt pads.
This is a very unpleasant and specific smell. It cannot be confused with anything.
It usually occurs when starting from a stop, when trying to accelerate at high speed and when driving uphill. The reason lies in the extreme wear of the clutch driven disc. Those. there was nothing left of its friction linings. It looks something like this:
If your car is very old, or Chinese, the springs in the clutch basket may wear out, but I have never seen this in practice.
You cannot drive with this malfunction for a long time, since slipping quickly wears out the basket and flywheel.
There is only one solution - replacing the clutch driven disc. At the same time, it is advisable to replace the release bearing. Since they serve approximately the same, it is not expensive, and its replacement requires removing the gearbox.
The reasons are exactly the same as in the previous case - wear of the friction linings of the driven disk.
It’s just that when driving at speed, the engine compartment and underbody are well ventilated and you may not always be able to smell the smell.
Sometimes the cause of such clutch malfunction is oiling of the clutch, but this is extremely rare.
When you press the clutch pedal, you hear a hum, noise, or grinding noise.
The reason, in most cases, lies in the wear of the release bearing. Depending on the design, it is changed or filled with lubricant (mainly on old machines).
You can drive with this malfunction for quite a long time, it’s just not very comfortable in terms of acoustics.
It is also important to understand that there is a possibility that the bearing will completely seize
A guaranteed solution to the problem is to replace the release bearing.
A temporary solution to the problem, for example, for selling a car, is to weld the bearing in refractory grease.
It is important to understand that the work of removing and installing the gearbox costs several times more than replacing the release bearing
If the squeaking and grinding noises are quiet, there is a possibility that the bearing in the flywheel has collapsed. But in my practice, only once was there a problem with it. It is usually changed when the clutch basket is removed or during an engine overhaul. By and large, it is needed to better preserve the bearings of the gearbox input shaft and its oil seal and increase the service life of the clutch disc.
Vibrations when starting off and/or when changing gears.
As a rule, the cause of vibration lies in the clutch driven disc. Typically, damper springs break or wear out:
Or the friction linings are partially destroyed:
It happens that the clutch basket itself cracks:
If the car is equipped with a dual-mass flywheel, the problem may also be with it.
The most unlikely option is that the clutch release pads are set incorrectly. The likelihood of this is extremely low, since claw clutch baskets have not been installed on cars for 25-30 years (with the exception of UAZ).
Only removing the gearbox and disassembling the clutch will help to accurately determine the fault.
Gears are shifted with great effort, and a grinding noise is heard when shifting.
These symptoms indicate that the clutch is not disengaging completely. Those. The clutch discs do not open completely, and the driven disc continues to rotate.
The reason for this may be:
- air in the clutch hydraulic drive (it is necessary to bleed the system and eliminate the causes of air ingress).
- deformation or excessive wear of the clutch fork (can only be eliminated by replacement; adjusting the fork is useless).
- Incorrect clutch adjustment (adjust according to instructions).
- melting of the release bearing from the plastic casing, this is especially often encountered by Chevrolet Niva owners. (The solution to the problem is to replace the release bearing).
Conclusion.
Above we looked at all the signs of a clutch malfunction and the reasons that cause them.
I hope this article was helpful to you. If you find an inaccuracy, want to supplement the article, or have any questions, please write a comment.
A clutch is a mechanism in a car that transmits the rotational motion received by the engine crankshaft, the gearbox and then to the wheels of the car. Its main task is to ensure that the car starts off without jerking and shifts gears without noise.
Clutch assembly
Clutch replacement operation
If the clutch cable on your car breaks, or its adjustment described above does not bring the expected results, you will have to install a new cable drive. Experienced drivers always have a spare cable in the trunk, having learned from the bitter experience of its breaking.
You can make a “spare wheel” yourself, but experts do not recommend doing it yourself in this matter. Firstly, because a homemade cable breaks quickly. Secondly, the process of making it yourself requires a lot of time, as well as the availability of tools and additional devices (machinery vice, grinder saw and others). Believe me, it’s easier to buy a reliable cable than to make it yourself.
To replace the clutch drive, you will need to remove part of the floor under the pedals in the car interior (otherwise you will not be able to get to the area where the clutch pedal and the cable connect). After this, they find the place where the mechanism is attached to the clutch block or directly to the gearbox and disconnect it (the exact diagram of the process is given below). Moreover, the cable should be pulled into the cabin.
Note! Before dismantling a failed cable, it is necessary to accurately measure its free part (located near the gearbox near the lower tip).
The sequence of actions for removing the drive is as follows:
- the cable is removed from the damper of its sheath located on the gearbox housing;
- in the car interior, the mechanism is disconnected from the pedal;
- pull the cable through the engine compartment.
Now you can install the new drive. First, it is connected to the pedal, then pulled in the opposite direction (to the clutch unit or manual transmission). After replacement, it is necessary to adjust the installed mechanism. In addition, it is advisable to lubricate it in three places:
- at the site of its entry into the shell;
- in the area of the clutch fork;
- in the area where the cable is fixed to the pedal (from the passenger compartment).
The clutch drive is usually lubricated with a graphite compound. Silicone grease can also be used. In general, it would be great if the motorist periodically serviced the cable clutch mechanism - to do this, it simply needs to be lubricated once every 6-12 months. Such simple maintenance perfectly prevents cable breaks and chafing.
How to adjust?
An out-of-control drive is located several centimeters higher or lower relative to the brake. This makes the drive inconvenient to use and can cause accidents.
The drive position changes as a result of wear on the driven disk linings during prolonged driving of the vehicle. For VAZ 2115 cars, pedal travel is considered normal to be 125-135 mm. The maximum safe stroke does not exceed 160 mm. Adjustment is also necessary if the unit does not turn off completely or is slipping. Debugging is carried out by changing the length of the clutch cable and its sheath.
Tools
2 keys for 17. On the VAZ 2115, the lower end of the cable “jacket” is held on by two fasteners, which are loosened using these keys.
17 keys - the main tools for adjusting the clutch cable
Step-by-step instruction
Initially, it is worth measuring the pedal deviation from the norm. To do this, you need to push the drive to the maximum, then release it. It is necessary to measure the stroke length - the distance from the center of the pedal pad in its lower position, when it is resting on the floor, and in its upper position. If the deviation from the normal length is significant, the pedal should be adjusted. Deviations from the norm can be detected without measurements. To do this, you need to place the car on a flat horizontal surface, engage first gear and, smoothly releasing the drive, start moving. If the car starts moving only at the end of pressing the pedal, debugging is necessary. In order to adjust the drive of the VAZ 2115, it is necessary to change the length of the cable jacket. To do this, you need to loosen or tighten the two nuts with which it is attached to the bracket. Open the hood. Remove the air filter. We find the cable and nuts that secure it to the bracket. They are located on its threaded part. Unfortunately, on the VAZ 2115 these parts are located inconveniently. When manipulating the nuts, the length of the cable jacket changes. In order to reduce the stroke, loosen the nut located inside the bracket and tighten the nut outside, and vice versa, if you need to increase
It is important to remember that constriction, as well as weak tension, are unacceptable. When overtightened, the cable will quickly break, and if the tension is weak, the clutch will no longer disengage completely. If the threads are rusty, you can use liquid to make the threads easier to remove.
If there is none, you can use engine oil or brake fluid. After debugging, you should check changes in the operation of the node. This should be done in the same way as during the initial check for deviation from the norm. After correct adjustment, the stroke does not exceed 135 mm. If the procedure does not lead to anything and the clutch of your VAZ 2115 continues to slip, then the element has become unusable and needs to be replaced.
Adjusting the cable drive - how to do it?
If you depress the clutch when changing gears, but the pedal goes to the floor instead, there is a problem with the clutch cable. In such a situation, you should drive as carefully as possible to a safe place on the road (for example, to a parking channel), stop the car and find out the reason for the failure of the mechanism we are considering.
Some car enthusiasts are sure that the cable cannot be adjusted; in their opinion, only replacing the mechanism can help, which is not entirely true. The car manufacturers themselves strongly recommend not to rush to install a new cable until the cause of its failure is determined. Often, a simple design adjustment solves all problems. It is performed using two 17 keys according to the following scheme:
- the locknut is slightly loosened so that the adjusting (tension) nut has sufficient distance to move;
- After this, the tension nut is manipulated until the required level of cable tension is achieved.
The results of the process are monitored by pressing the clutch pedal to determine the ease of its movement. In cases where, after tightening the cable, you do not notice any changes in the “behavior” of the pedal, you need to repeat the manipulations with the tension and lock nut again. And then press the pedal again. You may have to perform the stretching procedure several times. Until you achieve proper clutch pedal travel.
Adjusting the clutch on a VAZ 2114
Adjusting the clutch pedal VAZ 2114
We find the nut that is located at the bottom of the clutch pedal and release it. After which we tighten the lower nut to the maximum. Next, we tighten the fastening element under the clutch pedal. We tighten the rubber washer from the maximum to the fork. To increase pedal travel, tighten the fasteners at the end. To reduce the stroke, release this fastener.
When the adjustment process is completed, you need to: pump the clutch three times, measuring the stroke length. We carry out this procedure until the required parameters are achieved.
Adjusting the clutch cable on a VAZ 2114
You need to open the hood of the car, remove the contacts and remove the battery. For further work on adjusting the cable, we will need a set of open-end wrenches and screwdrivers:
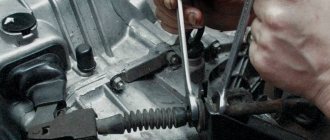
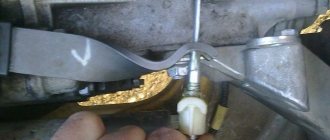
- We lift the hood of the car and find the cable mount at the gearbox. It is located on the adjusting unit and looks like two 17 nuts. The clutch cable has a red mark.
- Then we release the lock nut, then another nut, lowering or tightening the cable to the desired size.
- The pedal will move up from the floor if the nut is screwed towards the cabin, and down if twisted in the other direction.
- After the pedals have taken the required position, use the locknut to tighten the adjustment nut as tightly as possible.
When work is being done to adjust the tension of the clutch cable, it is necessary to check its integrity, whether its casing is damaged, whether there are any damages, burrs or other damage, and whether it moves freely in the casing. If any damage is found, then such a cable must be replaced. A damaged cable will wear out more, and the reliability of the adjustment will be in doubt.
Replacing the clutch cable
When it turns out that the cable is faulty, it has to be replaced; this also should not cause complications and can be done even in a garage.
We remove the plastic pads on the floor of the car under the pedal to provide easy access to the cable mount. Then disconnect the cable tip from the clutch engaging fork. We remove the shell damper from the mount, which is located in the gearbox housing. We separate the other end of the cable from the clutch pedal and take out the freed one. We take the whole pre-tested cable and install it in the reverse order.
Checking clutch cable adjustment
After completing the work of adjusting the tension of the clutch cable, it is necessary to check the correctness and quality of the work performed. We measure the pedal stroke with the engine off, depress the clutch three or four times, and re-check the measurements. If the measurements coincide, then the adjustment procedure was performed correctly. If the measurements do not coincide, it means that the locknut is not tightened properly, and the process of tightening the cable must be repeated. It is a well-known unwritten commandment among drivers that the clutch must engage in the middle of the clutch stroke.
To make sure that the procedure was carried out efficiently, we carry out the following test. Place the car on a platform without tilting to avoid spontaneous rolling, squeeze the handbrake and turn off the engine. Start the car and start driving if the engine stalls when the clutch pedal is released and the system is adjusted correctly. And if the engine continues to run at speed, with the clutch pedal released. The clutch slips, which means it needs to be re-adjusted.
Before you begin diagnostics, carefully read the VAZ 2114 operating manual and technical documentation. This will give you the opportunity to effectively and quickly diagnose and adjust the clutch on the VAZ 2114.
As can be seen from the above, the procedure for diagnosing and adjusting the clutch is accessible, even for people who do not have skills in this area.
Briefly about the design of a friction clutch and its purpose
Any self-respecting motorist will study the design of the unit before adjusting the clutch on a VAZ 2114. This will help you approach the issue wisely and avoid mistakes.
The mechanical drive design is simple and reliable. Compared to hydraulics, the cable requires minimal maintenance, and changing it is not labor-intensive. The mechanical drive consists of the following elements:
- Adjustable sheathed cable.
- Control pedal.
- Clutch release fork lever.
- Bracket for fastening the end of the cable sheath.
- Brake and clutch pedal bracket.
The mechanism serves to transmit force from the pedal to the release fork, which, in turn, removes the friction disc from the flywheel. Using a cable drive avoids major problems such as fluid leaks and periodic bleeding of air from the clutch control system. The weakest link in this chain is the cable, the quality of which at times leaves much to be desired. Therefore, replacing a cable on a Samara is a fairly common occurrence.
Meanwhile, the question of how to adjust the clutch on a VAZ 2114 car remains relevant for the cable mechanism. Setting standard values guarantees optimal tightness of the driven disk to the plane of the flywheel and basket when the clutch is engaged. The design also ensures complete separation (switching off) of the above parts from the passenger compartment through the pedal.
VAZ clutch fork, device, purpose, principle of operation
The main role of the clutch is to provide short-term disconnection between the transmission and the engine, as well as their subsequent connection after changing gear. However, in addition, the clutch has another important task - to ensure smooth operation of the transmission elements and protect them from unnecessary loads and vibrations. All clutch components are located between the gearbox and the engine.
Nowadays, there are several types of clutches that arose and were modified along with the development of the automotive industry: electromagnetic, friction and hydraulic. Friction clutch, in turn, can be single-, double- or multi-disc.
Most modern cars are equipped with a single-plate clutch, the design of which includes the following elements:
- Clutch fork.
- Diaphragm spring.
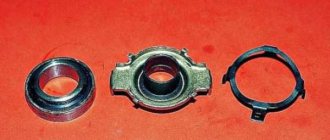
- Release bearing.
- Release bearing clutch.
- Driven disk.
- Drive (pressure) disk.
- Flywheel.
The operating principle of this mechanism is:
- When the driver presses the clutch pedal, it acts on the clutch drive, which moves the fork of this mechanism.
- Next, the fork exerts an impact on the release bearing, due to which the bearing moves and affects the petals of the diaphragm spring of the drive disc.
- As a result, the spring petals bend towards the flywheel, and its outer edge moves away from the drive disk, giving it freedom. At the same time, the “squeezing” of the drive disk also occurs due to tangential springs.
- As a result, torque transmission stops.
- When the driver releases the clutch pedal, by triggering the diaphragm spring, the drive and driven discs are closed again, and contact between the spring and the flywheel is re-established. The transmission of torque to the gearbox is restored.
From the described process, the principle of operation of the clutch fork and its other elements becomes quite clear. This part plays an important role when disengaging and engaging the clutch between the transmission and the engine, that is, it forms free space between the driven and pressure plates. This is necessary to completely disconnect the gearbox from the engine.
If we talk about manual transmission, then its operation becomes impossible without a working clutch fork. Thanks to her:
- The maneuverability of the car increases when driving at low speeds.
- The vehicle can remain stationary even with the engine running and without neutral transmission being activated.
- The multi-structure mechanism for switching vehicle speeds is launched.
In addition, without a fork, the clutch cannot operate, since this element is an on and off switch. With its help, the motorist can control the operation of the engine and provide it with normal operating modes.
Are adjustments done differently on different brands of cars?
If the car is equipped with a manual transmission, then this setting is identical for all car models. With automatic transmissions, such adjustments are not made because the driver does not engage the clutch.
The only thing that can be adjusted at home without disassembling the basket is setting the optimal amplitude of the pedal. The driving disc should not engage the driven disc either early or late so that the driver can smoothly release the pedal.
The only way the process may differ on a separate car is the position of the adjusting mechanisms. In one car, it is enough to simply lift the hood and the cable approaches the box from above, and in another, remove the air filter module or battery.
Signs of a slipping clutch
If you are faced with the fact that your VAZ 2114 periodically slips and the pedal squeaks, but you are not sure that the problem is in the clutch, then we will help you figure it out. To do this, you need to have a little understanding of the signs of slippage.
This is exactly what we will talk about next:
- When the clutch slips, a characteristic smell of burnt rubber will appear in the car.
- Even when you press the gas pedal to the floor, you will not feel any visible changes. In particular, the vehicle will pick up speed very poorly.
- When driving uphill, the car will move with difficulty. It may seem that the gas tank of the VAZ 2114 has run out of fuel, since the car will barely move on an incline.
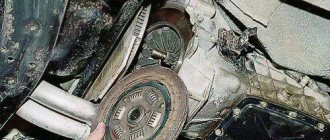
Clutch discs for VAZ 2114
VAZ 2115 Diagnosis of clutch faults
Diagnosis of clutch faults
The clutch is slipping
Insufficient clutch pedal free play. Check and make adjustments.
The clutch release mechanism is faulty. Check and make necessary repairs.
The clutch master or slave cylinders are faulty. Check and overhaul the hydraulic clutch drive system.
| The working surface of the clutch driven disc is worn. Check and replace the disc if its friction linings are worn to less than 0.3 mm above the rivet heads (see accompanying illustration). |
The servo drive unit is faulty (4.2L models). Check and replace if necessary.
| Typically, the first sign of clutch slipping is a noticeable, unreasonable increase in engine speed when climbing steep hills. To check the condition of the clutch, firmly engage the parking brake, chock the vehicle's wheels and place the transmission in the highest gear position, then slowly release the clutch at medium engine speed. If the engine does not stall, the clutch is slipping. To avoid more serious damage to the clutch, you should have it inspected and make any necessary repairs or replacements without delay. |
There are jerks and vibrations in the clutch
The working surfaces of the driven disk are contaminated with oil. Check and replace the disk if necessary. Find the source of the leak and eliminate its cause.
The driven disk hub is loose or damaged. Check and replace the disk.
The friction linings of the driven disk are loose. Check and replace the disk.
| Cracks have appeared in the working surface of the pressure plate (see accompanying illustration). Check and replace the clutch basket assembly. |
The surface of the pressure plate or flywheel is scratched. Check and replace the clutch basket or flywheel.
| Clutch vibration is usually most noticeable when reversing up a hill. Since one of the causes of vibrations is weakening of the power unit supports, before removing the clutch for inspection, carefully check the condition of the rubber pads and support brackets, as well as the reliability of their fastening. |
Clutch sticking occurs
| The power unit supports are broken or their fastening is loose (see accompanying illustration). Tighten fasteners or replace defective supports. |
The working surface of the driven disk is contaminated with oil. Check and replace the disk. Find the source of the leak and eliminate its cause.
Cracks have appeared in the working surface of the pressure plate. Check and replace the clutch basket assembly.
The clutch does not disengage
The free play of the clutch pedal is excessive. Perform pedal adjustment.
Air has entered the clutch hydraulic system. Bleed the hydraulic system.
The clutch slave cylinder is faulty. Check, overhaul or replace the cylinder.
The clutch master cylinder is faulty. Check, overhaul or replace the cylinder.
The clutch release mechanism is faulty. Check and make necessary repairs.
The driven disk is bent. Check and replace the disk.
The driven disk hub is jammed on the splines of the gearbox input shaft. Check and replace the disk or input shaft if necessary.
The driven disc has become “stuck” to the flywheel due to moisture getting into the clutch housing. Check the condition of the clutch, seal the casing.
The servo drive unit is faulty (4.2L models). Check and replace the block.
| Since in most cases, incomplete disengagement of the clutch is associated with a violation of the free play adjustment or the setting of the clutch pedal height, before removing the clutch for inspection, carefully check the correctness of the corresponding settings and bleed the hydraulic system. |
Extraneous noise occurs when the clutch operates
The release bearing is overdried or worn. Check and replace the bearing.
| The pressure plate diaphragm spring is damaged. Check the spring petals for grooves and other damage (see accompanying illustration); if necessary, replace the disc. |
The input shaft guide bushing is worn or not lubricated. Check and replace the bushing if necessary.
| To check the noise made by the release bearing, lightly depress the clutch pedal with the engine running. If the release bearing is faulty and requires replacement, be sure to also check the condition of other clutch components. |
VAZ 2114 how to adjust the clutch
A clutch is a mechanism in a car that transmits the rotational motion received by the engine crankshaft, the gearbox and then to the wheels of the car. Its main task is to ensure that the car starts off without jerking and shifts gears without noise.
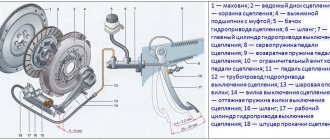
ABOUT THE CLUTCH DEVICE
Its design on this car is similar to mechanisms 2113 and 2115. It is made of a dry, single-disc mechanism. It is produced with a device that dampens torsional vibrations, and also has a pressure spring. The VAZ 2114 clutch device is shown in the figure.
The VAZ 2114 clutch consists of (see picture):
- Cable with a casing;
- Cable tip (lower);
- Adjusting nut;
- Housing for attaching the shell to the gearbox;
- Separating washers;
- Nut for adjustments;
- Rubber protective shell;
- Cable lead;
- Shutdown plug;
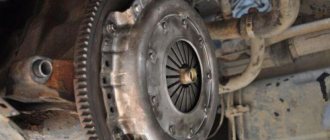
- Basket;
- Bolts securing the basket to the flywheel;
- Pressure disk;
- Flywheel;
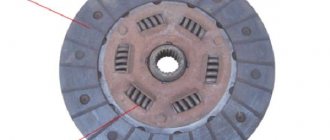
- Driven disk;
- Gearbox input shaft;
- Shield;
- casing;
- Spring (pressure);
- "Squeeze";
- Pad;
- Release housing;
- Cable end;
- Cable thrust washer;
- Cable fastening unit;
- Pedal axle;
- Release spring;
- Off pedal.
As can be seen from the mechanism diagram, there are two working units, one of them will be the master, and the second will be the slave. The second includes a disk with linings riveted on both sides and damper springs installed. It is installed and moves along the splines that are present on all gearbox input shafts. When the pedal is pressed, the driven disk is pressed against the flywheel by the pressure disk.
The drive unit includes a pressure disc with a clutch housing, which is attached to the flywheel with six bolts. To center it, there are pins on the flywheel and guide holes in the housing. The clutch has a backlash-free design and is operated by a cable.
To turn it off, a clutch drive is installed, which operates by pressing the pedal. The cable is hingedly attached to it with its upper tip. The lower end of the cable also has a hinged connection with the shutdown fork. With its movement, the “cable” turns it, and it moves the “releaser”.
HOW IT IS CHANGED
It is safe to say that repairs or adjustments to the clutch are carried out in case of wear of the linings; problems with the pressure plate or flywheel are less likely to occur.
WHAT ARE THE SIGNS OF A MALFUNCTION?
The culprits of breakdowns ahead of time are almost always the vehicle owners, and more specifically, their driving style. A sudden start of movement with “slipping”, or holding the foot on the pedal for a long time, have a negative impact on this mechanism.
The following facts indicate the presence of problems in the mechanism:
- The presence of jerks and vibrations during movement;
- Noise when shifting gearbox;
- Inability to engage or disengage the clutch mechanism.
Sometimes, unfortunately, spare parts of poor workmanship fail.
WHAT TO DO IF THIS UNIT IS "JAMBLING": ADJUSTMENT, REPLACEMENT OF THE CABLE AND CLUTCH
The first thing you need to do is try to adjust the VAZ 2114 clutch. The purpose of this adjustment is to change the length of the cable, its sheath, relative to its fasteners on the gearbox. These adjustments can be used to increase or decrease the pedal stroke. This operation is quite simple, any driver can perform it.
To adjust correctly, the procedure will be as follows:
- Place the car on a level surface and start the engine;
- They turn on first gear and try to move away. It is necessary to note the moment the car begins to move.
- When this happens at the end of the pedal stroke, it needs to be adjusted;
- Using a measuring ruler, the working pedal run-out is measured. To do this, squeeze it out completely and place a ruler next to it. You need to make a mark on it and release the pedal. At the end of the move, a mark is made again. The distance between the marks should be within 125 - 135 mm. If the dimensions are different, adjustments need to be made;
- Open the hood of the car and find the cable attachment point on the gearbox;
- There are two adjusting nuts on this assembly. They achieve the desired working stroke for the pedal.
Sometimes rust appears on the threaded part of the cable end. To remove it, treat this area with a “wedge”, brake fluid or oil. This will facilitate the process of carrying out adjustment work. At the same time, check the movement of the cable in the sheath and its condition. If broken wires are found, the cable is replaced with a new one.
Clutch pedal adjustment
Periodic adjustment of the VAZ 21014 clutch pedal is carried out for the following reasons:
- When driving on a non-adjustable clutch pedal, subsequent repairs are possible, because exaggerated energy costs for incorrect operation of the mechanism will cause malfunctions of other components of the car.
- Due to improper functioning, the clutch pedal periodically does not function. This leads to the fact that the pressure plate of the unit is forced into “engagement” with the motor flywheel, as a result of which they are subject to accelerated wear.
- If the pedal stroke is insufficient, the vehicle slips, i.e. the required torque of the wheel pair is lost.
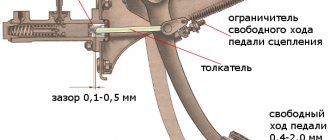
To carry out diagnostic work on adjusting the clutch pedal, you need to use an arithmetic ruler to measure the length of the pedal stroke to the floor. If it does not correspond to 16 cm, then adjustments are necessary.
Signs of incorrect operation of the clutch mechanism: there is no possibility of a smooth start from a standstill, movement from a standstill is accompanied by jerks and jolts, when changing gears the transmission makes increased noise, the pedal of the mechanism falls to the lower position. In practice, it turns out this way: if the vehicle began to move from the moment the pedal began to be lowered, then the free play does not correspond to the required value. When the pedal is completely released, the vehicle does not move, which means there is no free movement in the car.
Clutch pedal adjustment:
- Unscrew the nut located under the clutch pedal.
- Tighten the locknut located below until it stops.
- Next, screw in the fasteners located under the clutch pedal.
- We tighten the rubber washer to the clutch fork as far as possible.
- To increase the pedal stroke, you need to screw the fastener onto the tip. To reduce the pedal stroke, you need to unscrew this fastener. The VAZ 2109 clutch pedal is adjusted until the limit of 12-13 cm is reached.
- After completing the pedal adjustment operations, you need to: depress the pedal three times, measure the length of the pedal stroke, adjust the operation until the required stroke length is achieved.
To adjust the hydraulics you need:
- Remove the spring from the mountings of the working cylinder and the clutch fork.
- Adjust the fasteners located on the clutch cylinder rod.
- The recommended free play value is 0.5 cm.
Often, a large pedal stroke depends on the height of its location from the driver's floor, and this creates certain difficulties. To adjust the height, a series of simple plumbing operations and a wrench set to “12” are required:
We find two fasteners on the steering column shaft, one is a thrust screw that limits the height adjustment position, the second is a lock nut that changes the movement of the pedal.
- Unscrew the stop screw.
- We give it rotation until the pedal movement normalizes.
- Screw in the locknut.
If slippage is observed after adjusting the clutch, then the following operations must be performed:
- Remove the stem locknut.
- Move it until there is no free movement.
- Return the rod one full turn.
- Determine whether the clutch has free play.
- Test the operation of the transmission gears. If there is an incomprehensible noise, you need to perform the above operations again.
- Screw in the locknut.
Self-adjustment of the clutch on a VAZ 2114
Cart Despite the fact that manual transmissions mostly cause many problems and difficulties for women, in fact, an additional pedal in the form of a clutch is simply necessary for smooth gear shifting. In fact, it is the clutch that allows the VAZ 2114 car to move away
Therefore, increased attention should be paid to this node. You are obliged, as a car owner, to monitor the condition of the unit, and if necessary, replace the clutch on the VAZ 2114
Mechanism design
Structurally, the clutch on the VAZ 2114 consists of a total of 15 elements. Namely:
- Main shaft bearing having rollers;
- Clutch protection housing;
- Fork support bushing;
- Switch, also known as bearing;
- Press disk;
- Pressure spring;
- Secondary disk;
- Flywheel;
- Scale;
- Gearbox main shaft;
- Second bushing-switch;
- Carter;
- Plug switch;
- Fork toggle switch;
- Flywheel mounting bolt.
The clutch design on the “fourteenth” model cannot be considered very complex. In practice, you need to know four main points from him:
- Clutch with one disc brake;
- Type dry, closed;
- The driven disk has a device that dampens vibrations;
- The pressure spring is diaphragm.
Clutch drive design
Also an important node, already consisting of 19 elements. Namely:
- Pedal;
- Rope body;
- Fixation bracket from the bottom of the end of the cable sheath;
- Lower end of the cable;
- Fasteners;
- casing;
- Cable drive;
- Clutch switch fork lever;
- Pedal spring;
- Cable;
- Upper cable end;
- Clip;
- Pedal axis;
- Retaining brackets;
- Brake and clutch pedal bracket;
- Spacer sleeve;
- Clutch pedal bushing;
- Brake pedal.
The VAZ 2114 has a backlash-free drive with a cable. That is, there is no space between the clutch release bearing and the pressure spring.
Nuances of the device's operation
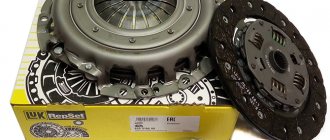
Valeo kit For the clutch to work effectively, be sure to pay attention to the pedal travel. The optimal stroke size is 12-13.5 centimeters
Adjusting the clutch on a VAZ 2114 is not difficult. But first, measure this very move.
To do this, measure the distance from the center of the pedal between the minimum and maximum pedal pressure, that is, when you press the pedal to the floor. If the stroke is small, the cable fastening nut is unscrewed slightly and the missing millimeters of the cable are removed. If the stroke is too large, proceed in the same way, only the extra millimeters are removed.
The maximum stroke is 160 millimeters.
Adjustment
You can visually study the VAZ 2114 clutch adjustment in a video. In practice, you have to take a few simple steps:
- Unscrew the clutch cable fastening nuts evenly;
- Check the pedal travel several times, measuring the distance exactly in millimeters;
- Tension or loosen the cable, depending on the situation;
- Tighten the nuts to 14.4 Nm.
If the clutch cable itself is damaged, the problem can only be solved by replacing it. This procedure is carried out during the process of disassembling the unit, which we will talk about later.
Clutch failures and their elimination
There are several characteristic and probable malfunctions that occur on the “fourteenth” model of the domestic automaker. Fixing all these breakdowns is not difficult in most cases.
Troubleshooting
To begin with, we note that the clutch sometimes works intermittently. There may be several reasons for this:
- The passive disc linings are contaminated with oil;
- There were problems with the drive;
- The pressure plate is deformed;
- If extraneous noise occurs when you press the clutch pedal, you can blame it on broken damper disc springs or lubricant leakage from the bearing.
There are also breakdowns that will allow you to put the clutch in order without completely replacing it. Their types and actions that should be taken are presented in the table.
A few words about the clutch cable drive
Foreign automakers extremely rarely equip their cars with such a clutch drive, preferring more reliable hydraulics that rarely fail. But on vehicles of Russian manufacturers, cable clutch mechanisms are standard. And this despite the fact that they have a lot of real shortcomings, which are well known to owners of domestic cars.
The clutch cable needs constant adjustment during operation, which is due to the natural operating wear of the clutch drive. It quickly becomes covered with rust, breaks off at the most unexpected moments, and so on. It is for this reason that every driver driving a car with a manual transmission is simply obliged to know what to do if the cable that interests us fails.
We will talk further about how to change and adjust the cable mechanism. Now let’s describe it in a few words. The cable is connected to the clutch pedal using screws, its other end is also fixed with a screw, but to a special bushing in the shield. In this case, the cable is screwed to the pedal as tightly and reliably as possible, and to the bushing more freely, due to which the described mechanism rotates on the axis without any serious difficulties. In addition, a stop must be installed under the pedal, which protects the cable from breaking.