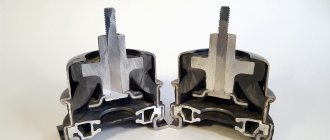
To prevent the engine from detonating, special rubberized parts were invented - supports. They reduce vibrations at any speed. The cushion, also known as the engine support for the Lada Priora with 16 valves, can be: lower, upper, left and right - they provide connection between the power unit and the body and limit its movement.
The price of parts starts from 500 rubles. Read the article to the end, it will tell you about which companies produce Priora engine mounts. Let's talk about analogues, their article number and price. How to replace supports on a 16 valve motor and what keys to prepare for the job!
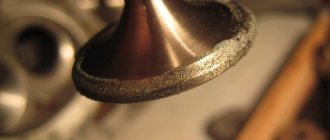
The top guitar looks like this
Airbag malfunctions
You can tell that the airbags have become unusable by the amount of engine vibration.
If it operates in normal mode, and the body begins to rattle, transmitting vibration to the steering rack, pedal block, and instrument panel, you can be sure that the reason for this is the wear of the pillows. The greatest vibration is usually observed when the engine starts, as well as when it is turned off. When the rubber cushions are completely worn out, a knocking noise may appear caused by the contact of the engine elements and its supports. To be more convincing, start the engine, open the hood and visually inspect the engine mounts and the cushions themselves. Place your palm on the motor and feel how much it vibrates.
The causes of failure of engine mounts can be:
- deformation due to spent life, mechanical or temperature effects;
- loss of elasticity due to “aging” of rubber and temperature changes;
- delamination or cracking caused by exposure to chemically active liquids.
5.9. Replacement of power unit supports
The power unit (engine and gearbox) is mounted on two rubber cushions at the front and rear, secured through brackets on the engine and gearbox housing. These supports are designed to transfer the weight of the power unit to the body and limit its longitudinal movements. On the right and left there are supports with rods that limit the lateral movements of the power unit.
| Rice. 5.5 . Power unit suspension: 1 – bracket on the right side member of the body; 2 – lower limiter of the pillow; 3 – upper support cushion; 4 – upper limiter of the pillow; 5 – pillow fastening nut; 6 – spacer washer; 7 – support fastening nut; 8 – front support bracket; 9 – left support rod; 10 – left support bracket; 11 – rear support cushion; 12 – nut with washer; 13 – rear support bracket; 14 – bracket for the right lower support; 15 – right support rod |
The suspension parts of the power unit are shown in Fig. 5.5. You will need: keys “13”, “15”, “17”, a jack or similar lifting mechanism. 1. Hang the front of the car on supports or lift the car on a lift. 2. Remove the engine splash guard (see “Removing and installing the engine splash guard”).
| 3. Before removing the power unit rear support cushion, install a jack or hydraulic stand under the gearbox housing (see photo). | 4. To replace the rear support cushion, use a 15mm wrench to unscrew the nut securing the support to the bracket. |
| 5. Remove the upper cushion stop. | 6. Using a 13mm wrench, unscrew the two bolts securing the rear support cushion to the body... |
| 7. ...and remove the pillow. | 8. Remove the lower cushion stop. |
| 9. To replace the rear support bracket, use a 13mm wrench to unscrew the two nuts securing the bracket to the rear of the gearbox housing... | 10. ... using a 13mm socket wrench, unscrew the upper mounting bolt and remove the bracket. |
11. Install the bracket and cushion of the rear support of the power unit in the reverse order of removal.
| Notes The upper 1 and lower 2 stops of the rear support cushion differ in shape. Do not mix them up during installation. Install the support pad with its conical part up and its cutout towards the front of the car. Install the support pad mounting pin with the shoulder facing down. |
| 12. Before removing the front support cushion of the power unit, install a jack or support under the engine oil sump. | 13. Using a 17mm wrench, unscrew the nut securing the front support cushion to the bracket and use a 13mm wrench to unscrew the two bolts securing the cushion to the body. Remove the cushion restraints and the cushion itself. |
| 14. Install the front engine mount cushion in the reverse order of removal, oriented with the conical part up and the cutout towards the rear of the car. | 15. To replace the right support rod, use a 15mm wrench to unscrew the bolt securing the rod to the cross member (the generator has been removed for clarity)… |
| 16. ...and to the support bracket... | 17. ...then remove the barbell. |
18. To replace the right support bracket, which is also a generator bracket, remove the generator (see “Removing and installing the generator”, page 212), unscrew the three bolts securing the bracket to the cylinder block with a 15mm socket wrench...
19. ...and remove the bracket. 20. Install the parts in the reverse order of removal.
| 21. To replace the left support rod, use a 15mm wrench to unscrew the bolt securing the rod to the body... | 22. ... using a 15mm wrench, unscrew the nut securing the rod to the support bracket and remove the rod. |
23. Install the rod in the reverse order of removal.
| Note Install the right and left engine mount rods with the arrows on the rubber mounts pointing away from the engine. |
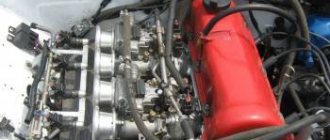
Car engine
The engine was not created from scratch, but on the basis of 21083, as a result, manufacturers received a 16-valve engine, and the VAZ-2112 feels more confident with it.
The geometric characteristics of the base engine are preserved, but there are differences in power, efficiency, and throttle response. Advantages:
Compensators are installed on the engine - now the driver is freed from adjusting the valves every 10 thousand km. Environmental standards fit into the Euro-3 standard. The injector makes it possible to forget about servicing the latter for a long time - there are far fewer worries than with a carburetor on a “classic”, for example
This ensures smooth running of the machine in all modes. When the engine revs above 3 thousand, the engine has better throttle response and dynamics compared to its predecessor. Due to the modified combustion chamber, the anti-knock qualities of this engine have been improved, and this is important considering that gasoline at gas stations is not of good quality. This measure of design changes extends the service life of the engine until the next major overhaul. Stable operation of the cooling system in any weather allows you to maintain the desired temperature regime.
It is noteworthy that very famous automobile brands were involved in its creation. This, however, did not relieve the design from some shortcomings:
- Low torque at low speeds.
- The belt drive is not reliable and if it breaks on a 1.5-liter engine, it bends the valves, which cannot be said about a 1.6-liter engine. This drawback ends up costing the car owner a lot of money: the cylinder head has to be repaired.
- The engine has two camshafts: intake and exhaust. They open and close the valves, intake and exhaust, respectively. There are not two such valves, as on the “ten”, but four for each cylinder. This, of course, significantly improves engine performance by supplying more combustible mixture to the cylinders, and there is also improved exhaust gas removal to the exhaust manifold. This is both an advantage of the engine and its disadvantage at the same time, since despite obvious advantages in operational characteristics, its repair is more expensive. If the 8-valve engine has always been famous for being unpretentious in maintenance, the same cannot be said about the 16-valve engine.
The timing belt (timing belt) is longer than on the base engine, therefore more expensive. If on the previous model one pressure roller and one timing gear were used, then on this one the number of mentioned parts has doubled.
How to replace the engine mount
Due to wear and tear on your vehicle, it may be necessary to replace your engine mounts at some point. The number of engine mounts depends on the vehicle. Follow these steps to successfully replace a faulty motor mount.
Step 2 - Attachment
The engine bridge may suffer from wear and tear associated with starting the vehicle. Examine your engine and note the fastenings that need to be replaced.
Step 3 - Components
Look at the fasteners as well as other components. Typically, the bolts holding the mount in place are also affected. You will need to remove them to begin the installation.
Step 4 - Battery
Once we've installed the mounts and components, it's time to turn your attention to the battery. The black wire or negative cable must be disconnected from the battery
Step 5 - Raising the Vehicle
For better access you need to raise the car. Use a jack to raise the car and place jack stands to support the car.
Step 7 - Safe Storage
It is necessary to remember the unscrewed components what goes where, this will save a lot of time when reinstalling.
Step 8 - Engine Support
When replacing the mount, you may put pressure on other parts of the brackets. This additional pressure may damage some parts. Therefore, it is recommended to support the side part with a socket. The jack must be placed close to the anchor point.
Step 9 - Removing the Bolts
Learn how to remove all the bolts from the mount you want to replace. Some bolts can be easily removed from the bottom. Depending on how the assembly is mounted, sometimes a screwdriver will not be useful. You will need to use a wrench.
Step 12 - Final Stage
Return the vehicle to ground level. Connect the black wire to the battery.
You have successfully replaced the engine mount on your car. Now you can take your car for a test drive
Source
Valve tuning: features of implementation
This engine, like any other, has valves
They are an important component of it and are responsible for the operation of the entire system. Moreover, they come in several types: 8 and 16
Depending on which one is used, such are the characteristics of the motor. And, of course, the whole car. When choosing valves for tuning, preference should be given to those with a larger diameter or lighter ones. In this case, it is necessary to take into account the rotation of the motor. If it exceeds 6000 rpm, then it is better to install stiff springs on the valves. Also in this case, both sports and modified plates, which are made from titanium, are suitable.
When replacing valves, you can use parts from other car models. For example, the 8-valve engine functions perfectly with BMW parts. In this case we are, of course, talking about valves. This modification option is often practiced. And, as experience shows, it is quite successful.
Before choosing valves, you need to evaluate your financial capabilities, since there are many parts. They differ not only in their characteristics, but also in cost. If you prefer an inexpensive option, then titanium products are suitable. They can be purchased ready-made and ordered according to individual requirements and sizes.
If you decide to use standard products, then you need to carry out additional manipulations with them. They should be significantly lightened and ground in. The manufacturer does not include these stages in the production process. Therefore, this gap must be filled on our own.
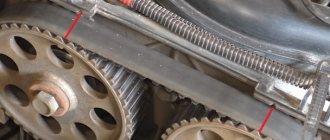
Replacing the optional top cushion:
This cushion is also not difficult to remove, it is attached in the same way to one bolt with a cage nut (This nut is indicated by a green arrow in the small photo and most importantly, when you unscrew the bolt, do not lose this nut, be sure to hold it) and to another bolt , but only at the end of which a regular nut is screwed in (the approximate location of this nut is indicated by a blue arrow, and its bolt is shown in red), when these two bolts are removed, you can remove the upper support and put a new one in its place.
Additional video clip: If you suddenly want to understand what kind of airbags are generally installed on 16 valve cars of the tenth family and the Priora family, and also if you suddenly wonder how they can be distinguished from each other, then in this case, watch the video clip just below :
Useful tips
Motorists recommend replacing the support in warm weather. In winter, the pillow becomes very dull, and can only be removed after preheating (using a hairdryer or blowtorch). If the support does not come out, it is recommended to use VD-40 type lubricant or its equivalent from. Regular lubricant will not work for this.
Often dust and moisture enter the cavity of the old cushion, resulting in corrosion processes occurring on the cylinder. It is not possible to remove the pillow. If you are replacing the rear support, pay attention to the direction indicated by the arrow on the part. It must be installed in the direction of travel of the vehicle. Otherwise, there is a risk that the element will not withstand the load and will break.
Do-it-yourself replacement of engine mount cushions on a Priora
On an 8-valve engine:
- The car must be prepared for repair work; for this purpose it is placed on a flat surface; it is imperative to place stops under the rear wheels and remove the protection of the power unit.
- Cl. 13” remove the bolt holding the generator belt tensioner. We remove the belt.
- We install a jack under the “engine” of the LADA Priora, not forgetting to place a thick board under it, or a regular beam will do. The power unit must be raised so that there is no load on the supports.
- Cl. 15” unscrew the nut of the so-called central fastening directly to the pillow on the right.
- We remove the cl. 13” bolts securing the pillow on the bracket.
- Unscrew the plug. 17” 3 bolts that secure the bracket to the car side member. You can find these bolts on the side of the right arch directly below.
- At this stage, we remove the bracket and replace the old pillow with a new one.
- In the reverse order, we put everything back in its place in exactly the same order.
- Next we jack up the gearbox.
- Cl. 15” unscrew the nut of the so-called central fastening on the left cushion.
- Cl. 13” unscrew the 2 existing bolts securing the supports we are considering.
- We replace the pillow with a new one and assemble everything, observing the sequence in reverse order.
- Cl. at 17”, unscrew the 2nd nuts, they are the ones that secure the support cushion to the body, then the 2nd nuts on the side where the cushion is attached to the gearbox.
- It's time to remove the rear support.
- Cl. 19” unscrew the only nut securing the support pad to the bracket. We replace the pillow with a new one, then collect it in the reverse order.
Replacement work on a 16 valve engine:
The 16 valves located on the side of the engine mount on the LADA Priora are removed and replaced in the same way as on 8-valve engines. In order to replace the pillow from below, you need to work from underneath.
- Cl. 15” remove the only bolt that secures the so-called lower support bar, which is located in front, to the suspension cross member, also located in front.
- Using a pair of 15” wrenches at once, unscrew the nut securing the metal. support to the motor bracket. We remove the bolt with ease.
- We remove the old support, change the pillow, or, if desired/necessary, the entire structure.
- And, don’t forget to collect everything in the reverse order of the given one.
- Under the hood, you need to unscrew the bolt connecting the upper front support and part of the body. We use cl. by 17”, and it is recommended to hold the nut by hand.
- We take out the nut and bolt.
- Cl. 15” unscrew the existing bolt connecting the upper front support and the power device bracket. We remove the nut and, accordingly, do not forget about the bolt.
- We then carry out the now familiar replacement and assemble everything, following the reverse instructions.
When the entire 16-valve engine mount has been replaced, or even if the engine has 8 valves, you need to start the engine and check if vibration is present. If the engine mount is installed correctly and properly secured, then vibration should be completely absent or minimal; detailed instructions can be found here.
Let's sum it up
Detecting a faulty airbag on a LADA Priora and replacing it yourself is not a difficult procedure, especially if you strictly follow the sequence of repair work. Among other things, this will help you save money.
Sources
- https://Autoprokat-RentMotors.ru/brendy/kak-pomenyat-podushki-dvigatelya-na-priore.html
- https://avtika.ru/kak-pravilno-ustanovit-podushki-dvigatelya-na-priore/
- https://avtika.ru/kak-pomenyat-podushku-dvigatelya-vaz-2170/
- https://avtika.ru/zamena-levoy-podushki-dvigatelya-priora-svoimi-rukami/
- https://kalina-2.ru/remont-vaz/opory-dvigatelja-priora-16-klapanov-shema
- https://motorchina-online.ru/avto-lada-drugoe/zamena-gitary-na-priore.html
- https://Vaz-Lada-Granta.com/priora/zamena-podushek-dvigatelya.html
What is a Priora airbag?
Typically, this Prior safety element will work in the event of a frontal impact or an angular impact, which occurs at an angle of no more than 30° at a higher required speed.
This indicator is also important: everything will depend on how rigid the object with which the collision occurs. If it is capable of deformation, then the system will come into action at a speed that exceeds 25 km/h, only with frontal interaction.
The so-called airbag is a whole coherent system that has the following elements:
- the gas generator itself;
- a special label with a barcode;
- a housing in which the folded inflatable pillow will be placed;
- fasteners; connector with fuse and igniter at the gas generator part;
- facing cover.
The essence of the action of the gas-generating element located in the pillow is as follows:
There are two types of gas generators:
The first will consist of a body that will be filled with a solid pyrotechnic substance and the igniter itself. As for the second, it will consist of a casing material containing compressed gas of inert origin, as well as all the components already listed above.
- When struck, an electrical signal will be generated.
- The electrical resistance will heat up and ignite the pyrotechnic substance.
- The rest of the mass ignites.
It is very important that the facing cover covering the airbag itself is intact. The purpose of this part in the Prior is to cover the folded element near the pillow during normal times, but it will rupture during gas filling at the moment of collision.
This will happen along the structural seam - it is located along the back side on the cover itself.
This will happen along the structural seam - it is located along the back side on the cover itself.
- sensor responsible for acceleration;
- an electronic circuit that generates signals entering the control.
The control unit itself is designed to convert and process information that comes directly from the sensor responsible for acceleration. In the future, it will generate a signal of electrical origin sent to the fuse.
The airbag responsible for safety in the Priora must be coordinated in its future operation with the belt. When the person driving is not wearing a seat belt, it simply will not work.
- At the moment of impact, the pillow will inflate very quickly and press the person to the seat with great force.
- In the case when the driver is not fastened, the body involuntarily swings forward and is met with a huge blow from the airbag. This is fraught with additional major injuries.
The status of the airbag on the Priora is regulated by a special sensor located on the dashboard. The light will indicate each existing fault. If it lights up, it helps to monitor the airbag data, as well as keep these systems in working order, which will be the key to saving the driver’s life on the road.
What problems do pillows have?
How can the owner of a Lada Priora understand that the engine mount, and its main element - the cushion, have already completely become unusable? When the engine operates in its usual mode, the body begins to rattle quite noticeably, plus vibration, which cannot be ignored, is transmitted to the steering rack, as well as the dashboard, and even to the pedal block. If you notice this, then know for sure that it is the pillows that have worn out and will certainly need replacement.
As a rule, a slight vibration is present when the engine starts, and it is felt when it is completely turned off. When the pillows are completely worn out, a knocking sound often begins to be heard, and it appears due to the contact of the motor with the support.
In order to be completely sure that this is where the problem lies, you need to open the engine compartment and inspect the supports and, without exception, all the pillows. You can feel the force of vibration if you place your palm on the “engine”.
What could be the reasons why the support cushions we are considering fail:
- Due to fairly rapid temperature changes and the natural aging of rubber, cushions lose their elasticity.
- Trace factors influence: temperature/mechanical stress or it happens that deformation is inevitable due to the spent resource
- All kinds of chemical liquids also act, and cracking and even delamination occurs.
Interior of the car
The interior of the twelfth model collected all the best from its previous “brothers”. Changes:
- The rear seatbacks are separated. Each of the backrests folds (moves forward as needed).
- The trunk has become significantly larger. Due to these changes, it became possible to transport long items, which summer residents like so much.
- Car owners complain that it is a bit dark in the cabin and the dashboard is not very visible.
- The assembly seems to be of high quality, but there are still pure VAZ noises and panel squeaks when driving.
- The power windows are controlled by buttons in close proximity to the handbrake, and this is not entirely convenient: it would be more appropriate to place them on the car door cards. In addition, such a drive is only on the front windows, and the rear windows are opened with “oars” - handles, and even then not in the basic configuration.
- There is an almost complete lack of sound insulation. However, almost all VAZs suffer from this. Even with loud music, you can hear the engine, chassis and rustling wheels in the cabin.
- As for the front seats, their performance is good, although the adjustments are very inconvenient. People of large build feel comfortable in this car - both the driver and the passenger on the right.
- The trunk is very convenient when loading - there is no shelf in the way.
- The driver has an excellent view.
- The rear seats are comfortable for passengers, although the gap between the roof and the passengers' heads is small.
The pedals are quite closely spaced. The driver experiences the greatest inconvenience from this in winter, when the shoes are wider.
This is interesting: Miss Tuning 2014 winner Veronica Klimovits
From the edge of the brake pedal to the console there is just over 100 millimeters, and many drivers have to press the accelerator pedal while keeping their right foot in an unnatural position, otherwise it can get caught in the brake pedal. The most interesting thing is that there are no such shortcomings in the “ten”. It is very possible that the convex panel on the side of the tunnel is to blame.
The interior looks much more modest in comparison with foreign cars of the same class.
What problems do pillows have?
How can the owner of a Lada Priora understand that the engine mount, and its main element - the cushion, have already completely become unusable? When the engine operates in its usual mode, the body begins to rattle quite noticeably, plus vibration, which cannot be ignored, is transmitted to the steering rack, as well as the dashboard, and even to the pedal block. If you notice this, then know for sure that it is the pillows that have worn out and will certainly need replacement.
As a rule, a slight vibration is present when the engine starts, and it is felt when it is completely turned off. When the pillows are completely worn out, a knocking sound often begins to be heard, and it appears due to the contact of the motor with the support.
In order to be completely sure that this is where the problem lies, you need to open the engine compartment and inspect the supports and, without exception, all the pillows. You can feel the force of vibration if you place your palm on the “engine”.
What could be the reasons why the support cushions we are considering fail:
- Due to fairly rapid temperature changes and the natural aging of rubber, cushions lose their elasticity.
- Trace factors influence: temperature/mechanical stress or it happens that deformation is inevitable due to the spent resource
- All kinds of chemical liquids also act, and cracking and even delamination occurs.
Why does it wear out?
Many motorists ask this question. Signs of faulty engine mounts can vary. This is primarily due to natural wear and tear that occurs due to vibrations. The resource of these elements is about 150 thousand kilometers. The stronger the vibration, the greater the load on the support (especially if one of the engine cylinders is not working).
If you think that the resource directly depends on the mileage, you are mistaken. The cushion wears out even when the car is parked in the garage. Over time, the rubber dries out. Microcracks appear. Another negative factor is oil. It is necessary to change the seals in time to prevent leaks.
Oil negatively affects the life of the engine mount. Signs of a VAZ 2110 malfunction may also be in the driving style. So, with a sharp start with slipping, a colossal load is placed on the support.
Replacing the right damper support
Before changing the right engine mount of a VAZ 2110 car following the video example, you should install wheel chocks and also disconnect the negative terminal from the battery. The further process is carried out according to the following scheme:
- Loosen the generator fasteners with a 13mm wrench and remove the belt drive.
- Loosen the tensioner bolt.
- Jack up the right side of the car.
- Using a 15mm wrench, unscrew the nut securing the support.
- Using a 13mm wrench, unscrew the two bolts securing the support to the bracket.
- Using a 17mm socket, unscrew the three bolts securing the bracket to the right side member.
- Remove the bracket and install the new support in the reverse order.
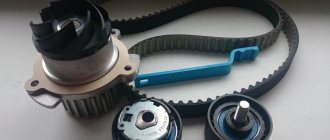
Lada Priora (2013+). Removal and installation of the VAZ-21126, -21127 engine
We carry out work when it is necessary to repair the engine or replace it.
Relieve the pressure in the engine power supply system (see “Replacing the fuel filter”) and disconnect the fitting of the fuel supply tube to the ramp from the tip of the fuel hose (see “Removing the cylinder head”).
Disconnect the wire terminal from the negative terminal of the battery. We drain the engine oil (see “Changing the engine oil and oil filter”) and coolant (see “Replacing the coolant”).
We disconnect the engine control system wiring harness block from the canister purge solenoid valve, remove the valve from the plastic engine cover (see “Removing the canister purge solenoid valve”) and move the valve to the side without disconnecting the hoses from it.
We remove the air filter along with the mass air flow sensor (see “Removing the air filter”) and the air supply hose to the throttle assembly.
Disconnect the end of the throttle drive cable from the drive sector (see “Replacing the throttle drive cable”).
Remove the vacuum brake booster hose from the intake manifold (see “Removing the intake manifold”). Remove the fuel vapor supply hose from the throttle assembly fitting (see “Removing the throttle assembly”).
We disconnect the wiring harness blocks of the engine control system from the idle speed regulator and sensors: oxygen concentration, detonation, low oil pressure indicator, coolant temperature, coolant temperature indicator, phases, crankshaft position, throttle position, rough road (see the corresponding chapters : “Engine”, “Power system”, “Engine control system”).
Remove the rough road sensor together with the bracket from the right mudguard cup (see “Removing the rough road sensor”).
We remove the generator (see “Removing the generator”). Remove the crankcase ventilation idle circuit hose from the cylinder head cover fitting and disconnect the engine management system wiring harness brackets from the cylinder head cover (see “Removing camshafts and replacing valve lifters”).
Unfasten or cut two layers of mass clamps securing the wiring harness of the engine management system to the rear timing cover (see “Removing the coolant pump”).
Disconnect the end of the ground wire of the engine management system wiring harness from the cylinder head and remove the end of the ground wire coming from the battery from the thermostat housing mounting stud (see “Removing the cylinder head”). We move the wiring harnesses away from the engine to the side.
We disconnect the pipe of the additional muffler from the catenary collector (see “Replacing the gasket in the connection between the catalytic collector and the additional muffler”). We remove the gearbox (see “Removing the gearbox”), the “basket” and the driven clutch disk (see “Removing clutch parts”).
Use a Phillips screwdriver to loosen the clamp securing the radiator supply hose...
...and remove the hose from the thermostat housing pipe. Similarly, remove the radiator outlet hose from the thermostat cover.
Use a Phillips screwdriver to loosen the clamp securing the inlet hose of the expansion tank...
...and remove hose 1 from the thermostat housing pipe. Similarly, remove the heater inlet hose 2 from the thermostat housing pipe, and the heater outlet hose 3 from the coolant pump inlet pipe.
Having removed the hood stop from the socket in the fender, and placing a rag between the hood and the windshield, set the hood to a vertical position.
To attach the lifting chain...
Having tightened the chains, we remove the adjustable stop from under the engine, which supported it when removing the gearbox.
Disconnect the front and rear supports from the engine brackets.
We unscrew the three bolts securing the right support bracket to the body side member without disconnecting the support from the engine bracket (see.
“Removing the power unit supports”).
Before removing the engine, you need to check that all hoses, tubes, and wires are disconnected from the engine and laid aside.
Using a lifting device, remove the engine from the engine compartment. We install the engine on the car in reverse order.
Video on the topic “Lada Priora (2013+). Removal and installation of the VAZ-21126, -21127 engine"
Source
Maintenance schedule
Servicing the 21124 engine by replacing consumables is necessary in accordance with the manufacturer’s regulations:
| Maintenance object | Time or mileage (whichever comes first) |
| Timing belt | after 40,000 km |
| Battery | 1 year/20000 |
| Valve clearance | 2 years/20000 |
| Crankcase ventilation | 2 years/20000 |
| Belts that drive attachments | 2 years/20000 |
| Fuel line and tank cap | 2 years/40000 |
| Motor oil | 1 year/10000 |
| Oil filter | 1 year/10000 |
| Air filter | 1 – 2 years/40000 |
| Fuel filter | 4 years/40000 |
| Heating/Cooling Fittings and Hoses | 2 years/40000 |
| Coolant | 2 years/40000 |
| Oxygen sensor | 100000 |
| Spark plug | 1 – 2 years/20000 |
| Exhaust manifold | 1 year |
The simplest possible design of the internal combustion engine allows you to carry out maintenance on your own without visiting a service station.
Installing an additional gearbox cushion
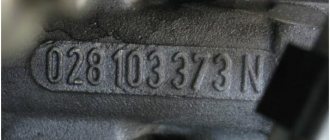
The Priora already has the holes necessary to install this pillow, so in addition to the spare part itself with article number 2110-1001280, you will only need fasteners:
- 2 bolts M12x75.
- 2 self-locking nuts M12.
- 4 washers for M12 bolts.
- 2 bolts M10x30 with a thread pitch of 1.25 (for some cars a thread pitch of 1.5 is suitable).
- 2 engravers for M10 bolts. 8 wide washers for M10 (can be replaced with a smaller number when using thick washers, for example, from the cylinder head).
The replacement technology itself
- The part is attached to the gearbox bracket using M12 bolts with self-locking nuts.
- The washers are placed under the bolt head and under the nut.
- M10 bolts are screwed into the body. Between it and the rod body, you need to place washers so that the rubber rod does not touch the body.
The good condition of the Priora engine mounts is the key to comfortable movement. At the same time, if you have a suitable tool, replacing components will not be difficult.
Source
Replacement
The process of replacing Lada Priora engine mounts is described below, as well as the tools that will be needed to carry out this work. By following these step-by-step instructions, work on replacing the Priora engine mounts can be carried out without much effort in the shortest possible time.
Required tool:
- Ratchet with 13, 15, 17mm heads. Head Torx E10;
- Open-end or socket wrenches 13, 15, 17 mm;
- Jack;
- Part of a wooden board;
Replacing the right support
If the car has a crankcase protection installed, it must be removed.
We jack the engine into the crankcase, placing the support through a wooden board.
Unscrew the central nut securing the support to the engine bracket.
Unscrew the fastenings of the support to the body.
Lower the engine slightly with a jack. This is necessary for easier dismantling of the unscrewed support.
Install the new support in reverse order
Replacing the left support
Replacing the left support is done in the same way as the right one, only the jack must be installed under the gearbox. The emphasis must be made through a wooden lining.
Replacing guitars
Replacing guitars is quite simple and effortless.
Using a 15 mm wrench, unscrew the bolt securing the guitar to the car body and remove it.
Using a 15 mm wrench, unscrew the bolt securing the guitar to the engine bracket and remove it, and then the support itself.
Install the new support in reverse order.
Replacing the lower guitar follows similar instructions.
Tightening guitars must be done with the engine running.
Replacing the lower support on 8-valve internal combustion engines
Work on replacing the lower support on 8-valve engines must be carried out from the inspection hole.
We unscrew the 2 nuts securing the rubber part of the cushion, which is attached to the car body.
Unscrew the two bolts securing the cushion to the gearbox housing and remove the cushion.
Installation is carried out in reverse order.
We hope our article was useful to you.
Category: Repair
Characteristic
What is this item? An engine mount is a gasket between body elements and the power unit. This is installed on all cars without exception. On Soviet Zhiguli cars, the cushion was a durable piece of rubber with fasteners on both sides. On more modern “nines” and “eights” (and subsequently all VAZs with a front-wheel drive layout) full-fledged rubber-metal supports were installed.
So, the power unit was mounted on four pillows. Two of them are on the gearbox, and the rest are on the engine. To avoid unnecessary loads, the box and motor are rigidly fixed. Any distortion leads to a change in the geometry of the input shaft. As a result, all the vibration is strongly transmitted to the gearbox lever and the transmission itself.
Where are the pillows? This element is installed on the engine from several sides:
- Front cushion. Attached to the front beam of the power unit.
- Back cushion. Installed to the front subframe. Located in the bottom area.
- Right support. It is located on top, near the front side member of the body.
Also note that not all vehicles have a rear support. This function is performed by the gearbox itself.
In this case, it is attached closely to the motor. The pillows themselves are made in different shapes. They are often an aluminum or steel cylinder with a silent block inside. To secure it to the body, a so-called “paw” is used. It also has a rubber spacer. This is exactly how modern engine mounts are designed. Symptoms, how to diagnose a part, what affects wear - we will consider in the course of this article.
Tips and tricks
It is important to understand that the airbags experience the heaviest loads when the car suddenly starts from a standstill, as well as during heavy braking. The service life of the supports is also reduced by driving through potholes when the body and engine sway, especially at high speed.
As for diagnostics and repairs, it is necessary to check and change engine mounts in a timely manner, since increased vibrations not only affect comfort, but also have an extremely negative impact on the engine itself, the body and the equipment. In other words, even if one airbag is torn, it is strongly not recommended to further operate the car with such a malfunction.
Car engine mounts: purpose. Types of power unit supports and design differences. Signs of malfunctions of engine support cushions and inspection.