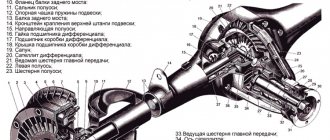
How to check and replace a VAZ-2107 axle shaft
Measuring the axial free play of the axle shaft on a car
The axial free play of the axle shaft can be measured on a car either with the wheel and brake drum removed or without removing them. In the first case, the measurement is more accurate.
rice. 1 |
For what:
– remove the caps from the rear wheels and loosen the bolts securing them;
– place stops under the front wheels and lift the rear axle;
– release the parking brake and set the gear shift lever to neutral;
– remove the wheels and brake drums;
– screw device 02.7834.9504 to the axle shaft;
– pass the indicator leg extension 1 through one of the two large holes of the axle shaft until it stops in the brake shield or oil deflector and secure the indicator;
– take measurements with an indicator, applying a force of about 49 N (5 kgf) to the axle flange in both directions, along the axis of the rear axle. Free play should not exceed 0.7 mm. Measure the free play of the axle shaft without removing the wheel and brake drum as described above, taking into account the following features:
– secure device 02.7834.9504 using one of the holes for the wheel bolts;
– pass the leg of the indicator extension through another hole for the wheel mounting bolt;
– the force applied to the wheel along the axis of the rear axle should be about 98 N (10 kgf), the free play of the axle shaft should be up to 0.7 mm.
Replacing the axle shaft and its cuff
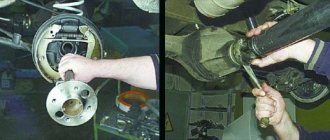
We hang the rear of the car on tripods, remove the rear wheel and brake drum. Using a jack, we lift the disassembled edge of the rear axle beam so that after removing the axle shaft, the oil does not spill out.
| 1. Using a “17” socket, unscrew the four nuts through the holes in the axle shaft flange. | 2. Remove the elastic washers with tweezers. |
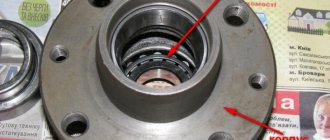
| 3. We attach an impact puller to the axle shaft flange and knock the axle shaft out of the beam. Instead of this device, you can use the removed wheel. We install it with the reverse side on two bolts and with a sharp movement pull out the axle shaft. | 4. The axle shaft is removed along with the oil deflector, mounting plate, bearing and locking ring. |
| 5. A rubber O-ring is installed between the beam flange and the brake shield. | 6. Using sliding pliers, remove the axle shaft cuff from its socket in the rear axle beam. |
| 7. Using light blows of a hammer on the socket head (a piece of pipe of suitable diameter), press in a new cuff. | In case of deformation of the axle shaft, large radial and axial clearances in the bearing, displacement of the locking ring, wear of the splines, the axle shaft must be replaced as an assembly. Replacing the bearing and snap ring alone is not recommended. Install the axle shaft in the reverse order of removal. Before installation, lubricate the working surfaces of the cuff with Litol-24 lubricant. |
How to correctly replace the rear axle bearing on a VAZ 2101
Cases when it is necessary to replace the rear axle bearing of a VAZ 2107 occur less often than a breakdown with replacement of the front bearings. The operating conditions of the vehicle are very important here. The repair itself is not complicated and it is quite possible to do it yourself, which will save you on a trip to a car service center.
Kit, VAZ 2107 axle shaft bearing with retaining ring and oil seal
Long-term operation of a vehicle with this malfunction can lead to negative consequences and more expensive repairs. The fact is that the destruction of the bearing cage will lead to a misalignment of the axle shaft, and the displaced brake drum will rub against the brake pads.
Purpose
The bearing is located on the axle shaft, inside the rear axle. It ensures rotation of the axle shaft, its centering, and also supports the weight of the car. From here we conclude that the more often we carry loads and the greater their mass, the more often we will have to change the bearing.
Symptoms of a problem
Cases of axle shaft failure are extremely rare, unlike bearings. The main sign of a faulty rear axle bearing is a hum in the area of the rear axle wheel. In this case, its intensity will depend on the speed of movement. With significant wear, a creaking or grinding sound will be heard. Sometimes the bearing simply jams and it begins to rotate in the seat, and this leads to wear and tear and expensive repairs. The reason for its failure can be not only significant and frequent loads, but also simply a significant service life. Bearing diagnostics
Tools
1. socket wrench 17;2. mount;3. hammer;4. flat screwdriver;5. chisel;6. bearing number 6306 or 180306 (designation of a sealed bearing). Has the article number - 6306.2RS, 099407, 2101-2403080;7. stuffing box.
Replacing the rear wheel bearing
Before starting work, we carry out standard actions to secure it, jack up the car and remove the wheel. Next: 1. remove the brake disc;2. through the holes of the axle shaft, unscrew its fastenings using a 17;3 socket head. remove the axle shaft by prying it with a pry bar;4. cut the locking ring;5. through the holes that unscrewed the axle shaft, we knock down the bearing;
If the bearing is very “stuck”, it can be cut off with a grinder or removed after heating.
Don't remove the pads, I removed them to replace them.
We take out the oil seal and clean the seat
Next, assembly proceeds in the reverse order: • install the oil seal; • stuff the bearing onto the axle shaft; • install the locking ring; • put the axle shaft in place.
Useful little things
1. Do not remove the pads, this will only increase the operating time.2. It is better to heat the locking ring when installing.3. It is better to stuff the bearing with a piece of pipe measuring 32 (overall dimensions of the rear axle shaft bearing: d=30 mm, D=72 mm, B=19 mm).4. Use safety glasses when working with an angle grinder. Here is a video of how to replace the rear axle bearing of a VAZ 2107:
Anti-lock braking system (ABS)
| GENERAL INFORMATION |
| The front wheel sensors are located in the steering knuckles as shown. They control the speed of the car's wheels through ring gears mounted on the front drives. |
| The rear wheel sensors are attached to the rear axle carrier as shown. |
REPLACEMENT OF ABS ELEMENTSREPLACEMENT OF ANGULAR SPEED SENSORS OF FRONT WHEELSRemoval
PERFORMANCE ORDER 1. Disconnect the ground cable from the battery. 2. Raise and place the front of the vehicle on stands. 3. Remove the wheel, allowing access to the sensor cable.
4. Remove the plug connection in the wheel housing from the holder and unplug it using a screwdriver.
5. If there are several plug connections, find out which one belongs to the ABS sensor.
6. Disconnect the cable from the mount.
7
Unscrew the sensor mounting bolt with a socket wrench and carefully separate it with a screwdriver. Installation
Installation
PERFORMANCE ORDER 1. Tighten the fastening bolt to a torque of 9 Nm. 2. Be careful not to twist the sensor cable. The cable is marked with a white line. 3
When tightening the cable mounting bolts, pay attention to the different tightening torques. 4
The lower cable fastening bolt is fastened with a torque of 27 Nm, the upper cable with a torque of 6 Nm
4. The lower cable fastening bolt is fastened with a torque of 27 Nm, the upper cable with a torque of 6 Nm.
5
Make sure that the speed sensor is not dirty or damaged.
6. After completing the work, set the ignition key to the operating position and check that the ABS warning light goes off.
REPLACING REAR WHEEL ANGULAR SPEED SENSORS Removal
| EXECUTION ORDER |
| 1. Disconnect the ground cable from the battery, lift and place the rear of the car on stands. |
| 2. Find the sensor cable and unplug the plug connection, disconnect the cable from the mount. |
| 3. Unscrew the sensor. The location of the sensor on the rear suspension is shown in the illustration. |
Installation
| EXECUTION ORDER |
| 1. Be careful not to twist the cable when connecting. For proper installation, the cable is marked with a white line. |
| 2. Tighten the sensor mounting bolts to a torque of 22 Nm, the cable mounting bolts to a torque of 27 Nm. |
INSTRUCTIONS ON WHEEL SPEED SENSORS Diagram explaining the principle of operation of the wheel speed sensor REPLACING THE FRONT WHEEL SENSOR ROTOR
| EXECUTION ORDER |
| 1. Remove the front hub as described in the appropriate section. |
| 2. Remove the rotor from the inside of the wheel hub. |
| 3. If the removed rotor is installed backwards, it is necessary to check the tooth surfaces. They must not be damaged. |
| 4. When installing, tighten the bolts to a torque of 18 Nm. |
REPLACING THE REAR WHEEL SENSOR ROTOR
| EXECUTION ORDER |
| 1. Raise and place the rear of the car on stands. |
| 2. Remove the rear drive as described in the appropriate section. |
| 3. Remove and install the gear rotor in connection with replacing the drive bearing. |
| 4. The specified work is also described in the Chapter Brake system |
Causes of failure
Every part on a car tends to become unusable. Rear wheel bearings are no exception, but any part has characteristic operational features. If the operating conditions are met, the part can serve for years, which is confirmed by the driving experience of current older drivers.
The main reasons for bearing failure are:
- careless driving;
- incorrect installation of the product;
- water and dust getting inside the hub;
- leakage of lubricant;
- long service life.
If a VAZ-2107 car is often operated in aggressive conditions close to off-road, then the need to replace the rear wheel bearing will not take long to arrive.
It is especially important to take into account the fact that the famous “seven” is a rear-wheel drive car. But how can you determine that a wheel bearing has failed and needs to be replaced? Let's find out in more detail
Methods for determining whether a wheel bearing is faulty
Timely identification of a malfunction allows you to prevent unpleasant consequences that can provoke an emergency situation on the road. The part in question on the VAZ-2107 car plays an important role, since thanks to this product the wheel rotates easily. The car has 2 rear wheel bearings, one for each rear wheel.
The main way to determine the malfunction of an important part of the hub on a VAZ-2107 is to carry out the following manipulations:
- raise the rear of the car on a jack;
- swing the outer part of the wheel in different directions;
- if a knocking noise occurs and the wheel dangles, then the rear wheel bearing of the VAZ-2107 needs to be replaced.
If the car drives while turning corners and a squeaking noise appears, this also indicates the need for repair work. To replace the wheel bearing, you will need the following tools:
- jack;
- wrenches and screwdrivers;
- chisel and hammer;
- puller;
- Litol brand lubricant.
After making sure that you have a complete list of tools and materials for the work, you can begin replacement.
Replacing a faulty product
You must begin replacing the product by loosening the wheel bolts. This must be done before the rear of the car is jacked up. At the same time, do not forget to install stops under the front wheels.
- A jack is installed, then the rear side of the car where the bearing needs to be replaced is jacked up. Once the car is raised, you can install a safety stump in case the jack comes off.
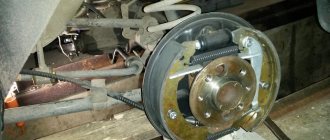
- The wheel is removed, and then the drum. It should be remembered that you cannot put the car on the handbrake, otherwise you will not be able to remove the drum. To remove the drum, you need to unscrew two pins and insert them into the technological holes. When the pins are tightened, the drum is pulled out, after which it can be dismantled.
- Using a screwdriver, pry off the steel cap or protective cover. The 4 nuts securing the axle shaft are unscrewed.
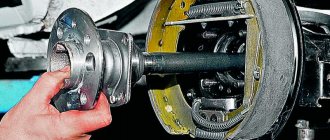
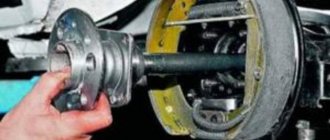
- We use a special puller, with the help of which the hub is removed from the drive axle axle. If there is no puller, then you can use a regular chain or cable, attaching it to the axle shaft.
- It is necessary to remove the worn bearing from the axle shaft using a puller or grinder. To remove the bearing using a grinder, you need to cut the outer race on both sides.
We make a cut to remove the old part
- Before pressing in a new product, it is necessary to thoroughly lubricate the seat on the axle shaft and in the hub. The bearing must be pressed in using a locking sleeve.
- The bushing must be heated with a blowtorch, then put on the axle shaft and cooled with water.
Further actions are performed in the reverse order of removal
It is important not to forget that when replacing a bearing, the sealing seals must also be replaced.
The bearing must not be misaligned, which can lead to its failure on the very first day of operation. If you operate the car correctly and carefully, then you can forget about replacing the bearing for 2-5 years. You can also read about replacing the front wheel hub bearing.
Replacing the rear axle gearbox seal of a VAZ 2107 with your own hands:
“Zhiguli Seven” is the latest rear-wheel drive VAZ model. A distinctive feature of any classic VAZ model is the presence of a gearbox. It is to this that the driveshaft, which transmits torque, fits. Next, this moment goes to the axle shafts and, accordingly, the wheels.
The circuit is quite simple, and, at first glance, there is nothing to break here. But a rear gearbox leak is one of the most popular problems that arise among owners of rear-wheel drive “Classics”.
So, let's look at how to replace the rear axle gearbox seal on a VAZ-2107 and what is this element needed for?
Characteristic
What it is? The gearbox seal is a sealing element that acts as a gasket. It prevents oil from escaping from the gearbox. The oil seal also prevents dirt and other deposits from entering the bridge from the outside. This element is located between the cardan drive and the gearbox flange. It is connected to the latter using four bolts.
Signs of replacement
When is it necessary to replace the oil seal on a VAZ-2107? It does not have a specific resource or regulations. But there is a clear sign that will indicate that the VAZ-2107 rear axle gearbox seal has been replaced.
These are traces of oil leaks in the area of the gearbox flange. At first they will be minor. But, as you use it, all the oil from the bridge can leak out through this gap. If measures are not taken in time, wear on the gears and differential will increase.
As a result, the bridge will hum, especially at speed.
Note! If the bottom of the bridge is simply fogged, the problem is most likely not with the seal. Such symptoms are observed when there is excess oil pressure in the breather, due to which the liquid begins to leak out.
Getting ready for replacement
If all signs of malfunction are confirmed, you should immediately replace the worn oil seal. This way we will save the resource of the gearbox. But first we need to drain the oil from the bridge.
To do this, use a hexagon to unscrew the drain hole and place a container with a volume of at least two liters. It is advisable to drain the oil “while it’s hot,” especially if the temperature outside is below zero.
But you don't need to warm up the engine. In order for the oil in the bridge to warm up, you need to drive the car at least 3-5 kilometers. It is quite viscous and difficult to drain in the cold.
Rear axle oil
On the VAZ 2106, friction of the internal elements of the rear axle is reduced by means of GL5 class gear oil with a viscosity of 85W-90. The volume of the substance is 1.3 liters. There are many similar oils today, but for Zhiguli cars you can use less expensive ones, for example, TAD-17.
You can fill the rear axle of the VAZ 2106 with TAD-17 oil
Checking the oil level and adding oil
To check the lubricant level and top up, you will need a 17 wrench and a special syringe. The procedure consists of the following steps:
- We place the car on a level surface.
- We unscrew the oil filler plug and use our finger to check the oil level: it should be at the level of the lower edge of the filler hole.
You can check the oil level in the gearbox with your finger by unscrewing the filler hole. - If necessary, top up using a special syringe to the required volume, then wrap the cap and wipe away any stains with a rag.
To fill the oil, use a special syringe
The rear axle of the VAZ “six” is a fairly reliable unit and does not require much attention. The need for repairs, if at all, occurs infrequently. The most common problems are leaking axle or shank seals. Replacing them is simple and does not raise any questions. A more complex procedure is replacing the axle bearings or repairing the gearbox. However, these mechanisms can also be repaired in a garage by carefully reading and following the step-by-step instructions.
How to change the gearbox seal on a VAZ 2106:
1) Treat the seating surface with a lubricant, namely sealant. The working edge of the oil seal is also well lubricated;
2) The oil seal must be driven in with light hammer blows. Apply blows through an attachment of a certain diameter, while avoiding distortion of the parts;
3) Collect all parts removed from the ponytail;
4) The flange locking nut will need to be replaced with a new one;
5) It is necessary to hang the rear of the car;
6) Disengage the differential gears and axle shaft;
7) Fix the tail flange using the bolts that are inserted into the flange hole;
8) Using a special torque wrench, tighten the tail nut;
9) Change the oil in the gearbox.
Replacing the front wheel bearing
Work on replacing a wheel bearing begins with the preparation of tools and materials. You will need:
- set of socket wrenches;
- screwdriver;
- chisel;
- hammer;
- pliers;
- extension for knocking out the bearing race;
- new bearing, seal and lubricant;
- rags;
- kerosene.
How to remove
To dismantle the part, lift the front wheel using a jack. In a service station, work is carried out on a lift. When replacing a bearing, the following sequence of actions must be performed:
- Unscrew the fasteners and remove the wheel.
- Unscrew the fastening and dismantle the caliper.
- Using a screwdriver, pry up the protective cap of the hub and remove it.
- Align the side of the hub nut.
- Unscrew the nut and remove it along with the washer.
- Dismantle the hub.
- Remove the outer bearing cage.
- Using a tool and a hammer, knock out the outer part cage from the hub.
- Pull out the ring that separates both wheel bearings and the oil seal.
- Knock out the inner race.
- Using kerosene and rags, clean the seat from dirt.
How to put
After dismantling the wheel bearings and cleaning the hub itself, you can begin installing new parts. The work is performed in the following order:
- Press in the races of both bearings.
- Apply lubricant to the separator and insert it inside the hub.
- The space between the bearings is filled with lubricant.
- Insert the spacer ring.
- Install a new seal.
- Install the hub onto the steering knuckle axis.
- Apply lubricant to the outer cage and place it in the bearing race.
- Place the washer in place and tighten the hub nut until it stops.
- After replacing the wheel bearings, adjustments are made by smoothly unscrewing the nut and ensuring that the hub rotates freely, but there is no play.
- Strike the side of the nut with a chisel, which will prevent it from unscrewing arbitrarily.
- Place the caliper in place and tighten the fasteners.
- Install the protective cap and wheel and tighten the bolts.
- They lower the car.
Video: how to replace the front wheel bearings of a VAZ 2107
What to lubricate
Litol-24 is used to lubricate wheel bearing separators. It is also used to apply a new oil seal to the working edge during installation.
Bearing nut tightening torque
The need to tighten the hub nut arises after replacing the bearings or during their adjustment. The nut is tightened using a torque wrench to a torque of 9.6 Nm, while the hub is turned several times to install the bearings in place. Then loosen the nut and tighten it again, but with a torque of 6.8 Nm, after which it is locked in this position.
The hub nut is tightened with a torque wrench
Replacing the axle shaft
Let's look at the process of replacing the axle shaft, its bearing and oil seal in detail. Tools you will need:
- wheel wrench;
- a jack and a safety stand (in extreme cases, a stump or a few bricks);
- wheel stops;
- reverse hammer;
- wrenches 8 mm, 17 mm;
- slotted screwdriver;
- Bulgarian;
- round nose pliers;
- hammer;
- chisel;
- workbench with a vice;
- blowtorch or gas torch;
- spacer made of wood or soft metal;
- a piece of steel pipe with a wall diameter of 33–35 mm;
- Litol type lubricant;
- dry clean rag.
Removing the axle shaft
To dismantle the axle shaft, you should:
Place the car on a flat surface and place chocks under the front wheels. Use a wheel wrench to unscrew the wheel bolts. Raise the car body with a jack. Unscrew the wheel bolts and remove the wheel. Using a size 8 wrench, unscrew the drum guide pins. Remove the drum
If it does not come off the blocks, carefully knock it down using a spacer and a hammer.
How to remove a broken axle shaft
If the axle shaft is broken, it will not be possible to dismantle it in the usual way. But there are other methods. If the shaft breaks directly in front of the flange and its broken end sticks out of the bridge casing, you can weld a piece of reinforcement to it, and then use it to pull out the rest of the axle shaft.
If the axle shaft breaks inside the casing, you can try to knock it out with a piece of reinforcement inserted from the back side of the bridge, after first removing the opposite axle shaft. In extreme cases, to remove a piece of shaft, you will have to disassemble the gearbox.
Removing and installing the bearing on the axle shaft
When replacing the axle shaft with a new one, it is recommended to replace the bearing, but if the old one is still fully functional, you can install it too. But to remove it you will need to remove the retaining ring. To do this you need:
- Securely fix the axle shaft in a vice.
- Using a grinder, saw through the outer part of the ring.
Installing the oil seal
To install a new oil seal:
- Wipe the seat with a clean, dry cloth.
- Lubricate the socket surfaces with grease.
- Lubricate the oil seal itself with grease.
- Install the part into the mounting socket.
Installing the axle shaft
Once the bearing and seal are installed, you can install the axle shaft. Installation is carried out in the following order:
- We install the sealing gasket.
- Insert the axle shaft into the housing until it stops. Check how the splines engage with the gear teeth by turning the axle shaft in different directions.
- Apply a few gentle blows with a hammer to the axle shaft flange to make sure it is seated correctly.
- Install spring washers onto the axle shaft studs. Install and tighten the nuts securing the axle shaft with a 17 mm socket wrench.
- Place the drum on the shoes and secure it with guide pins.
- Mount the wheel.
- Check to see if there is any play in the axle shaft or bearing by trying to shake the wheel along the vertical and horizontal axes.
- Lower the body and remove the chocks from under the front wheels.
- Tighten the wheel bolts.
- Check whether the signs of axle shaft malfunction have disappeared by driving on a flat section of the road.
Video: replacing the axle shaft on a VAZ 2107
As you can see, fixing a faulty axle shaft is not that difficult. And for this it is not at all necessary to contact a service station.
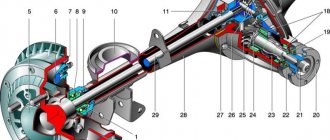
In rear-wheel drive cars, which the “seven” actually belongs to, the rear wheels are driving. It is they, rotating, that make the car move.
The torque is transmitted to them from the gearbox through the drive (cardan) shaft, gearbox and axle shafts. There are only two axle shafts: one for each rear wheel.
Their role is to transmit torque from the corresponding gear of the gearbox to the wheel rim.
Each of the axle shafts is installed in the corresponding (left or right) rear axle housing. An oil deflector with a gasket and an oil seal are used to prevent lubricant from leaking out of the casing. The bearing is designed to ensure uniform rotation of the axle shaft and distribute shock loads coming from the wheel to the rear axle of the vehicle.
How to Determine a Bearing Failure
The VAZ-2107 axle bearing wears out during operation, and sometimes the seat underneath it breaks. Malfunctions of this element can be determined by several signs:
- A humming noise appears from the rear axle. Sometimes it turns into crackling and squeaking. Moreover, the higher the speed, the louder these sounds. This should not be confused with a similar hum that can be heard when the rear axle gears wear out.
- The balls fall out and the separator is destroyed; the axle shaft jumps out of its seat when moving.
- Increased play of the rear wheels. Diagnostics is quite simple; you just need to place the car on a jack and rock the wheel several times. A knocking sound and free movement indicate that there is a malfunction.
- Sometimes the rear wheels jam, which can result in a serious accident.
The design of the VAZ-2107 axle bearing is simple and reliable; it can last for quite a long time. But if the car experiences very heavy loads, moves on bad roads, or the bearing is made of low-quality material, the service life is significantly reduced. The bearing cannot be repaired; it will only need to be replaced. In case of deformation and excessive wear, new mechanisms must be installed.
List of faults
The total service life of an axle bearing in domestic cars can range from 50 to 150 thousand kilometers. However, the bearing wears out faster when the car is driven on uneven roads, and vice versa, if the car is driven on roads with good coverage, its service life can be significantly longer. Most often, the initial signs of axle bearing wear, which a car enthusiast can notice, appear after the car has covered a mileage of 100 thousand or more km.
Mechanical deformations and material wear of the bearing lead to its malfunction and should be replaced. Without disassembling the axle shaft, it is not possible to determine wear or damage to the part. There are factors by which bearing failure can be determined:
Noise, hum when turning the wheels.
At the initial stage of bearing wear, a hum or metallic grinding noise can be heard when the wheels are turned. These sounds may increase or decrease depending on the speed of the car. This factor is not critical when the car is moving. But at the same time, you should not put off replacing the bearing for too long.
Drum heating.
When moving, a faulty bearing increases the friction force of the axle shaft and flange, and the excessively generated heat is transferred to the central part of the drum. This factor can be noticed if you drive the car a little and then touch the central part of the drum with the back of your hand.
The grinding of wheels.
After a hum appears during the turning movements of the wheels and the drum heats up, and the grinding of the wheels also becomes audible, then it’s time to sound the alarm. Most likely, the axle bearing has failed or is completely destroyed. Given the combination of these three factors, you should not continue further movement, but immediately look for a service center to replace the bearing. Otherwise, it will lead to irreparable consequences.
The appearance of a gap on the wheels.
If the wheel has a gap or play, this may indicate a faulty axle bearing. To detect this, you need to shake the wheel using your hands and a jack. If the bearing is normal, the wheel will not wobble.
How bridge malfunctions manifest themselves
The rear axle of the VAZ “six” is endowed with its own characteristic problems, which manifest themselves in one way or another.
Excessive noise from rear wheels
There may not be many reasons for the appearance of large noise from the wheels of the rear axle:
- The wheel has become loose. In this case, it is necessary to check and tighten the fasteners;
- semi-axial bearing failure. The axle bearing wears out over time, resulting in a characteristic noise. The axle shaft needs to be inspected and the faulty element replaced.
Constant noise from the rear axle while driving
Sounds unusual for the normal operation of the device in most cases indicate problems. The main causes of malfunctions include:
- stocking deformation. If the case is deformed, you can try to restore it, but it is better to replace it with a serviceable one;
- bent axle shafts and excessive runout. In this case, the part must be replaced;
- increased wear on splines. It is necessary to inspect the gears and splines of the axle shafts, and then replace the damaged elements;
- the gearbox is incorrectly adjusted, gears or bearings are worn or broken.
Complete disassembly, defect detection and repair of the mechanism is required; If the bearing rollers are damaged, extraneous noise may appear in the operation of the rear axle. - low oil level. You need to check the level, bring it to normal and make sure that there are no leaks through the lip seals and gaskets.
Noise when accelerating the car
The appearance of noise when accelerating a vehicle may be associated with the following reasons:
- Worn or incorrectly adjusted differential bearings. The gearbox needs to be dismantled, inspected and repaired;
- The gearing between the teeth of the bevel and planetary gears is incorrectly set. The problem is solved by proper adjustment;
- wear of semi-axial bearings. It is necessary to remove the faulty axle shaft and replace the bearing;
- little lubrication.
The problem is resolved in the same way as with constant noise. Lack of lubrication in the gearbox leads to increased production and jamming of the mechanism
Noise when accelerating and braking the engine
If noise from the motor side is present when the motor accelerates and decelerates, then the reason is possible in the following:
- Excessive wear or damage to the shank bearings. Requires disassembly and diagnostics of the gearbox;
- Incorrect alignment of the teeth of the bevel and planetary gears. Eliminated by checking the integrity of the parts and setting the correct gap.
Video: identifying the cause of noise in the rear axle
Noises when cornering
Extraneous noise can appear not only when driving straight, but also when cornering. This may be due to the following reasons:
- Difficulty turning the satellites on the axis. Requires disassembly, inspection of serviceability and replacement of elements whose condition does not allow them to be used further;
- jamming of side gears. If the gears and the surfaces with which they come into contact have minor damage, then they are cleaned with sandpaper. Otherwise, failed elements must be replaced;
- Incorrect alignment of the differential gears. Diagnostics and correct adjustment of the gap are required;
- failure of semi-axial bearings. Defective elements must be replaced.
Knock when starting to move
If the “six” rear axle gearbox (RAZ) makes a knocking sound as soon as the car starts moving, then this may indicate the following:
- Excessive clearance between flange and tip. Inspection of the spline connection and replacement of worn parts is required;
- increased gap between the shank and the planetary gear. Eliminated by setting a gap;
- increased wear of the landing site under the satellite axis. If such a breakdown occurs, the box must be replaced;
- The rear suspension rod fasteners have dropped. The bolts need to be checked and, if necessary, tightened.
Oil leak
Lubricant may leak from the gearbox for the following reasons:
- wear of the bevel gear cuff. If a leak appears from the shank side, the oil seal must be replaced;
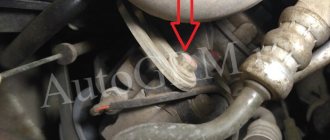
- Damage to the axle seal. If traces of grease appear on the brake flaps, this indicates wear of the axle shaft seal, which requires its replacement;
- The fastening of the gearbox to the stocking has become loose or the gasket has been damaged. In such a situation, it is necessary to tighten the fasteners or replace the seal.
When oil leaks, gear wear accelerates.
Disassembling the gearbox and replacing satellites
How to remove a VAZ 2107 axle shaft, replacing the oil seal, size, drawing, instructions with photos and videos
The satellites are additional gears installed in the differential gearbox. Their purpose is to transmit torque to the axle shafts of the rear wheels. Like any other part, pinion gears are subject to wear. After this, they will have to be changed, since this part cannot be repaired. To restore worn teeth, the car owner has neither the necessary skills nor the necessary equipment. In addition, any gear in a car undergoes a special heat treatment - carburization, which is carried out in a nitrogen atmosphere and strengthens the surface of the teeth to a certain depth, saturating this surface with carbon. An ordinary car enthusiast cannot do anything like this in his garage. Therefore, there is only one solution: purchase a repair kit for the rear axle gearbox. It costs about 1500 rubles. Here's what it includes:
- a pair of gears for axle shafts;
- a pair of satellites for the differential;
- satellite axis;
- support washer.
In addition to the repair kit for gearboxes, you will also need a set of regular open-end wrenches, a screwdriver and a hammer.
Sequence of operations
To disassemble the gearbox, it is best to use a regular bench vice. Then the work will go much faster.
- The gearbox removed from the machine is clamped in a vice in a vertical position.
- A pair of adjusting locking bolts are unscrewed from it, under which the locking plates are located.
- Now the four bolts (two on each side of the gearbox) holding the bearing caps are unscrewed.
- The covers are removed. Next, the roller bearings themselves are removed. They must be carefully inspected for wear. At the slightest suspicion of wear, the bearings should be replaced.
- After removing the bearings, you can remove the satellite axis and the satellites themselves, which are also carefully inspected for wear.
- Now the drive shaft and bearing can be removed from the gearbox housing. The shaft is installed vertically and knocked out of the roller bearing using a hammer (to avoid damaging the shaft, you need to place something soft under the hammer, for example, a wooden mallet).
- At this point, the disassembly of the gearbox can be considered complete. All parts, including satellites and bearings, should be thoroughly washed in kerosene. Damaged satellites are replaced with satellites from the repair kit. If wear is also detected on the axle gears, they too are replaced, along with the support washer. After this, the gearbox is reassembled and installed in its original place.
So, an ordinary car owner is quite capable of removing the gearbox from the rear axle of the “Seven”, disassembling it and replacing its worn parts. There is nothing complicated about this. Certain difficulties may arise only at the stage of adjusting the new gearbox. But you can also deal with them by carefully reading the above recommendations.
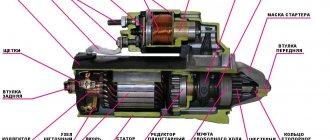
Procedure for bearing replacement
To get to the faulty unit, you will have to remove the gearbox, clutch and flywheel. Carry out similar work on a lift, pit or overpass, using a special crankshaft bearing puller (a device for pressing out of blind holes).
The replacement procedure is as follows:
1.First, disassemble the crankshaft bearing removal tool into its component parts, otherwise you will damage the thread when installing it. After this, lubricate the conical protrusion on the puller bushing with engine oil or grease - this will protect its surface from damage.
2.Install the press-out spacer sleeve into the inner race of the bearing and drive the device in until it stops.
3.To remove the bearing from the crankshaft, do the following. First tighten the puller screw by hand. Then, holding the press-out sleeve from turning with a 14-point open-end wrench, tighten the screw with a 17-point socket. Resting against the blank wall of the hole in the crankshaft flange, the shank of the device moves out of the coupling, pushing it along with the bearing out of the socket.
4. Having removed the damaged part, wipe the seat in the crankshaft from dust and lubricate it with engine oil. Don’t forget to check and, if necessary, replenish the amount of lubricant in the new bearing - manufacturers often sin with excessive efficiency.
5. When installing the new VAZ 2107 crankshaft bearing in place, make sure that it does not warp. The final pressing is carried out with a hammer and a suitable mandrel. If one is not found, then use the dismantled unit or hammer the bearing with a hard rubber mallet.
6.Installation is complete when the top plane of the bearing is flush with the flange.
If you are unable to find a press-out, do not despair. Every experienced auto mechanic knows how to remove a bearing from a crankshaft without a tool. In this case, you will need: a drift with a diameter of 15 mm (you can use a suitable bolt) and plastic material - lithol, plasticine or bread crumb mixed with sawdust. It is placed through the opening in the inner race in such a way as to fill the space under the bearing. Then a drift is inserted into the hole and hit with a hammer. Expanding to the sides, the soft mixture squeezes the bearing out. This way you can replace the faulty unit and avoid troubles in the future.
Something else useful for you:
- How to replace the rear crankshaft oil seal of a VAZ with your own hands?
- How to replace the front crankshaft oil seal of a VAZ yourself?
- What are the types of engine knocks, causes, diagnostics?
Replacing the rear axle gearbox seal of VAZ 2107, 2106
Good day, dear reader. Once you’ve entered the boat, it means you want to see the rear axle of your classic dry again, without fogging or oil leaks.
This article tells you how to replace the rear gear oil seal (at the place where the crankshaft shank enters) on your own.
First, let’s look at all the reasons why the VAZ rear gear oil seal stops holding oil.
Why does oil leak from the rear axle gearbox of VAZ 2107, 2106?
It is important to understand when the seal is leaking and when there is simple fogging. If after using the machine no drops of oil are visible near the oil seal, we can assume that the oil seal is simply sweating. In a situation where drops of oil or a trail followed by a drop are visible, we can assume that the oil seal is leaking.
Causes of leakage of the rear gear axle seal of VAZ 2107, 2106:
- Wear of oil scraper elements of the oil seal.
- Rupture of the compression spring of the oil seal.
- Oil seal defect.
- Development on the flange.
- Faulty or clogged gearbox breather.
When the oil seal is just sweating on a VAZ gearbox, you don’t have to change it, but if it leaks, then it definitely needs to be changed! But before changing the oil seal, check whether the gearbox breather is working by simply pressing on its head, and it should move a little.
If it is motionless, then the breather is most likely for the leak, because. it does not allow gases to escape from the gearbox, which creates excess pressure and presses the oil out of the oil seal. Also try unscrewing and blowing out the breather before deciding to replace the gearbox seal.
Let's now talk about replacing it.
Replacing the rear axle oil seal on a VAZ 2107 with your own hands
First, let's prepare spare parts and tools. Of the new parts we will need:
- The seal itself.
- Spacer sleeve.
- Oil deflector washer.
- New gear oil.
You will need 1.35 liters of oil. According to Murzilka, it is recommended to change it together with the oil seal. Ideally you need:
- Head 24
- The key is 17 (you can have a head) .
- A dynamometer (can be replaced with spring scales up to 15 kg) or a torque wrench of at least 150 N*cm.
- Open-end wrench 13.
- A good, thick flathead screwdriver.
- Mandrel for oil seal.
- Hammer or mallet.
- Container for old oil.
- Rags.
- Marker.
- Jack.
We've prepared everything and are starting the replacement!
Preparing and dismantling the gearbox oil seal
We drive the car into a pit or overpass and drain the oil from the bridge (do not forget to immediately screw the drain plug back). We make a mark with a marker at the junction of the cardan with the gearbox (so as not to throw off the balancing during installation). We take a 13 mm wrench and a strong screwdriver or some kind of mounting tool and unscrew the nuts securing the cardan to the gearbox.
We disconnect the driveshaft from the gearbox and see the 24 nut, but do not unscrew it. This is where a torque wrench or dynamometer comes in handy. We need to measure the force at the input to the gearbox until the suspended wheel begins to spin. Use a jack to jack up any rear wheel and then proceed according to the situation:
- If you have a torque wrench, then simply turn the nut 24 degrees until the wheel starts spinning and look at the readings on the wrench at this moment. We remember them because When assembling, we will tighten with the same force.
- If you have a dynamometer (or scales), then we hook it onto the bolt and pull until the suspended wheel moves. We remember the readings because When assembling, we will tighten the nut until we achieve the same readings.
- if you have nothing at all, then make a mark on the flange, nut and gearbox and count how many turns you unscrew the nut to tighten it the same number of turns.
We remove the wheel from the jack (but do not remove it far) and unscrew the nut by 24. To unscrew it, we place bricks under the wheels as stoppers, or we screw in 2 bolts and make a stop from a mounting or pipe as shown in the photo below.
Next, use a mallet or hammer to knock down the gearbox flange through a wooden spacer.
Now you can see the oil seal itself and you can remove it with a screwdriver or wrench.
Installing a new oil seal in the rear axle gearbox
Wipe the oil seal installation area from dust and debris. Check the flange for wear or rust. Before installation, lubricate the outer part of the oil seal with lithol.
Press the new oil seal through the mandrel to a depth of 1.7-2mm from the edge of the gearbox. If there is a large hole on the flange , then it is better to drive the oil seal a little deeper or, conversely, slightly undercut it.
Focus only on the outer edge of the oil seal, otherwise you may damage it.
After installing the oil seal, use an oil can to lubricate its inside with oil. And install the flange.
How to tighten the flange nut of the classic rear gearbox
We tighten the nut based on what you had in order to measure the force with which it was tightened. After tightening, check that there is no play either axial (forward-backward), up-down, left-right.
We assemble further in the reverse assembly process. Don't forget to add oil to the gearbox.
Have smooth roads!
Still have questions for the author? Ask them in x!
Source: https://www.vaz-zona.ru/zamena-salnika-reduktora-zadnego-mosta-vaz-2107-2106/
Assembling a VAZ 2101 axle shaft
Pressing in the axle bearing lock ring
| 1 – mandrel A.74107/2R; 2 – bearing lock ring; 3 – bearing mounting plate and oil deflector assembly with gasket; 4 – support ring A.74107/1R; 5 – axle shaft; 6 – bearing; 7 – clip A.74107/4R |
Checking the force with which the axle bearing lock ring is pressed out using tool A.95601/R and a torque wrench
| 1 – indicator; 2 – axle shaft; 3 – device A.95601/R; | 4 – torque wrench; 5 – ball bearing; 6 – bearing lock ring |
| Execution order |
| 1. Place the axle shaft vertically, resting its flange on ring 4 of the device (A.74107/IR) (see Fig. Pressing in the axle shaft bearing lock ring). |
| 2. Install on the axle shaft, pre-connected with two screws, the axle bearing oil deflector and the bearing mounting plate with a gasket; Install the axle ball bearing. |
| 3. Insert the new locking ring into the special holder 7, place it in the oven and heat the ring to approximately 300° C so that at the time of pressing onto the axle shaft, its temperature is 220–240°. |
| 4. Press the locking ring onto the axle shaft using mandrel 1 on a press, with a force not exceeding 58.8 KN (6000 kgf) so that the inner bearing ring is clamped between the locking ring and the shoulder of the axle shaft. |
| 5. After pressing, make sure that the ring does not move under an axial load of 19.6 KN (2000 kgf). For this purpose, install the axle shaft assembly on fixture A.95601/R (see Fig. Checking the force with which the locking ring of the axle shaft bearing is pressed out using fixture A.95601/R and a torque wrench) and clamp the locking ring in a special vice . |
| 6. Place the indicator leg, with a division value of 0.01 mm, to the axle shaft flange. After setting the indicator arrow to “0”, apply the indicated axial load, using a torque wrench to create a tightening torque of 78.4–83.3 N·mm (8–8.5 kgf·m) on the device screw. The screw rests through the ball against the end of the axle shaft. At the same time, even the smallest gap should not appear between the lock ring and the inner ring of the bearing. |
| 7. After removing the load and unscrewing the screw of the device, the indicator arrow should return to the zero position; this proves that no movement has occurred between the locking ring and the axle shaft. If the indicator arrow does not return to the zero position, then the locking ring has moved and the axle shaft assembly must be replaced with a new one. |
Video about “Assembling a half shaft” for VAZ 2101
How to replace a VAZ axle bearing.
Replacing the bearing and oil seal of a VAZ classic axle shaft
Replacing the rear axle shaft on VAZ 2101, 2103, 2104, 2105, 2106 and 2107
Sequencing
- The car is jacked up, and the wheel is removed using socket wrenches, behind which there is a worn bearing.
- The brake disc and pads are removed.
- Now you need to unscrew the axle shaft itself with a 17 socket wrench.
The axle shaft is unscrewed with a 17 socket wrench. To remove it from the seat, you can use a crank.
It should be inserted between the brake cylinder and the rear of the axle and used as a lever to push the axle out. Pushing out the axle shaft using a wrench Now you need to remove the bearing from the axle shaft. Often it turns out to be tightly welded to it, so you have to literally cut it off with a grinder. This must be done by first clamping the axle shaft in a vice.
The old bearing is cut off with a grinder
Once the old bearing is removed, the axle must be thoroughly wiped with a rag. And then a new part and a retaining ring are put on the axle shaft.
Installing a new axle bearing
Now, using a medium-sized flat-head screwdriver, you need to remove the worn oil seal from the seat.
The old oil seal is removed with a screwdriver
As soon as it is removed, a new oil seal is installed in its place (it is most convenient to drive it into the seat with a 32 socket head). The axle shaft with a new bearing is installed back into the seat and the entire assembly is reassembled.
Signs of malfunction on the VAZ 2107
If the bearing itself fails or its seat breaks, the car owner will definitely notice this. We list a number of the main signs of failure of this part:
- While driving, a uniform low hum appears in the area of the rear axle, which over time can turn into a loud creaking or crackling sound. And the faster the car goes, the louder the noise becomes.
- A strong play appears on one of the rear wheels (to check this, just jack up the rear axle of the car and pull the wheel with your hands away from you and towards you).
- Balls fall out of the bearing (this means that the separator in which these balls are located has completely collapsed).
- Finally, the rear axle may simply jam. The drive wheels will stop rotating, and this can happen while driving (which may well cause an accident).
The reason for the destruction of a part can be both metal fatigue, which occurs due to very long cyclic loads on this part, and the quality of domestic roads, driving on which is often associated with impacts and other mechanical damage to the rear axle.
Illusory repair possibilities
It should be said right away that repairing throttle position sensors is extremely rare. Firstly, the part itself, even the most expensive one, costs only a few dollars, and it makes sense to spend the money. Secondly, in most cases it is simply impossible to make repairs, for example, to restore a worn-out base layer. However, in some models you can slightly shift the resistive tracks relative to the slider and thereby extend the life of the device.
So, there is a special screw on the sensors. With its help, the position of the tracks is fixed. If they are already worn out, then you should loosen this same screw, this will change the location of the slider a little, and you can be a little patient with replacing the device. But don't count on long-term respite. Naturally, we remember that the contactless sensor cannot be repaired. This completes the adjustment, repair and replacement of the throttle position sensor, now you can operate the car for several more years and not even think about such issues.
To check the supply voltage, disconnect the wire block from the sensor. Turn on the ignition and use a tester to measure the voltage between terminals “A” and “B” of the wire block. The supply voltage should be about 5V. To check the sensor, we connect the block of wires to it and, with the ignition on, measure the voltage (the wires of the block can be pierced with thin needles connected to the terminals of a voltmeter) between the sensor terminals “B” (“ground”) and “C” (slider) - it should not be more than 0.7V. Turning the plastic sector of the drive by hand, fully open the throttle valve and measure the voltage again - it should be more than 4V. Turning off the ignition, disconnect the wire block and connect an ohmmeter between terminals “C” and “A” (or “B”) of the sensor. Slowly turning the drive sector, we monitor the readings of the tester arrow. There should be no jumps in the needle throughout the entire working range. To replace the sensor, remove the throttle body from the receiver studs without disconnecting the coolant inlet and outlet hoses from it (see Removing the throttle body).
Using a Phillips screwdriver, unscrew the two screws securing the sensor to the throttle body...
...and remove the sensor.
The sensor is marked 2112-1148200
Remove the sealing foam ring installed under the sensor.
Install the sensor on the throttle body in reverse order. In this case, the damper must be in the closed position. The tightening torque for the sensor mounting screws is 2 N•m.
The VAZ 2107 throttle sensor, together with a mass air flow sensor and oxygen concentration control, acts as an element that controls the supply of fuel to the combustion chamber depending on the position of the throttle valve. As with any repair to replace electronic fuel injection sensors, they must be checked for functionality. To check, you will need a regular multimeter with the function of measuring resistance in the power circuit and a set of standard tools.
To check the throttle sensor:
- Disconnect the package with wires from the sensor.
- The connector body will be marked. Connect the ohmmeter leads to terminals “B” and “C”. We open the throttle valve; for a working sensor, the resistance will increase from 2.7 to 8.2 kOhm.
- Next, we switch the multimeter to voltmeter mode and connect its negative terminal to engine ground, turn on the ignition in the circuit, and the positive probe will turn on. For a working sensor, the voltage should be approximately equal to 5V, if absent or significantly different from the norm, there is a malfunction in the power circuit or in the computer. After measuring the voltage, turn off the ignition.
After confirming that the throttle sensor is not working and deciding to replace it, you must:
- To remove the sensor, use a Phillips screwdriver to unscrew the two screws securing it to the throttle body and remove it.
- There will be a foam gasket between the sensor and the housing.
At this point, the repair work to check and remove the VAZ 2107 throttle sensor is completed. The installation must be carried out with the damper closed, aligning the protrusion of the damper axis with the groove on the sensor body.
Sources
- https://carnovato.ru/proverka-regulirovka-datchika-polozhenija-drosselnoj-zaslonki/
- https://www.autofizik.ru/VAZ/VAZ-210721047/features-of-repair-of-a-VAZ-2107-20-with-engine-VAZ-2104/checking-and-replacing-position-sensor-d
- https://remont-vaz2106.ru/datchik-drosselnoj-zaslonki-vaz-2107