How to replace the front brake cylinder on a classic
- Remove the wheel and hang the hub
We turn the wheel to the left if we change the cylinders on the right caliper, if on the left, then to the right. Don't forget about safety measures - put stops or a stump under the lever of the suspended wheel - this will protect you from the car falling off the jack.
- Use a pry bar or pliers to separate the brake pads
This is necessary to easily remove the pads from the caliper, otherwise you will not be able to remove them.
- We unsplint the guides and knock them out of the brake cylinders with a hammer.
- We take out the brackets and pads. How to do this correctly and the points described above are described in detail in the article Replacing the front brake pads of a VAZ 2016. In order to avoid making mistakes, I recommend that you read this lesson.
- In order not to lose a lot of brake fluid, remove the cap from the reservoir, put a bag over the neck and screw the cap into place. Thus, the cover will be sealed and will not allow all the liquid to drain when removing the hose from the front brake cylinder of the VAZ 2107.
Or we pinch the brake hose so as not to lose the entire “brake housing” when unscrewing it from the caliper. In this case, there is a high probability of running into replacing the hose. It dries out over time and when it is forcibly compressed, it can begin to leak.
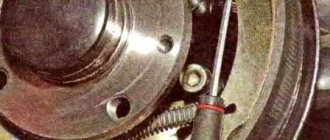
- Using wrenches or a socket “14” we unscrew the brake hose fastenings
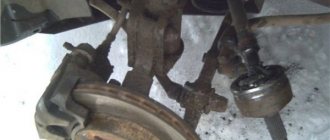
- Using a “17” wrench, unscrew the two fastening bolts and remove the brake caliper from the hub
- We clamp the caliper in a vice, use special wrenches to unscrew the tube
To do this, we put a split wrench on “10” onto the nut securing the brake pipe. If necessary, you can lightly tap it with a hammer so that it is more securely fixed on the edges of the nut. We clamp this key with a screw, thereby its walls tightly compress the nut, and tear it off. This is the only way you will not “lick” the edges of this nut.
After you “tear off” the nut, you can unscrew it with a regular open-end wrench. We do this carefully, making sure that the brake pipe does not rotate together with the nut, it may break.
It is recommended to unscrew the nut several times by half a turn and tighten it to move the area where the nut meets the tube apart. After this, we move it to the side, without breaking it too much, making sure that a crack does not form at the break point.
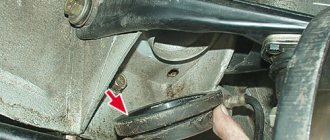
- We clamp the clamp and knock out the old brake cylinder from its seat
It is necessary to fix the clamp so that it does not interfere with knocking the cylinder out of the caliper. Try to save it, since it may not be included with the new brake cylinder. If you can’t fix it, you need to pull it out, no, with one hand we press on it with a sharp, thin object (a nail), with the other, we carefully knock out the cylinder with a hammer.
It is recommended to do this through a soft metal guide, but there may not be a third hand, so first we tap with a hammer so that the place where the latch is located moves and it hides in the depths of the guide. Then with the freed hand we hold the attachment and completely knock out the old part from the caliper.
- We clean the seat for the new brake cylinder.
It “walks” on a slide on which dirt and rust can accumulate. To avoid problems with installing a new part, you need to clean them.
- We remove the old retainer from the cylinder to install it on the new one.
If this is not possible, then we buy new ones for the brake calipers or make them ourselves. An object made of durable material, such as a nail, with a diameter corresponding to the diameter of the mounting hole in the cylinder, is suitable for this.
Important! When making such clamps yourself, it is worth considering that when you subsequently replace the cylinder, it will no longer be possible to “sink” it into the body, because there are no springs. Secondly, you need to accurately measure the depth of the seat and make the length of the homemade product a little longer by 1.5-2 mm. This is due to the fact that the next time you change the cylinder, you will have to knock it out by force, cutting off this retainer, due to the lack of a spring in it, since it will no longer be possible to pull it out. The longer it is, the harder it is to cut it, and you can damage the caliper body.
- Lubricate the cylinder slide with a thin layer of oil or lithol so that it slides better in the caliper. Using the adapter, we drive the new part into its seat until the hole for the clamp aligns with the slot in the caliper body. We insert the manufactured clamp and lightly knock the cylinder until it stops so that it is fixed with it.
- Screw on the brake pipe.
The main thing in order to “get” into the thread is to correctly align the tube nut and the hole for it. If, when tightening the nut, you feel that it is too tight to turn - you have not “got it”, it is better to remove the nut and re-align it with the thread of the hole. There is no need to tighten too much. After installing the caliper on the car and bleeding the system, if fluid leaks in this place, then tighten it with an open-end wrench.
Installation on the car occurs in the reverse order.
Video of replacing the VAZ front brake cylinder:
Do-it-yourself: Replacing the pads and caliper cylinder of a VAZ-2107
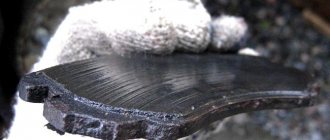
Hi all! As we remember, during the spring inspection of the car, a sticking working cylinder was discovered on the right wheel on the outside, so I decided to replace it by winter, and with it the brake pads, which came with the car. Oddly enough, in 3 years and about 25 thousand kilometers they have worn off just a little less than half the thickness, leaving about 5-6 mm.
I decided to replace them with the same ones that were there before - Ferodo in a green package, it seems like medium hardness. They have proven themselves well, they brake softly, quietly, and sometimes squeak in the heat. True, recently a slight vibration of the pedal has begun to be observed during prolonged braking.
I also bought a cylinder from Lada-Image; from experience, the factory ones last much longer. Before this, there was only one Phoenix and it turned sour in just a year.
I started replacing from the left wheel. Here the old pads turned out to be in good condition, but the lining is already peeling off from the sole.
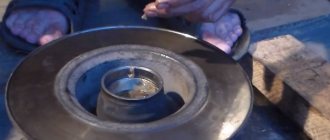
Also, on the outside of the brake disc there was a rather significant flange.
I decided to remove it using a grinder so that I could measure the approximate thickness of the disc, and the new pad simply would not be able to fit tightly to it.
This took a lot of time, and it was inconvenient; there was no smaller cutting disc available, and it was impossible to turn around because of the caliper. I decided not to do the other side, since the collar there was almost invisible.
As a result, the residual thickness of the disk was about 8 mm, which is less than the permissible 9 mm.
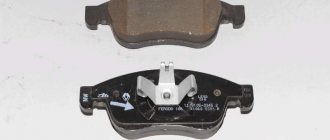
The new pads installed without problems.
On the right wheel they were more worn out due to a jammed cylinder.
Plus, an arc-shaped uneven development is clearly observed. Either the disc was crooked or did not fit tightly when braking.
Although, to the touch the surface of the disk seems to be smooth.
It turned out to be even thinner if you subtract the small beads from half a millimeter - in the region of 7.5-8 mm.
I changed the cylinder without any problems, since all surfaces were lubricated 3 years ago when it was replaced, then when I bought the car, a couple of cylinders also turned out sour
I simply unscrewed the brake pipe, carefully moved it away and plugged it with a boot from the new cylinder, without draining anything
Before installation, I lubricated the guide grooves, the threads of the fittings with graphite grease, and also under the boot with a small layer between the piston and the cylinder with special grease MS-1600.
I also lubricated the cylinder “ears” and guide pins a little.
Since only a couple of drops of brake fluid spilled out, I only bled this one wheel.
I took the old cylinder apart to see what was wrong. The piston itself had some minor corrosion on the outer edge and minor scuffs on the inner surface of the cylinder.
The pads were worn in for about a week, the pedal at first dropped almost to the bottom, but then began to grab at the very top. Braking has improved noticeably, runout is no longer observed, but still, I think that the discs will still have to be replaced in the spring.
Where is the front caliper of the VAZ 2107
On the “seven”, disc brakes are installed only on the front wheels. The rear ones use a drum brake mechanism. Therefore, in the phrase “front caliper VAZ 2107” the word “front” is redundant. There are only two calipers and both of them are on the front wheels.
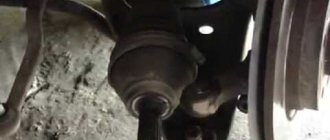
Access to the brake calipers opens after dismantling the front wheels of the car.
- screwdriver or bit;
- keys for 17, 14 and 10;
- pliers;
- a piece of rubber tube or bolt with a diameter suitable for the inner diameter of the brake hose tip;
- marker.
It is necessary to remove and install the caliper when replacing it in case of deformation or damage. This is also a necessary action in order to repair the VAZ 2107 caliper.
To carry out the work, you must lift the car on a lift or use a jack. The latter option is somewhat more tedious, but ideal for home use.