Engines
On the domestic market, the model could be purchased with one of three engine options:
- 1.5-liter 8-valve engine, 69 hp. Model 2110 base carburetor powertrain;
- 1.5-liter 8-valve engine, 79 hp. Accelerates to hundreds in 14 seconds;
- 1.5-liter 16-valve engine, 94 hp. The most powerful version of the power unit. Acceleration to 100 km/h takes 12.5 seconds.
8-valve engines have valve protection - they do not bend if the timing belt breaks. There is no such protection on a 16-valve power unit.
All VAZ engines require timely maintenance. Failure to meet replacement deadlines may result in major repairs.
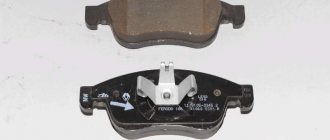
During operation, the intake manifold fails. Repairing a problem yourself requires a lot of time and effort. Repairs at a service station will cost twice as much. If you have no experience in such work on your own, it is better to turn to specialists.
We change a grenade on a VAZ 2110 without removing the drive
This is the first, shortest path, which implies the presence of all the specified tools. Everything is quite simple.
- Before jacking up the car, you need to unscrew the grenade nut. To do this, we seat the assistant in the cabin; he must press the brake pedal with all his might and hold the steering wheel. In order to unscrew a grenade after a conscientious tightening, you need a lever of about a meter, sometimes more. The threads are usual everywhere, right-handed.
- Then we remove the wheel bolts, jack it up and remove the wheel.
- We unscrew the two 17mm bolts that hold the ball joint, disengage the splines, and move the hub to the side.
- Now, using a tool for removing clamps or a screwdriver, depending on the type of clamp, remove it. Don't forget about the small clamp.
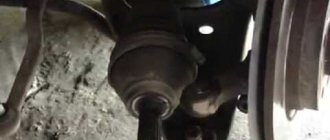
- Now we screw the reverse hammer with a welded nut onto the grenade. We clamp the drive with a gas key so that it rests against the forged lever (saber). This is necessary in order not to tear the drive out of the box, otherwise you will have to take the second path. With a sharp blow we rip the grenade off the slots.
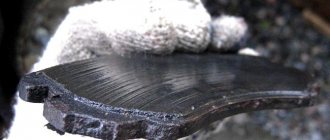
- We remove the boot; as a rule, the grenade fails precisely because it has broken through.
Important! Under no circumstances should you install the anthers that come with the grenade. They are made from very low-quality rubber, become tanned at the slightest cold snap and burst
Therefore, you will soon have to change the grenade again.
We install a new boot. We do this very carefully, preferably after washing the slots first. The main problem is the thrust ring; carefully throw the boot over it with a screwdriver. Now we tighten the inner clamp, screw the new grenade onto the hammer, and then hammer it into place. Theoretically, this can be done with a hammer through an old nut; knocking a grenade down with a hammer is also possible, but there is a risk of damaging the slots if you are not used to it. We take CV joint lubricant, it is usually included in the kit
We squeeze it out in a circle onto the balls, removing the boot and turning the grenade inside out. Next, tighten the clamp. We put everything back together in reverse order. It is very important to tighten the nut just as tightly and be sure to tighten it.
Front wheel drive, when it is necessary to remove the front wheel drive
The need to remove the front wheel drive arises when the drive itself or its elements fail. The cause of drive failure is worn parts in the hinge, deformation of the wheel drive shafts, or a damaged or torn cover, which is necessary for its tightness. If any part malfunctions, it must be replaced, which requires dismantling the front drive and then installing it.
Also check out
- Using a jack, hang up the wheel on which the CV joint is supposed to be replaced.
- Unscrew the bolts to remove the thrust washer of the hub nut.
- Remove the 2 bolts that secure the lower ball joint of the steering knuckle.
- If the CV joint is being replaced on the right, turn the steering wheel as far as possible to the left, and if on the left, then to the right.
- Pull out the steering knuckle and strut. Remove the splined end of the outer CV joint from the hub. Using a pry bar, remove the inner joint from the gearbox.
- Fix the drive shaft in a vice, remove the clamps from the outer and inner CV joints. Turn the anthers inside out. If they are torn or cut somewhere, you can simply cut them off with a knife.
- Remove the VAZ 2110 CV joint from the shaft. You can use a hammer and a wooden or bronze adapter.
Assembly is performed in reverse order. At the same time, install a new hub nut. Upon completion of the tightening, you need to touch its edge to avoid unwinding.
- When installing the inner CV joint, a plastic plug is placed on the end of the shaft.
- Before installing the VAZ 2110 CV joint, you need to make sure that a sufficient amount of lubricant is applied. Place a retaining ring on the inner CV joint.
- After the drive is placed in the box, place it in the side gear so that it is completely locked. This can be done by lightly tapping the surface of the wooden adapter with a hammer along the entire perimeter of the shaft axis.
Methods for diagnosing CV joints
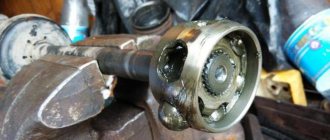
Grenade structure: 1 - body with outer clip; 2 - separator; 3 - inner race; 4 — balls (6 pcs.); 5 — drive shaft; 6 — retaining ring; 7 — corrugated cover; 8 — cover clamps
How to determine which grenade is damaged and needs to be replaced? There are several diagnostic methods.
- First, let's try to determine the crunch of the external grenade. The car is stationary. We pull the axle at the hinges one by one and listen. A knocking sound appears, which means there is play in the CV joint, which indicates that the grenade is damaged.
- Now let the car drive on a flat area. To install, what kind of grenade crunches, how to proceed, you need to turn the steering wheel all the way to the right, then do the same to the left. There was a crunch when you turned to the right, which means the right outer grenade is faulty, a crunch when turning left means the left outer grenade.
- If the internal grenade malfunctions, the question arises: which one, how to determine the failure? To do this, we choose a road surface with bumps and holes so that the wheel drops as low as possible, and drive the car straight. We listen to the sounds, alternately driving either the left or the right front wheel into the hole, and by ear we determine which grenade is crunching.
- Raise the car on a lift. Engage first gear so that the wheels can rotate while suspended. If the grenade malfunctions, you will hear a hinge crunch.
We found out what, how and in what place a grenade “clicks”. All that remains is to start replacing the damaged CV joint. This can be done at a car repair shop or you can carry out the repair yourself if you have the appropriate experience. There are three basic rules, when followed, the car’s drive will last a long time.
The CV joint wears out quickly under significant loads and dirt. Take care of your car.
Replacing a grenade
Before you begin the process of replacing a grenade, you need to arm yourself with the following tools:
- lift;
- a sledgehammer or large hammer;
- an ordinary hammer;
- heads for 17 and 30;
- balloon type wrench;
- a chisel, not necessarily sharp;
- a flat screwdriver, preferably a slotted one;
- wrenches 13 and 17;
- crowbar or pry bar;
- pipe;
- a special puller designed to replace CV joints;
Special puller for CV joints
And, of course, you should purchase a new CV joint kit.
New CV joint kit
Dismantling an old grenade
Let's start the replacement process:
first you will need to unscrew the nut that sits on the shaft using a 30mm socket, a wrench and a pipe;
Replacing the external grenade of a VAZ 2110
Note. Don't worry if the nut is a little jammed, because if you apply a little force, the pipe and collar will easily unscrew it.
After the nut is unscrewed, the lift should be installed.
Note. When installing the jack, you need to make sure that the cup coincides with the stop point on the car.
This is very important and is prescribed in safety regulations. You should also definitely place a log or bricks under the body of the car, although the latter are quite fragile and can easily break
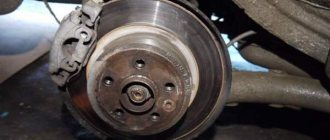
- the wheel will now need to be lifted and then removed by unscrewing the mounting bolts;
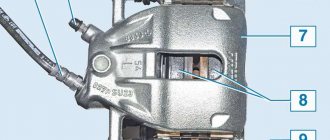
- now you need to release the pads by retracting the brake cylinder piston;
- you will need to insert a crowbar or pry bar into the caliper slot to free the brake pads;
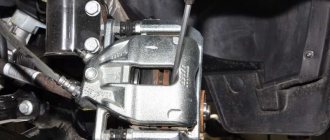
- it's time to remove the caliper;
- To do this, using keys 13 and 17, unscrew the caliper fastenings.
Note. After removing the caliper, it is advisable to tie it to the strut spring so that it does not interfere.
- now you need to unscrew the ball joint, again using a wrench and a socket, but this time to 17;
- take a crowbar and press it down, while simultaneously pulling the hub towards you;
- remove all the clamps and reach the boot;
- turn it away;
- the hub is completely pulled off the ball;
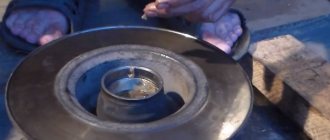
- the time has come to remove the grenade using a special puller (it will need to be installed behind the grenade and then squeezed out).
Note. If you don’t have a puller, you can simply use a hammer, carefully knocking off the CV joint.
Replacing an external grenade on a VAZ 2110
When knocking out a CV joint with a hammer, you need to be very careful. It is recommended to deliver a sharp blow to the edge of the grenade.
Now you will need to remove the boot from the CV joint.
Note. You will need to act very carefully. After removing the old boot, you should wipe it thoroughly with a rag and remove the old retaining ring.
- now you should put on a small collar;
- put in a new boot;
- clamp the clamp;
- install a new retaining ring.
Installing a new grenade
Replacing external grenades on a VAZ 2110
Installation of a new CV joint is carried out opposite to removal, using the same steps.
- after we put the new grenade in place, you need to take a sledgehammer;
- We carefully hit the grenade through the board;
Installing a new grenade
- after the drive is in place, you should bend the boot;
- put more lubricant in there.
Note. It is recommended to use the lubricant that comes with the new CV joint. In addition, you will need to remove all the air from the boot.
- put on the boot;
- install a large clamp.
Note. Until the hub is completely assembled, it is recommended to check the condition of the pads, as well as ball joints and brake hoses. It often happens that they also fail and need to be replaced.
After the shaft nut is tightened, it will need to be processed with a chisel.
Note. The edges of the nut are processed with a chisel, or in other words, they are crushed. As for tightening the nut, this must be done with the car lowered from the lift.
The video will tell you how to do everything correctly. In addition, when installing a new grenade on a VAZ 2110, it is recommended to use photographic materials and the necessary tools. As you know, when doing the work with your own hands, you definitely need a good tool in order to somehow compensate for the lack of sufficient experience with high-quality equipment . Thus, a grenade remover will be a great help for a beginner, whose visual aid is only instructions, videos and photos. When working independently, you should know that this way you can save your family budget well, from where you will not need to constantly snatch funds for repairs, the price of which today is not cheap.
Tools, assistants, accessories and consumables
- Hammer.
- Wooden plank.
- Stub.
- Mounting blade.
- A piece of pipe.
- Screwdriver Set.
- Set of wrenches.
What is needed to install a new CV joint
The CV joint, despite its strength, has parts that can wear out over time or if used incorrectly. Often, CV joint replacement occurs due to damage to the boots - during driving, cracks and holes appear that become clogged with dirt, water and dust. This way you can drive hundreds, or even thousands of kilometers, which will finally finish off the mechanism. Boot problems are expressed in a crackling sound when turning the wheels (when turning to the right, the left wheel cracks, when turning to the left, the right wheel cracks). Sometimes the CV joint has to be replaced due to incorrect actions by the driver. Acceleration of the engine with slipping, starting on the wheels turned out, braking by the transmission - often the cause of the malfunction lies in this.
Play in the ball joint has a negative effect on the CV joint. It occurs when the support itself is already severely worn out. If this problem is not identified in time, it will have a very negative impact on the CV joint. Thus, driving at high speed can tear out the support pin, which can cause the grenade to break.
It is extremely rare that CV joint failures are caused by factory defects in the mechanism parts or initially incorrect installation. Coupled with a worn boot, the problem can reach unimaginable proportions. Many reviews on automotive forums mentioned the poor quality of some parts - both basic functional elements and additional little things, like clamps.
Regardless of the source of the problem, a grenade that is not working properly will require replacement. Machine manufacturers claim that when parts wear out, the entire mechanism must be replaced, even those elements that were not damaged by failure. Considering the high quality of materials, the repair will cost quite a lot. In this regard, the car owner tries to replace the CV joint with his own hands. What will the driver need?
- pit or lift;
- hammer, screwdriver, pliers, jack;
- a set of keys or heads;
- bench vice;
- new clamps, lubricant (CV joint-4, for example), hub nut with stopper.
The latter (consumables) are often provided with a new grenade. All of the above are suitable for replacing outer and inner CV joints.
Frequent causes of speedometer drive failure
- Long service life - each device has its own service life.
- Something fell on the sensor and damaged its connection.
- The wires have dried out or the contact has simply come loose, which prevents the device from working.
- Complex design features of use, increased amount of humidity and constant contamination of the space under the hood.
- Installing a device of poor quality or purchasing a cheap speed sensor without special qualities and characteristics.
How to remove and install a manual transmission
The procedure for removing the gearbox must be carried out by driving the car onto an overpass or into a garage with an inspection hole. The wider and more spacious the pit, the easier it will be to do the work. Provide good lighting for the underside of the car, because all work will take place in semi-darkness.
The gearbox in the “ten” weighs about 30 kg, provided that the oil is drained. The weight does not seem very large, but keep in mind that you will need to hold the gearbox and unscrew the nuts. There are two options: work with an assistant or build a device into which you can rest the box when removing it and then grab it with both hands to remove it.
List of tools required for dismantling:
- Set of wrenches;
- Set of socket heads with extension;
- Flat and figured screwdrivers;
- Pliers;
- Mount;
- Jack;
- Clean dry cloth for wiping.
Further work is carried out in the following order:
- Remove the plastic engine protection by unscrewing the bolts with a socket wrench. We also remove the shield covering the engine compartment.
- Drain the oil from the box. Any container is suitable for this, for example, a plastic 5-liter bottle with a cut off neck. We unscrew the plug, wait until everything drains, then wipe the plug and drain neck and tighten the hole.
- We de-energize the car by removing the terminal from the battery
- Remove the air filter along with the throttle valve. We also remove the air flow sensor and crankcase ventilation hoses.
- We remove the starter. To do this, you need to remove all the rubber caps from the large bolt with the plus from the battery and the small bolt of the solenoid relay, disconnect all the terminals, and then unscrew the bolts securing the starter to the engine housing.
- We remove the clutch cable by releasing it from the fork and loosening the outer nut.
- We disconnect the wiring from the box - this is the speed indicator sensor and the reverse gear lights.
- You can remove the reaction thrust by unscrewing the two nuts holding the bracket to the buffer.
- Disconnect the gear shift rod from the joint
- Next, you need to unscrew the bolts on the clutch housing cover and move the cover to the side.
- The next step is to remove the right and left front wheel drives. You can insert a plug into the hole of one of the drives so as not to mix them up during assembly. We remove the left drive completely, move the right one to the side so that it does not interfere. The bolts that secure the ball joint must be loosened.
- Then we remove the lower crankcase cover and unscrew the lower bolt that secures the gearbox to the engine.
- After this, the engine must be lifted to free the box for removal. You can throw a cable with a hook over the ceiling beam. A handy option is to use a strong board as a support.
- The next step is to remove the rear power unit mount. First you need to unscrew the bolt holding the engine to the left side support, then unscrew the bolts securing the rear support to the body and gearbox. Hold the bolt heads with a second wrench, otherwise they will turn. After this, you can remove the support itself.
- The box must be removed from the guides while holding it in weight. To obtain a good breaking force, you can insert a flathead screwdriver between the cylinder block and the clutch housing. The input shaft gears should disengage. If this does not happen, slightly shake the engine by pressing it with a stop board.
- Be careful! The heavy body of the box should not rest on anything. Moving it back as far as possible, tilt the assembly with its front edge forward and pull it out from under the car.
After removing the box, it should be disassembled to carry out a visual inspection of the shafts and gears. If necessary, replace worn parts with new ones
When assembling the box, pay special attention to sealing the crankcase and replacing the seals
Reinstallation of the box is carried out in the reverse order. If this is your first time carrying out a similar procedure, take photographs of each step, the location of parts and fasteners. This will help restore the sequence of actions.
Video: dismantling the gearbox on Lada 2110
After repairing the gearbox, you need to run in the new gears for some time, especially if you changed them block by block, in groups. During the break-in period, refrain from aggressive driving style. When switching to a higher speed, pause for one or two seconds, and when downshifting, on the contrary, engage a new one immediately. Always monitor the oil level - if it drops, take the time to crawl under the car and inspect for leaks at the junction of the cover and crankcase. Handle your vehicle carefully and the service life of the gearbox will increase.
Methods for diagnosing CV joints
Grenade structure: 1 - body with outer clip; 2 - separator; 3 - inner race; 4 — balls (6 pcs.); 5 — drive shaft; 6 — retaining ring; 7 — corrugated cover; 8 — cover clamps
How to determine which grenade is damaged and needs to be replaced? There are several diagnostic methods.
- First, let's try to determine the crunch of the external grenade. The car is stationary. We pull the axle at the hinges one by one and listen. A knocking sound appears, which means there is play in the CV joint, which indicates that the grenade is damaged.
- Now let the car drive on a flat area. To install, what kind of grenade crunches, how to proceed, you need to turn the steering wheel all the way to the right, then do the same to the left. There was a crunch when you turned to the right, which means the right outer grenade is faulty, a crunch when turning left means the left outer grenade.
- If the internal grenade malfunctions, the question arises: which one, how to determine the failure? To do this, we choose a road surface with bumps and holes so that the wheel drops as low as possible, and drive the car straight. We listen to the sounds, alternately driving either the left or the right front wheel into the hole, and by ear we determine which grenade is crunching.
- Raise the car on a lift. Engage first gear so that the wheels can rotate while suspended. If the grenade malfunctions, you will hear a hinge crunch.
We found out what, how and in what place a grenade “clicks”. All that remains is to start replacing the damaged CV joint. This can be done at a car repair shop or you can carry out the repair yourself if you have the appropriate experience. There are three basic rules, when followed, the car’s drive will last a long time.
- Avoid jumping off.
- Do not accelerate by turning the steering wheel.
- Inspect the anthers periodically.
We found out what, how and in what place a grenade “clicks”. All that remains is to start replacing the damaged CV joint. This can be done at a car repair shop or you can carry out the repair yourself if you have the appropriate experience. There are three basic rules, when followed, the car’s drive will last a long time.
How to properly remove and disassemble the CV joint in your garage
AUTOSIZE
Hello, dear car enthusiasts! Front drive wheels provide car owners with many bonuses in the form of: more responsive steering, increased maneuverability, stability on slippery roads and other delights.
In return, the machine, namely its chassis coupled with the drive, will require additional attention. The front wheels are able to pull the car only thanks to the presence of a shaft connecting the hub to the variable gearbox.
However, that's not all. It would be impossible to transmit rotation from the transmission to the wheels without special devices installed at the ends of the shaft - CV joints.
A constant velocity joint is, today, the only way to transmit rotational motion between axle shafts located at an angle to each other.
In this regard, any self-respecting car enthusiast should know how to remove and disassemble the CV joint, diagnose, maintain and repair it.
How to remove a CV joint yourself without the help of a car service
Despite the apparent complexity of the front-wheel drive design of a car, regardless of its make and model, the design of this unit is quite simple and similar in all cars.
In order to remove and replace the CV joint, it is enough to have a garage with an inspection hole or an overpass to facilitate access to the lower part of the car, as well as a set of standard tools.
As a rule, experienced car enthusiasts manage their work without any special devices, but if there is a desire to speed up repair work, you can purchase a CV joint puller.
Considering that each drive wheel has two hinges, repair work can be carried out depending on the following types of failure:
- removal of the internal CV joint and its repair;
- removing the outer CV joint;
- Removal and repair includes a shaft and two joints.
How to remove the inner CV joint in the garage
Repairing an internal CV joint is an event that is quite rare, but you must have the skills to handle this mechanism, because for its long life it is necessary to carry out preventive measures, replacing the boot and lubricant.
Before describing the technology that includes removing the internal CV joint, it should be noted that in this case, an inspection hole will be simply necessary, because the joint cage is bolted (6-8 pieces) directly to the differential gears, and this is the lowest point of the transmission.
After all the fastening bolts have been unscrewed, the steering wheel should be turned to free the spline joints from moving freely. Using a pry bar, the CV joint is very easily removed from the mounting socket. Removing it from the shaft is also easy; to do this, you just need to unfasten the retaining ring and the boot clamps.
A strong recommendation to all car enthusiasts: you should not remove the CV joint from the shaft under the car and, especially, do not disassemble it. It is much more convenient and rational to remove the shaft with two CV joints at the same time, and then perform all the manipulations on the workbench with a vice.
How to remove the outer CV joint yourself
The outer CV joint, which is installed directly at the hub, although more accessible, will require more time and effort to remove. Here you will have to almost completely disassemble the front suspension.
The wheel is removed, the hub nut is unscrewed and the lock washer is removed. After unscrewing the lower ball joint, the moving strut allows you to remove the CV joint axle shaft.
Repairing CV joints can be associated with certain difficulties. The first is the inability to remove the axle shafts or shaft from the splined joint. There are several options for getting out of the situation. First you need to take a wooden or brass spacer and try to knock out the axle shaft.
If nothing could be done at this stage, you will need a CV joint puller. One of the most common and simple pullers is made in the form of a horseshoe, which is attached to the axle shaft, and the thrust bolts remove the CV joint when rotating.
It is not difficult to disassemble the CV joint itself; for this you need:
- apply marks on the holder and body for reassembly in the same position;
- tilt the shaft with the holder at the end as much as possible to one side;
- Remove the ball from the holder on the opposite side and perform the procedure with all the balls in turn.
There is an opinion among some experts that it is enough to simply wash the CV joint with diesel fuel and “fill it in” with lubricant again without disassembling it.
In this case, there is a high probability that fragments of old retaining rings or other debris will remain inside. If the CV joint has already been removed, then it is better to disassemble it, wash it, reassemble it and lubricate it.
Installation of the CV joint after replacement or maintenance is carried out in the reverse order of removal.
Video “Removing the gearbox”
This video shows the step-by-step process of removing the transmission.
Most owners of 2108-21099 are aware of the problem with engaging and sometimes knocking out 2nd gear. And I was no exception))) Since the cost of work at the service station did not particularly suit me, I decided to go through the checkpoint myself. As it turned out later, there is nothing complicated about this. Without problems with the Murzilka, you can safely climb into the gearbox!)) Having studied a lot of articles on the Internet, having studied all the intricacies, I got to work at the moment while the car was being painted (naturally, only the bare body was painted), and everything else was in the garage and needed a little renovation. I took the box to the car wash. They washed it thoroughly for me there. The next day I disassembled the box, laid out each piece on pieces of paper and signed the next removal number)))) Oh, how tedious it was. The first problem arose with the nuts on the shafts, which only my father could unscrew. The second problem arose with the bolts securing the metal plate that holds the bearings of the primary and secondary shafts, under a Phillips screwdriver. Well, no matter how much they didn’t want to unscrew, I already broke 2 of my favorite large screwdrivers until I bought an impact screwdriver)))) The impact screwdriver became a new favorite, the screwdriver is SUPER))) Having unscrewed the plate, I found a collapsed plastic separator of the secondary shaft bearing (((
And naturally, the ball bearings were replaced with bearings with a metal cage, and the roller bearings were simply new
With grief, we pick out the retaining rings of the bearings with round pliers and remove the crankcase... I discovered a broken spring in the gear shift mechanism, which reduces the play of the lever and helps to disengage the gear.
I ran through all the auto stores and the search was unsuccessful ((((And of course, everyone offered to buy the complete mechanism for 1,700 rubles, diligently insisting that I had no choice, that I would still have to buy it. I even went to our production specifically for the spring GOC, in an attempt to find something similar, but alas... But to spite all the store sellers, I naturally found help on GOOGLE (I always turn to it) and found an interesting idea to install a spring from the radiator cap of a VAZ Classic. The old cap with 6ki father))) And of course she fit like her own.
Engine tuning VAZ 8 valve injector
When the engine power is increased, this is called tuning or modification of the engine. Also, boosting - as you are more familiar with. But in order to increase power, it is not always necessary to seriously rework the engine - sometimes it is enough to modify ordinary, standard parts - bore them, polish them, grind them, if necessary. These operations, at first glance, are quite simple, but in reality they require a lot of effort, which will ultimately give a tangible result. Even though such operations will not make your “eight” or “nine” a modern car, they will squeeze out of the car everything that it is capable of. At the same time, the car will still remain your good old VAZ.
Main directions in engine modification
Let's go over a short list of directions that are used when tuning a VAZ 8-valve injection engine. Which one to choose depends only on your desire and financial capabilities. Of course, you can install a zero filter (adds 3-5 percent to power, costs $50-70), install a forward flow (several hundred dollars, sometimes up to a thousand. The increase in power is the same 3-5%) or make a chip -engine tuning (adds no more than 10 percent for naturally aspirated engines). But all this, as we see, will not be cheap, and the result will not be so tangible. Let's look at alternative ways to increase power in this article.
engine modification
The mechanical efficiency of the motor can be increased by:
- reducing the mass of reciprocating parts - pins, pistons, connecting rods,
— reduce friction in the piston-cylinder-ring contact,
— reduce the number and reduce the thickness of the piston rings.
You can increase the thermal efficiency of the motor in the following ways:
- increase the compression ratio,
— increase the engine temperature.
— bore the cylinder head channels
If you carry out small work in several directions at once, you can achieve an increase in engine power, but you can also perform complex work.
One of the most effective ways to refine an engine is to increase the displacement. This is achieved by boring the block and using special forged pistons, shortened connecting rods and, in some cases, a different crankshaft. Why are forged pistons used when tuning an engine? They differ from serial ones in a number of advantages - they have a lower specific weight and higher mechanical reliability. But in order to further reduce the weight, during assembly other modifications are made to the piston group - the skirt is lightened, unnecessary, excess metal on the pin bosses is removed, and the shape of the piston bottom itself is modified. Some craftsmen lighten other parts of the flywheel and crank mechanism.
In addition, in order to increase the volume of the engine, some also modify the cylinder head - the cylinder head. A clear confirmation of the proverb that everything ingenious is simple. This method of boosting the engine has been known for a hundred years, but has not become widespread - primarily because this work is quite labor-intensive. The whole point of the modification comes down to boring out the channels of the cylinder head of the VAZ - various roughnesses and irregularities create additional friction for the fuel assembly (fuel-air mixture) in the head and manifolds. If intake mixture resistance is minimized, this will have a positive effect on cylinder filling, and, in turn, will lead to increased power. The diameter of the cylinder head channels of the 8-valve VAZ engine, intake - 28mm, exhaust - 26mm, which is optimal for operating speeds in the range. Refinement of the cylinder head, first of all, means modification of both the intake and exhaust channels. But it is necessary to take into account that the gas mixture in the channels moves at the speed of sound (which is why noise occurs during inlet and outlet), which means that any roughness and inconsistencies in the parts will lead to a decrease in the flow rate. The result is a decrease in cylinder filling and loss of power. Based on this, boring the cylinder head channels of 8 valves includes the following work:
- the diameter of the channel increases,
— the geometry changes, the required radii of curvature are displayed.
Valve seat modification:
modification of the engine - the sharp edges of the seat, which create increased resistance, are ground.
The collectors and channels in the block head are combined:
— even minor inconsistencies can seriously slow down gas flows.
The channels and intake manifold are ground to IV-V class cleanliness:
- ideally it should be a mirror surface - like for a sports car engine.
Adjustment
You still need to engage first gear and drive onto the overpass. Naturally, put the car on the handbrake and put wheel chocks under the wheels. Don't turn off first gear!
From below, find the clamp that secures the rocker and loosen it. Returning to the car, you need to move the lever to the left as far as you can. You cannot move the lever back or forward; the link may come off.
Go back under the car and tighten the clamp. Sometimes it is enough to move the rocker relative to the cardan by a few millimeters, and the gearbox will work perfectly again, gear shifts will occur as expected.
What tool will be needed to remove
It is better to remove the box in a garage with a pit or on an overpass. If it is not possible to use a pit, then you will need a jack and stands to fix the car at a certain height. It will be quite difficult to do without an assistant, so it is better to agree with a person in advance.
It is better to prepare all the tools in advance. In addition to wrenches, you will also use spanners. The rotating head will make removing the gearbox easier and simpler. It is also necessary to secure the car in a certain way so that there is access to the protection casing from below.
Diagnostics of the malfunction and the necessary tools for replacing the internal CV joint of the VAZ 2110
The constant velocity joint of the VAZ 2110 car model (abbreviated CV joint) is subject to loads throughout the entire period of operation, which leads to its failure. The design is distinguished by a high level of quality; high-quality carbon steel is used for its manufacture, capable of withstanding loads for a long period of time.
CV joint VAZ 2110
The reasons for the failure of the CV joint of a VAZ 2110 vehicle include the ingress of dirt and sand into various elements, which is associated with loss of lubrication and sooner or later leads to damage if the equipment is operated with a torn rubber boot.
In this case, a mandatory replacement of the internal grenade will be required, which fails and needs to be monitored for technical condition, guaranteeing long-term operation of the VAZ 2110 model car.
You can detect the need to replace the internal CV joint of a VAZ 2110 if you hear a characteristic crunching noise caused by the presence of gaps in the mechanism or foreign bodies leading to malfunction.
What will you need at work?
When replacing the internal CV joint of a VAZ 2110 car, it is necessary to select the right equipment and tools, without which subsequent work is impossible. Repairing the unit is not possible; it will only need to be replaced.
To perform the following operations, you will need a set of equipment and tools:
- A new internal grenade, which includes a clamp and lubricant, will ensure subsequent trouble-free operation of the system over a long period of time;
- A lift, or a special inspection hole with a jack, will be required to lift and secure a VAZ 2110 model vehicle, guaranteeing safety during the work;
- A set of standard tools used to replace the internal CV joint. Includes wrenches, screwdrivers, pliers and much more needed for repairs.
Replacement of failed equipment
Replacing the CV joint of a VAZ 2110 vehicle, located on the inside rather than the outside, is a simple process; several operations will be required. The design transmits rotation from the gearbox to the shaft. The operation of the device affects traffic safety; for this reason, detection of a CV joint failure is carried out at a high level from the ground.
The replacement operation is performed on a special lift, an inspection hole, which is due to its location in the lower part of the vehicle; access is needed only in this position.
You will first need to perform the following operations:
- Secure the vehicle, which is done by turning on fourth speed and firmly tightening the hand brake;
- Install wheel chocks exactly under the rear wheels of the car; you can use ordinary bars instead;
- Mount the protective cap of the unit, then unscrew the hub nut; a pry bar is used for this;
- After dismantling the hub nut, proceed to unscrew the car wheel fastening elements;
- Hang the wheel on which it is necessary to replace the unit using a jack.
After identifying a node in the structure you will need:
- Unscrew all six bolts, as a result the unit will hold one flange in the structure;
- Unscrew the two mounting bolts of the lower knuckle support;
- Turn the steering mechanism to its extreme position; the unit falls out by itself.
After it falls out, you have to perform a simple set of operations, namely:
- Removing the boot installed as part of the structure;
- Removing the retaining ring;
- Removing the hinge mounted on the shaft splines so as not to damage other equipment;
- Diagnostics of equipment and the entire system;
- The unit is installed back in its intended place.
Things to remember during reinstallation:
- A plastic plug must be installed at the end of the shaft;
- Before installing the unit, ensure that the required amount of lubricant is installed;
- Installation of the locking ring is carried out before installing the mechanism on the vehicle;
- After installing the drive, it sits in the gear until it is completely locked, which will require the use of a hammer.
The process does not require skills and abilities as with other units. However, for a high guarantee of the work performed, it is necessary to contact qualified specialists, a car service center, where they will treat the work with the utmost responsibility. Thus, a high guarantee of reliable quality of vehicle service is obtained.
- Benjamin
Possible malfunctions
In common parlance, many VAZ owners call the unit in question a “grenade” - this is exactly what it looks like in appearance.
Most often, CV joints break after the boots are damaged. In this case, dirt, sand, etc. begin to get into them. Foreign particles quickly destroy the assembly, and, of course, it has to be replaced.
If a damaged boot is detected in a timely manner, then in most cases serious trouble can be avoided. After replacing it, all that remains is to wash the CV joint and return it to its place. When the problem remains out of sight of the VAZ car owner, then there is a high probability that the grenade will become unusable literally after 2-3 hundred kilometers.
A sign of CV joint failure is a characteristic sound reminiscent of crunching gravel. It occurs exclusively when turning and accelerating. Such a signal is the basis for an urgent inspection of the hinge and its replacement.
Fortunately, the new element is relatively cheap and is sold in almost any auto store. However, you should not experiment - take only parts made strictly for the VAZ-2109.
In general, replacing a hinge yourself is not at all difficult - it is enough to have at least a little repair experience and a basic set of tools.
Tuning the interior of the VAZ 2110
At the same time, the emphasis is placed on qualitative improvement of noise insulation performance. Plus, the interior needs to be punched. They mainly use two-color velor. You can use tweed to match the body color. It is necessary to reupholster the seats. This need is dictated by the fact that the factory fabric wears out quickly. When reupholstering, the factory seats must be removed. This makes it much easier to get the job done.
Fragments are carefully cut out from standard material, placed on new material and outlined with a pen. For any constriction, reinforcement with foam rubber is necessary. Its thickness must be at least 5 mm. It would be nice if the seats were covered in leather. They will, of course, not be cheap, but they will last a very long time.