On any passenger car with a gasoline engine, the gas pump serves to supply fuel under pressure from the fuel tank to the metering device - depending on the modification of the engine on VAZ cars, the fuel system can be carburetor or injection.
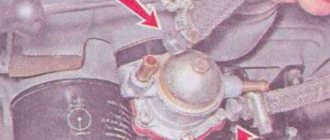
The fuel pump (BN) on carburetor internal combustion engines of the 2110 car is located behind the valve cover, next to the distributor-distributor; on a car with an injection engine, it is located in the fuel tank (submersible type). If the BN begins to malfunction, the engine does not pull or develop speed, and in many cases the engine cannot be started at all.
Changing the fuel pump yourself
If the fuel pump in the VAZ does not pump, and all of the above system components are normal, it is necessary to clean the filters, and, if necessary, completely replace the unit.
Before starting work, you must completely drain the fuel from the gas tank. To do everything with our own hands, we need a screwdriver and a set of keys. Replacing the VAZ 2114 fuel pump is carried out according to the following algorithm:
- We de-energize the car by removing the “-” terminal from the battery;
- We take out the rear row of passenger seats;
- Unscrew the plastic cap that covers the pump;
- Remove the power wires from the device and disconnect the fuel supply hoses;
- We dismantle the main fastenings of the fuel pump; for this we need the 7th key;
- Now you can remove the fuel pump on the VAZ 2114 and remove the device.
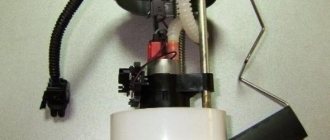
It must be removed carefully, since the float sensor for determining the fuel level is a very delicate structure that is easy to damage. Inspect the fuel pump - if necessary, clean or replace the strainer, however, it may be necessary to completely replace the unit.
Coarse and fine fuel filters: where they are, when and how to change them
Russian gasoline is not always of the same quality, so over time, sediment accumulates in the tank due to low-quality fuel. Dirt also clogs the sieve of the electric fuel pump; as a result of accumulated dirt, fuel does not completely enter the fuel line and the engine fails. To fix the problem, you need to replace or clean the coarse filter. However, to get to the filter, you need to disassemble the fuel pump.
The fuel system must be relieved of pressure before disassembling, otherwise fuel may leak into the vehicle when disassembling the fuel line fittings. To relieve pressure, remove the fuel pump fuse, start the engine and wait until it goes out. Replacing the fuel pump sieve with a “ten” (nozzle) is done as follows:
- Turn off the ignition.
- In the rear, locate the hinges and pull them to fold the lower seats forward (right and left).
- There are two bolts under the seat on the underside that hold the hatch in place.
- Unscrew the bolts and remove the hatch.
- Disconnect the wire connector that supplies power to the electric fuel pump by opening the latch and pulling part of the connector away from you.
- We unscrew the fuel line connectors - main supply and “return” (17mm wrench).
- Unscrew the nuts of the fuel pump pressure plate, there are 8 bolts (at 7mm).
- Since the nuts are small, it is better to put them in a jar, otherwise you can lose them. Remove the plate and remove the pump assembly from the fuel tank. The pump must be removed with the sealing ring; lift the pump carefully so as not to damage the fuel level sensor. When removing the housing, tilt the fuel pump so that it comes out of the tank.
- We remove the screen from the fuel pump and install a new part.
- Install the fuel pump.
How to change the mesh on the fuel pump of a VAZ 2110
The mesh on the fuel intake is a coarse filter. Thanks to the action of this element, large particles of dirt, ice, lumps of tar and rust deposits do not enter the fuel pump impeller. The first sign that the mesh needs to be changed is the car jerking during acceleration and poor traction when the fuel level in the tank is less than 20%.
Let's say you have already removed the fuel supply module, as described in the manual above.
Next you should take the following steps:
- Disconnect the fuel pump connector (very brittle on the VAZ 2110);
- Remove the retaining rings from the two guide pins;
- Separate the module into two, then into three parts;
- There is guaranteed to be an accumulation of dirt at the bottom of the glass. It needs to be cleaned;
- The mesh itself is attached to the central part of the module with a clamp;
- We remove it and clean the seat;
- Install a new coarse filter;
- We assemble the fuel unit in the reverse order and install it in the gas tank.
Before installing the hatch, you need to turn on the ignition several times and check the motor with the fuel level sensor for functionality. And also, check the tightness of the fuel fittings after dismantling. If everything is in order, then the VAZ 2110 fuel pump grid has been replaced successfully.
Tips and tricks
If it is necessary to replace the VAZ 2110 pump or after removing the pump for preventative replacement/cleaning of the mesh, after completing the reassembly and installation of the pump, do not immediately install the rear sofa and the pump cover.
Additional verification will be required before doing this. To do this, you need to turn on the ignition and determine whether gasoline is leaking from the fuel pipes. Also, the smell of gasoline in the car interior, etc. is not allowed. If this is the case, then you need to determine the cause of the leak and replace the problematic elements, tighten the tube nuts, etc.
To make the selection accurate, the existing module must be removed from the car and purchased a similar one. Also, when choosing, you need to take into account the type of engine, since the pumps are different. Before purchasing, the fuel pump itself should also be inspected, its housing should be checked (cracks, dents, and defects are not allowed).
Step-by-step instructions for checking the electric fuel pump VAZ 2110
To check the electric fuel pump on a VAZ 2110, you will need an indicator sold in any car store. The installation of the indicator, in each specific case, should be done in accordance with the instructions that come with it. Then the engine is started and, after a few minutes, it is turned off. After this, the indicator readings are studied: normally, the pressure should not drop below 1.6 atm. – otherwise, you will have to replace either the injector or the regulator.
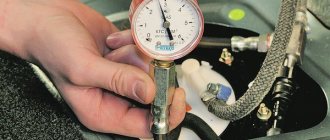
You can also check the fuel pump using a pressure gauge. It is connected directly to the fuel rail, and the device itself is connected to the windshield of the car (this is done under the edge of the hood).
As soon as the ignition is turned on, it is necessary to take the pressure gauge readings (they should not exceed 380 kPa and be less than 300 kPa). After accelerating the car (it would be optimal to do this up to 3rd gear), you again need to take the pressure gauge readings, which, if the fuel pump is working, should not vary much and go beyond the specified range.
If the car stalls while driving, first of all, check the relay on the fuel pump. This procedure consists of connecting a special light bulb to the fuel pump connector. After this, turn on the ignition. If the light stays on for a few seconds, then the fuel pump relay is working properly.
If fuel starts to leak, you just need to change the filters or gaskets. It may also be necessary to replace the diaphragm, or, in rare cases, valves.
Checking the power supply at the fuel pump terminals
The fuel pump is installed in the tank. To access it you will need to remove the rear sofa cushion, it is not difficult.
The fuel pump is protected by a cover.
Fuel pump power supply.
When the ignition is turned on, there should be a voltage greater than 12 Volts at these terminals.
If there is no voltage, then you need to:
- ring the ground on the body. This is a white and gray wire. It is convenient to check the continuity of the bolt securing the rear seat belt fasteners.
- check the positive contact using a tester, or call it directly from the battery, etc.
Try to “fiddle” the wires; they often fray. The negative wire (ground) is connected to the handbrake bolt.
Check directly
It is necessary to carefully strip the wires and apply power to them. (As in the diagram)
If, when voltage is applied, the fuel pump shows no signs of life, then it is faulty.
Causes of malfunction
During operation, VAZ 2110 car owners may encounter some difficulties associated with this element. Malfunctions of the VAZ 2110 injector fuel pump can be as follows:
- element failure due to breakdown;
- a dirty tank or low-quality gasoline with foreign inclusions that contaminate the pump filter.
The very first sure indication that the VAZ 2110’s fuel pump is faulty is the following symptom: the engine “jerks” during operation, especially at medium and high speeds. This indicates that the fuel pressure is insufficient. But this is precisely what the fuel pump is responsible for. But sometimes the reason should be sought in the injectors, as well as the RTD.
There are main signs of a malfunction of the VAZ 2110 injector fuel pump, in which you should definitely take action to check this component:
- A loud noise that the element has not previously made.
- The vehicle refuses to gain speed and also does not move when engaging first or second gear.
- The car moves jerkily and behaves strangely on the road.
- The engine suddenly stopped running.
Each of the VAZ 2110 fuel pump malfunctions must be carefully considered in order to understand what to do if you encounter them.
Model selection
It is best to install an imported fuel pump on the VAZ 2110 injector, capable of delivering a performance of up to 7 atm. It will not only last much longer, but will also ensure better and longer operation of the injector and improve the quality of the mixture at the outlet of the nozzle.
You should know that Bosch fuel pumps usually differ only in length, location of terminal connectors, and sometimes in the diameter of the housing. Therefore, it is advisable to either go shopping with an old device, or make some minor modifications at home.
Bosch fuel pump
To avoid buying a fake, keep in mind that any Bosch gas pump is packaged in very durable packaging. The bag contains purified gasoline in which the device is immersed. If you smell it, it means the seal is broken, corrosion may begin inside the pump, it’s better not to buy one.
Replacement
It is necessary that the gasoline level is no more than half the volume of the tank. Next we proceed like this:
- Disconnect the negative battery;
- Removing the back seat;
- Remove the cover from the hatch;
- Disconnect the electrical connector;
- We remove the fuel supply pipe by unscrewing the fitting;
- We do the same with the drain pipe;
- Remove the clamping ring (it is secured with nuts 7);
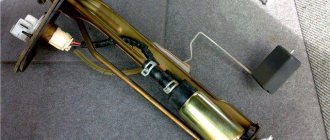
- Carefully remove the float from the hole in the tank, remove the electric fuel pump along with the fuel level sensor;
- Using a screwdriver, disconnect the fuel level sensor;
- We remove the clamps and remove the fuel pump itself from the guides;
- Reinstalling a new Bosch pump is simple and straightforward.
You just need to consider a few points:
- If you installed not a new, but a refurbished pump on a VAZ injector, lubricate the centering bushings (WD-40 grease is usually used);
- The fuel pump with a fuel sensor is installed in the tank so that the arrow on the flange faces the rear of the car;
- Be sure to check that all o-rings are intact, but it is best to replace them with new ones.
After replacement, start the engine and check what pressure the fuel supply system produces and whether there are any leaks.
Diagnostic device
To determine the pressure in the main line, a device is needed. It's easy to do it yourself. You need to take a 10 atmosphere pressure gauge, a fitting and an oxygen hose with an internal diameter of 9 mm. We twist all the elements and tighten them with clamps.
The meter is connected to the ramp. To do this, remove the plastic cap from the end of the tube. Next, use a tire cap to unscrew the nipple.
Bleed off excess gasoline. Before draining the flammable liquid, place a rag to prevent gasoline from getting on the generator. Smoking and using electrified tools near the hood is strictly prohibited.
The free end of the hose is pulled onto the ramp. Secure the clamp. After connecting the battery, turn on the ignition. They take readings. The pressure of the VAZ-2110 fuel pump injector will deflect the pressure gauge needle to 3 atm.
After starting the engine, observe the movement of the needle. On working equipment, the pressure will be maintained within 2.8-3.2 units. If no deviations are found, then the VAZ-2110 fuel pump, injector and regulator are working correctly. It is advisable to remember the characteristics of the equipment.
The pump capacity is about 2 liters per second. If problems arise with the fuel supply, the pump must be replaced. Before checking the pump, make sure that the remaining elements are in good working order. The filter or mesh may be clogged. The fuel filter is changed and the mesh is cleaned.
Description of the work
The location of the VAZ 2110 fuel pump nozzle is in the gas tank located under the car, next to the rear seat. It can be accessed from the cab, so inspection cameras and other additional devices are not required. The only tools you need are:
- Open-end wrench 13 and 17 mm;
- Crosshead screwdriver;
- 7 mm socket wrench.
You can use a small wrench instead of a 7mm tubular wrench, but this will be inconvenient and take longer. Before starting any repair work, the rear seat must be completely removed and pulled out to gain access to the gas tank. There are two more preliminary steps that are performed in the space under the hood.
- Unscrew the nut securing the negative terminal of the battery, remove the clamp with the cable.
- Relieve pressure in the fuel line. At the end of the ramp, near the outer nozzles, there is an outlet valve with a rubber plug on it. After removing and installing the plastic cap, press down on the valve stem. From there, fuel flows and the pressure in the system drops.
Under the bottom of the rear seat there is a square hatch for access to the gas tank and must be removed. The disassembly procedure is as follows.
- Using a Phillips screwdriver, remove the 2 bolts securing the hatch cover, remove it and set it aside.
- Disconnect the fuel pump electric drive plug and move it to the side so that it does not interfere.
- Loosen and use a wrench to unscrew the 2 nuts that secure the fuel lines to the fuel pump fittings.
- Pull the pipes out of their places. The round rubber rings at the ends should be removed and replaced with new ones as they are for one-time use only.
- Using a long tubular wrench, unscrew the 8 nuts holding the flat ring that presses the VAZ 2110 fuel pump to the bottom surface. Remove the collar from the pins.
- There is a rubber gasket on the studs under the clamping part of the body. The latter must be removed from the studs, otherwise it will not be possible to pull out the fuel supply device. Then you need to carefully remove the fuel pump from the tank cavity along with the float. If the rubber gasket is worn out. If it is not in good condition, it is better to replace it.
Removing the assembly will cause gasoline to leak, so place a rag under the assembly and quickly move the fuel pump outward, positioning it over a wide pan. The filter is located at the end of the suction tube and is secured with a plastic ring. It can be removed manually.
If the ring is firmly glued to the pipe, it is recommended to pry it off, for example, with a flat-head screwdriver. Then a new mesh is inserted and secured by manually pressing it until it stops. Now you can begin reassembling in reverse order. There is an arrow stamped on the top of the device that should point towards the rear of the car.
We recommend that all connections be lightly tightened. To avoid distortion when tightening the 8 nuts of the clamping flange, a star diagram is used.
If you need to replace the fuel pump on a ten-meter VAZ, or repair it, the system is disassembled as described. When replacing, remove the float and level sensor from the device and transfer them to the new pump. The entire procedure, if carried out in conjunction with replacing other consumables, will take you no more than half an hour.
Troubleshooting, simple tips for reliable operation of the fuel pump
- If the VAZ fuel pump does not spin, first of all you need to check the serviceability of the fuses and relays by replacing these parts. They are located behind the console panel on the lower front passenger side. If their condition is satisfactory, to check their operation, the supply voltage must be supplied directly to the fuel pump. To do this, remove the rear seat cushion and open the cover secured with screws. It should be remembered that if the alarm is installed, the power supply to the VAZ pump will have an additional shutdown relay during run-in. If the fuel pump does not respond to voltage or you need to check and replace the filter, follow these steps to remove the fuel pump from the fuel tank. To relieve pressure in the fuel lines, turn off the fuel pump with the fuse and start the car. After stopping the engine, open the gas tank at the filler neck to relieve gasoline vapor pressure, disconnect the negative clamp from the battery (to prevent fire), disconnect the electrical connector from the pump mounting flange on the gas tank, and disconnect the gasoline hose. connections (it is necessary to replace the gas-tight rubber ring on the trunk), unscrew the flange (8 7 mm hex nuts), remove the rubber gasket and remove the VAZ fuel pump complete with a float and a strainer (pre-covered with a cloth nearby so as not to contaminate the interior with gasoline). Pump filter main points of its effective operation:
- Driving a car with an empty fuel tank is an extreme challenge for the gas pump, and in the long run it costs much more than simply filling up;
- The gasoline pump “does not like” suspicious gasoline, which also leads to frequent replacement of the filter and pump;
- When replacing a VAZ 2110 fuel pump, preference can be given to imported analogues, which have higher pressure and whose operation is more stable.
- To feel like you own a car means to take care of it like a family member. In this case it will last a long time. And every trip will be counted as gratitude to the owner for his care.
- Domestic cars have a significant advantage: spare parts and consumables are cheap. In addition, everything is structurally very simple. That's why our cars are easy to repair yourself. However, if you are a beginner and have never serviced or repaired equipment before, you should not gain experience in the industry by replacing a gas pump. To start getting acquainted with an independent car service, it is better to choose simpler tasks. If you dare to replace the fuel pump with your own hands, then you need to remember that the mechanism is installed in the fuel tank strictly so that the indicator arrow points towards the rear of the car. After completion, it is recommended to measure the pressure in the fuel system and make sure there are no leaks.
Fuel coarse mesh in the fuel pump - why is it needed?
While driving, shifting into third or fourth gear and then pressing the gas pedal, there is no increase in power.
Additionally, a clogged grille can cause the engine's revs to drop while driving because the required amount of fuel simply isn't getting into the combustion chambers.
When to change the screen in the fuel pump?
The filter located in the gas pump, in the presence of dirt on it, subject to mandatory exchange, the price is not very good for this. However, if you find yourself in a situation where purchasing a new item is simply not an option, you can wash it.
Please note that the effect of cleaning the gas pump mesh will be temporary, and the exchange should be carried out as soon as possible
Signs of a fuel pump malfunction
Signs of unit malfunction:
- a metallic howl or increased noise during its operation is detected by ear;
- the product does not pump fuel or the contacts do not work;
- The power of the power unit is sharply reduced.
First of all, we check the pressure of the “tens” fuel pump in the common fuel system by connecting a pressure gauge to the fitting. If the pressure in the product is more than 3.3 kgf/cm2, it becomes clear that the malfunction is a defect in the pressure regulator, which requires replacement. If the pressure gauge readings are less than 2.8 kgf/cm2, it is necessary to replace the fuel filter of the fuel pump, which caused the defect. If the car continues to act up, it is advisable to dismantle the fuel unit and clean the fuel filtration mesh.
In other cases, the VAZ 2110 injector fuel pump is replaced, because repair of the product did not give positive results. Also, when checking this electrical device, it is necessary to test the fuel pump relay, which is subject to elementary “sticking”. It would be a good idea to check the unit's fuse, which may also blow out and require replacement.
Step-by-step instructions for checking a mechanical fuel pump
First of all, let’s check whether the supply system of your VAZ 2110 is working at all. To do this, you need to take the following steps:
- Remove the pump fuel hose from the source or discharge fitting;
- Manually press the fuel pump lever several times;
- If the pump is operational, a strong stream of fuel will immediately flow through the fitting;
- If there is no jet or it is very weak, it will be necessary to carry out other checks.
Next, check the operating condition of the intake valve:
- Disconnect the hose from the suction fitting so that both hoses are eventually removed, each from its own fitting.
- Simply plug the suction fitting with your finger, then pull the lever several times to manually pump fuel. If everything works fine, your finger will begin to be sucked into the fitting. This effect indicates that the pump is working properly. Therefore, we look for the problem in the tank or lines.
- If there is no suction, you will have to disassemble the device to replace the inlet valve. Its tightness is most likely broken.
The next step is to check the VAZ 2110 fuel pump for leaks for this:
- Place your finger on the hole from the injection fitting and pump up the fuel several times using manual pumping;
- In this case, a stream of air should come out of the hole, significantly repelling the pressed finger;
- If the stream turns out to be weak or does not exist, the fuel pump simply does not pump.
Types of fuel pumps
Today, two types of fuel pumps for the VAZ 2110 are produced - mechanical and electronic .
- Mechanical ones are considered a classic solution, which is located outside the fuel tank. It works quite simply - the gas pump sucks fuel from a container, that is, a tank. It can operate quite well at low pressure, since the distance between the pump and the carburetor is small.
- Electronic is a more modern type of pump, which is mounted inside the tank itself. This is due to increased noise during its operation when compared with its analogue. Its operation depends entirely on the electronic system, which takes into account several factors simultaneously: The current location of the throttle;
- Exhaust content;
- Air/fuel ratio, etc.
Electronic fuel pump for the VAZ 2110
Many people are interested in where is the fuel pump fuse for the VAZ 2110?
Fuse for fuel pump VAZ 2110
Electric fuel pumps operate under pressure, which causes a certain level of noise. Because of this, the fuel pump is mounted deep inside the car's tank. In this case, the fuel is used for cooling and as a muffler for the operation of the pump.
The pump is started by an electric motor. When the ignition switch is turned on, the on-board system sends a signal to the pump, after which it starts supplying fuel.
In some situations, an electrical charge is applied to the pump. With its help, the motor rotates for several minutes, which sets the pressure inside the fuel system.
Please note that if after 3 seconds the computer does not provide the pump with data to start working, it will automatically turn off. That’s why we hear the sound from the pump motor for the first few seconds.
If there is no pressure in the fuel rail of a VAZ 2110, it is advisable to replace the fuel pump with a new one. As practice shows, there is no point in repairing it. This is a labor-intensive, energy-consuming process that is seriously not justified from a financial point of view.
Therefore, if the fuel pump on your injection VAZ 2110 does not work, we recommend replacing it. Moreover, it is better to install an electronic type.
How to replace the fuel pump on a VAZ 2110 with your own hands - step-by-step instructions
In order to replace the fuel pump on a VAZ 2110, you must perform the following procedure:
- Disconnect the negative battery terminal;
- Relieve the residual pressure in the fuel rail using a special fitting;
- The “tens” fuel pump is located under the rear seat of the car. We recline the seat and unscrew the protective cover;
- Disconnect the electrical terminal block of the pump, unscrew the fuel supply and drain lines.
- The rubber gaskets for the tips of the lines should be replaced;
- On a VAZ 2112, the fuel pump is held in place by eight bolts on an O-ring with a lining
- All you have to do is remove the old fuel pump and install a new one according to the indicating arrow on the body of the product.
As you can see, removing and installing a fuel pump on a VAZ 2110 is a simple procedure that does not require any special skills from you.
Installing a new
Installation of a new electric fuel pump is carried out in the reverse order.
The following actions are performed sequentially:
- The seal is installed.
- The new pump is carefully inserted.
- The pressure ring is installed and 8 fastening bolts are tightened.
- The fuel lines are screwed on.
- The power supply is connected to the connector.
- The hatch cover is installed and closed with the folded carpet flap.
- The rear seat cushion is installed.
- The battery terminals are connected.
When installing, remember that the arrow stamped on the housing must be directed backwards.
VAZ 2110 does not pump the fuel pump, reasons
First, let's look at breakdowns of mechanical refueling. All parts of a car engine are subject to aging and wear, and the life of a mechanical fuel pump also ages over time.
The main malfunctions in the operation of a mechanical device include:
- Valve fault.
- Diaphragm rupture.
- Shell deformation.
If the diaphragm is leaking air, the fuel pump may stop delivering fuel to the carburetor, or gasoline may pass through the ruptured diaphragm into the crankcase, where it mixes with the engine oil. When fuel gets into the oil, fuel consumption increases sharply and the engine begins to have difficulty starting, especially when warm. Checking the presence of fuel in the crankcase is quite simple - if you light the oil dipstick with a lighter, a fire will start. In addition, the sump will smell like fuel.
A common malfunction of mechanical fuel pumps is deformation of the mounting surface of the oil cylinder to the auxiliary housing. If the surface is deformed, engine oil begins to flow out at the meeting point of the planes.
Now about the electric fuel pump.
If it stops working, there may be several reasons for the failure:
- The fuel pump motor burned out.
- The relay has stopped working.
- The fuse has blown.
- Faulty electrical wiring.
- Engine control unit malfunction.
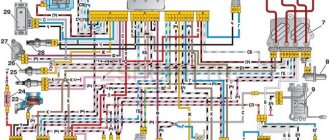
Fuel pump circuit (electric)
The design of the electric fuel pump 2110 itself is quite simple - the unit is an electric motor, which is supplied with 12 Volt power. The BN is mounted in a housing, and a mesh is installed at its inlet - a coarse filter. The filter element prevents dirt particles from penetrating into the pump housing, thereby protecting the device from clogging and possible breakdown.
The electrical circuit of the VAZ fuel pump contains the following elements:
- ignition;
- fuse;
- relay;
- wiring;
- the engine control unit.
When you turn the ignition key, power is supplied through the relay to the BN terminals, and the pump begins to pump gasoline. After the input line of the fuel line is filled with gasoline, the ECU (control unit) through a relay gives a command to turn off the voltage - the fuel system is ready to start the engine, all that remains is to crank the engine with the starter.
Installing a fuel pump
Despite the fact that this mechanism has a simple structure, its installation is quite complex. First you need to determine which device is suitable for a specific carburetor and fuel group. Additionally, additional parts will be required for installation. So, to install an electric fuel pump, a hose is required. Its size should be about 5 m and thickness 10 mm. You also buy the fuel pump itself and a relay for it. You will also need a 3-5 mm drill, an injection system filter and a carburetor filter. A steel tube 7 mm thick is also required. The width of the latter holes should be at least 2.5 cm.
First, remove the device showing the fuel level in the gas tank. A hole is made in its lid into which a 7 mm tube is inserted. In order for the return line to drain properly, the end of this tube should be bent slightly so that it is at a greater distance than the fuel intake pipe. The upper part is also bent until parallel with the tube intake hole. Then a modern fuel level measuring device is installed, equipped with an intake and return line.
It must be borne in mind that the rubber tube must be connected with a return fitting from the power system. Now one of the ends of the hose is connected to the heat intake fitting. Subsequently, using clamps, the device is attached to a metal tube. The electric fuel pump is mounted horizontally in relation to the engine shield through a special bracket included with the device.
The second fitting is connected to a 7 mm tube; it is attached vertically for proper fuel supply from bottom to top. Using a hose, connect the fuel pump to the tank. The last step is to connect the electric fuel pump to the carburetor using a fuel filter.
The principle of operation of the mechanism
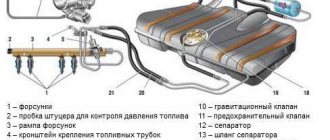
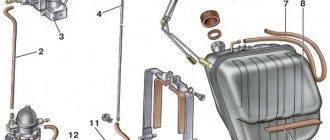
Product diagram for injection engines:
Mechanical products are used in cars with a carburetor fuel system, where fuel is supplied under low pressure, and electric fuel pumps in vehicles with fuel injection equipment, where gasoline is supplied under high pressure.
1. Fuel pump on vehicles equipped with a carburetor as a dispenser. The drive lever (pusher) is in constant friction, but the diaphragm shifts to the lower plane only when it is necessary to fill the product chamber with fuel. The return spring moves the diaphragm to the upper position, thereby supplying fuel to the dispenser. Composition of a mechanical fuel pump:
- Fuel filling chamber;
- Inlet and outlet type valves;
- Diaphragm seal;
- Return spring;
- Pusher (drive type lever);
- Cam;
- Camshaft.
2. Electric fuel pump on injection cars. Such a device is similar in operating principle to a mechanical prototype: the core is pulled into an electromagnetic valve until the contact group opens, blocking the flow of electric current. Composition of this product:
- Fuel filling chamber;
- Inlet and outlet type valves;
- Diaphragm seal;
- Return spring;
- Electromagnetic valve;
- Fuel pump mesh;
- Core;
- Contact Group.
For beginners, we inform you where the VAZ 2110 fuel pump is located: it should be looked for under the rear seat cushion of the car.
Signs of a relay failure
The operation of the relay is important for the entire vehicle. If the part fails, the engine may not start at all or stall. In some cars, the fuel supply system is designed in such a way that even if the relay breaks down, the fuel pumps continue to operate, but the amount of fuel consumed can increase significantly. Do not neglect the problem if it occurs, as this can lead to failure of the fuel pump. The main signs of a relay failure are:
- The engine does not start because there is no fuel supplied to the system.
- A constant hum from the fuel pump means the relay is not turning it off. Such a malfunction leads to excessive fuel consumption, battery discharge and premature wear.
- The HP operates even when the motor reaches the maximum permissible speed.
All these signs are quite easy to detect, so there are no difficulties when replacing the relay to further normalize the operation of the car.
Signs of fuel pump wear
A faulty fuel pump either works intermittently, that is, incorrectly, or does not function at all. Problems may occur due to severe wear or failure of other system elements.
Signs of a fuel pump malfunction that require checking its functionality are:
- engine failure to start;
- uneven operation of the power unit, it stalls and loses power;
- extraneous noises in the operation of the fuel pump or their complete absence.
Without diagnostics, it will not be possible to determine the nature of the malfunction, and during the test you must always move from the simplest to the most complex.
Sources
- https://smotriavto.ru/obsluzhivanie-i-remont/vaz/zamena-benzonasosa-2110.html
- https://auto-gl.ru/toplivnyy-nasos-v-vaz-2110-2112-samostoyatel-naya-diagnostika-i-zamena/
- https://vazweb.ru/desyatka/pitanie/toplivnyj-nasos.html
- https://vazweb.ru/desyatka/pitanie/benzonasos.html
- https://ladaautos.ru/vaz-2110/po-kakim-prichinam-mozhet-ne-kachat-benzonasos-na-vaz-2110.html
- https://bibiauto.club/systems/toplivnaya/nasos-vaz-2110.html
- https://vaz-2110.ru/dvigatel/benzonasos-vaz-2110-ustrojstvo-i-remont.html
Bosh fuel pump for VAZ 2110 – pros and cons performance and characteristics
The manufacturer Bosch produces its own fuel pump for each type of fuel system. Why, after the original fuel pump fails, do people install a Bosch fuel pump from a VAZ 2110? How does the pressure and performance of the fuel pump compare with the original one? If you put it with high pressure, will the flow rate increase?
Consequently, there was a 2.8 bar pump, they installed a Bosch VAZ 2110 fuel pump with 3.8 bar and it will only get better. Fuel consumption may increase if the fuel pump does not create sufficient pressure in the rail and the injectors begin to pour gasoline, which does not burn, rather than spray.
Most often, the characteristics of gasoline pumps (not only Bosch, but also from other manufacturers) may differ in length, pressure, location of terminal chips, and that’s it. The fuel pump mesh does not differ in seating, but it may differ in shape.
The chip for the terminal can be remade or supplied from the same VAZ. The length of the fuel pump is important, since its operation depends on this when the fuel level in the tank is low, and if it is in the module, then you need a match to install it.
Where is the fuel pump located?
The fuel pump is one of the most important devices in a car, performing the functions of pumping fuel. It takes gasoline from the tank, then sends it through a pipeline to the filtration system and then to the combustion chambers.
Often, the car owner needs to replace or temporarily remove this device; its location depends on the car model and the type of fuel system. In the VAZ 2110 it is located under the hood, directly next to the engine, so detecting it does not cause any difficulties.
Tips for motorists
VAZ-2109 passenger cars of the last years of production had injection engines, so on these “nines” an electric fuel pump was installed in the fuel tank. And on a small part of the VAZ-2109 with a carburetor engine still in use today, mechanical fuel pumps were installed.
Failure to operate the fuel pump on VAZ-2109i injection engines is determined quite simply, since when the ignition key is turned to the “ignition on” position, the driver simply will not hear the characteristic noise that the running electric motor of the fuel pump makes. Typically, drivers of “nines” begin their search for the cause of a fuel pump failure by checking the condition of the fuse that protects this electrical circuit.
It is located under the front panel shelf, which is located below the glove compartment. When you unscrew the fastening screws, the block of three relays and three fuses on the wires will move lower, so it will be more convenient to work with it. You will need to check the rightmost fuse and the condition of its contacts. If a blown fuse is detected, it will have to be replaced with a new one. And also find the reason why he burned out.
If the fuse is intact and the contacts are not oxidized, then the next step in troubleshooting is to check the functionality of the fuel pump relay. It is located in the same block as the fuse and is located on the far right. Drivers usually check it by replacing it with a known-good relay. If after such a replacement the fuel pump starts working, then you will have to purchase and install a new relay.
But when the fuel pump still continues to be “silent”, then you will need two wires four meters long. They are needed to check the condition of the fuel pump itself by connecting it to power directly from the battery. To do this you will need to: lift the rear seat cushion, remove the hatch cover, disconnect the plug block and connect the wires from the battery to the fuel pump terminals. There are three terminals in the block: one for ground, the negative one from the battery is connected to it, two more positive ones, for the fuel pump and the fuel level indicator in the tank.
If the fuel pump, when connected directly, works, then you will have to ring the wires going from it to the fuel pump relay, and if it does not work, then either replace it with a new one, or you will have to disassemble it and look for a fault inside the fuel pump.
On “nines” with a mechanical fuel pump, the most common malfunction is wear of the fuel pump diaphragm, as a result of which gasoline will leak through the drainage hole in the housing when it operates. The second reason for the failure of such a fuel pump is wear of the pusher, which transmits force from the camshaft cam to the fuel pump drive lever.
Fuel pump diagnostics
If the gas tank is full, the battery is in good condition, the spark plugs are dry and give a spark, and the starter rotates the engine, then the reason is the fuel pump. The most common reason is that after turning on the ignition, there is no power supplied to the fuel pump. In the same way, it manifests itself when the car is moving, when the power is lost and the engine begins to stall. Another important nuance is the supply of the required amount of fuel.
The pump may be working, producing a hum and buzzing, that is, power is supplied, but not producing the required pressure.
The pressure in the fuel system with a working fuel pump is considered normal to be more than 3 bar. This pressure is collected in the fuel rail and corresponds to a value of 300 kPa. To check the condition, you need to take a pressure gauge and measure the pressure in the fuel rail, taking into account those indicators that are considered normal for each individual model.
For a VAZ-2110 with an injector, the pressure at the moment the ignition is turned on should show no less than three atmospheres, at idle speed - 2.5, and when the gas pedal is pressed - from 2.5 to 3 atmospheres. This method allows you to accurately determine:
- Failure of the rail pressure regulator.
- Fuel pump malfunction or decreased performance due to wear.
- Severe contamination of the filter or mesh.
A decrease in pressure leads to the fact that the engine does not start or starts with difficulty, it begins to stall, and dips appear during operation. If the pump is to blame, then the fuel pump coarse strainer may be clogged. In this situation, there is no need to change the entire unit; you can clean the mesh or install a new one. If you suspect that the fuel pump is not receiving power, you need to turn on the ignition and listen. A slight buzzing or hum should be heard when the fuel pump is operating. And if you don’t hear anything, then there is a problem with the operation of the fuel pump or the wiring to it.
The main list of reasons why the fuel pump on a VAZ-2110 car does not pump includes:
- fuse malfunction;
- non-working relay;
- motor failure;
- oxidation of contacts in the wiring leading to the fuel pump;
- fuel pump failure.
Wiring
On almost all car models, the wiring to the fuel pump consists of three wires: “positive”, “negative” and a wire for determining the amount of fuel in the tank. If the fuel pump stops pumping, the wiring may be damaged. You can check the power using a 12 W lamp, powering it from the external connector of the fuel pump. When the ignition is turned on, the light should light up. If not, then the external circuit is broken somewhere.
To check the external wiring, you need to connect in turn the “positive” and “negative” contacts removed from the fuel pump power connector. It is necessary to close the “negative” contact to ground, after which the light will light up when the ignition is turned on. So, it can be determined that the contact is inoperative. If the lamp does not light up, then the “positive” contact is damaged. Placing a contact on the relay in which the light does not light up, there may be a problem with the wiring in the section from the relay to the fuel pump.
Electric motor
If searching for a problem in the fuel rail and wiring does not produce results, you need to check the fuel pump motor. It is responsible for circulating fluid in the internal part of the fuel pump. When checking, it is necessary to take into account that after a certain period of time the terminals on the fuel pump may oxidize and there will be no power. This is also often the reason why the fuel pump stops working. This means that the motor is most likely working, but the terminals need to be cleaned and tightened.
Ground contact
Problems with the fuel pump ground can be indicated by an incorrectly indicating fuel level sensor. Poorly secured ground can cause the fuel pump to stop pumping fuel. The ground wire is located under the dashboard and runs through the entire interior of the car. You need to find it, clean the contacts and secure it properly to the fuel pump.
Step-by-step installation with photo of the fuel pump
K-contact is a signal (spark-producing) B-contact is + 12V ignition
I connected the relay according to this diagram:
The relay itself looks like this.
This is what it looks like under the hood. I put the plugs on the mechanical fuel pump that were included with the EBN and haven’t started removing them yet, otherwise you never know.
Well, what can I say based on 2 weeks of experience in using this gas pump. The car drives and does not heat up even in the heat of 30+ degrees. 140 - 150 the car began to drive much better; there is enough gasoline, consumption has not increased, in general, so far everything is good.
The maximum speed at which it was driven
I found on a foreign website a diagram for controlling the fuel pump from the ignition, maybe it will be useful to someone. I soldered this myself and it works great, when you turn on the ignition the relay turns on for about 10 seconds, which is necessary to increase the pressure in the fuel system, then we start the relay again turns on the fuel pump while the ignition coil is working
How to test a relay
If the electric fuel pump does not show any signs of life when the ignition is turned on, this does not mean that it has burned out. The cause of the malfunction may also be a relay. The easiest way to check the RB by ear is that when you turn on the ignition, the relay should click. If you don’t hear a click, there is a high probability that the “relay” is faulty.
But not everything is so simple - the problem can be “tricky”, for example, the car does not start the first time. The cause of the malfunction may be hidden in burnt relay contacts. It’s quite simple to check the functionality of the pump itself; proceed as follows:
- remove the protective casing, under which there is a block with relays and fuses;
- we unscrew the fastenings of the block, remove it, it remains attached to the wires;
- we pull the RB out of the block, place a jumper between two opposite contacts, thus directly supplying power to the BN;
- If, with such a connection, the electric motor of the pump begins to make noise, it means that the BN itself is working, most likely, the malfunction is hidden in the relay.
If there is no voltage on any of the contacts on the RB block, you should look for a break in the wiring; there may also be poor contact at the place where the wire is attached to the terminal.
VAZ 2109 fuel pump injector how it works. Replacement and inspection
You will need to consider the features that the VAZ 2109 fuel pump has. If the injector is in the fuel injection system, then the pump is of an electric type. Its use is due to the need to control the fuel supply to the combustion chambers. But, as you know, gasoline first enters a special ramp, in which it is mixed with air in a certain proportion (14 to 1). It maintains constant pressure, with the help of which the mixture is supplied to the combustion chamber through holes in the electromagnetic injectors. These are devices that transform the air-fuel mixture into very small droplets. Essentially, the mist in which the gasoline is suspended in the combustion chamber is ignited.
How does a fuel pump work?
There is nothing complicated about the fuel supply system. A conventional pump, which is driven by the rotor of an electric motor. To protect the entire fuel system from small particles, a filter is used. But this is not the end of the features, because it is worth noting that it is necessary to maintain the pressure in the ramp at the same level. And the VAZ 2109 fuel pump (the injector simply cannot work without it), provided that it constantly pumps gasoline, will begin to pump up the pressure higher and higher. And this will disrupt the operation of the system.
Therefore, it is necessary to adjust the pressure. For this, a special device is used, which is called a pressure regulator. It is installed in the fuel rail and connected to a pipeline that serves to dump excess gasoline into the tank. When the ignition is turned on, the rail pressure sensor is polled, after which the fuel pump drive is turned on. After the pressure in the rail has increased to the required value, the fuel pump is turned off. Therefore, it does not work all the time.
How to remove the fuel pump
The VAZ 2109 fuel pump is located under the rear seat. The injector implies its installation directly in the tank. The thing is that the pump is a submersible type. In the same unit there is a float-type fuel level sensor. It works due to the fact that the float moves the slider using variable resistance. At the same time, the current in the power circuit changes. The amount of gasoline remaining in the tank is determined by the magnitude of the change. To remove the pump you will need to use pliers, screwdrivers and an 8mm wrench.
It is quite possible that the reason that fuel is not supplied is a non-working VAZ 2109 fuel pump relay. The injector contains it, as well as a fuse, which could easily burn out. Before starting work, thoroughly clean the entire cover so that after removal no dust gets inside the tank. Then, using a screwdriver, loosen the clamps that secure the hoses. Remove them; if you can’t do it with your hands, try gently squeezing them with pliers and twisting them. After this, use a size 8 wrench to unscrew all the nuts that secure the lid to the tank body
Please note that there are washers there. Don't lose them. That's all, now the pump can be easily removed for replacement or repair
That's all, now the pump can be easily removed for replacement or repair.
Checking the pump's functionality
It is easy to check the VAZ 2109 fuel pump even without special instruments. The injector will not be able to operate without pressure in the fuel rail. Therefore, you need to keep the pump motor spinning. It’s easy to check; just connect its terminals to the battery. If you are afraid, then turn on an incandescent lamp in the gap of one wire. It will help determine the health of the motor winding
Please note that the filter must be as clean as possible. If it is clogged, be sure to change it. Otherwise, the pump will not be able to create the required pressure.
Otherwise, the pump will not be able to create the required pressure.
Pump installation
Pay attention to the condition of the wires when replacing the VAZ 2109 fuel pump. The injector involves powering the engine from the on-board network, so there should be no breaks or destruction of the insulation. Installation of the fuel pump is carried out in the reverse order of removal
First, place the body in the tank, landing on the studs. Then you need to tighten all the nuts, then put the hoses in place and connect the plug with wires
Installation of the fuel pump is carried out in the reverse order of removal. First, place the body in the tank, landing on the studs. Then you need to tighten all the nuts, then put the hoses in place and connect the plug with the wires.
Fuel pump drive
The VAZ 2107 mechanical fuel pump is driven by a pusher and an eccentric. Among drivers, it is customary to call the pusher a rod, although the rod is another part of the fuel pump. The eccentric is located on the intermediate shaft, which operates from the gas distribution mechanism.
The fuel pump drive includes (see figure):
- 1 - pusher;
- 2 — heat-insulating spacer;
- 4 — adjusting gasket;
- 5 - sealing gasket;
- roller (cam).
The pusher is driven by an eccentric located on the shaft of the auxiliary mechanisms
Device and principle of operation
The operation of the mechanical fuel pump drive is not based on the fact that:
- the oil pump shaft is driven through a timing chain;
- the cam (or eccentric) begins to press cyclically on the pusher;
- The pusher transmits force to the lever and the fuel pump begins to pump fuel.
Drive faults
Problems with the mechanical fuel pump drive lead to interruptions in the operation of the fuel supply system. Actuator malfunctions are most often associated with deformation or excessive wear of the pushrod or cam.
Fuel pump rod bends
The fuel pump pusher is often made of metal that is not strong enough. There are often cases when, after 2–3 thousand kilometers, such a pusher bends and flattens the constant impact of the cam. The length of the pusher should be 82.5 mm. If your fuel pump tappet does not meet this size and is flattened on the cam side, it will need to be replaced.
If the fuel pump pusher is flattened on the cam side, it needs to be replaced.
How does the device work?
After the driver turns the key in the ignition switch, the relay begins its work. The part sends a signal to the fuel pump and it turns on for 2 - 3 seconds to achieve the required pressure in the rail. The relay turns off the pump and then it starts only when the engine is rotated by the starter or while driving. After stopping the engine, the relay turns off the fuel pump and relieves pressure. In the latest models of gasoline pumps, the device performs several additional functions:
- Acceleration. If the automatic transmission needs to increase speed, the relay can additionally turn on the pump to supply more fuel.
- Slowing down the engine speed. If the engine is running at maximum speed, the relay may temporarily turn off the fuel pump. Temporarily turning off the device allows you to normalize the number of engine revolutions.
A sign that the fuel pump is working is a slight hum. Normally, the hum lasts only a few seconds, but if the relay or other parts of the system fail, the device may not turn off for a long time or may not turn on at all.
Diagnostics
If it is impossible to start the car, when the starter turns the flywheel perfectly and there is a spark, you should check the fuel supply. If the pump works and gasoline enters the ramp, then the cause should be looked for further. To initially check the operation of the pump, just open the tank lid and, turning on the ignition, listen, the characteristic pumping noise should sound.
You should not immediately change the unit; first you need to check the fuse responsible for the operation of the electric motor of the fuel pump. Even if it is working properly, you need to check the power supply with a multimeter or probe and examine the relay. If power is supplied, then replacing the pump cannot be avoided.
It is more difficult when the pump is running, that is, it buzzes when turned on. First you need to check the condition of the filter, clean it if it is clogged with foreign impurities. Interruptions in operation can also be caused by faulty spark plugs, injectors, sensors, or a decrease in pressure in the fuel line. The pressure in the ramp, in turn, depends on the tightness of the main pipeline connections and the serviceability of the bypass valve.
It would be a good idea to measure the pressure using a pressure gauge with the fuel pump on but the engine stopped. Absence or significant deviation from the norm will indicate a malfunction.
Where is the fuse and fuel pump relay on the VAZ 2110
It’s worth saying right away that the fuse and relay for the VAZ 2110 injector fuel pump are located in the same place. They are both located in the center console on the passenger side below. The main task of a relay in an electrical circuit is to close and open a circuit. Thanks to this, the circuit is protected from high inrush current.
| F1 - 5A | License plate lamps. Instrument lighting lamps. Side light indicator lamp. Trunk light. Left side marker lamps. |
| F2 - 7.5A | Left headlight (low beam). |
| F3 - 10A | Left headlight (high beam). |
| F4 - 10A | Right fog lamp. |
| F5 - 30A | Electric door window motors. |
| F6 - 15A | Portable lamp. |
| F7 - 20A | Engine cooling fan electric motor. Sound signal. |
| F8 - 20A | Rear window heating element. Relay (contacts) for turning on the heated rear window. |
| F9 - 20A | Recirculation valve. Windshield and headlight cleaners and washers. Relay (coil) for switching on the heated rear window. |
| F10 - 20A | Spare. |
| F11 - 5A | Starboard side marker lamps. |
| F12 - 7.5A | Right headlight (low beam). |
| F13 - 10A | Right headlight (high beam). Indicator lamp for turning on the high beam. |
| F14 - 10A | Left fog lamp. |
| F15 - 20A | Electrically heated seats. Locking the trunk lock. |
| F16 - 10A | Relay-breaker for direction indicators and hazard warning lights (in hazard warning mode). Hazard warning lamp. |
| F17 - 7.5A | Interior lighting lamp. Individual backlight lamp. Ignition switch illumination lamp. Brake light bulbs. Clock (or trip computer). |
| F18 - 25A | Glove box lighting lamp. Heater controller. Cigarette lighter. |
| F19 - 10A | Locking door locks. Relay for monitoring the health of brake light lamps and side lights. Direction indicators with warning lamps. Reversing lamps. Generator excitation winding. On-board control system display unit. Instrument cluster. Clock (or trip computer). |
| F20 - 7.5A | Rear fog lamps. |
| K1 | relay for monitoring the health of light bulbs; |
| K2 | front wiper relay; |
| K3 | repeater and alarm relay interrupter; |
| K4 | low beam relay; |
| K5 | high beam relay; |
| K6 | additional relay; |
| K7 | rear window heating relay; |
| K8 | backup relay |
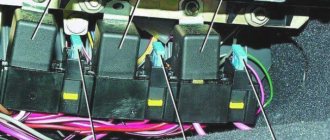
A similar type of relay is installed on the fuel pump, protecting the circuit when the engine starts. It consists of a plastic housing that houses an electromagnetic coil with a core. The incoming voltage allows the core contacts to close. The operating current of the relay is 30 Amperes.
Where is the fuel pump relay located on a VAZ 2110?
People often wonder where the fuel pump relay is located on a VAZ 2110; this photo will help you answer this question ↓
Where is the fuel pump relay located on a VAZ 2110?
Location of the relay and fuse for the fuel pump VAZ 2110 injector
If during repairs or diagnostics, the fault indicates a relay and fuse, then they must be removed and replaced with new parts. You should prepare a Phillips screwdriver and position yourself on the passenger side. At the bottom of the center console there is a cover secured with two screws. You need to unscrew them. It is there that the panel is located where the VAZ 2110 injector fuel pump relay is located and where the fuse for the VAZ 2110 fuel pump is located.
Rice. 2 Removing the side cover
After removing the protective cover, access to the power fuses and relays of the car appears. The required parts responsible for the operation of the fuel pump are marked with numbers 5 and 2 in the center of the photograph.
Fig.3 Power fuses and relays
Why does the VAZ 2110 fuel pump fuse blow out?
Fuse failure is a fairly common occurrence. Burnout indicates one thing - there is a short circuit in the fuel pump power system. In this case, you can change the fuse, drive away for several days without problems, and the situation will repeat again. So it is necessary to look for the reason.
The most common culprits are:
- the wiring harness above the exhaust manifold melted;
- wires under the carpet are damaged or melted;
- interturn short circuit in the pump motor;
- The positive wire going to the pump is damaged (current leakage to ground).
To identify the cause, you should disconnect the power supply from the fuel pump and turn on the ignition. If the fuse is blown, then the problem is in the wiring. Remained intact - short circuit in the electric motor. In the first case, you have to inspect the entire harness, looking for contact of the “plus” with the ground. As a rule, this is a gray wire running from the relay to the tank. The harness runs along the central tunnel, and not from the left threshold.
Fuel pump power supply diagram
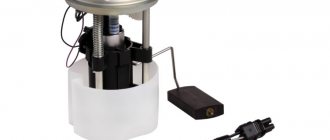
The fuel pump module looks like this.
- When you turn the key, positive is supplied to the fuel pump relay.
- The relay closes and already supplies power to the fuel pump itself. There is also a fuse built into the circuit.
Often, when installing an alarm system, a blocking relay is also built into this circuit.
This is a diagram of the main electrical components - simplified to make it clearer.
Verification algorithm
You should start checking by inspecting the relay and fuse.
On older machines, the positive wire often frays and shorts to ground, which causes the fuse to blow. This is a common occurrence.
The fuel pump relay and fuse are located inside the panel.
To access the block you will need to unscrew 3 bolts. They are circled in red in the diagram.
The fuel pump fuse and relay are marked in the diagram.
The fuse can be checked with a multimeter, but it is better to buy a new relay, it is inexpensive.
Put it in the car, it may come in handy at the most inopportune moment.
Design of the VAZ 2110 fuel pump for injection and carburetor car models
Mechanical fuel pumps, which were installed on the first modifications of the VAZ 2110/2112, have a simple design. It is based on a set of membranes made of special rubberized fabric that is resistant to the chemical action of gasoline. The pump body has two valves: inlet and outlet. The membranes are driven by a rod (pusher). It is driven by a cam mechanism rotated by a camshaft.
With an electric fuel pump, things are much more complicated. Its design is based on a small electric motor. It is no different from a regular one, although it works completely immersed in gasoline. The pressure in the system here is created not by a membrane (although there are such pumps), but by a specially shaped impeller mounted on the electric motor shaft.
The service life of the electric fuel pump is 150–200 thousand km. But it can fail much earlier. The main cause of breakdowns when the resource is not used up is additives added to gasoline, as well as various kinds of mechanical impurities. The former destroy the brushes and commutator, while the latter clog the valve mechanisms.
What kind of fuel pumps are installed on VAZ 2110/2112 cars
The fuel pump is considered the most important element of the fuel system of any car. So, depending on what type of engine the VAZ 2110/2112 model is equipped with, the choice of fuel pump will also depend. An electric pump is installed on injection cars, and a mechanical one on carburetor cars.
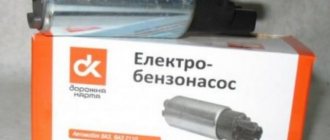
The family is equipped with fuel pumps produced by AvtoVAZ. However, these units do not have a high service life and reliability, so often car owners do not wait until the fuel pump fails and replace it.
Installed at the factory on every VAZ 2110/2112 model
Most often, fuel pumps (Russia) and “Bosch” (Germany) are chosen for replacement. Their quality and durability have been known for a long time, although their cost is several times higher than the price of AvtoVAZ gasoline pumps.
The German manufacturer ensures the quality and durability of the products
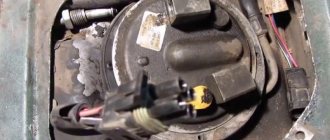
It’s worth mentioning separately about the location of the fuel pump in the VAZ 2110/2112: the device is not located under the hood. To achieve maximum optimization of the fuel pump, manufacturers install it directly into the fuel tank. That is, to get to the pump, you will need to fold back the cushion in the back seat of the car and open the hatch hidden under the carpet.
The fuel tank and fuel pump are located under the seat cushion.
Prevention and useful tips
For trouble-free operation and increasing the life of the fuel pump, professionals recommend:
- refuel only with high-quality fuel;
- maintain the maximum fuel level in the tank;
- do not use a car with a discharged battery;
- promptly replace the fuel filter;
- use sport driving mode less often.
Self-diagnosis and replacement of the fuel pump is quite simple. To do this, you just need to carefully follow the recommendations of professionals. The same applies to preventive measures. Refuel with high-quality gasoline and do not forget to replace the fuel filter on time. Then you will have problems with the fuel pump much less often.
Frequent breakdowns
A fuel pump malfunction can be caused by: poor quality fuel, clogged fuel filter, simple emptying of the gas tank, or how intensively the vehicle is used. Mechanical damage to internal components due to wear or poor quality of workmanship and materials cannot be ruled out.
Helping the fuel pump last longer is within the capabilities of any car enthusiast who follows a number of rules:
- refuel with high-quality fuel at proven gas stations;
- change the fuel filter in a timely manner;
- periodically clean the gas tank from accumulated impurities;
- Make sure that the fuel level in the tank is sufficient for the system to operate.
The last point is due to the fact that running the pump idle will lead to overheating and failure.
Replacing the electric fuel pump
Such a replacement is carried out in the following cases:
- failure or incorrect readings of the fuel sensor;
- weak throughput effect or defect in the fuel intake grid;
- failure of the electric fuel pump.
The tools you will need are a screwdriver and a 10mm socket wrench with a wrench.
- Reduce pressure in the fuel supply system.
- Using the fuel supply hose tip clamp, disconnect 2 hoses in turn.
- Disconnection should be carried out slowly, without using unnecessary force, so that the fuel block fittings remain intact.
- Unscrew the 8 nuts around the circumference of the clamping ring and remove it.
- A wire with negative polarity is attached to one of the nuts; it must be removed carefully.
- We take the electric pump block out of the fuel tank, tilting it slightly, to keep the fuel level indicator sensor lever intact, otherwise it will produce incorrect parameters.
- Remove the sealing rubber ring of the fuel block. If its properties are lost, the product must be replaced.
- Install the product in reverse order.
Important: during installation, the installation arrow on the electric pump cover must point towards the rear of the car!
Important: when installing fuel hoses, follow the direction of fuel supply indicated by the arrows!
Many people ask where the VAZ 2110 fuel pump relay is located? Let us clarify that this electronic device is located in a special recess on the front passenger side of the floorplane. You need to unscrew the plastic cover, there will be 3 relays. Closer to the hood is the required part.