Modern cars are equipped with a large number of electronic devices that allow the system to independently monitor the state of the car and its environment, quickly adapting the vehicle to the changing environment. One of such devices is a light sensor, which is installed in a car. Read the article about what it is and why it is needed.
Purpose
A light sensor is installed in a car to quickly respond to changes in the light level around the car. If it detects that the road ahead is not clearly visible, it transmits a signal to the control unit. The ECU processes it and sends a command to turn on the high beam headlights. Thus, the sensor controls the operation of the lighting systems in the car, reacting to the level of shading ahead. In addition, there are several varieties of this product on sale, which may include additional functionality, such as tracking natural precipitation and activating front windshield wipers.
What is a light sensor in a car
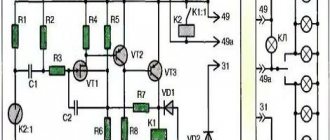
Another name for this option is light sensor. Its device is quite simple. It consists of a photocell, a control unit and a small relay. The element itself is installed in the most illuminated place of the car, not subject to contamination. Usually above or below the windshield. Indirectly, a light sensor can be classified as a security system. The driver may simply forget or ignore the need to turn on the headlights when entering a tunnel or other darkened area. The system will do this itself.
A photocell records changes in illumination in space. If there is not enough light, a signal is transmitted to the control unit, and then the relay turns on the low beam and side lights. If the system detects sufficient illumination, the lighting equipment turns off.
Design and operating principle
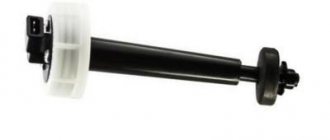
Considering that this device can be part of the factory equipment, the light sensor is manufactured in the format of a small compact housing for installation in the appropriate position in front of the windshield in the vehicle interior. The electronic product consists of several photosensitive elements and an LED, which are sufficient for the sensor to quickly and reliably respond to changes in time of day, weather conditions, turning off street lights, or entering and exiting a tunnel. Having detected changes, the device sends a signal to the control unit, whose relay turns on the low or high beam headlights.
Using a light measuring device allows the driver not to be distracted while driving by adjusting the headlights. However, the functionality of this device also has its downsides, because many car owners get so used to the operation of this device that they lose the habit of independently controlling how the headlights on their car are turned on and off. Sometimes this turns against inattentive drivers who forget to turn on the high beams in the daytime during fog and other conditions that are not intended to be detected by the light sensor. On some brands of cars, these devices are capable of operating regardless of the engine ignition, which leads to unpleasant situations when the car’s headlights come on while parked at night, thereby draining the battery.
Light sensor device
The design of the component and the entire system is quite simple. If such an option is present in the basic configuration of the car, then it is located in a special recess in front of the windshield. The sensor housing contains an LED and photosensitive elements. The sensor is connected to the control unit, relay and contacts for turning on the headlights and low beam.
The lighting control switch must be set to AUTO for the system to operate in automatic mode.
Lighting system switch. AUTO position
Special photodiode filters detect daylight and electric light. Very convenient, for example, when entering a tunnel or indoor parking. You can also adjust the dimming time of the headlights after turning off the ignition or in normal lighting.
Varieties
Like many other systems, the automotive lighting sensor comes in several varieties. Some of them are available for purchase and self-installation, while others are found only in the factory equipment of the vehicle:
- A standard sensor can be purchased at an affordable price and installed yourself. The sensor is fixed in the passenger compartment in front of the windshield of the car, followed by connecting the relay and electrical wiring. The functionality includes adjusting the mode and intensity of the vehicle's headlights.
- A built-in light sensor is more often found in expensive foreign cars, where it performs a wide range of functions. In addition to the standard tasks of turning on and adjusting the headlights, the device can adjust the lighting inside the cabin and on the dashboard.
- The combined light and rain sensor is one of the most expensive models of automotive sensors, combining the functions of controlling lighting and the operation of windshield wipers. The rain sensor detects precipitation through photodiodes and photocells, instructing the wipers to begin wiping the windshield. Depending on the intensity of precipitation, the sensor can also activate the headlights, reacting to heavy rain or snow.
Is it possible to install it yourself?
YES, of course you can - no problem at all. If you have a foreign car, in which the “poor” configuration does not have light sensors, then look at them in the “richer” ones. If they are present there, then you just need to buy them and install them yourself, or at least at a service station.
Often there is already a place in the instrument panel to mount it. Also, most likely you will need a different headlight switch; it will have an AUTO mode. Or you will just need to change the decorative backing under the handle. As a rule, the regime is also already laid down.
Therefore, the entire installation comes down to purchasing a sensor - if you need a handle - and connecting it to a special board. This information has already been discussed a hundred times on the forums about your model, I’m sure of it.
If you take a domestically produced car or a car that doesn’t even have such a sensor in “high” trim levels, then it’s a little more complicated, you’ll need to buy and configure a board as well.
However, “the devil is not as scary as he is painted” - in fact, the light sensor is a switch that opens the electrical circuit that goes to the headlights. It is in the gap that you need to place it. True, you will have to look for a place to mount the photocell itself, however, this is the second question.
Personally, my friends installed a VAZ 2110 in a couple of hours, without haste. There is also a lot of information on the forums on the correct installation and placement of the photocell itself.
This is how the article turned out, I think now you know what it is. And I will end here, bye to everyone - sincerely your AUTOBLOGGER.
Similar news
- Carku E-Power – 43. Review and testing, my review, as well as…
- Charging from the cigarette lighter for tablets, phones and laptops. How…
- New Saab car control system
Add a comment Cancel reply
Installation
To install and connect a light and rain sensor in a car, it is not necessary to seek the services of a workshop. Each set of sensors comes with detailed instructions describing the installation procedure. In most machines, the sequence of user actions is equally simple:
- The main component of the device, called the “eye,” is fixed inside the passenger compartment in place of the rear-view mirror holder. Considering how the light sensor works, for greater accuracy of the sensor, it is recommended to point it towards the driver and not towards the street. The dimming in the cabin is fixed much faster and more reliably.
- The sensor relay and control unit are connected in accordance with the diagram from the instructions.
- The last to be connected are the contacts responsible for adjusting the car's lighting. Some sensor models provide the ability to connect a button to turn the light and rain sensor on and off.
Light sensor in a car
Modern cars are equipped with a large number of electronic devices that allow the system to independently monitor the state of the car and its environment, quickly adapting the vehicle to the changing environment. One of such devices is a light sensor, which is installed in a car. Read the article about what it is and why it is needed.
Adjustment (setting)
After installation, the motion sensor must be configured to turn on the light. There are small rotary controls on the body to adjust almost all parameters. They can be turned by inserting your fingernail into the slot, but it is better to use a small screwdriver. Let us describe the adjustment of a DD-type motion sensor with a built-in light sensor, since they are most often installed in private homes to automate street lighting.
Tilt angle
For those sensors that are mounted on walls, you first need to set the angle of inclination. They are mounted on rotating brackets, with the help of which their position changes. It must be selected so that the controlled area is the largest. It is impossible to give exact recommendations, since it depends on the vertical viewing angle of the model and on the height at which you hung it.
Adjusting the motion sensor begins with selecting the angle of inclination
The optimal installation height for the motion sensor is about 2.4 meters. In this case, even those models that can cover only 15-20° vertically control sufficient space. Adjusting the incline is a very rough name for what you'll be doing. You will gradually change the angle of inclination, check how the sensor works in this position from different possible entry points. It's not difficult, but it's tedious.
Sensitivity
On the body this adjustment is labeled SEN (from English sensitive - sensitivity). The position can be changed from minimum (min/low) to maximum (max/hight).
Basically, the settings look like this
This is one of the most difficult settings, since it determines whether the sensor will work on small animals (cats and dogs). If the dog is large, it will not be possible to avoid false alarms. With medium and small animals this is quite possible. The setup procedure is as follows: set it to minimum, check how it works for you and for inhabitants of smaller stature. If necessary, increase the sensitivity little by little.
Delay time
Different models have different shutdown delay ranges - from 3 seconds to 15 minutes. You need to insert it the same way - by turning the adjusting wheel. It is usually signed Time (translated from English as “time”).
Glow time or delay time - choose what you like best
Everything is relatively easy here - knowing the minimum and maximum of your model, you can approximately choose a position. After turning on the flashlight, freeze and note the time after which it will turn off. Next, change the position of the regulator in the desired direction.
Light level
This adjustment relates to the photo relay, which, as we agreed, is built into our motion sensor to turn on the light. If there is no built-in photo relay, it simply will not exist. This adjustment is labeled LUX, the extreme positions are labeled min and max.
They can be located on the front or back side of the case
When connecting, set the regulator to the maximum position. And in the evening, at the level of illumination when you think the light should already turn on, turn the regulator slowly to the min position until the lamp/lantern turns on.
Now we can assume that the motion relay is configured.
Source
Coverage areas
Basic separation involves processing signals from two coverage areas. First of all, this is a global zone. It refers to the space directly next to the car. The second zone is the front. It extends to the section of the road in front of the car. Modern sensor models are able to distinguish between these zones by sending corresponding signals to the relay. It would seem that if in the current conditions there is a reduced level of illumination, then optical devices corresponding to the traffic conditions should be activated. But the difference lies precisely in the operating features of the low and high beam headlights, for which the light sensor in the car is responsible. What does this division mean in practice? In conditions of lack of visibility, high-beam headlights should be activated, and during the daytime, running lights with low beam should be activated. However, the boundary states between these lighting conditions are not always accessible to electronic recording. Therefore, it is desirable that the sensor also provide the ability to monitor intermediate illumination characteristics.
Where to place
You need to install the motion sensor correctly to turn on the lighting - for it to work correctly, follow certain rules:
- There should be no lighting devices nearby. Light interferes with correct operation.
- There should be no heating or air conditioning units nearby. Motion detectors of any type react to air currents.
As the installation height increases, the detection zone increases, but the sensitivity decreases
In large rooms it is better to install the device on the ceiling. Its viewing radius should be 360°. If the sensor must turn on the lighting from any movement in the room, it is installed in the center; if only some part is monitored, the distance is selected so that the “dead zone” of the ball is minimal.
Motion sensor to turn on the lights
It is unwise to turn on lighting in some rooms or outdoors for the entire dark period. To ensure that the light turns on only when needed, a motion sensor is installed in the lamp’s power circuit. In the “normal” state, it breaks the power circuit. When a moving object appears in its coverage area, the contacts close and the lighting turns on. After the object disappears from the coverage area, the light turns off. This operating algorithm has proven itself excellent in street lighting, in lighting utility rooms, corridors, basements, entrances and stairs. In general, in those places where people appear only periodically. So, for savings and convenience, it is better to install a motion sensor to turn on the light.
