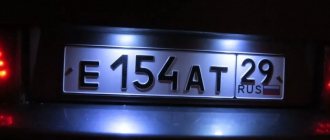
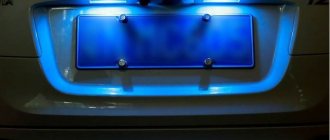
Why is the VAZ 2114 license plate illuminated? To identify a car in the dark, the color of the lamp must comply with the legislative standards of GOST and traffic regulations. White or yellow lighting is recommended rather than blue or red. The original lighting has one drawback - in the presence of a wide color variety, the process of operating the car is difficult, so the lighting system needs serious modification or complete replacement.
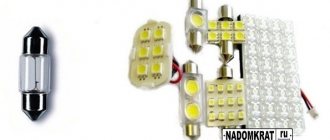
Variants of doves for number plate illumination
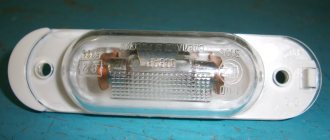
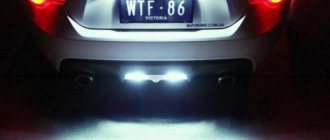
License plate backlight, why backlight is needed, where is the backlight bulb located
Plexiglas lighting
State lighting. number is necessary to identify the vehicle in the dark; the color of the lamp must comply with traffic rules and GOST legislation. It is recommended to use yellow or white lighting rather than red or blue. The original lighting has one drawback - in the conditions of a wide variety of colors, the procedure for operating the car becomes difficult, so the lighting system requires serious modification or its complete replacement.
LEDs instead of conventional lamps
License plate color according to law
License plate lighting requires the installation of special lamps, but only on the rear of the vehicle. Of course, this requirement will not in any way affect the functionality of the car itself and is only necessary to ensure the readability of the license plate in the dark, however, failure to comply with the rules for the installation and operation of these lighting elements entails certain problems.
The backlight must be bright enough, but at the same time have a standard color, and the light bulbs provided by the design must be constantly lit. Even if one of them burns out, resulting in part of the registration plate being poorly visible, the driver may be subject to fines.
It is prohibited to install reflective devices or red light devices on the front of the car, or other lighting devices whose operating mode and color of lights do not meet the requirements of the main regulations for the approval of vehicles for operation.
It is prohibited to mount reversing lights on the rear of the vehicle, as well as license plate lighting with lights of any color other than yellow, orange or red. It is also not allowed to install reflective devices of any color other than red. Based on this, installing blue license plate lights, which many car owners love, will also be grounds for imposing a fine.
Options and methods for installing LEDs for license plate lighting
Many car owners install additional lighting on their license plates. And for good reason.
Firstly, LED lighting has a long service life and low electrical energy consumption.
And secondly, such lighting is an excellent car tuning, allowing you to make it more aesthetically pleasing for little money.
LED backlight for VAZ 2114 license plate
It is important to know that installing additional lighting is only allowed on the rear license plate!
There are two ways to install LEDs as car license plate illumination.
The first option is to simply replace conventional light bulbs with diode elements.
The second option involves installing additional LED devices.
Of course, you can contact a service station for these services. However, this problem can be solved with your own hands, which will allow you to save a lot of money.
For tuning, diode strip is mainly used.
It can be installed in two ways:
- Fastening the tape to the car body. To do this, you need to buy a diode strip (ideally three-matrix), which can be directly connected to the on-board network. Then measure the required length of the tape and cut a piece. Solder the wires and wrap the soldering points with insulating tape to protect them from moisture. Next, you should attach the lighting elements directly to the body using clamps or glue. Now all that remains is to connect the wires, not forgetting the polarity.
- The introduction of an LED strip into the lampshade to illuminate the room. To do this, you need to prepare a piece of LED strip in the same way as described in the first option. Then you need to dismantle the lampshade and remove all the contents from it. Attach the LED strip to previously prepared pieces of plastic, or, in extreme cases, to protective glass. After installing the tape, you can connect the wires to the standard wiring, remembering to insulate all connection points. All that remains is to check the functionality of the structure and screw the lampshade into place.
Option for upgrading license plate lighting
The methods described are the most common in modern practice, but there is another option.
It consists of installing an additional lantern made of organic glass and foil. The wires are attached to the LED strip in the same way as in the first option. Then the tape should be attached to pre-selected plexiglass, 3-4 mm thick. The foil will act as a reflector in this design. The edges should be treated with silicone sealant and the wires should be connected directly or routed to a separate switch.
The license plate backlight does not work, possible reasons
If the license plate illumination does not function, there may be several reasons for this:
- The light bulb has burned out.
- The system fuse has failed.
- There is no mass on the body.
- There is no voltage on the wires (+).
- The contact in the mounting block is too weak.
To eliminate these factors, you will need to either repair the backlight or completely replace it.
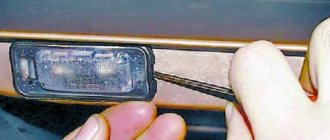
How to replace the VAZ 2114 license plate light bulb, step-by-step instructions
To replace the license plate lamp on a VAZ 2114, do the following:
- Turn off the lighting.
- Open the trunk.
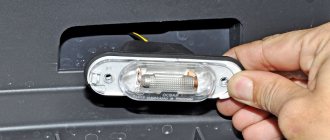
- Using a plastic screwdriver, pry the lampshade by the sealing clips.
- We take out the backlight housing and disconnect the contacts.
- We take out the sealing coupling.
- We are making a replacement.
- We install the structure back.
- We check the functionality of the device.
We perform exactly the same actions on the other side.
LED backlighting, how to replace conventional incandescent lamps with LED ones
Replacing standard lamps with LED lamps is very simple, since they have the same contacts as the factory products. However, when installing an LED lamp, it is very important not to reverse the polarity, otherwise the lamp will not function.
It is equally important to choose the right lamps, since too bright ones will take a lot of energy and often fail. There is also no need to install very expensive light bulbs, because the lighting will be very noticeable, distracting motorists from the road process. Low quality products can often fail and have various defects. So, bulbs should be purchased from trusted manufacturers and used sparingly.
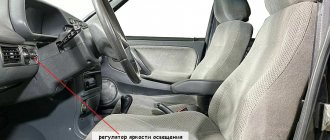
Basic lighting
In a standard way, on the base model the issue of interior lighting on this car is resolved quite simply:
There is also lighting for the glove box and interior lighting of the VAZ 2114, which includes illumination lamps for the front ashtray, heater switches and levers, and the hydraulic corrector scale for the front lamps.
The interior lighting is a simple electrical device. Built into the upholstery in the middle, upper part of the body, above the heads of the driver and passengers. It should light up when the doors are opened and go out when they are closed, a simple electrical signal is supplied from limit switches installed on the door pillars. The interior has switches on the front and rear side pillars on each side for manually turning on the dome light.
There are times when the light in the interior of a VAZ 2114 does not work. Such issues are often discussed on the forums of fans of this car. In fact, there should not be any special problems in fixing such a problem. There is a proven action plan in such cases.
- Check the functionality of the lamp. If it does not light up, the fuse is faulty and should be replaced. If the brake light works properly, then the fuse is fine and you need to look further.
- Check the condition of the light bulb, if it is working, then you need to check the contacts and limit switches on the door pillars. If an LED lamp was installed, then change the polarity; there could be a mix-up during installation.
- It is necessary to measure the current at the contacts, whether it flows or not. If there is no current, then you need to ring the entire circuit; a breakdown in the wiring is possible.
- The limit switches on the door pillars should be checked very carefully; experts and many of those who communicate on the forums say that this is where problems often occur. There may simply be a bad contact that needs to be adjusted.
LED license plate illumination, how to install an LED strip, step-by-step instructions
To install the LED strip you will need three resistors and three LED strips. Their color range is extremely diverse, but it is best to give preference to yellow or white tones. To replace conventional backlighting with LED, do the following:
- Solder a resistor to the positive end of the LED strip.
- We attach small wires to its end, as well as the minus side.
- The result is a design that has two contacts that are connected to the wires from the standard backlight.
To give the tape an original design, take a piece of plexiglass and glue the strip onto it with silicone sealant. Then the wires of the tape must be connected to the contacts of standard backlight lamps, after which we make insulation.
Next, you need to prepare the surface for mounting the structure:
- We dismantle the lampshades.
- Degrease the mounting side with solvent.
- Let the surface dry and apply sealant.
- Glue the LED strip.
- We seal the tape along the edges and leave it until completely dry.
- We check the product in action.
Options and methods for installing LEDs for license plate lighting
Many car owners install additional lighting on their license plates. And for good reason.
Firstly, LED lighting has a long service life and low electrical energy consumption.
And secondly, such lighting is an excellent car tuning, allowing you to make it more aesthetically pleasing for little money.
It is important to know that installing additional lighting is only allowed on the rear license plate!
There are two ways to install LEDs as car license plate illumination.
The first option is to simply replace conventional light bulbs with diode elements.
The second option involves installing additional LED devices.
Of course, you can contact a service station for these services. However, this problem can be solved with your own hands, which will allow you to save a lot of money.
For tuning, diode strip is mainly used.
It can be installed in two ways:
- Fastening the tape to the car body. To do this, you need to buy a diode strip (ideally three-matrix), which can be directly connected to the on-board network. Then measure the required length of the tape and cut a piece. Solder the wires and wrap the soldering points with insulating tape to protect them from moisture. Next, you should attach the lighting elements directly to the body using clamps or glue. Now all that remains is to connect the wires, not forgetting the polarity.
- The introduction of an LED strip into the lampshade to illuminate the room. To do this, you need to prepare a piece of LED strip in the same way as described in the first option. Then you need to dismantle the lampshade and remove all the contents from it. Attach the LED strip to previously prepared pieces of plastic, or, in extreme cases, to protective glass. After installing the tape, you can connect the wires to the standard wiring, remembering to insulate all connection points. All that remains is to check the functionality of the structure and screw the lampshade into place.
The methods described are the most common in modern practice, but there is another option.
It consists of installing an additional lantern made of organic glass and foil. The wires are attached to the LED strip in the same way as in the first option. Then the tape should be attached to pre-selected plexiglass, 3-4 mm thick. The foil will act as a reflector in this design. The edges should be treated with silicone sealant and the wires should be connected directly or routed to a separate switch.