- home
- Car brake system
- …
Not long ago I wrote an article about how to unscrew a stuck bolt, say on a muffler . My readers liked the article, they asked me to tell you about dismantling a soured brake pipe. After all, on used cars this is a real problem, and it is difficult to unscrew both from the caliper or cylinder, and from the brake hose itself. WE WILL solve the problem. Well, today there are some useful tips on installing these tubes, there will be a video, so read and watch...
I myself have encountered brake pipes many times on our VAZs, from 2101 to 2114; of course, if you go to a service station, they will easily and quickly unscrew them for you. But if you climbed it yourself, and have never done this before, and even if the mileage on the car is huge and the brake fluid has almost never been changed! It will be triple difficult to do this.
How to unscrew a brake pipe. If it has soured and the edges are torn off! Let's disassemble the hose and cylinder
Not long ago I wrote an article about how to unscrew a stuck bolt, say on a muffler .
My readers liked the article, they asked me to tell you about dismantling a soured brake pipe. After all, on used cars this is a real problem, and it is difficult to unscrew both from the caliper or cylinder, and from the brake hose itself. WE WILL solve the problem. Well, today there are some useful tips on installing these tubes, there will be a video, so read and watch... ARTICLE CONTENTS
I myself have encountered brake pipes many times on our VAZs, from 2101 to 2114; of course, if you go to a service station, they will easily and quickly unscrew them for you. But if you climbed it yourself, and have never done this before, and even if the mileage on the car is huge and the brake fluid has almost never been changed! It will be triple difficult to do this.
How to bleed brakes without an assistant
How to pump the brakes with a partner has already been described above. What to do if there is no such thing nearby, but you need to bleed the brakes? You can get out of this situation in several ways:
- You can bleed the brakes alone if you have a gas stop. The meaning is the same as when pumping with an assistant, only instead of him the gas stop will press on the pedal. Therefore, you need to press the pedal several times, keep it pressed, set the stop and begin to bleed the brake fluid. When the fluid begins to flow, the stop will begin to push the pedal to the floor to the limit.
- bleeding the brakes with a syringe. You need to hermetically embed the syringe into exactly the same lid as on the tank. Then, having first filled the syringe with brake fluid, replace the regular cap with this device, unscrew the fitting, place a container and apply pressure with the syringe.
- another method with a modified lid. You need to insert a car nipple into a cap similar to the one installed on the tank. Then put the lid with the nipple on the tank, then put one end of the hose with a connection clamp on the lid, and the other on the spare chamber, inflated to no more than 1 atmosphere. Open the fitting and bleed out the liquid with air bubbles.
Replacing brake fluid and bleeding brakes
Bleeding brakes with a homemade device
DIY brake bleeding device
These are the main ways to bleed brakes without an assistant, but many drivers have their own methods, which, however, are not very different from the above.
How to bleed brakes using Vag Com
VAG COM program menu
Service center specialists recommend not using “old-fashioned” methods to bleed brakes on Volkswagen, Skoda and Audi. To bleed the brake system on VAG cars, it is better to use the VAG-COM program. With this program you can bleed the brakes alone.
The software connects to the vehicle system and is able to remove air from the brake pipes and restore the brake pedal position to factory settings.
The procedure for bleeding brakes using Vagcom is as follows:
- Jack up the car and remove the wheels.
- Place tubes on the fittings of each wheel and lower them into bottles to drain the brake fluid.
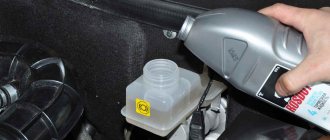
- Unscrew the reservoir cap and add fluid (while making sure that it does not fall below the minimum and periodically add fluid during the pumping procedure).
- In the program, select item 03 - Brake system unit.
- Click item 04 - Basic parameters.
- Select the parameter group “001” (if the code is not specified, it must be entered manually).
- Open the fittings on the front wheels.
- We select the “On/Off/Next” item, after which the pump begins to hum and the system requests 10 presses of the brake pedal. By pressing the pedal 10 times, the pump stops and a message pops up that the fittings must be closed.
- Quickly tighten the fittings and then just press the “On/Off/Next” button.
- Unscrew the rear wheel fittings and press the “On/Off/Next” button.
- At the request of the system, we repeat 10 presses on the brake pedal, the pump is activated and we tighten the fittings.
- After pressing the “On/Off/Next” button, the “Partial pumping complete” notification appears.
Brake fluid must be constantly added during bleeding to prevent air from entering the system again.
About brake pipes
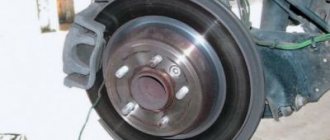
It itself is usually made of a thin copper tube, at the ends it is flared and covered with metal nuts. It is these nuts that are attached to the calipers , brake cylinders and screwed to rubber hoses. And it is they (in threaded connections) that “sour” or, as many say, “stick”; it is really very difficult to unscrew!
Especially if you are a beginner and go in with a regular wrench, which can tear off the edges and make the nut round, then be careful, it’s not so easy to unscrew. Well, I present to you several methods according to complexity.
What to do to prevent brake pipes from souring in the future
There is no universal recipe here, it all depends on the time. But the use of penetrating anti-corrosion compounds for hidden body cavities, which envelop parts, prevent the development of corrosion due to the inhibitors contained in the composition, and do not allow water and oxygen to pass through to the threads, helps a lot.
The connection of the tube, nut and mating part is generously moistened with one of these compounds. After drying, they remain in a fairly elastic state.
On top of this treatment, you can apply a layer of protection with more durable characteristics. These can be compositions such as anti-gravel or other body sealants. If necessary, they are easily removed.
Before screwing, the thread itself is coated with a special lubricant containing finely dispersed copper. Such auto chemical goods have recently been widely used during repair installations, significantly facilitating subsequent unscrewing.
Source
Why do they sour so much?
There are several reasons:
- They are located next to the wheels of the car. And this is water, snow, dirt and other delights of our roads, that is, a banal external factor
- Warming up calipers and drums. When braking, a lot of heat is generated, so the elements of the braking system can heat up, and after getting into a puddle they can cool down sharply
- Brake fluid is hygroscopic. If it takes up water more than 3.5% of the total volume, then it urgently needs to be replaced. However, even if the proportion is only 2.5 - 3%, then such brake fluid will oxidize metal parts from the inside
These are the most basic points why sticking and souring occurs so strongly.
Is it worth switching to reinforced brake hoses?
Since most cars have rubber brake hoses, many car enthusiasts wonder if it makes sense to replace them. The answer is simple: yes, but only if driving conditions allow it. Rubber hoses make the brake system more inert and noticeably less informative - it can be difficult for the driver to understand how quickly the system will respond to pressing the pedal. At the same time, in conditions of measured driving around the city, this disadvantage of rubber hoses is practically not felt.
Reinforced hoses are strictly recommended for those who prefer aggressive driving and own a sports car. With such hoses, the brake absorbs the force from the pedal a little better and, accordingly, becomes more predictable. An experienced sports car driver can estimate how hard the pedal should be pressed in a given situation. In addition, the modified system will perform much better during emergency braking. A series of tests showed that a motorcycle traveling at a speed of 150 km/h reduced the braking distance during emergency braking by 15-30 m after installing reinforced hoses. The car will show a similar result - the braking distance will decrease.
It should be noted that reinforced hoses are highly resistant to mechanical and chemical influences. If the car is operated in particularly difficult road and weather conditions, reinforced brake hoses are strictly necessary. The above-mentioned emergency braking can also be classified as severe conditions if they occur quite often.
To summarize, we note that reinforced hoses are indeed superior to standard rubber hoses in all respects . But there are many cases where their installation and further operation did not end well. Firstly, such hoses are known to fray. Secondly, if you brake suddenly, the hose may burst. The first option is associated with incorrect installation of the element. The reason for the second situation is the installation of a hose that is not suitable for the car. For example, an item from an American auction for an American car may be suitable for European or Asian vehicles, but in reality the compatibility is not complete. Choosing the right reinforced brake hose for your vehicle can be difficult, and in some cases, impossible.
Unscrew the loose nut
If the tube has never been unscrewed, then its edges are intact. However, the mileage is high, then there is a 95% chance that it has gone sour! I EXTREMELY DO NOT ADVISE you to climb and unscrew with a regular wrench, be it an open-end wrench or a socket wrench!
What you need to do initially:
- Clean the mounting area. Often there can be so much dirt that the nut is not visible at all.
- Treat the fastening area with liquids like WD-40 ( they made a homemade one here ) and wait 30 - 40 minutes
- We need a special wrench to remove the brake pipes. It has an extra bolt that fits very tightly around the edges of the nut.
Here the principle is simple, throw on the wrench, tighten the bolt on it and unscrew the nut. In 60-70% of cases everything works out quite quickly and easily. Watch the video
However, there are still 30 - 40% of cases. And here it is not always so simple.
The edges are broken, what should I do?
Not everyone reads my articles and, as usual, we go under the car with a regular key. What happens, the oxidation is very strong, we try to unscrew it and “bang” - the edges are torn off, the nut becomes round, it is almost impossible to unscrew it. What to do? There are several ways, but often the only thing that will help you is “breaking off” the tube and removing the caliper, cylinder or hose completely!
No matter how sad it sounds:
- Again, we try to work out the place with WD-40. This product knows its stuff and often helps even problem areas
- We take the key (which I wrote about above), put it on, and tighten the bolt. We try to unscrew it, the whole point is that sometimes some edge remains and it can get caught on it. If it scrolls, you need to cut the tube
Actually, next we break (cut) the tube and remove the caliper or cylinder itself, here again we have several ways:
- You need to take the correct head, in which the force is applied not to the corners of the nut, but to the edges. Let's watch this useful video and you'll understand everything.
- If the case is completely advanced, you can try to grind off a few edges with a file, give it a square look and then clamp it in a vice and try to unscrew it
However, it happens that the nut simply breaks, and a part remains inside; this is an even more complicated case.
Here again there are several options:
- Drill out. That is, take a drill of approximately the same diameter as the hole, then drill out a part of the nut and tube EXACTLY, after that we take a tap and cut the thread. This is a VERY complex and precise process, not everyone can handle it
- This is to weld a washer or a nut of larger diameter to part of the nut and try to unscrew it. It’s also difficult, but you don’t need to cut anything. Again a useful video.
In conclusion, I would like to say that I have had cases when I had to buy a new brake cylinder because the old one just wouldn’t budge. And after drilling out the tube, the drill went in the wrong direction, and it was impossible to cut the thread! Fortunately, for a VAZ, a rear brake cylinder costs a penny, as do brake hoses.
I also want to note - CHANGE THE BRAKE FLUID ACCORDING TO REGULATION (usually 2 - 3 years), do not let moisture accumulate in it! You may not even need to remove anything.
I end here, SINCERELY your AUTOBLOGGER. We like and repost the article.
( 11 votes, average: 4.82 out of 5)
Similar news
Rust converter composition. Can I do it myself?
Brake fluid composition. Basic properties, necessary information
Anti-squeak plates for brake pads. Why are i needed?
Add a comment Cancel reply
TOP articles for the month
The holidays are coming, which means most of our country will be drinking alcohol. Easy: -…
I have many different articles and videos on various gearboxes, for example here...
The vehicle battery voltage, as well as its capacity, are the most important indicators of this automotive unit,...
Source: avto-blogger.ru
How to remove brake and fuel pipes yourself without damage
If you are repairing a car yourself, most likely you have already encountered the problem of removing brake and fuel pipes without damage. This is especially difficult when the car has been used for a long time without proper maintenance, the connections are rusty or stuck.
Basic mistakes
The first mistake that perhaps all beginners make is the wrong tool. Most often, they try to unscrew the joints of the tubes with open-end wrenches and get common consequences: licked nuts, ruptures and cracks in hoses, etc. To avoid these troubles, you need to remove the fuel lines correctly.
Brake pipes
Brake pipe nuts are prone to souring, but the main problem in removing them is the condition of the edges. You can evaluate it after cleaning the unit from accumulated dirt. If you yourself or someone before you tore off the edges on the fittings, the likelihood that the tubes themselves will not be damaged during removal is significantly reduced. In this case, it is better to purchase a new kit, and only then get down to business.
It is recommended to treat the nut with a special bolt remover or WD-40. To remove the fitting, use a special brake pipe wrench with a bolt. Using this tool, you can even unscrew a nut with licked edges, if at least two of them are preserved. Place the wrench on the fitting, tighten the bolt so that the pressure is distributed evenly, and unscrew the nut.
If the fastening still does not lend itself, there are several options left:
- Try using a key with a head for torn edges.
- Sharpen the nut with a file, re-marking the edges, and use a smaller puller.
- Cut off the brake pipe.
If the tube had to be cut, the remaining fitting can be dismantled by welding a nut of a larger diameter onto it, or drilled out. The drill option is difficult to do in the garage because it requires cutting threads to get rid of the old fastener.
belstunter › Blog › How to remove a broken bleeder fitting. Experience.
I literally had to do this procedure the day before yesterday. And since I came across a couple of interesting points, I decided to share my experience with the people. The bleeder fitting on my front caliper refused to come out. At first he resisted, and then he completely broke down. And the bastard broke down right at the very root, there was nothing to catch it. I started trying different methods. 1. I tried to unscrew it with a hammer and chisel, striking tangentially to the circle. Method tested on other fasteners. Didn't work. The metal is very soft and has a hole in the center. It wrinkles even when using a punch with a blunt tip, not to mention a chisel. 2.Use of extractors or analogues. Hammered the TORX sprocket. As a result, when trying to unscrew it, the sprocket broke off and a fragment remained sticking out in the ill-fated fitting. I took out the fragment with pliers, picking out the metal around it with a small chisel. After thinking about it, I didn’t take any further risks with the extractors I had already purchased. The prospect of drilling out tool steel did not appeal at all (I had experience. A drill hardened with the addition of cobalt does not work). But if someone decides to try this method, there is one piece of advice - take an extractor that is as thick as possible for a given thread. Usually on the box it is written which extractor number is suitable for which thread range. My ill-fated TORX broke only because it was not designed for the torque required to unscrew the M8 thread. So if you have a thread, for example, like I have M8, and there are two extractors M3-M8 and M8-M10, then it is better to choose the second one... so as not to regret it later. 3. Having suffered, I decided to drill out the thread. Ahead of the story, I’ll say right away that this is the most successful method I’ve tried and if there are problems with the fitting again, I’ll immediately go to it. It is impossible to drill out the threads without removing the caliper from the car. You need to remove the caliper and secure it in a vice. You need to plug the hole where the brake hose is screwed in with a rag, otherwise you will fill everything around with brake fluid and it will be dirty.
How to unscrew the brake cylinder fitting if it is sour
share tips. turnkey 8 mm.
spill the HP, tap (press down) and unscrew it with a good (namely a good wrench), there are no edges? - weld it with a rod and try it, gas number zero.
In general, for the future we will install reinforced turnkey ones for 10
and before tightening, lubricate the thread with graphite or lithol.
Along the way, I am interested in this question - what would be safe?
Grofitko - this is understandable, but I think that if he hits the brakes a little, won’t it ruin it?
In general, for the future we will install reinforced turnkey ones for 10
So I bought them - 4 rubles a couple of years ago. I decided to put it on now
So I bought them - 4 rubles a couple of years ago. I decided to put it on now
so I bought them - 4 rubles a couple of years ago
I love the brake, I need to change it - it's a black thing
If you tighten it with reasonable force, and then treat the fitting or tube with an anti-corrosion agent, then everything unscrews with a bang. Verified
If the fitting is very soured, it will unscrew with a special wrench or curl up and break, but the edges will not deteriorate. Here is this key, which is on top, on one side is 8, on the other is 10:
And also tell me which manufacturer of hoses to buy and what else is needed besides hoses (gaskets, washers)?
Dranik, it’s getting dark from the singed cuffs!
And also tell me which manufacturer of hoses to buy and what else is needed besides hoses (gaskets, washers)?
If there are no edges left, there is only one way out. Remove the caliper or rear center and do some magic in a vice. There are no problems with removal. The only thing is, if you remove the rear TC, you need to buy a tube from it to the hose. Tubes rarely evert out without being damaged.
When I was climbing three years ago, I unscrewed the back ones - there are even live edges and hockey tubes. but the front one
I have a vice and a workbench - but I don’t want to do any magic - I think they’ll come loose. with tongs where the axis moves - like a gas wrench. By the way, the rear left one also has one cylinder leaking. took the pilenga.
Source
Unscrewing the fitting or pipe of the brake system
A new car is a pleasure to maintain and repair: all the nuts come off easily, there are no difficulties with broken studs or bolts broken in the body of any body. As the number of kilometers traveled increases, parts and fasteners rust, especially those located under the bottom of the car.
It is sometimes very difficult to unscrew the brake pipe from the cylinder, which makes repairs more difficult. But you can remove the brake cylinder, tube, hose, and other parts that are difficult to dismantle without much difficulty, you need to know various tricks, removal methods, and approach the matter competently.
Acidified brake pipe: how to dismantle the device?
Most vehicle mechanisms operate under constant overload conditions and high temperatures. This often causes sticking of its individual parts. Moreover, if the vehicle owner neglects regular preventative maintenance. Often difficulties with dismantling arise specifically with the brake pipe. This element of the brake system sticks more often than others when exposed to high temperatures. Unscrewing the tube from the brake hose is not as easy as it might seem at first glance. In many cases, ignorance of the rules for dismantling it leads to damage to the part. To prevent this from happening, we will try to understand all the intricacies of the process. This material will discuss this problem in detail.
Features of unscrewing a rusted tube
Parts of the brake system (TS), except for “consumables”, last quite a long time, mainly the pads and, if necessary, discs are changed on the car. Connections of brake pipes (TT), cylinders, hoses “sour” over time for a number of reasons:
- Dirt, salt, and moisture enter the parts located at the bottom of the car from the road;
- the temperature difference influences - when the pads interact with the drums/discs, heating occurs, when water or snow “porridge” gets in, a sharp cooling occurs;
- nuts, fittings, bolts are not loosened for a long time, a kind of sticking occurs.
Unscrewing a stuck TT from the working cylinder after a long mileage (say, after 100 thousand km) is problematic if you don’t know how to do it correctly, because many people pick up a regular open-end wrench. As a rule, the key immediately slips through the fitting, the edges roll up, and then difficulties arise in disconnecting the CT, and you have to contact specialists.
Basic rules for unscrewing the tube:
- You only need to use a special split wrench with a fixing bolt;
- Before you start unscrewing, it is necessary to thoroughly clean the parts of the connection from dirt;
- before starting work, you should treat with WD-40, wait 5-10 minutes for the “Vedashka” to eat away the rust;
- In some cases, it is not harmful to unscrew the brake bleeder fitting, as it will get in the way, and it can also be accidentally broken.
Using a special wrench is quite simple: twist the clamping bolt, place the wrench on the fitting, tighten and clamp the bolt so that the hexagon is tightly grasped, without any play. After this, we begin unscrewing, but we cannot use much force, as the tube may break off.
In a car service center, they often use a gas cutter and heat the joint. But here you need to heat it extremely carefully; it is possible that the cylinder cuffs will be damaged.
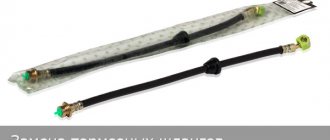
Do-it-yourself replacement of front brake hoses
metal tubes should not have obvious mechanical damage or various deformations; rubberized hoses must be elastic without cracks or tears
Particular attention should be paid to the quality of the hose seals in the tips. Do not allow fuel or lubricants to come into contact with them; mounting brackets must be in satisfactory condition; Liquid leakage is not allowed at the junction of the tubes with the main cylinder, tank and line.
The simplest repair work can be carried out even at home. For example, replacing the front brake hoses is carried out in the following sequence:
- Place the car on a level surface.
- Remove the front wheel.
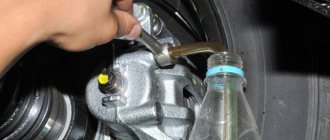
- Unscrew the brake line fitting, while holding the hose with a wrench so that it does not turn.
- Remove the bracket and remove the tip from the bracket.
- Unscrew the hose fitting from the working cylinder.
- Unscrew the damaged hose from the brake pipe.
- Screw in the new hose.
Home →
Maintenance and Repair → Brake system →
Disconnecting the brake hose from the tube
The same nuances with removal often arise when replacing brake hoses (BL), and due to inexperience, you can roll up the edges not only on the BL, but also on the hose fitting. If the TS needs to be replaced, it’s not so bad to ruin it, but the tube still needs to be preserved.
Let's consider, for example, how the brake hose is disconnected from the tube on a VAZ 2114 car:
- remove the wheel;
- Use a metal brush to clean the connection between the hose and the tube from dirt;
- Spray from a can of VD-40 onto the TT fitting, wait some time for the impregnating oil to penetrate into the dirt:
- Use a 15mm wrench to keep the brake hose from turning, and with a 10mm wrench we begin to unscrew the pipe fitting.
When the TS is being replaced, and the connection is “dead to death” and does not give in, you should cut the hose, disconnect it first from the caliper, and in this case it is better to hold the other half with a spanner. But still, unscrewing must be done carefully, without excessive force; it is very easy to break off the tube, especially if it is old and rusty.
Topic: Brake hose stuck, how do I unscrew it?
Theme Options
- print version
- Send by email...
- Subscribe to this topic...
The brake hose is stuck, how do I unscrew it?
Maybe someone can recommend some folk methods - I can’t unscrew the brake hose from the fittings, even if it cracks. Vedeshka does not heal
In my opinion, concentrated hydrochloric acid is possible. but carefully. In pharmacies it seemed to be inexpensive.
Zroiia
Take a 400 gram hammer and a punch (steel rod) in your hands. Tap the surface on the caliper near the hole where the hose is attached. Tap as much of the adjacent surface as possible. Strikes must be clear and energy-intensive. 1000% unscrew!
As I understand it, the problem is not near the caliper, but a little further?
I managed to clamp 2 planes of the fitting in a vice (small ones, 350-600 rubles), the hose itself with a good wrench. Heating helped me, but maybe it’s not entirely correct (I didn’t heat it much, but it was enough, I couldn’t unscrew it without heating). The main thing is to wear gloves so that when you turn the first turn sharply, you don’t leave half your hand on the edge of the wing... PS, if you don’t tighten it too much, you can ruin the edges.
There is a special wrench for brake pipes. It has the appearance of a spanner wrench with a hexagonal inner part. It has a slot for the brake pipe and a bolt that securely tightens the splines. It’s impossible not to turn it away))) You can look for it in basin stores.
Guys, do you seriously think that the author of the topic has been walking around the hose for a month?
A 555 XM 50
These are the machinations of black diggers, but be observant!
I'll raise the topic, because... Today I encountered a similar problem. It was not possible to unscrew the brake hose from the tube. Everything there was quite oxidized and the first time I tried to unscrew it, the slots were licked off. In this regard, I did not even try to unscrew the remaining tubes. Tell me what to do in this case? and how to unscrew the remaining hoses without tearing off the splines?
pashylin
this is for bleeder fittings, you can’t pull it onto the hose
I love our roads! I tried everything! The hoses are so stuck to the brake pipes that it's bad. Tomorrow I'll go buy a caped key with a slot and will try again, but the slots of the nuts are dying.
Last edited by Itsarev; 04/29/2013 at 09:43.
WD, dampen a rag and tie it, then more WD. There is no need to heat it up, this is only if a bolt is stuck to the caliper
I barely unscrewed it today. I bought the spanner that Vadim talked about (Rus-trade, price 91 rubles).
Most manufacturers are worthless! Only enough, God willing, for four hoses, then that’s it. The metal is very soft.
Maybe it will be useful to someone, how I struggled. WD40 in the evening before removal, then a rag with WD for the night, then a clamping wrench of 10 and fixing the hose itself at 17. And very carefully, without sudden movements, we turn off the nut (the splines will jerk off). It is IMPOSSIBLE to heat! The brake pipes are very weak, either the casing will melt or the pipe itself can be damaged.
Tomorrow the system will be completely pumped. When replacing the fourth hose, I lost fluid and it left the tank. moron. ((
It’s strange, even on 10-year-old days everything turned away fine. The main thing is to remove the dirt with a cleaner/brush within a week or two and pour in WD-40, better several times with an interval of 2-3 days or wrap and soak a rag. Keys sold by Force|Johnsway (cheap and accessible). You can heat it, but carefully and with a small burner. I sometimes use a turbo lighter for cigars for such purposes. You need to twist it with a jerk; if the jerk causes the edges of the nut to curl, then you need to change the tool. But the main thing is that everything turned away, but how - usually everyone decides for themselves
“Worthless” metal is precisely found in keys of the type shown in the photo in message #15. Handicraftsmen make these keys in a garage somewhere, and then sell them to stores. This type of key, with bolts, is generally a purely Soviet product; there is nothing like it anywhere else. And normal pipe wrenches, split (without any bolts or slot-like cuts), are the ones that Shaman mentioned. There's metal like metal. Moreover, there are such keys as “six-sided” and “12-sided” (well, by analogy with socket heads, to make it clearer). To reduce the likelihood of “licking” the edges of the nut, it is better to look for a hex wrench. As for soaking, instead of VDshka, you can also fill it with brake fluid, which is also a good option.
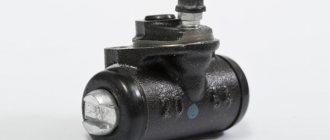
Removing the brake wheel cylinder
On cars with drum brakes, working cylinders are installed on the rear axle; the problem is that their mounting bolts boil and break off in the housing. When the cylinder is being replaced, there is no problem, but in some cases the part needs to be preserved, and after removal it must be put back in place.
In order not to break off the fasteners (usually the cylinder is held on by two bolts), before unscrewing, you should also tap with a hammer through a drift; you can knock on the bolts themselves (being careful not to spoil or flatten the edges), next to the fasteners on the cylinder body. And here we don’t forget to use WD-40, this usual method helps without fail. You should unscrew the bolts with a socket wrench, do not force the bolts off and, again, do not rush.
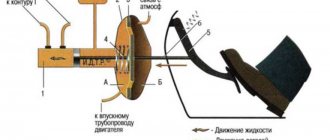
How to remove air from the brake system
Before starting work, prevent spontaneous rolling of the vehicle. To do this, wheel chocks are installed under the wheels. To avoid injury, use personal protective equipment (goggles, gloves). Bleed the rear brakes first. This makes it possible to completely remove air from the system.
Bleeding the rear wheels
Manufacturers equip cars with rear drum or disc brakes. In the first case, the friction linings are pressed by the working cylinder to the inner surface of the drum, in the second - to the disk.
To bleed, you need to find a fitting connecting the cylinder cavity to the atmosphere. It is screwed onto the thread. To make work easier, anti-corrosion liquid is applied to the joint. Bleeding rear brakes with ABS is carried out in the following order:
- Turn on the ignition.
- Select a transparent container. This is necessary to monitor air bubbles in the liquid.
- Disconnect the electrical wiring from the level sensor.
- Remove the boot, which prevents small abrasive particles from entering the system.
- Attach the hose to the fitting. The diameter of the elastic product is selected separately for each case. The hose must fit tightly onto the seat.
- Pump fluid into the system by pressing the control repeatedly.
- Press and hold the pedal in a stationary position.
- Unscrew the threaded element.
- Wait until the liquid and air have completely drained.
- Tighten the threaded element.
The procedure is repeated several times until the air mass is completely released from the pipeline and working parts. As ABS brakes are pumped, the fluid level in the reservoir decreases.
It will need to be restored periodically. Complete emptying of the tank will lead to airing of the pipeline.
Bleeding the front wheels
For the front axle of a car, the technology is no different. The work is carried out with the ignition on. Manufacturers install disc brakes on the front axle of cars. The pads are pressed against the rotating part using a caliper. It has one or two cylinders. To balance the pressure, both caliper cylinders are connected to each other.
On some models, the threaded element for bleeding is located at the top of the caliper. This requires removing the wheel when bleeding. To avoid injury after lifting the vehicle, special stops are installed on the jack.
Breaking off the bleeder fitting
Another trouble is the breakdown of the bleeder fitting (PH) in the working cylinder or caliper; this often happens when trying to bleed the brakes. The PN also boils due to the fact that it is rarely unscrewed, and in many cases, after the upper part of the “bleeder” breaks off, the entire assembly has to be replaced. To ensure that the fitting moves out of place and does not break, we use the same methods as when unscrewing a brake pipe or hose. Here, the method of tapping the metal around the “pumping” with a hammer is very effective; in no case should you knock on the PV itself.
If a piece of metal still remains in the caliper body, you can try to remove it:
- drill with drills of suitable size;
- drive the base of the file into the hole under the handle (non-working part), try to unscrew the fragment;
- weld a piece of metal to the fitting (if the tip sticks out and there is something to weld to).
Before removing the remains of the fitting, you should also thoroughly tap the metal around it, this helps very well, it has been tested many, many times. If, when drilling, the drill goes to the side, the thread inside is damaged, the cylinder (caliper) must be replaced, such a part cannot be used further.
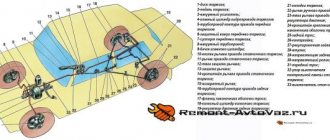
Approximate sequence of steps for pumping brakes on a VAZ-2112
The car itself is placed on an overpass or in a pit. Pumping is carried out “diagonally”, starting from the rear wheels. Example: first the rear right cylinder, then the front left one, etc.
Rear and front brake cylinder
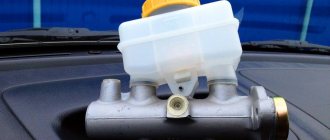
There is a fitting on each brake cylinder. We clean it, then remove the plug-cap. This will allow you to put the tube on top (see photo).
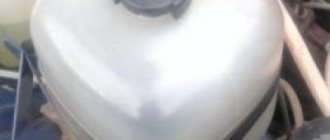
- On any car, including the VAZ-2112, you can bleed the brakes only with the tank cap closed. We find the expansion tank and tighten the cap tighter.
DOT fluid tank
At the final step, all four plugs must be returned to their place.
Tricks and subtleties
Perhaps we don’t have an overpass, but only a lift. This means that the rear wheels will be hanging out. And then you need to do the following: before pumping, install a slot between the bracket and the pressure regulator.
Brake pressure regulator
After bleeding the rear cylinder, the screwdriver or slot is removed.
It is advisable to use a spanner “8” key, not a flat one. The tube is then put on the fitting following the key. The material of the tube, that is, the hose, must be transparent. This also applies to the drainage container.
Common mistake
Let's assume that two cylinders were pumped, and when the second was pumped, there were no more bubbles. Then the third cylinder is pumped, and the job is considered done. This is where the mistake lies: all four cylinders need to be pumped. On another it is impossible!
When the edges are rolled up
If the edges of the brake line, hose or bleeder are already rounded, it is difficult to loosen the connection, but there are ways to help solve the problem. You can do the following:
- use a special grip wrench (plumbing pliers) to unscrew;
- to remove the brake pipe, make a cut on the side in the wrench head of the appropriate size (using a grinder), cut off two edges on top to install the wrench, secure the resulting device to the TT and unscrew the fitting;
- To “bleed” it, use a new hex head; trying to unscrew the fitting with a spanner, or even more so with an open-end wrench, is no longer acceptable here - the edges will become even worse.
To “soak” a soured connection, you should use not only WD-40, but also diesel fuel or kerosene; it is important to unscrew it not immediately, but in small jerks, then the tube or fitting will not break off. And don’t forget about heating and tapping; such methods are more effective than various cunning devices.
Source: avtobrands.ru
How to disable ABS
Almost all modern cars are equipped with an ABS anti-lock brake system as standard, and the presence of this system requires motorists to undergo appropriate maintenance, including, among other things, regular bleeding of the brakes. This operation requires certain skills and familiarity with the design of the brake system equipped with the ABS system.
Bleeding methods may differ depending on the design features of the anti-lock brake system, and not in all cases maintenance can be carried out independently, since special equipment is required to carry out routine maintenance on some ABS models.
It is easiest to maintain systems in which the hydraulic valve block, pump and hydraulic accumulator are assembled into a single unit. In this case, bleeding the brake system and replacing used brake fluid is carried out in the same way as servicing cars not equipped with ABS. The anti-lock braking system is disabled by removing the corresponding fuse, after which the following operation is carried out:
- The RTC bleeder screw is unscrewed and the circuits are bled while the brake pedal is pressed.
- After turning on the ignition, the pump displaces accumulated air from the circuit.
- The RTC fitting is tightened and the brake pedal is lowered. The effectiveness of the operation is indicated by the extinguishment of the ABS malfunction indicator.
In car models in which the components of the brake system with ABS are assembled as separate units, the brakes are bled using a special scanner that allows you to read information from the electronic control unit. Naturally, not every car owner has such a diagnostic scanner in their technical arsenal, and to service the brake system you should contact specialists from service centers.
Brakes while bleeding
If the design of the ABS system provides for the presence of electronic activators ESP or SBC, bleeding of the brake system can only be carried out in specialized car services.
It makes no sense to talk about step-by-step actions when bleeding brake systems that require the use of special equipment in our story, and we will focus on describing the maintenance of simpler structures that are available for independent bleeding.
How to unscrew a broken brake bleeder fitting
If you find that your brake line is leaking, it will need to be replaced. Any hydraulic system operates only as a closed system. Air inside or leaking fluid can compromise its potential and result in soft or no brakes at all. But how to bleed the brakes if the fitting is completely licked or destroyed.
Sequence of bleeding the brakes with the participation of a partner
- The plug covering the bleeder fitting is removed, and a transparent hose is put on this plug. Its free part is lowered into the container, which is partially filled with brake fluid.
- The partner presses the brake pedal intensively three or four times, leaving the pedal depressed. You need to easily unscrew the bleeder fitting until the brake fluid begins to squeeze out into the container. You can find out if there is air escaping by looking to see if there are any bubbles in the brake fluid inside the container.
- Then you need to tighten the fitting and carry out this process again in a similar order for the remaining wheels. You need to replace brake fluid or top it up, choosing a composition with exactly the same characteristics recommended by the automaker.
- If, after bleeding is completed, the brake pedal remains “soft,” you should check the brake pads for wear or carry out bleeding again.
How to unscrew a licked bleeder fitting
Removing the fitting is as simple as removing the bolt from the nut. But the braking system can be damaged by road debris and corrosion from salt, water and plating. Most fittings are made of steel, and although they are anodized to reduce rust and corrosion, they can corrode. If your brake bleeder is broken, use one of the methods described.
The process will involve disassembling the caliper. If you don't have a rebuild kit, you should order one, otherwise you need to be careful when removing the dust boot and square cut. After removing the caliper, secure it in a vice. Use a hacksaw to cut a hole for the screw in the top of the broken fitting. If the fitting is broken flush with the housing, you will have to drill out the housing. This part of the caliper is non-structural and if done correctly it will not damage the component or cause it to break.
Next, get a container large enough to hold the entire caliper body and fill it with enough water to completely submerge the caliper. A 5 liter bucket is perfect for this. Now apply heat to the caliper body around the fitting. Once warmed up, grab the caliper with a pair of wrenches, remove it from the vise, and place it in a bucket of water. Let the caliper sit for a minute and then remove it and place it back in the vise. Using a flat-blade screwdriver with a tip that fits snugly into the hole for the broken fitting, try to remove the stuck component. You may need to force the tip of the screwdriver into the screw slot using a hammer to ensure a good fit. In most cases, pumping will go without problems.
This process will “shock” the caliper body and fitting, and will cause the connection between the two parts to break. Experts note that in rare cases it is necessary to heat it twice. This method can also be used on wheel cylinders.
ADVICE! Precautions to be observed:
- Never attempt this on an aluminum caliper or wheel cylinder.
- Never heat the caliper or wheel cylinder while it is still assembled. Heat can damage internal rubber parts.
- Always check the device for leaks after completing work.
After removing the fitting, the caliper can be reassembled. If necessary, clean the hole with sandpaper and rinse with hot water. Blow the housing dry with compressed air. Make sure your hands are clean during the assembly process. When installing the square cut piston and boot, use either brake fluid or silicone as a lubricant for the assembly.
Install the piston by hand. If the device uses a press in a dusty case, be sure to install it completely. Complete the process by installing the caliper, making sure it is properly lubricated. Install the part and bleed it, checking for leaks.
Second way
If you apply brute force to a broken brake fitting, you will immediately break off the nipple and hex part of the exhaust valve. You don't have to worry about this since you're probably planning on replacing the entire exhaust valve as soon as you manage to get it out. But breaking the fitting can actually make it difficult to remove the remaining part.
Many craftsmen automatically apply heat to a stuck fitting head. But when it comes to jamming screws, this is not a good idea for several reasons. First, the heat can damage the caliper's O-ring, forcing you to buy a new component, eliminating the entire benefit of trying to remove the blocked fitting. Second, the heat expands both the drain screw and the caliper casting, making it even more difficult to remove.
Bleeding the brakes alone
This process is labor-intensive, but some people resort to it. In this case, devices for pumping can be a cap from the brake fluid reservoir (similar to yours), a container, or a syringe.
- The syringe must be hermetically built into the lid of the tank intended for the fluid using a “sealant”, then it is screwed onto this tank, drawing brake fluid into the syringe.
- The fitting located at the outlet of the pumped circuit is unscrewed. A container is installed into which the flowing liquid will be collected. Then this liquid is injected with a syringe.
The second method of pumping the brakes individually involves using a block or other stop.
After adding fluid to the brake barrel to 100%, you need to pump the brake pedal several times and lock it in the depressed position. Then a standard type of process is performed: the fitting is unscrewed, after which it is necessary to wait until the flow of escaping brake fluid becomes uniform and weak. Then you need to tighten the brake system fitting. Release the brake pedal and repeat the entire procedure again. Add the correct brand of liquid
Then you can test drive the brakes with caution.
Emergency method of bleeding the brake system
If for some reason your fitting turns out to be broken or licked, use the emergency bleeding method. You can simply bleed the brakes using a brake hose.
- Raise the car on a lift or securely fix it on the ground.
- Remove the wheel.
- Take a spanner and run the brake hose. Then tighten it.
ATTENTION! At this point, some brake fluid will leak out.
- Signal your partner to start pumping the brakes.
- After pressing a few times, run the brake hose again and drain some brake fluid.
Repeat the procedure 5-10 times until the brake pedal becomes hard again. You can bleed the brakes this way at any time.
Source: drivertip.ru
Replacement
| 1. | Raise the rear of the car and |
| 2. | Remove the rear wheels. |
| 3. | Remove the flange bolts (A) while holding the corresponding caliper pin (B) with a spanner. Be careful not to damage the pin collar and remove the caliper (C). Check the hose and cotter pin collars for damage or wear. NOTE: Do not kink the brake hose or parking brake hose. B A C |
| 4. | Remove the brake pads (A). A |
| 5. | Remove the trim clips (A). A B |
| 6. | Clean the caliper bracket (B) thoroughly, remove any rust, and check for nicks or cracks. |
| 7. | Check that the surface of the brake disc is not cracked or damaged. |
| 8. | Apply a thin layer of Molykote M77 grease to the caliper bracket where they touch (indicated by arrows) opposite the clips. |
| 9. | Install the pad retaining plates. Wipe off excess grease from the fasteners. Do not allow grease to come into contact with discs and linings. |
| 10. | Completely clean the bracket from wear and corrosion and inspect it carefully. There should be no chips or cracks on it. |
| 11. | Peel off the paper from the adhesive pad (A), stick and press it to the surface of the inner pad and outer pad. The adhesive pad is made of stretchable material and is not removable. Make sure it is stuck in place thoroughly. NOTE:
A |
| 12. | Peel off the protective film from the adhesive pad that was stuck to the outer and inner plate. |
| 13. | Apply a thin layer of Molykote M77 to the areas indicated by the arrows. Wipe off excess grease from the brake linings. Grease that gets on the brake discs or linings reduces braking efficiency. Do not allow grease to come into contact with the surface of the brake discs and brake linings. |
| 14. | Install the brake pads in their place. If you are not replacing brake pads, but installing old ones, then install them in the same position in which they were before removal. Otherwise, braking efficiency will be reduced until they are broken in. NOTE:
|
| 15. | Clean and remove grease from the outer support side (A), piston contact side (B), and rear caliper gasket. Make sure there is no grease left. A D F B C E35 N m (3.6 kgf m) |
| 16. | Rotate the caliper piston clockwise, then align the slots (C) on the piston with the tongue (D) on the inner brake lining by rotating the piston back. Lubricate the stand with rubber grease to prevent the piston cup from twisting. If the piston collar is twisted, install it correctly. Make sure the piston collar is in the correct position, otherwise it will be damaged when installing the caliper. NOTE:
|
| 17. | Install the rear caliper accordingly into the inner cover. Install new flange bolts (E) and tighten them to the recommended torque while holding the caliper pin (F) with a spanner. Be careful not to damage the piston boot and pin boot. |
| 18. | Start the engine and press the brake pedal for 10 seconds (pedal pressure: 20 kgf). NOTE: This is necessary to install the adhesive pad. |
| 19. | Apply the brake pedal several times to ensure that the brake system is in good working order. NOTE: Applying the brakes immediately after replacing the entire brake pad set may require increased pedal travel. After several presses of the brake pedal, normal pedal travel will be restored. |
Brake bleeder fitting: how to unscrew?
Moderator: Moderators
Brake bleeder fitting: how to unscrew?
by Fedor » Oct 04, 2010 10:13 am
The process of pumping the brake circuit of the front left wheel stopped because I could not unscrew the fitting through which the brake fluid is drained. Apparently, he got used to it.
I tore off the edges of the fitting, it’s not difficult
Share your experience and thoughts on what to do next.
Question for materials scientists: what is the caliper made of?
The fitting is the protrusion under the longest bolt in the figure
Re: Brake bleeder fitting: how to unscrew?
shyrik974 » Oct 04, 2010 10:19 am
Re: Brake bleeder fitting: how to unscrew?
by Fedor » Oct 04, 2010 10:23 am
Re: Brake bleeder fitting: how to unscrew?
shyrik974 » Oct 04, 2010 10:26 am
Re: Brake bleeder fitting: how to unscrew?
Bang » 04 Oct 2010, 10:28
Re: Brake bleeder fitting: how to unscrew?
by Fedor » Oct 04, 2010 10:31 am
Re: Brake bleeder fitting: how to unscrew?
shyrik974 » Oct 04, 2010 10:33 am
Re: Brake bleeder fitting: how to unscrew?
Bang » 04 Oct 2010, 10:37
Re: Brake bleeder fitting: how to unscrew?
DJEM » 04 Oct 2010, 10:40
Re: Brake bleeder fitting: how to unscrew?
by Fedor » 04 Oct 2010, 11:03
Re: Brake bleeder fitting: how to unscrew?
Ferapont » 04 Oct 2010, 11:07
Re: Brake bleeder fitting: how to unscrew?
Bang » 04 Oct 2010, 11:08
There is an option to drill a hole in the fitting using a three-piece for bleeding and then a bolt there.
Added after 1 minute 13 seconds:
Re: Brake bleeder fitting: how to unscrew?
shyrik974 » Oct 04, 2010 11:13 am
Re: Brake bleeder fitting: how to unscrew?
Pat » 04 Oct 2010, 11:16
Re: Brake bleeder fitting: how to unscrew?
Bang » 04 Oct 2010, 11:33
shyrik974 , And in your opinion, “drilling” means using a ten where there was an eight? Then of course it's a shame.
To drill correctly is if, say, there was a ten, drill with a six, if it went normally in the center, then with an eight. There is a huge chance that the bolt will move during the process - then unscrew it. If not, then we hammer a hexagon or an asterisk into the drilled hole, or I forgot what the cone is called, there is one specifically for these purposes and we tear it off with it. Even if the sprocket starts to scroll, eventually the hole is developed to the point where only the thread remains in the thread itself - and then it comes out with a bang. If not, then use an awl to clear the entry into the thread so that the tap goes along the thread and, with oil, we go through the thread with a tap. The fact that this thread of the thread will become stuck to such a state that it can no longer be removed even if you go through the thread with a tap - I have never seen this. If done carefully, the likelihood of stripping the thread is extremely low. Only if your hands are extremely crooked, there is no habit of turning your head on in time and there is zero experience.
Re: Brake bleeder fitting: how to unscrew?
DJEM » 04 Oct 2010, 11:37
Re: Brake bleeder fitting: how to unscrew?
Ferapont » 04 Oct 2010, 11:47
Re: Brake bleeder fitting: how to unscrew?
by Fedor » 04 Oct 2010, 12:03
I wonder where the end of the drill will end up? won't drilling with a smaller diameter spoil the part in the brake cylinder (the cylinder itself, for example)
By the way: I tried to unscrew it the same way as in the picture, only the key is set to 8, having first doused it with anti-rye from LiquiMoli and waited a little:
Then he poured it on him many times and hit him with a hammer. No sense. So I don’t really believe in soaking anymore. When I tore it off, I twisted it with pliers: it didn’t help.
The fitting is screwed into the caliper. This is 100%. Apparently the thread is also cut in the caliper. Here’s the question: if you drill out and do it carelessly, is it possible to then restore the threads in the caliper (to the question of what is it made of)? If you go in with a drill more than necessary, what are the dangers?
My questions are exclusively mercantile. Here's the thing: the caliper is sticking. If you hang the wheel, the wheel makes about 4 turns due to rustling noises, if you turn it by hand with all your heart. I've already rebuilt the caliper, replaced the rubber bands and guides - it didn't help. All that remains is to bleed the circuit. This should remove the wedging. But on the other hand, you can drive further and, in principle, without problems. Or repair it, but at the risk of getting 8 thousand, not counting the work (if I kill the caliper). It looks like the brake fluid hasn't been changed since birth - that's another reason to do it.
Re: Brake bleeder fitting: how to unscrew?
by stiffmaster » Oct 04, 2010 12:28 pm
So carve 2 faces parallel to each other or a square. Grab it with a gas wrench and, first, slightly in the direction of twisting, then in the direction of unscrewing. I did this on 10. everything OK! I don’t think it will be possible to drill it out, although drilling will be useful! The fitting will heat up well.
Re: Brake bleeder fitting: how to unscrew?
KATALA » 04 Oct 2010, 12:36
Differences and specifics of bleeding brakes with ABS
The anti-lock braking system allows you to control the vehicle's handling when braking. After pressing the pedal, the central control panel receives a response signal from sensors installed on the front and rear wheels. Thanks to the control system, the wheels slow down at the same speed as the car itself. In other words, thanks to ABS, the car cannot skid.
Regardless of the manufacturer, most devices have common characteristics:
- Electronic speed sensors on the hubs;
- Pressure controllers for main brake fluid lines;
- Electronic unit for signal processing.
Unlike most cars with simple braking systems, bleeding anti-lock brakes is difficult. For the procedure to be successful, it is necessary to familiarize yourself in detail with the theory of ABS operation. However, if the hydraulic accumulator, valves and pump are located nearby due to the design solution, the pumping technology will be very similar to the standard one.
Before starting work, in addition to standard tools, you must acquire a scanner to read information from the electronic unit. However, if the car has additional sensors, it is better to take the vehicle to a specialized salon. Any improper intervention calls into question the safety of road users.
Usually, for successful bleeding with the ABS system, it is enough to monitor the pressure in the hydraulic system. The standard value is 180 atm, but to work with the brakes it must be reduced - turn off the ignition and apply the brake 20 times. Only after this, some of the liquid will splash out and the pressure will drop significantly. After reducing the pressure, you can begin to turn off the ignition and disconnect the connectors and controllers on the GTZ tank for further manipulations.
The brake bleeding diagram, or, in other words, the brake bleeding sequence, should look like this:
- front left wheel mechanism;
- front right wheel mechanism;
- rear right wheel mechanism;
- rear left wheel mechanism.
- front right wheel mechanism;
- front left wheel mechanism;
- rear left wheel mechanism;
- rear right wheel mechanism.
Starting the pumping procedure itself, provide comfortable access to the relevant mechanisms with which you will work - remove the desired wheel, or drive the car into the inspection hole. Procedure for bleeding the brakes.
- Remove the cap from the expansion tank.
- Unscrew the brake bleeder fitting and clean it of any buildup.
- Place a clean hose onto the fitting of the corresponding brake mechanism, lowering the free end into a reservoir filled with brake fluid. Due to the fullness of the container, air does not enter the cylinder through the fitting.
- Start the engine and leave it running.
- Press the brake pedal several times (your assistant can do this) until the brake fluid flows through the hose into the reservoir. Perform these actions as long as the brake pedal allows, until it hits the floor.
- Bleed the brakes until all the air is out of the mechanism, while constantly refilling the reservoir with new brake fluid. The tank should not be completely empty, otherwise it will fill with air again. This system is used for cars with a manual transmission.
- Tighten the abs bleeder fitting. Tighten it while the pedal is reversed to prevent air from entering.
- Remove air and fluid from the clutch hydraulic drive as well.
- Add fluid to the expansion tank to the maximum mark.
- Check the action of the brake pedal; it should be depressed 1/3 of the entire pedal stroke.
In any case, before starting pumping, read all the nuances in the technical documentation for the car.